Push Configuration to Network Devices from Within the NorthStar Application
Using the Device Configuration tool, together with the Work Order Management tool, you can push configuration statements to Juniper devices in the network, without leaving the NorthStar application. Users with the necessary permission can create templates (called “configlets”), where you specify which routers should receive the configuration and the specific Junos OS configuration statements to include. Once a template is provisioned, the request enters the Work Order Management system. Logical systems and a view-only mode are supported.
At present, only Juniper devices are supported.
The following sections describe using the Device Configuration tool:
Overview
The Device Configuration tool in NorthStar uses configuration templates called “configlets” to push Junos OS configuration statements to Junos devices in the network. Each configlet specifies the configuration statements to include and the routers that are to receive the configuration. Before actually pushing the configuration, you have the option to verify the statements in the context of Junos syntax, leveraging the Junos commit check function.
Only users with Create or Auto-Approve permission can create, modify, or delete templates. These users can also tag templates as being available in View Mode, where all users can see them. Untagged templates are not available in view mode. This tagging method can be used to keep works in progress from being viewed by all users, or to separate what different teams have access to.
See User Management for information about how permissions are assigned to groups, and therefore, to users.
Creating a Configuration Template
To create a new configlet:
Navigate to Provisioning > Device Configuration to display the Device Configuration window as shown in Figure 1. This window lists all the previously saved configlets (if any) and indicates whether or not they are available in View Mode. There are no default templates, so if none have been created, the list is blank.
Figure 1: Device Configuration Window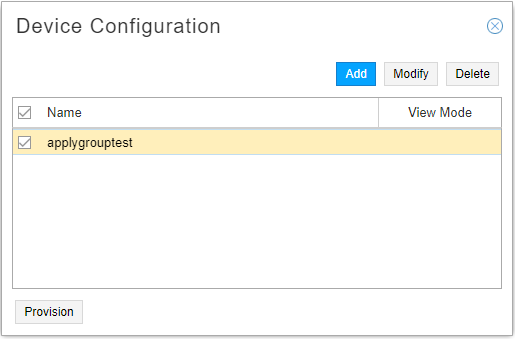
Click Add in the upper right corner of the window to display the Add Configlet window as shown in Figure 2.
Figure 2: Add Configlet Window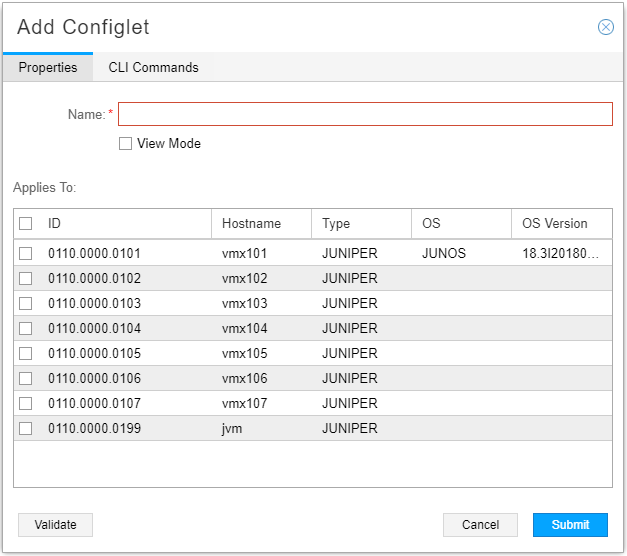
In the Properties tab:
Give the configlet a name.
If you want the configlet to be visible in View Mode, click the View Mode check box. Otherwise, leave it blank.
All of the eligible Junos devices in the network are listed under Applies To. Click the check box for each one that is to receive the configuration. If you want all the listed devices to receive the configuration, click the check box beside ID.
Note:Logical systems are supported. Not all networks have logical devices, but for every physical device that has a corresponding logical device, there is an information icon beside the physical device in the list of devices. Click the information icon to see the logical device. An example is shown in Figure 3.
Figure 3: Physical Device with Associated Logical Device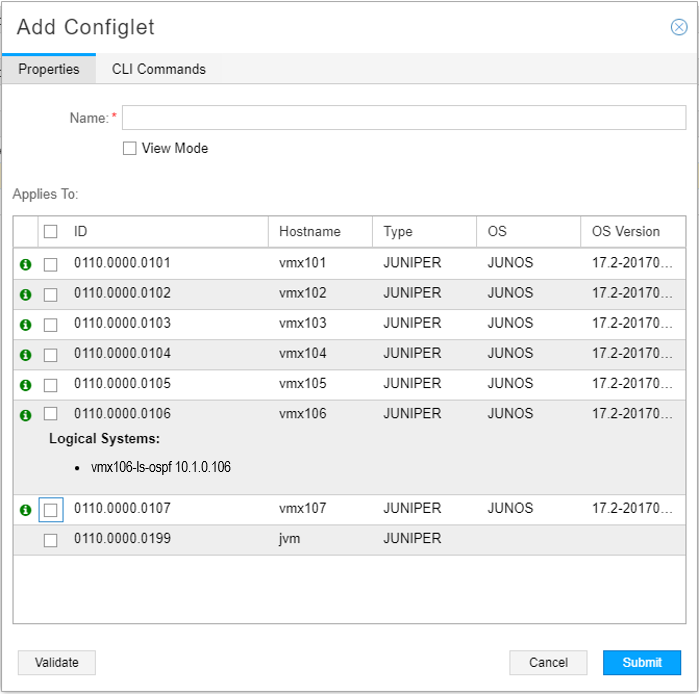
In the CLI Commands tab:
Enter the configuration statements, one statement per line. This is the configuration that is to be pushed to the routers.
Note:If you want a logical device to receive configuration, you must select the corresponding physical device and include configuration statements that are appropriate to logical devices in the list of commands. In the same list, you can have statements that affect the physical device, statements that affect the logical device, or some of each.
To verify the statements in the context of Junos syntax, leveraging the Junos commit check function, click Validate in the lower left corner of the window. This button is also available on the Properties tab. A Validate CLI Commands feedback window lets you know if the validation was successful. Performing this check does not submit the work order or push the configuration to the routers.
An example configuration statement is shown in Figure 4.
Figure 4: Add Configlet Window, CLI Example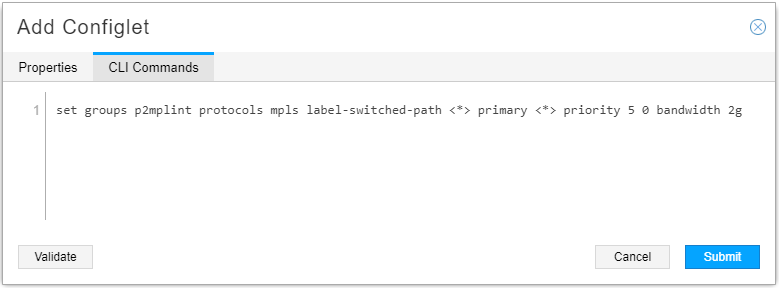
Figure 5 shows the feedback you would see if the validation were unsuccessful and if it were successful.
Figure 5: Validate Button Feedback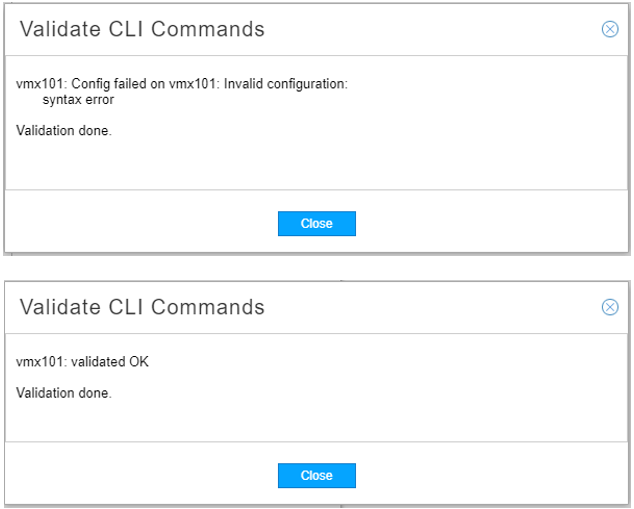
Click Submit to save the template.
Role of the Work Order Management System
Device configuration requests must be submitted to the work order management system, and then be approved and activated before the configurations are actually pushed to the devices. Group permissions and the assignment of users to groups dictate which users can perform the various functions in the work order management system. See Work Order Management to learn how the work order management system works and what the various permissions enable users to do.
Specifically in relation to device configuration:
A user with Create Work Orders permission can create, modify, and delete configlets and submit them to the work order management system.
A user with Approve (or Reject) Work Orders permission can approve or reject device configuration work orders created by anyone, including those he himself created (if he also has Create Work Orders permission).
A user with Auto-Approve Work Orders can create device configuration work orders which are automatically approved and activated. Create and Auto-Approve are mutually exclusive permissions because Auto-Approve includes Create. Auto-Approve permission does not enable a user to approve work orders submitted by other users.
A user with Activate Work Orders can activate (provision) approved device configuration work orders created by anyone.
This is the work flow to complete a device configuration work order:
In the Device Configuration window, a user with Create or Auto-Approve permission clicks the check boxes for one or more configlets to be pushed to the devices. If you select multiple configlets, a work order is created for each one.
The user clicks Provision in the lower left corner of the window. This creates the work order. If the submitter has Auto-Approve permission, the work order is automatically approved and activated. Otherwise, a user with Approve permission takes the next step.
A user with Approve permission approves (or rejects) the device configuration.
A user with Activate permission activates the approved work order. Once activated, the configuration is pushed to the specified devices.
Modifying or Deleting Configlets
From the Device Configuration window, you can modify or delete an existing configlet by selecting the row and clicking Modify or Delete in the upper right corner of the window. If you modify a configlet, you should submit it to the work order management system for updating on the router(s). Deletions do not create work orders.
More About View Mode
Users who do not have Create or Auto-Approve permission can only access Device Configuration in View Mode. Figure 6 shows what the Device Configuration window looks like in View Mode.
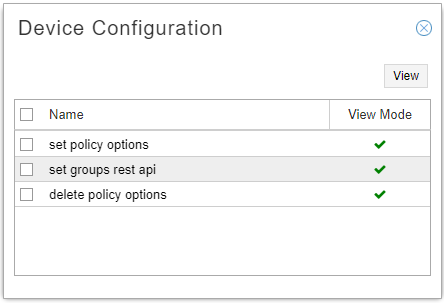
Only configlets that were tagged View Mode are visible. Select a configlet and click View in the upper right corner of the window to see details of the configlet. No changes can be made in View Mode.
