Maintaining the PTX5000 Chassis
Routine Maintenance Procedures for the PTX5000
Purpose
For optimum performance, perform preventive maintenance procedures.
Action
On a regular basis:
Inspect the installation site for moisture, loose wires or cables, and excessive dust. Make sure that airflow is unobstructed around the PTX5000 and into the air intake vents.
Check the status-reporting devices on the craft interface: system alarms, LEDs, and the craft interface display.
Inspect all air filters in the PTX5000 for dust and debris.
As a general guideline, we recommended that you replace the filter elements every 6 months for routers operating in a typical environment. The filter elements degrade over time, and replacement intervals will vary by operating environment.
Note:Do not run the PTX5000 for more than a few minutes without all the air filters in place.
See Also
Tools and Parts Required to Maintain PTX5000 Components
To maintain the hardware components, you need the following tools and parts:
ESD grounding wrist strap
Flat-blade (–) screwdriver
Phillips (+) screwdriver, number 1
Phillips (+) screwdriver, number 2
See Also
Tools and Parts Required for Replacing PTX5000 Hardware Components
To replace hardware components, you need the tools and parts listed in Table 1.
Components |
Tool or part |
|---|---|
All |
Electrostatic discharge (ESD) grounding wrist strap |
AC PDU |
Phillips (+) screwdrivers, number 2 1/5-in. (5.5-mm) slotted screwdriver |
AC power cord |
Phillips (+) screwdrivers, number 2 1/5-in. (5.5-mm) slotted screwdriver |
Air filter |
Phillips (+) screwdrivers, numbers 1 and 2 |
Control Board |
Phillips (+) screwdrivers, numbers 1 and 2 Electrostatic bag or antistatic mat Blank panel (if component is not reinstalled) |
CCG |
Phillips (+) screwdrivers, numbers 1 and 2 |
Craft interface |
Phillips (+) screwdrivers, numbers 1 and 2 |
DC PDU |
Phillips (+) screwdrivers, numbers 1 and 2 7/16-in. (11-mm) nut driver CAUTION: You must use an appropriate torque-controlled tool to tighten the nuts. Applying excessive torque damages the terminal studs and the PDU input power trays. |
DC power cable |
7/16-in. (11-mm) nut driver CAUTION: You must use an appropriate torque-controlled tool to tighten the nuts. Applying excessive torque damages the terminal studs and the PDU input power trays. |
Fan tray |
Phillips (+) screwdrivers, numbers 1 and 2 |
FPC |
Phillips (+) screwdrivers, numbers 1 and 2 Blank panel (if component is not reinstalled) Electrostatic bag or antistatic mat |
PIC |
Phillips (+) screwdrivers, numbers 1 and 2 Rubber safety cap for fiber-optic PICs or fiber-optic PIC cables Electrostatic bag or antistatic mat Blank panel (if component is not reinstalled) |
Routing Engine |
Phillips (+) screwdrivers, numbers 1 and 2 Electrostatic bag or antistatic mat Blank panel (if component is not reinstalled) |
SIB |
Phillips (+) screwdrivers, numbers 1 and 2 Electrostatic bag or antistatic mat Blank panel (if component is not reinstalled) |
Replacing a PTX5000 Craft Interface
Removing a PTX5000 Craft Interface
The craft interface is located on the upper front of the PTX5000 chassis. The craft interface weighs approximately 2.6 lb (1.2 kg). The craft interface is hot-insertable and hot-removable.
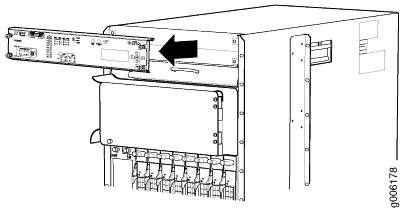
To remove the craft interface (see Figure 1):
- Attach an electrostatic discharge (ESD) grounding strap to your bare wrist, and connect the strap to one of the ESD points on the chassis.
- Loosen the screws at the four corners of the craft interface, using a number 2 Phillips (+) screwdriver.
- Grasp the craft interface, and support it a few inches in front of the chassis.
- Locate the ribbon cable behind the left side of the craft interface.
- Squeeze the latches on either side of the ribbon cable connector where it attaches to the rear of the craft interface, and gently disconnect the cable.

Installing a PTX5000 Craft Interface
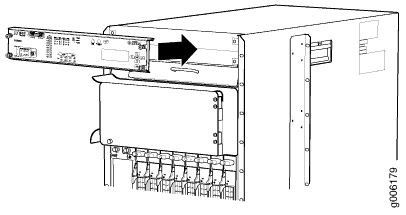
To install the craft interface (see Figure 2):
- Attach an electrostatic discharge (ESD) grounding strap to your bare wrist, and connect the strap to one of the ESD points on the chassis.
- Locate the ribbon cable on the left side.
- Squeeze the latches on either side of the ribbon cable connector where it attaches to the rear of the craft interface, and connect the cable.
- Grasp the craft interface, and press it into the chassis.
- Tighten the screws at the four corners of the craft interface, using a number 2 Phillips (+) screwdriver.
After you install the craft interface in an operating PTX5000, allow several minutes for the LEDs on the craft interface to reflect the current state of the PTX5000.

Maintaining the PTX5000 Centralized Clock Generators
Purpose
For optimum performance, verify the condition of the CCGs.
Action
On a regular basis:
Check the CCG LEDs. For more information, see PTX5000 Centralized Clock Generator LEDs.
During normal operations:
The green OK LED on the CCG faceplate is lit.
The yellow FAIL LED on the CCG faceplate is not lit.
Issue the
show chassis environment ccgcommand to display information about the CCGs.
Replacing a PTX5000 Centralized Clock Generator
Removing a Centralized Clock Generator
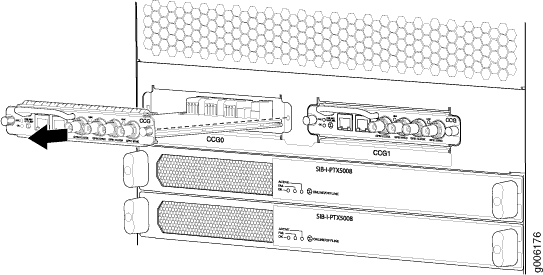
The PTX5000 can have one or two CCGs installed. The CCGs are located in the upper rear of the chassis, above the Control Boards and Routing Engines. Each CCG weighs approximately 1.9 lb (0.9 kg).
A nonredundant CCG is hot-pluggable. For redundant CCGs, the primary CCG is hot-pluggable. The backup CCG is hot-removable and hot-insertable if the primary CCG is functioning. Removing the backup CCG does not affect the functioning of the PTX5000. Taking the primary CCG offline might result in a brief loss of SONET clock lock while the backup CCG becomes the primary.
To remove a CCG (see Figure 3):
- Place an electrostatic bag or antistatic mat on a flat, stable surface.
- Attach an electrostatic discharge (ESD) grounding strap to your bare wrist, and connect the strap to one of the ESD points on the chassis.
- Press the online/offline button on the CCG faceplate and hold it down until the LED goes out (about 5 seconds).
- Loosen the captive screws on the edges of the CCG faceplate.
- Grasp the CCG by the handle on the faceplate and slide it out of the chassis.
- Place the CCG on the antistatic mat.

Installing a Centralized Clock Generator
Replacing a Cable Between a PTX5000 CCG and an External Clocking Device
- Removing a Cable for an External Clocking Device From a PTX5000 CCG
- Installing a Cable Between an External Clocking Device and a PTX5000 CCG
Removing a Cable for an External Clocking Device From a PTX5000 CCG
To remove a cable with RJ-48 connectors from a BITS A or BITS B port on the CCG:
- Attach an electrostatic discharge (ESD) grounding strap to your bare wrist, and connect the strap to one of the ESD points on the chassis.
- Disconnect the cable from the T1 external clocking device.
- Disconnect the cable from the BITS A or BITS B port on the CCG.
Installing a Cable Between an External Clocking Device and a PTX5000 CCG
To connect a cable with RJ-48 connectors to an BITS A or BITS B port on the CCG:

