Setting Up a Logical System
Example: Configuring Root Password for Logical Systems
Requirements
Before you begin, read SRX Series Logical Systems Primary Administrator Configuration Tasks Overview to understand how this task fits into the overall configuration process.
The example uses an SRX5600 device running Junos OS with logical systems.
Overview
The Junos OS software is installed on the router before it is delivered from the factory. When you power on your router, it is ready for you to configure. Initially you log in as root user without using a password.
After you log in, you can configure a password for the root user, or, in logical systems terms, the primary administrator. The primary administrator has root privileges over the device.
Topology
Configuration
Configuring the Root Password
Step-by-Step Procedure
Configure a root password for the device.
user@host# set system root-authentication Talk22rt6
Example: Creating User Logical Systems, Their Administrators, Their Users, and an Interconnect Logical System
This example shows how to create user logical systems and assign administrators to them. It shows how to add users to a user logical system. And the example shows how to create an interconnect logical system, which is optional.
Only the primary administrator can create user login accounts for administrators and users. If a user logical system administrator wants to add users to his logical system, he must convey the information to the primary administrator, who will add the users.
Requirements
The example uses an SRX5600 device running Junos OS with logical systems.
Overview
Before you begin, read SRX Series Logical Systems Primary Administrator Configuration Tasks Overview to understand how this task fits into the overall configuration process.
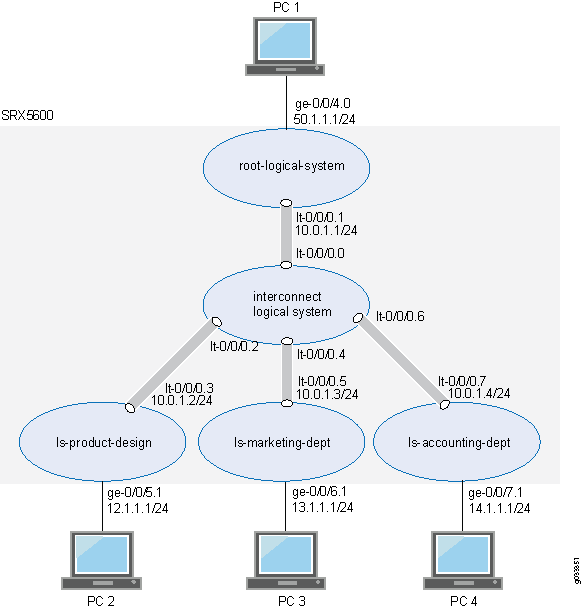
This example is for a company that includes product design, marketing, and accounting departments. The company wants to curtail hardware and energy costs, but not at the risk of exposing data across departments or to the Internet.
Each department has its own security requirements in regard both to other departments and to the Internet. To meet its requirements for cost control without forfeiting security, the company deploys the SRX5600 device. The primary administrator configures three user logical systems giving each department a logical device that is private and fully secured.
This topic covers how to:
Create user logical systems and an interconnect logical system that is used as an internal VPLS switch to allow traffic to pass from one logical system to another.
Create administrators for user logical systems other than the interconnect logical system. A user logical system can have more than one administrator. The interconnect logical system does not require an administrator.
Add users to a user logical system.
Note:This example shows how to configure only two users—lsdesignuser1 and lsdesignuser2. In reality, every user logical system will include many users that would require configurations similar to those shown in this example.
Topology
Figure 1 shows an SRX5600 device deployed and configured for logical systems. The configuration examples reflect this deployment.
Configuration
Configuring User Logical Systems, Their Administrators, Their Users, and an Interconnect Logical System
CLI Quick Configuration
To quickly configure this example, copy the
following commands, paste them into a text file, remove any line breaks,
change any details necessary to match your network configuration,
copy and paste the commands into the CLI at the [edit] hierarchy
level, and then enter commit from configuration mode.
set logical-systems ls-product-design
set system login class ls-design-admin logical-system ls-product-design
set system login class ls-design-admin permissions all
set system login user lsdesignadmin1 full-name lsdesignadmin1
set system login user lsdesignadmin1 class ls-design-admin
set system login user lsdesignadmin1 authentication encrypted-password "$ABC123"
set system login class ls-design-user logical-system ls-product-design
set system login class ls-design-user permissions view
set system login user lsdesignuser1 full-name lsdesignuser1
set system login user lsdesignuser1 class ls-design-user
set system login user lsdesignuser1 authentication encrypted-password "$ABC123"
set system login user lsdesignuser2 full-name lsdesignuser2
set system login user lsdesignuser2 class ls-design-user
set system login user lsdesignuser2 authentication encrypted-password "$ABC123"
set logical-systems ls-marketing-dept
set system login class ls-marketing-admin logical-system ls-marketing-dept
set system login class ls-marketing-admin permissions all
set system login user lsmarketingadmin1 class ls-marketing-admin
set system login user lsmarketingadmin1 full-name lsmarketingadmin1
set system login user lsmarketingadmin1 authentication encrypted-password "$ABC123"
set system login user lsmarketingadmin2 full-name lsmarketingadmin2
set system login user lsmarketingadmin2 class ls-marketing-admin
set system login user lsmarketingadmin2 authentication encrypted-password "$ABC123"
set logical-systems ls-accounting-dept
set system login class ls-accounting-admin logical-system ls-accounting-dept
set system login class ls-accounting-admin permissions all
set system login user lsaccountingadmin1 full-name lsaccountingadmin1
set system login user lsaccountingadmin1 class ls-accounting-admin
set system login user lsaccountingadmin1 authentication encrypted-password "$ABC123"
set logical-systems interconnect-logical-system
Step-by-Step Procedure
The following example requires you to navigate various levels in the configuration hierarchy. For instructions on how to do that, see Using the CLI Editor in Configuration Mode in the CLI User Guide.
Create the first user logical system and define its administrator.
Step-by-Step Procedure
Create the user logical system.
[edit]
user@host# set logical-systems ls-product-design
Assign the user login class to the user logical system.
[edit system]
user@host# set login class ls-design-admin logical-system ls-product-design
Create the login class to give the user logical system administrator full permission over the user logical system.
[edit system]
user@host# set login class ls-design-admin permissions all
Assign a full name to the user logical system administrator.
[edit system]
user@host# set login user lsdesignadmin1 full-name lsdesignadmin1
Associate the login class with the user logical system administrator to allow the administrator to log in to the user logical system.
[edit system]
user@host# set login user lsdesignadmin1 class ls-design-admin
Create a user login password for the user logical system administrator.
[edit system]
user@host# set login user lsdesignadmin1 authentication plain-text-password
New password: Talk1234
Retype new password: Talk1234
Configure the first user for the logical system.
Step-by-Step Procedure
Configure the user login class and assign it to the user logical system.
[edit system]
user@host# set login class ls-design-user logical-system ls-product-design
To give the first user the ability to see the logical system’s resources and settings but not change them, assign
viewas the permission to the login class.[edit system] user@host# set login class ls-design-user permissions view
Assign a full name to the logical system user.
[edit system]
user@host# set login user lsdesignuser1 full-name lsdesignuser1
Associate the login class with the user to allow the user to log in to the user logical system.
user@host# set login user lsdesignuser1 class ls-design-user
Create a user login password for the user.
[edit system]
user@host# set login user lsdesignuser1 authentication plain-text-password
New password: Talk4234
Retype new password: Talk4234
Create the second user for logical system ls-product-design.
Step-by-Step Procedure
Assign a full name to the user.
[edit system]
user@host# set login user lsdesignuser2 full-name lsdesignuser2
Associate the user with the login class to allow the user to log in to the user logical system.
user@host# set login user lsdesignuser2 class ls-design-user
Create a user login password.
[edit system]
user@host# set login user lsdesignuser2 authentication plain-text-password
New password: Talk9234
Retype new password: Talk9234
Create the second user logical system and define its administrator.
Step-by-Step Procedure
Create the user logical system.
[edit]
user@host# set logical-systems ls-marketing-dept
Configure the user login class and assign it to the user logical system.
[edit system]
user@host# set login class ls-marketing-admin logical-system ls-marketing-dept
To give the user logical system administrator control over the user logical system, assign
allas the permissions to the login class.[edit system] user@host# set login class ls-marketing-admin permissions all
Assign a full name to the user logical system administrator.
[edit system]
user@host# set login user lsmarketingadmin1 full-name lsmarketingadmin1
Associate the user logical system administrator with the login class to allow the administrator to log in to the user logical system.
[edit system]
user@host# set login user lsmarketingadmin1 class ls-marketing-admin
Create a user login password for the user logical system administrator.
[edit system]
user@host# set login user lsmarketingadmin1 authentication plain-text-password
New password: Talk2345
Retype new password: Talk2345
Create a second user logical system administrator for the ls-marketing-dept logical system.
Step-by-Step Procedure
Assign a full name to the user logical system administrator.
[edit system]
user@host# set login user lsmarketingadmin2 full-name lsmarketingadmin2
Associate the user logical system administrator with the login class to allow the administrator to log in to the user logical system.
[edit system]
user@host# set login lsmarketingadmin2 class ls-marketing-admin
Create a user login password for the user logical system administrator.
[edit system]
user@host# set login user lsmarketingadmin2 authentication plain-text-password
New password: Talk6345
Retype new password: Talk6345
Create the third user logical system and define its administrator.
Step-by-Step Procedure
Create the user logical system.
[edit]
user@host# set logical-systems ls-accounting-dept
Configure the user login class and assign it to the user logical system.
[edit system]
user@host# set login class ls-accounting-admin logical-system ls-accounting-dept
To give the user logical system administrator control over the user logical system, assign permissions to the login class.
[edit system]
user@host# set login class ls-accounting-admin permissions all
Assign a full name to the user logical system administrator.
[edit system]
user@host# set login user lsaccountingadmin1 full-name lsaccountingadmin1
Associate the user logical system administrator with the login class to allow the administrator to log in to the user logical system.
[edit system]
user@host# set login user lsaccountingadmin1 class ls-accounting-admin
Create a login password for the user logical system administrator.
[edit system]
user@host# set login user lsaccountingadmin1 authentication plain-text-password
New password: Talk5678
Retype new password: Talk5678
Configure an interconnect logical system to allow logical systems to pass traffic from one to another.
user@host# set logical-systems interconnect-logical-system
Results
From configuration mode, confirm your configuration
by entering the show logical-systems command to verify
that the logical systems were created. Also enter the show system
login class command for each class that you defined.
To ensure that the logical systems administrators were created,
enter the show system login user command.
If the output does not display the intended configuration, repeat the configuration instructions in this example to correct it.
user@host# show logical-systems ?
interconnect-logical-system;
ls-accounting-dept;
ls-marketing-dept;
ls-product-design;
user@host# show system login class ls-design-admin
logical-system ls-product-design;
permissions all;
user@host# show system login class ls-design-user
logical-system ls-product-design
permissions view;
user@host show system login class ls-marketing-admin
logical-system ls-marketing-dept;
permissions all;
user@host show system login class ls-accounting-admin
 logical-system ls-accounting-dept;
permissions all;
user@host show system login user ?
 lsaccountingadmin1   lsaccountingadmin1
lsdesignadmin1       lsdesignadmin1
lsdesignuser2        lsdesignuser2
lsmarketingadmin1    lsmarketingadmin1
lsmarketingadmin2    lsmarketingadmin2
Verification
To confirm that the configuration is working properly, perform these tasks:
- Verifying User Logical Systems and Login Configurations from the Primary Logical System
- Verifying User Logical Systems and Login Configurations Using SSH
Verifying User Logical Systems and Login Configurations from the Primary Logical System
Purpose
Verify that the user logical systems exist and that you, as the primary administrator, can enter them from root. Return from a user logical system to the primary logical system.
Action
From operational mode, enter the following command:
root@host> set cli logical-system ls-product-design
Logical system:ls-product-design
root@host:ls-product-design>
root@host:ls-product-design> clear cli logical-system
Cleared default logical system
root@host>
root@host> set cli logical-system ls-marketing-dept
Logical system:ls-marketing-dept
root@host:ls-marketing-dept>
root@host:ls-marketing-dept> clear cli logical-system
Cleared default logical system
root@host>
root@host> set cli logical-system ls-accounting-dept
Logical system:ls-accounting-dept
root@host:ls-accounting-dept>
root@host:ls-accounting-dept> clear cli logical-system
Cleared default logical system
root@host>
Verifying User Logical Systems and Login Configurations Using SSH
Purpose
Verify that the user logical systems you created exist and that the administrators’ login IDs and passwords that you created are correct.
Action
Use SSH to log in to each user logical system as its user administrator would do.
-
Run SSH specifying the IP address of your SRX Series Firewall.
Enter the login ID and password for the administrator for one of the user logical systems that you created. After you log in, the prompt shows the administrator name. Notice how this result differs from the result produced when you log in to the user logical system from the primary logical system at root. Repeat this procedure for all of your user logical systems.
login: lsdesignadmin1
Password: Talk1234

lsdesignadmin1@host: ls-product-design>