NETCONF Call Home Sessions
NETCONF Call Home enables a NETCONF server to initiate a secure connection to a NETCONF client. The NETCONF client can then establish an SSH session and NETCONF session with the server.
NETCONF Call Home enables a NETCONF client to remotely manage Junos devices in cases where the client cannot initiate a connection to the network device. The Junos device that is acting as the NETCONF server initiates and maintains secure connections to a predefined set of NETCONF clients. The following sections discuss the NETCONF Call Home feature.
Understanding NETCONF Call Home
NETCONF Call Home Overview
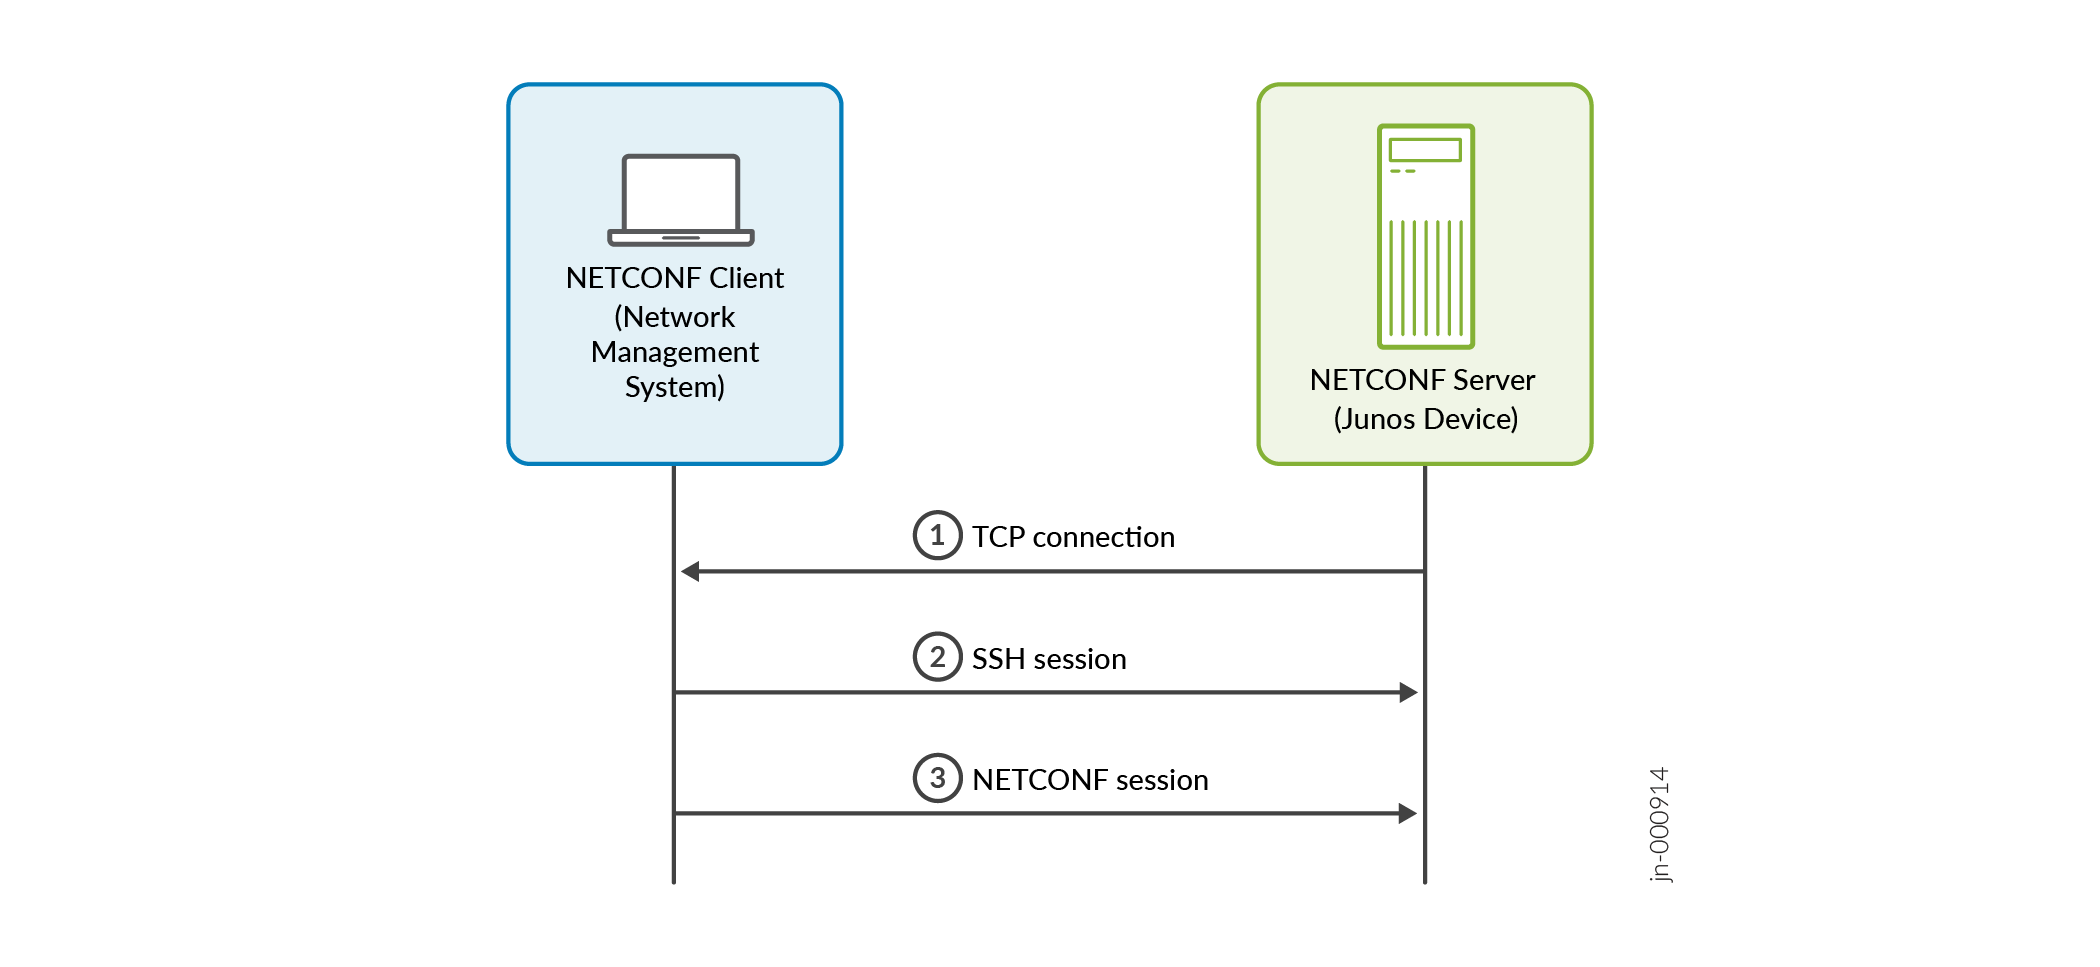
For normal NETCONF sessions over SSH, the NETCONF client first initiates a TCP connection to the Junos device that is acting as the NETCONF server. The client then starts the SSH session followed by the NETCONF session. In a NETCONF call home scenario, the roles of the TCP server and client are reversed. The NETCONF server initiates the TCP connection to the NETCONF client. After the connection is established, the NETCONF client then starts the SSH session and NETCONF session as normal.
NETCONF Call Home enables you to remotely manage Junos devices that might not be otherwise accessible. This might happen, for example, if the device is behind a firewall, and the firewall or another security tool restricts management access to the device or implements Network Address Translation (NAT). In such cases, the NETCONF client might not be able to initiate the connection with the Junos device. However, you can configure the Junos device to initiate, establish, and maintain a connection with a predefined set of network management systems.
You can use NETCONF Call Home in the following scenarios:
-
Initial deployment
-
General device management
Figure 1 outlines the call home sequence. In a NETCONF call home scenario, the network management system (NMS) is the TCP server, and the Junos device is the TCP client. You configure the TCP server to listen for connection requests on a specified port. The NETCONF Call Home standard port is 4334, but you can configure any valid port number that does not conflict with another service. You configure the Junos device to connect to one or more predefined network management systems on the specified port. After the devices establish a TCP connection, the NMS assumes its role as SSH client and NETCONF client.
The NETCONF client initiates an SSH session over the TCP connection. During SSH session establishment, the NETCONF client must authenticate the server by validating the server's presented host key or certificate. The NETCONF server must also authenticate the client. The client can choose any SSH authentication method supported by the server. The server first checks certificate-based authentication, then key-based authentication, and finally password-based authentication.
We recommend using SSH certificate-based authentication for users and hosts. Certificate-based authentication enables you to set up SSH access to a device with password-less login for users and gives the capability to trust hosts without the need to verify key fingerprints. Additionally, you can define the length of time that a given certificate is valid. For certificate-based authentication, the server and client each send their SSH certificate. You must configure the client with the CA public key that verifies the server's certificate. Similarly, you must configure the server with the CA public key that verifies the client's certificate.
Junos OS includes a customized implementation of OpenSSH
for device management. Security fixes are backported
as needed, independent of the OpenSSH version
numbers. The version displayed in CLI output (for
example, show version) may not
reflect all applied patches. Always refer to Juniper
Security Advisories (JSAs) for vulnerability impact
assessments.
For more information about NETCONF Call Home, see RFC 8071, NETCONF Call Home and RESTCONF Call Home.
Benefits of NETCONF Call Home
NETCONF Call Home can streamline the initial deployment of devices.
NETCONF Call Home using certificate-based authentication can simplify the management and scaling of authentication keys and offer stronger security compared to traditional password-based approaches.
How to Set Up NETCONF Call Home
To configure NETCONF Call Home, perform the steps described in the following sections:
- Configure the Junos User Account
- Configure SSH Authentication
- Enable the NETCONF Service
- Configure the Junos Device to Connect to the NETCONF Call Home Client
Configure the Junos User Account
For all SSH authentication methods, the NETCONF client needs a local user account or user template account on each device where it establishes a NETCONF session.
To create a local user template account:
Configure the
userstatement at the[edit system login]hierarchy level and specify a username. Include theclassstatement, and specify a login class that has the permissions required for all actions to be performed by the user.[edit system login] user@host# set user username class class-name
Commit the configuration
[edit]
user@host# commit
Repeat the preceding steps on each Junos device where the client application establishes NETCONF sessions.
Configure SSH Authentication
During SSH session establishment, the NETCONF client authenticates the server by validating the server's presented host key or certificate. Similarly, the NETCONF server authenticates the client. The server first checks certificate-based authentication, then key-based authentication, and finally password-based authentication. You must configure the server and client for whichever authentication method you choose. The SSH authentication methods are described in the following sections:
- Configure Password-Based Authentication
- Configure Key-Based Authentication
- Configure Certificate-Based Authentication
Configure Password-Based Authentication
If the NETCONF client uses password-based authentication, configure the Junos user account with a password.
To create a text-based password:
Include the
plain-text-passwordorencrypted-passwordstatement for the user account.To enter a password as text, issue the following command. You are prompted for the password, which is encrypted before being stored.
[edit system login user username authentication]
user@host# set plain-text-password
New password: password
Retype new password: password
To store a pre-encrypted password, for example, a password that you previously created and hashed using Message Digest 5 (MD5), issue the following command:
[edit system login user username authentication]
user@host# set encrypted-password "password"
Commit the configuration.
[edit system login user username authentication]
user@host# commit
Repeat the preceding steps on each Junos device where the client application establishes NETCONF sessions using password-based authentication.
Configure Key-Based Authentication
If the NETCONF client uses key-based authentication, first generate the user's SSH key pair on the configuration management server. Then configure the public key under the corresponding user account on the Junos device.
To configure key-based authentication for the NETCONF client:
Generate the SSH key pair for the given user.
On the network management system, issue the
ssh-keygencommand and provide the appropriate arguments.user@nms:~$ ssh-keygen options
For example:
netconf-user@nms:~$ ssh-keygen -t rsa -b 4096
Generating public/private rsa key pair.
Enter file in which to save the key (/home/netconf-user/.ssh/id_rsa):
Created directory '/home/netconf-user/.ssh'.
Enter passphrase (empty for no passphrase):
Enter same passphrase again:
Your identification has been saved in /home/netconf-user/.ssh/id_rsa
Your public key has been saved in /home/netconf-user/.ssh/id_rsa.pub
...
ssh-keygencommand stores the public and private keys in files in the .ssh subdirectory of the user home directory; the filename depends on the encoding and SSH version. See thessh-keygenmanual page for more information about the command options.On the Junos device, associate the public key with the Junos login account for that user.
[edit system login user username authentication]
user@host# set load-key-file URL
Junos OS copies the contents of the specified file onto the device running Junos OS. URL is the path to the file that contains one or more public keys. For information about specifying URLs, see the CLI User Guide.
Note:Alternatively, you can configure the public key by including the
ssh-rsaor equivalent statement at the[edit system login user username authentication]hierarchy level.Commit the configuration.
[edit]
user@host# commit
Repeat the steps for configuring the public key on each Junos device where the client application establishes a NETCONF session.
During the initialization of the SSH connection, the client can authenticate the identity of the NETCONF server by using the server's public key. You can either install the server's public key on the network management system, or you can pass in the key during session initialization.
Configure Certificate-Based Authentication
NETCONF Call Home supports using SSH certificates for authentication. An SSH certificate comprises an SSH public key that has been signed by a certificate authority (CA). A CA private key (signing key) signs the host public key to generate the host certificate. Similarly a CA private key signs the user public key to generate the user certificate. The host certificate authenticates the host to users, and the user certificate authenticates the user to hosts.
You can use OpenSSH to create SSH certificates and the associated CA infrastructure. The OpenSSH certificate specifies a public key, identity information, and validity constraints. To use SSH certificates for authentication you must:
Create the certificate authorities and generate the CA signing keys.
Generate the user's SSH key pair.
Generate the user and host certificates by using the CA private key to sign the user public key and host public key.
Configure the CA public key as trusted on the Junos device and the network management system.
Configure the authorized principals on the Junos device.
By default, generated certificates are valid for all users. To limit the user certificate to a specific set of users (principals), you must specify the authorized principals when you generate the certificate. Junos devices require certificates that specify one or more authorized principals. You must also configure the list of authorized principals on the Junos device. If any authorized principal configured on the device matches an authorized principal in the certificate, the device authenticates the certificate. The connecting user is authorized even if they are not explicitly configured as an authorized principal in the certificate or on the device.
To configure certificate-based authentication, perform the following steps:
- Generate the Certificate Authorities
- Generate the User Certificate
- Generate the Host Certificate
- Configure the Authorized Principals
Generate the Certificate Authorities
On any Linux/FreeBSD system, generate the certificate authority signing keys.
user@nms:~$ ssh-keygen -t type -f output-key-file -N passphrase -b bits
For example, the following commands create separate CA signing keys for signing the user and host certificates.
user@nms:~$ sudo ssh-keygen -t rsa -f /root/.ssh/user_ca -N "" -b 4096
Generating public/private rsa key pair.
Your identification has been saved in /root/.ssh/user_ca
Your public key has been saved in /root/.ssh/user_ca.pub
The key fingerprint is:
SHA256:0GbR/Lar1eH3/lULO66XSikD+gSwbibgTtFdnHNwlKg root@nms
...
user@nms:~$ sudo ssh-keygen -t rsa -f /root/.ssh/host_ca -N "" -b 4096
Generating public/private rsa key pair.
Your identification has been saved in /root/.ssh/host_ca
Your public key has been saved in /root/.ssh/host_ca.pub
The key fingerprint is:
SHA256:Aps80CYHqK8jRaMt2BNkjS1SrJpuEcgF7QTlBoB/ygI root@nms
...
Configure the network management system to trust the host CA.
Copy the contents of the host CA public key and add it to the global or user's SSH known hosts file to mark it as a trusted CA. In the following example, we copy the host CA public key contents and add
@cert-authority *
                                 host-ca-public-key
to the user's known_hosts file.user@nms:~$ sudo cat /root/.ssh/host_ca.pub ssh-rsa AAAAB3Nz...
user@nms:~$ cat ~/.ssh/known_hosts
@cert-authority * ssh-rsa AAAAB3Nz...
Note:The NMS uses the host CA public key to verify the host certificate. To trust the certificate for only specific hosts or domains, replace the wildcard (*) with the appropriate host or domain names.
Copy the user CA public key to the Junos device.
user@nms:~$ scp path-to-user-CA-public-key user@device-ip:/var/tmp/
For example:
user@nms:~$ sudo scp /root/.ssh/user_ca.pub user@198.51.100.1:/var/tmp/
On the Junos device, configure the user CA public key as a trusted CA key.
[edit system services ssh]
user@host# set trusted-user-ca-key-file path-to-user-CA-public-key
The following example adds the CA public key that is stored in the user_ca.pub file as a trusted user CA key.
[edit system services ssh]
user@host# set trusted-user-ca-key-file /var/tmp/user_ca.pub
user#host# commit
When you configure this statement, the device adds the user CA public key to the /var/etc/ssh_trusted_user_ca.pub file. The Junos device uses the user CA public key to verify the user certificate during SSH session establishment.
Generate the User Certificate
To generate the SSH certificate for the NETCONF client:
On the client NMS, generate an SSH key pair for the user.
user@nms:~$ ssh-keygen -t (rsa | ecdsa | ed25519) -f output-key-file -N passphrase -b bits
For example:
lab@nms:~$ ssh-keygen -t rsa -f ~/.ssh/id_rsa -N "" -b 4096
Generating public/private rsa key pair.
Your identification has been saved in /home/lab/.ssh/id_rsa
Your public key has been saved in /home/lab/.ssh/id_rsa.pub
...
Copy the user's public key to the CA server that has the CA signing keys, if the devices are different.
Generate the user certificate.
Use the user CA private key to sign the user's public key, and specify the list of authorized principals (users) that can access the Junos device using this certificate.
user@nms:~$ ssh-keygen -s path-to-user-ca-private-key -I key-identity -n principal1,principal2,principal3 -V validity-interval path-to-user-public-key
The following command uses the CA private key stored in user_ca to sign the user's public key stored in id_rsa.pub. The certificate is valid for two principals: lab and netconf-user.
user@nms:~$ sudo ssh-keygen -s /root/.ssh/user_ca -I netconfusers -n lab,netconf-user -V +52w6d /home/lab/.ssh/id_rsa.pub
Signed user key /home/user/.ssh/id_rsa-cert.pub: id "netconfusers" serial 0 for lab,netconf-user valid from 2024-04-11T17:47:00 to 2025-04-16T17:48:20
Verify that the user certificate is created.
user@nms:~$ ssh-keygen -Lf path-to-user-cert
For the previous step, the command creates the id_rsa-cert.pub file.
lab@nms:~$ ssh-keygen -Lf /home/lab/.ssh/id_rsa-cert.pub
/home/lab/.ssh/id_rsa-cert.pub:
        Type: ssh-rsa-cert-v01@openssh.com user certificate
        Public key: RSA-CERT SHA256:SMInnJm8SXfsYLm7NvQZqcaGpuXc9QuraKZSsewdFKM
        Signing CA: RSA SHA256:0GbR/Lar1eH3/lULO66XSikD+gSwbibgTtFdnHNwlKg (using rsa-sha2-512)
        Key ID: "netconfusers"
        Serial: 0
        Valid: from 2024-04-11T17:51:00 to 2025-04-16T17:52:45
        Principals:
                lab
                netconf-user
        Critical Options: (none)
        Extensions:
                permit-X11-forwarding
                permit-agent-forwarding
                permit-port-forwarding
                permit-pty
                permit-user-rc
Copy the user certificate to the network management system, if the devices are different.
$ scp path-to-user-cert user@nms-ip:/home/user/.ssh
Ensure the user certificate file owner and permissions are correct.
user@nms:~$ sudo chown user:group /home/user/.ssh/id_rsa-cert.pub
user@nms:~$ sudo chmod 644 /home/user/.ssh/id_rsa-cert.pub
Add the SSH key and certificate identities to the ssh-agent application, if they are not added automatically. For example:
lab@nms:~$ ssh-add
Identity added: /home/lab/.ssh/id_rsa (lab@nms)
Certificate added: /home/lab/.ssh/id_rsa-cert.pub (netconfusers)
Generate the Host Certificate
The Junos device stores SSH keys in the /etc/ssh directory. To generate the host certificate, first copy the host's public key to the CA server, and then use the host CA private key to sign the host public key.
On the Junos device, verify the host public keys.
user@host> file list /etc/ssh/*.pub
/etc/ssh/ssh_host_ec_p384_key.pub
/etc/ssh/ssh_host_ec_p521_key.pub
/etc/ssh/ssh_host_ecdsa_key.pub
/etc/ssh/ssh_host_ed25519_key.pub
/etc/ssh/ssh_host_rsa_key.pub
Copy the Junos device's public key to the CA server that has the CA signing keys.
user@host> scp /etc/ssh/ssh_host_rsa_key.pub user@ca-server-ip:/var/tmp/
Generate the host certificate.
Use the host CA private key to sign the host's public key, and specify the
-hoption to create a host certificate.user@nms:~$ ssh-keygen -s path-to-host-CA-private-key -I key-identity -h path-to-host-public-key
The following command uses the CA private key stored in host_ca to sign the host's public key stored in ssh_host_rsa_key.pub.
user@nms:~$ sudo ssh-keygen -s /root/.ssh/host_ca -I ssh_server -h /var/tmp/ssh_host_rsa_key.pub
Signed host key /var/tmp/ssh_host_rsa_key-cert.pub: id "ssh_server" serial 0 valid forever
Verify that the host certificate is created.
user@nms:~$ ls path-to-host-certificate
For the previous step, the command creates the ssh_host_rsa_key-cert.pub file.
user@nms:~$ ls /var/tmp/ssh_host_rsa_key-cert.pub
/var/tmp/ssh_host_rsa_key-cert.pub
Copy the host certificate to the Junos device.
user@nms:~$ scp path-to-host-certificate user@device-ip:/var/tmp/
For example:
user@nms:~$ scp /var/tmp/ssh_host_rsa_key-cert.pub user@198.51.100.1:/var/tmp/
On the Junos device, configure the host certificate.
[edit system services ssh]
user@host# set host-certificate-file /var/tmp/ssh_host_rsa_key-cert.pub
user#host# commit
When you configure this statement, the device adds the host certificate to the /var/etc/ssh_host_ca.pub file.
Configure the Authorized Principals
User certificates can be tied to specific users, or principals. Junos devices require that the user certificate specify one or more authorized principals. You must also configure authorized principals on the Junos device. The Junos device authenticates the certificate if at least one of the authorized principals configured on the device matches an authorized principal in the certificate.
You can configure the list of authorized principals using several methods. You can load a file that contains the list of authorized principals, each on a separate line. You can also configure the authorized principal list directly in the configuration.
To configure the authorized principals:
(Optional) Create the authorized principals file and copy it to the Junos device.
user@host> file show /var/tmp/auth_principals_list
lab
netconf-user
Configure the authorized principals that can access the system using SSH certificates.
To load a file containing the authorized principals, configure the
authorized-principals-filestatement and specify the path of the file to load.[edit system services ssh] user@router# set authorized-principals-file filepath
For example:
[edit system services ssh]
user@router# set authorized-principals-file /var/tmp/auth_principals_list
To configure one or more authorized principals directly in the configuration, use the
authorized-principalsstatement and specify a principal name or a list of principal names.[edit system services ssh] user@host# set authorized-principals principal user@host# set authorized-principals [principal1 principal2 principal3]
For example:
[edit system services ssh]
user@host# set authorized-principals [lab netconf-user]
Commit the configuration.
[edit]
user@host# commit
When you configure authorized principals, the device adds the list of authorized principals to the /var/etc/ssh_authorized_principals file.
Enable the NETCONF Service
Configure the Junos Device to Connect to the NETCONF Call Home Client
In a NETCONF call home scenario, the roles of the TCP server and client are reversed. You configure the Junos device to initiate, establish, and maintain a connection with a predefined set of network management systems. NETCONF Call Home uses outbound SSH to connect to the specified NETCONF clients.
Before you begin:
If you use SSH certificates for authentication, configure the user CA certificates, the host certificate, and the authorized principals.
The NETCONF call home client configuration registers the SSH certificate configuration at the time that you commit the client configuration. You must configure the host certificate and at least one user CA certificate and one authorized principal at the time that you commit the client configuration. If you add these initial values later, you must deactivate and commit the client configuration and then activate and commit the client configuration for the values to take effect. If the initial values are configured when you first activate the client configuration, then the client configuration will automatically register any updates to the existing values.
To configure a NETCONF Call Home client on the Junos device:
After you configure the device to connect to the NETCONF Call Home client and commit the configuration, the device attempts to initiate a TCP/IP connection with the client. The device continues to create this connection until successful or until the NETCONF call home client configuration is deleted or deactivated.
Each time the Junos device establishes an outbound SSH connection, it sends an initiation sequence that identifies the device to the client. Within this transmission is the value of device-id. When you do not configure the secret statement, the initiation sequence is:
MSG-ID: DEVICE-CONN-INFO\r\n
MSG-VER: V1\r\n
DEVICE-ID: <device-id>\r\n
If you configure the secret statement, the initiation sequence includes the Junos device's public key, and a SHA1 hash derived in part from the secret statement. The client can compute the expected hash value and compare it to the HMAC value to verify that the presented host key is from the device identified by the device-id statement.
MSG-ID: DEVICE-CONN-INFO\r\n
MSG-VER: V1\r\n
DEVICE-ID: <device-id>\r\n
HOST-KEY: <public-host-key>\r\n
HMAC:<HMAC(pub-SSH-host-key, <secret>)>\r\n
The client authenticates the Junos device by validating the presented host key or certificate. Similarly, the NETCONF server authenticates the client. The server first checks certificate-based authentication, then key-based authentication, and finally password-based authentication. After the SSH session is established, the client starts the NETCONF session.