Configure Certificate-Based (EAP-TLS ) Authentication with Azure IdP Integration
Follow these steps to register your Juniper Mist™ organization in Microsoft Entra ID, add your Identity Provider in Juniper Mist, and create authentication policies for your user groups.
We can extend the Extensible Authentication Protocol–Transport Layer Security (EAP-TLS) authentication process through the integration of an external identity provider (IdP). With this integration, an IdP validates an EAP-TLS authentication exchange and ensures that only trusted users have network access. By introducing an additional verification through IdP integration with EAP-TLS authentication, you can enhance the robustness of network access control (NAC).
In Juniper Mist™, you can integrate Microsoft Azure Active Directory (AD), now known as Microsoft Entra ID, as identity provider using OAuth. This integration allows you to leverage Azure AD as an identity provider in combination with Mist Access Assurance and perform:
- Authenticate users via EAP-TTLS by doing delegated authentication checking username and password via OAuth.
- Obtain user group memberships to leverage them in authentication policies.
- Obtain user account state information (active / suspended).
- Authorize users via EAP-TLS or EAP-TTLS.
Azure AD returns the following details that you can use to fine-tune your authentication policies in Juniper Mist Access Assurance:
-
Group memberships: Information about the groups to which an user belongs provides insights about user roles and permissions.
-
Account validation: Account status is essential to ensure that Juniper Mist Access Assurance grants network access only to valid active users.
-
Additional user context: Gathering additional information about users allows us to better understand the user's profile. When you configure identity provider lookup, the system sends an API request to the configured identity provider to fetch additional context for the authenticated user.
Overview
This task shows you how to look up the Azure AD for the common name (CN) associated with a specific domain name when you evaluate a certificate. The results from Azure AD look up fetch additional information about the user which you'll use to define the authentication policy. This task is applicable for a wireless network.
As a prerequisite for this task, you must configure EAP-TLS authentication. See Configure Certificate-Based (EAP-TLS ) Authentication for details.
In this example, you'll:
- Create a new application on the Azure portal to use Azure AD as an IdP.
- Integrate Azure AD as an IdP and grant API permissions in Microsoft Graph for the registered application.
- Retrieve details about users logged in to the Juniper Mist portal.
- Further refine the authentication policy with the additional details that the IdP fetches about users who are logged in.
To create authentication using Okta as an IdP, watch the following video:
Create the authentication policies with Mist Access Assurance considering the same exact scenario with TLS users authenticating using certificates and TLS users authenticating using credentials. The first thing that we will do is we will import the root CA certificate so we can trust the certificates on our client signed by that CA. So we'll go to organization > access certificates and I'll click on add certificate authority.
I will go to my folder where I have all the pre-configured items ready. I'm going to copy my root CA cert, import it in here. It's the same cert we used with the other two vendors. It's now imported, it's decoded, we're good to go and good to proceed. We'll then go to organization authentication policies. Actually we go to identity providers first.
We need to configure an identity provider in here and unlike with ClearPass and ICE, we don't need to have a local AD on-prem. We would actually be able to talk to Okta as our identity provider to fetch the user group information to authenticate users and provide them with network access. So I will click on add IDP.
I will select this connector type as auth since we will use native API connector to talk to Okta. I will open my setup instructions since my Okta app has been pre-created. Same as AD for other providers so I'm going to take tenants. I'm going to select the auth type as Okta, paste the tenant ID. I'll take the client ID, paste it in here. I'll take the private key so we can authenticate ourselves to Okta.
Add it right there and finally I'll configure the ROPC API ID for TTLS authentication and it's secret. The last thing I will do is I will configure the domain name. So the domain name would actually tell us based on the user realm like when the user signs in as user at like in this case lab.mystify.com. We'll take that domain based on the domain. We'll talk to a respective IDP in our configuration so just give it a name called Okta. Click create. We have our IDP configured now.
The last step is to go to access authentication policies and create the two policies that we need based on our requirements. First, we will create a rule for certificate authentication. What we'll then do is in the match criteria on the left hand side we will use labels to match in certain conditions.
In our case, we need to match on wireless users that are using certificates or TTLS to authenticate and we also need it to match on the group employee that we will take from IDP. But as you can see by default we are not having any label associated with the group so what we can do is we can create a label right from that same place. We'll call it employee group.
We will select label type as directory attribute and the label value will be group and the actual value will be employee. Click create. We can now select this label on the left hand side. It shows up here as the directory attribute. Now we are matching on all these three conditions. Then on the right hand side we are deciding what we want to do with these types of users. By default we will allow access to the network but we also want to assign VLAN 750 and role corp. Again we need to create labels for that. So we'll go and create first corp VLAN label.
The label type will be AAA attribute and the value would be VLAN. I'll configure it as 750. I'll then create corp role attribute and I'll just configure it as corp. And then I'm going to create also labels for BYD VLAN and BYD role. So 751 and finally BYD role. Good to go.
So we can select corp VLAN and corp role. Now we'll create one more rule for our users that are doing TTLS based authentication. So we'll call it credential authentication and we'll match on wireless users that are doing TTLS and that they're also part of the same employee group.
And on the right hand side we'll assign them BYD VLAN and BYD role. At this point we can hit save and our authentication policy setup is done. The last thing is to create the actual WLAN template. So I'm going to go to WLAN templates. I'm going to create a new one. I'm going to call it MIST 802.1X. I'm going to click create.
Add a WLAN. Select security as 802.1X. And in this case we don't need to configure radio servers one by one. We don't need to add APs as radio clients. None of that is required. We'll just go and select MIST authentication as our authentication service. That's it. We'll then just go on and configure dynamic VLANs. It's the same two VLANs that we will be sending. So 750.751. Click create and just assign this template to the org.
Click save. At this point we should be able to test with our client devices. We have one laptop that's connected using a certificate. It got the role corp. We have a mobile device that connected using TTLS using username and password and got the role BYD. And now let's take a look deeper and look at the client insights.
What can we see with MIST access assurance here? So what you could see is in addition to the all the client events that are coming from the access point and that are showing the user experience, from the network perspective, you also see all the events coming from the NAC side of things as the client goes through the authentication and authorization process. So, first event is, okay, we're seeing the client certificate. We are grabbing all the metadata about the user certificate.
We see that the client trusted our server cert that's provided by the MIST authentication service. We'll then did a IDP lookup against Okta. And we got all the user group information from Okta. So we know now this user is part of all these user groups. And we see one of these groups is actually employee, which we needed to match on. And finally, when we look at the NAC client allowed access event, we're saying, okay, this client is good to go. It's allowed in the network. This is the VLAN that we are assigning from a NAC perspective. This is the user role that we are assigning from the NAC perspective.
And this is the authentication rule that hit during that process. So if we click on that link, it will actually go and highlight, this is the rule that this particular user hit during the auth process, right? Similarly, if we look at the mobile device, if we look at the client insights, we're now seeing that in this case, client trusted the service certificate, but instead of showing the client certificate, it actually did the IDP authentication using username and password credentials against Okta. Finally, we got the user role and group information from Okta.
And we've allowed client to access the network, assign a different VLAN 751 and different user group. But in this case, we are hitting a different authentication rule in our policy. So again, if we click on it, we're saying that particular user went through a different role.
Configure Certificate-Based (EAP-TLS) Authentication for Wireless Network
-
On the Microsoft Azure portal, set up an IdP connector on Azure AD.
-
From the left-navigation bar, select App
registrations.
Figure 1: New Application RegistrationIf you have already registered your application, go to the Owned Applications tab. Click the application name to see details such as client ID, tenant ID, and client secret.
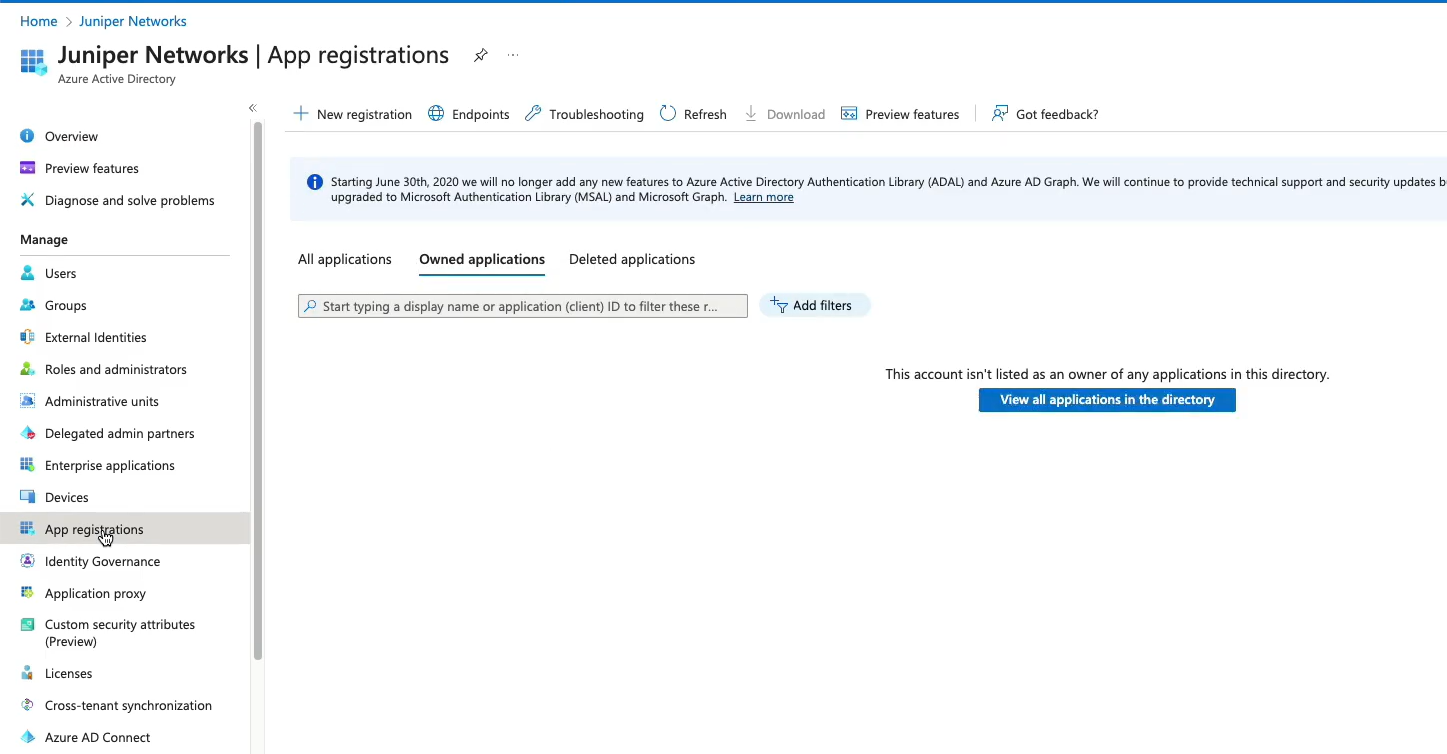 If you want to register a new application on the Azure portal, click the New registration tab.In the New Registration page, enter the required information in the following fields. Note that the Name field in the following list shows sample user input.
- Name—Enter Mist AA IDP connector
- Supported Account Type—Select Accounts in this organization directory only.
-
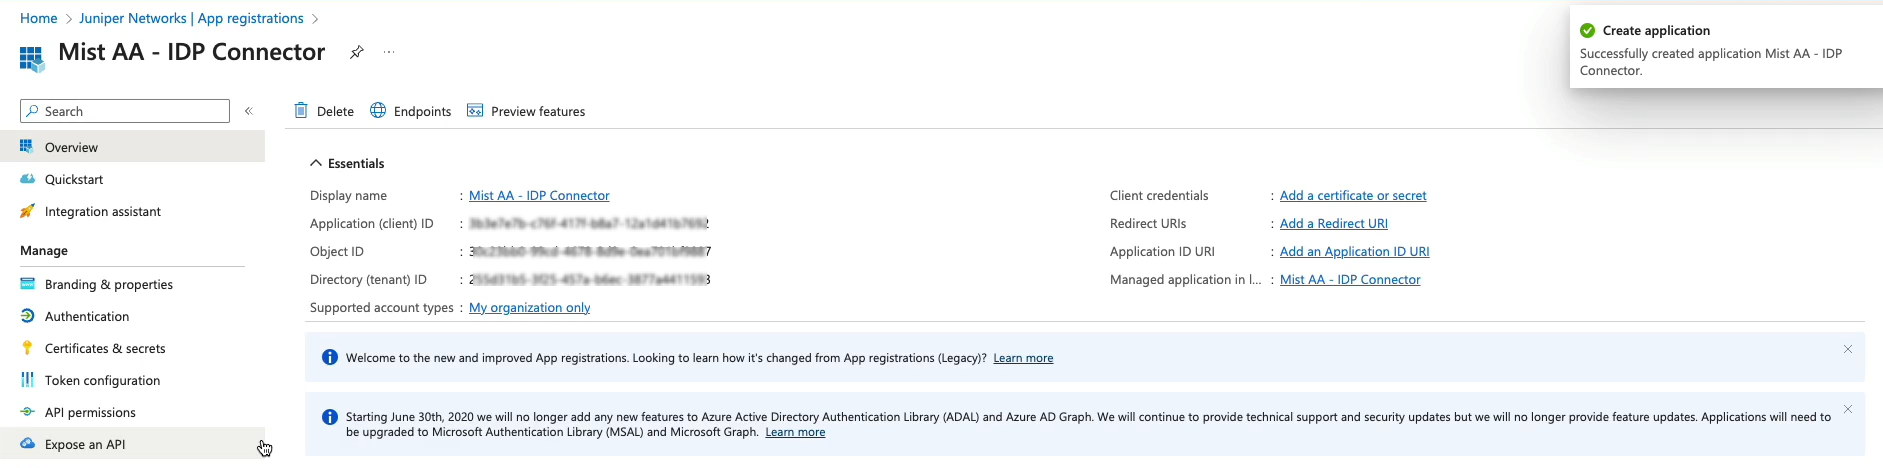
Click Register to continue.
A page appears displaying information about the newly created connector as shown in Figure 2.Figure 2: New Application Details
-
On the left-navigation bar, select Certificates and
Secrets> New Client Secret.
Enter the following details and click Add.
- Name
- Expiry time
Figure 3: Client Secret Details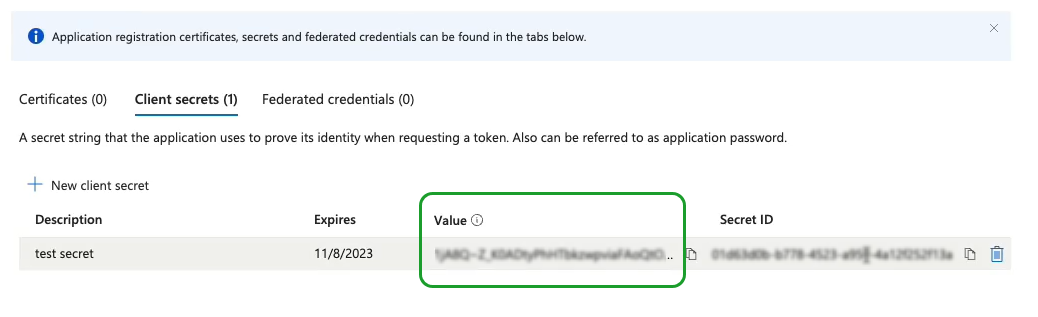
Note down the information in the Value field. You need this information for the OAuth Client Credentials Client Secret field in the Juniper Mist portal while adding Azure AD as an IdP.
-
From the left-navigation bar, select App
registrations.
-
Grant delegate permissions and application permissions to the Azure AD
application. With these permissions, the application can read users, groups,
and directory information.
-
On the Add a permission page, under Microsoft Graph, add the
following permissions on the Delegated
Permissions and Application
Permissions tabs.
-
- Directory.Read.All
- Group.Read.All
- User.Read
- User.Read.All
Click grant admin consent for your AD as shown in Figure 4.
Figure 4: API Permissions for Application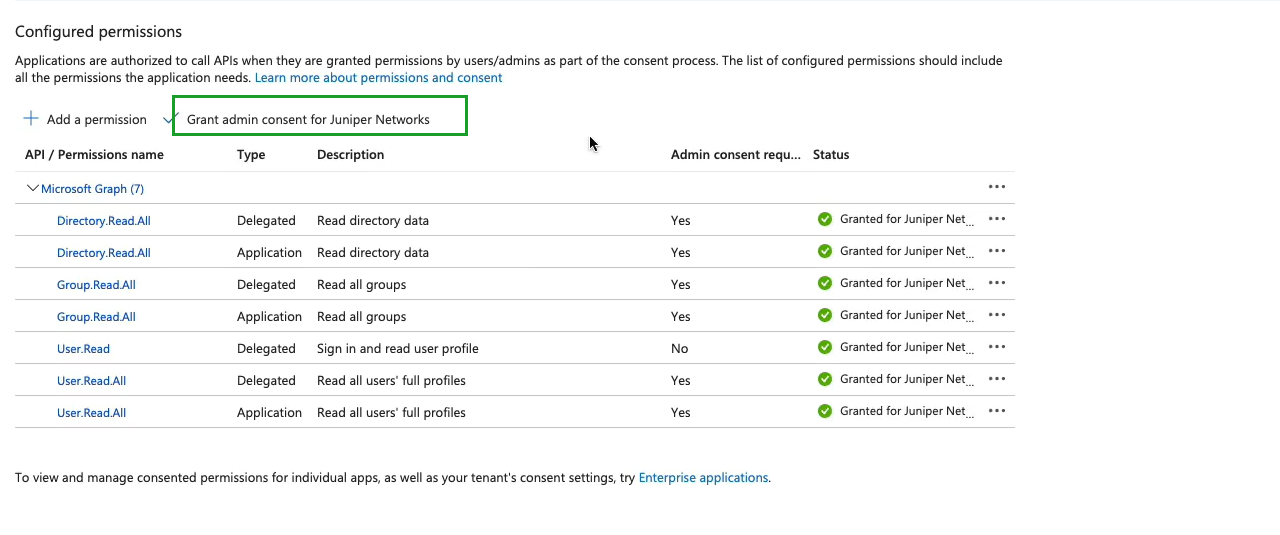
Application permissions are required for the application to operate in your Azure AD. Delegated permissions are essential when your connector uses username and password for authentication.
-
-
On the Add a permission page, under Microsoft Graph, add the
following permissions on the Delegated
Permissions and Application
Permissions tabs.
-
On the Juniper Mist portal, add Azure AD as an identity provider.
-
On the New Identity Provider page, enter the
required information as shown in Figure 5.
Figure 5: Add Azure AD as Identity Provider
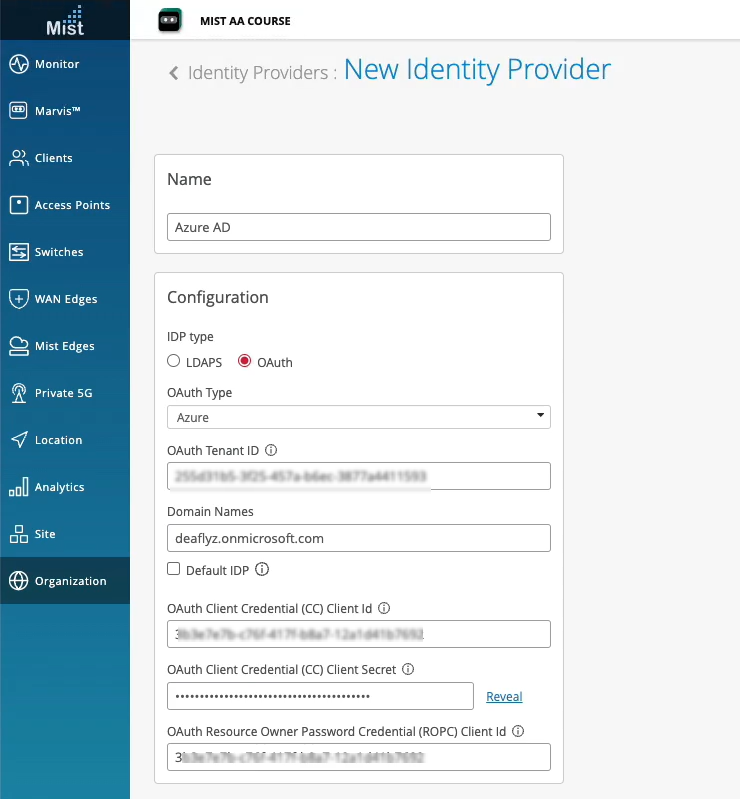
- Name—Enter an IdP name (In this example, use Azure AD)
- IDP Type—Select OAuth.
- OAuth type—Select Azure from the drop-down list.
- OAuth Tenant ID—Enter the Azure AD tenant ID.
- Domain Names—Enter the domain name, that is, the user's username (for example: username@domain.com). The domain name field examines incoming authentication requests, identifying the respective username and associated domain. After setting up the domain name for a connector, the connector can identify the Azure tenant it needs to communicate with.
- OAuth Client Credential (CC) Client id—Enter the client ID of the registered Azure AD application.
- OAuth Client Credential (CC) Client secret—Azure AD application secret. Azure AD application secret. Enter the value component of the client secret that the Azure portal generated for the IdP connector.
- OAuth Resource Owner Password Credential (ROPC) Client id— Enter the Azure AD application ID. This ID is the same as the OAuth client credential client ID.
-
On the New Identity Provider page, enter the
required information as shown in Figure 5.
When you authenticate a user by using EAP-TLS, Juniper Mist matches the username to the specified domain name. Juniper Mist sends an API request to the corresponding Azure AD tenant to fetch the details for that user.
Figure 7 and Figure 6 show an user's details in Azure AD and the Juniper Mist portal.
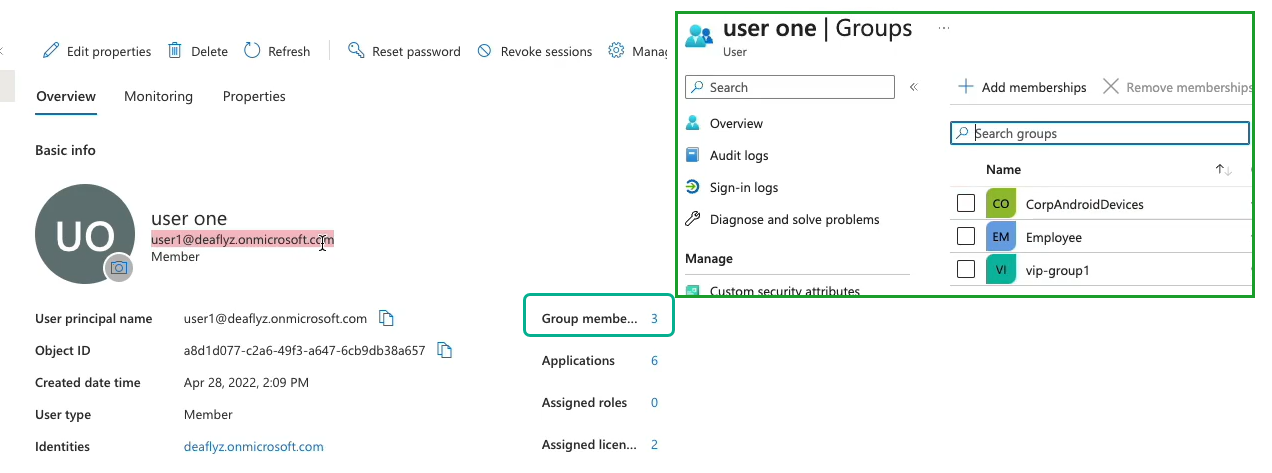
On the Juniper Mist portal, you can view the group membership information returned by Azure AD. On the Juniper Mist portal, navigate to Monitoring > Insights > Client Events to see the information.
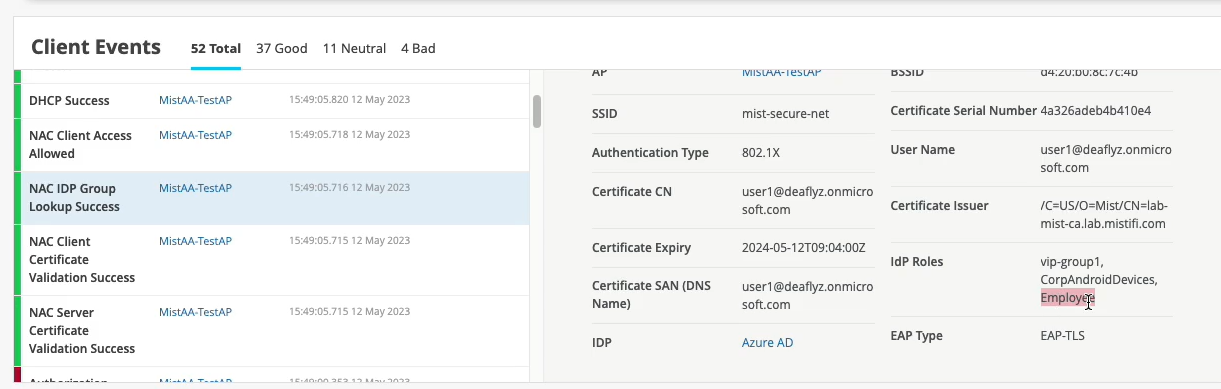
In the example shown in Figure 7, the user belongs to the group, Employee.
You can create an authentication policy based on the group details.
Create Authentication Policy Based on Group Details
You can create an authentication policy using the label with directory attribute based on the user group membership retrieved by the IdP.
To create an authentication policy:
-
On the Auth Policy page, click Create Labels and
enter the details.
Figure 8: Labels for Authentication Policies
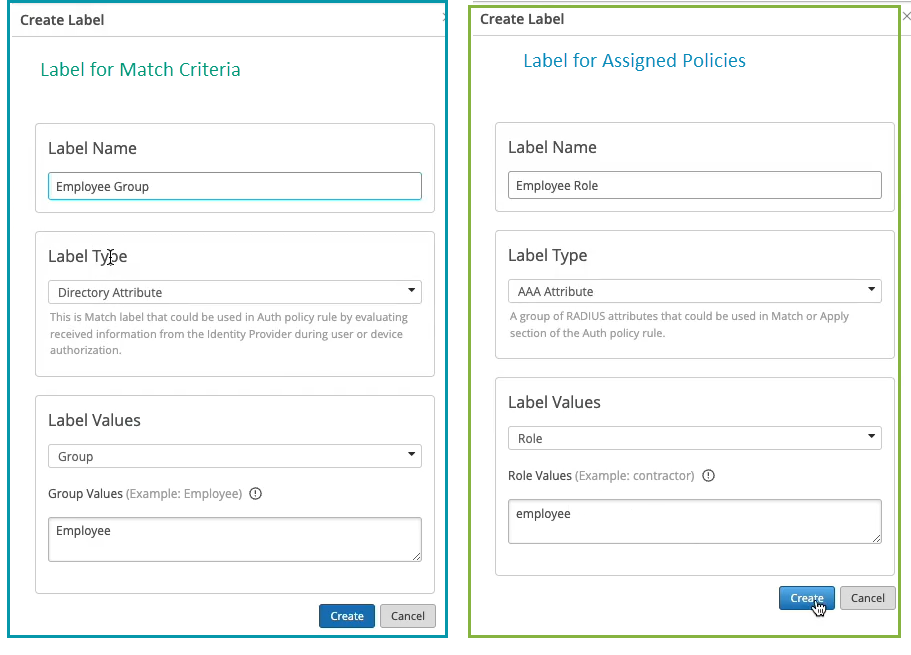
- Create a label Employee Group with label type as Directory Attribute based on the user group membership retrieved by the IdP. Select label value as Group and group value as Employee. Use this label as policy match criteria.
- Create a label Employee Role with label type as AAA Attribute. Select label value as Role and role value as Employee. Use this label to assign policies.
-
Create authentication policy by clicking Add Rule.
The system inserts a new row allowing you to add a new policy.
Figure 9: Create Labels for Authentication Policy
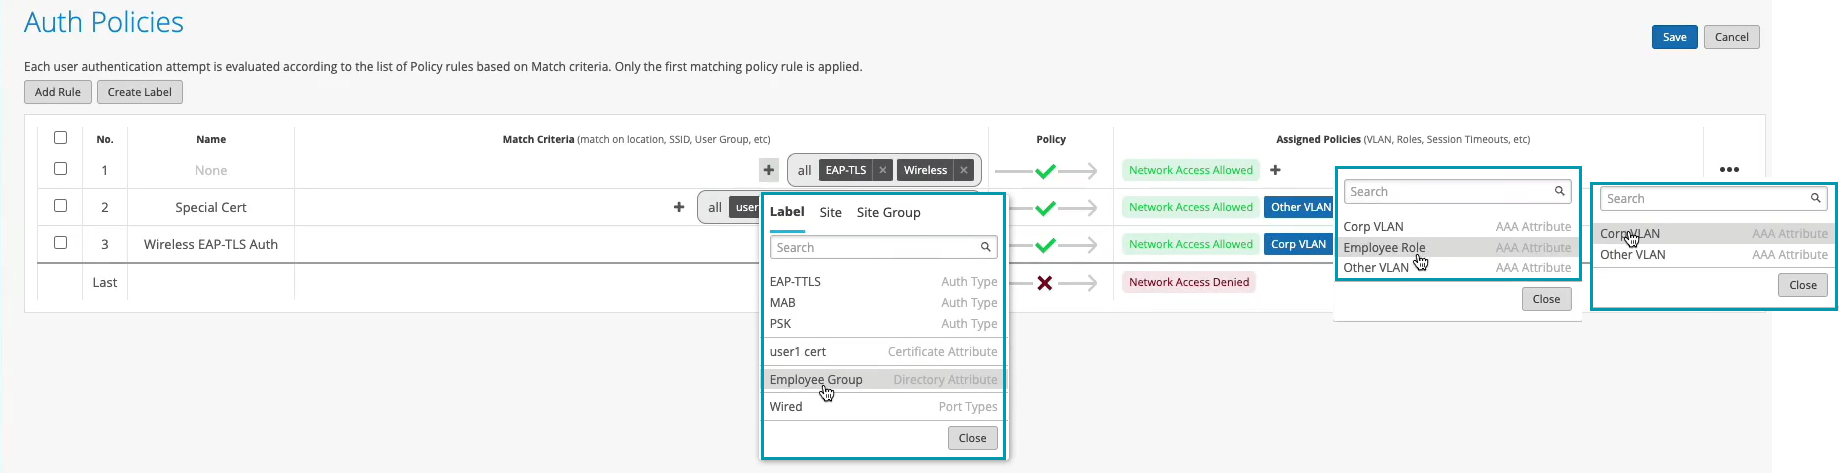
Enter policy name.
Click the add icon (+) in the Match Criteria column and select a user label from the list that appears. Select the label (Employee Group) you created based on directory attributes.
In the Policy column, click the check mark icon (✓), and then select the action you want to enforce, Allow or Block, on the resources you will identify next.
Click the (+) in the Assigned Policies column and selectthe label (Employee Role) you created based on AAA attribute for assigned policies. Since the user is part of the employee group, you can assign the employee role and move them to the corporate VLAN
-
Click Save.
Figure 10 shows the completed authentication policy.
Figure 10: Authentication Policy
Create an Authentication Policy in a WLAN Template
When you add an authentication policy in your WLAN template, it applies to all WLANs that use this template. First, you'll create the labels that you need to reference in the policy. Then you'll edit the template to add the policy.
-
Create labels for your users so that you can use these labels in your WxLAN
policy.
-
Select the appropriate Label Type and
Label Values for the users that you want
to identify.
Label Types for users include AAA Attribute, Access Point, WiFi Client, and WLAN. Values vary by the selected type.
In the following example, the AAA Attribute type is selected, and the Label Value is User Group. By creating labels that correspond to your system user groups, you can create different policies for different groups of users.Figure 11: Create New Label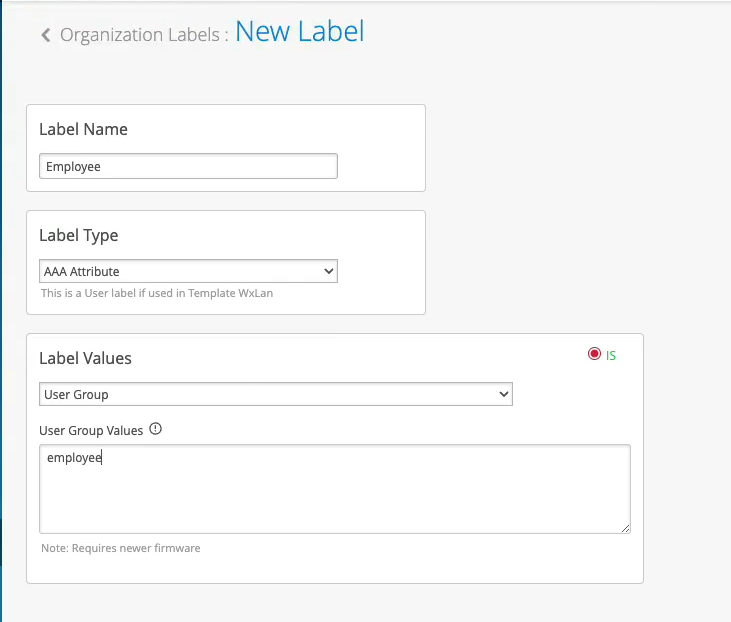
-
Select the appropriate Label Type and
Label Values for the users that you want
to identify.
-
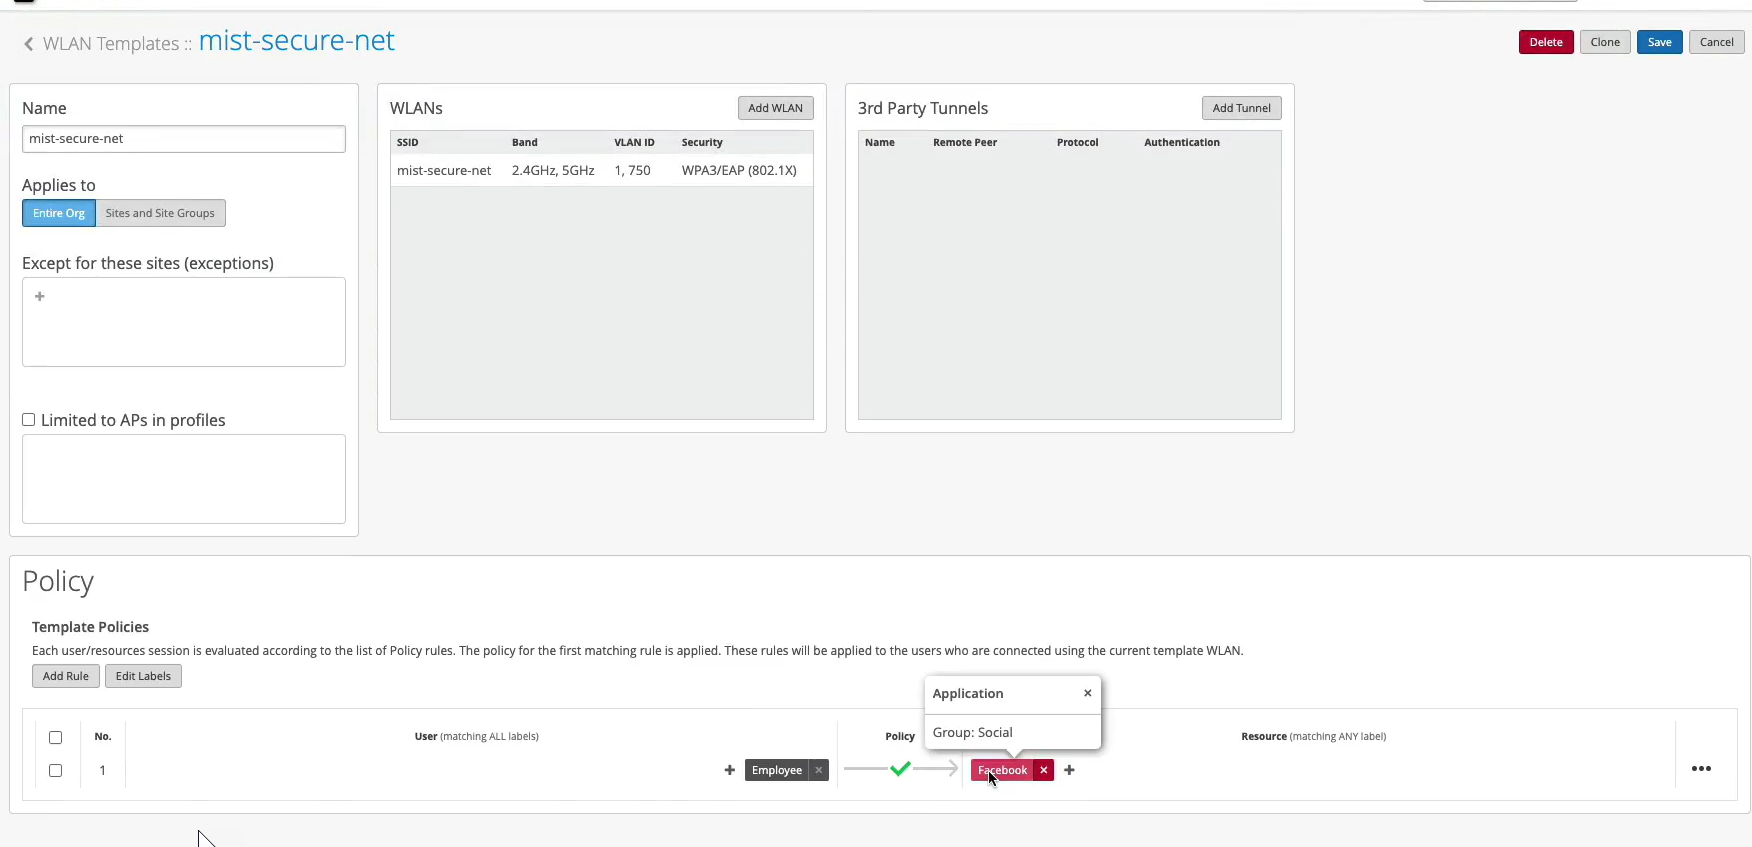
Select the users, the policy, and the resources that the rule applies
to:
-
In the User section, click the add icon (+). Then select one of the user labels that you created earlier.
-
In the Policy section, click the check mark icon (✓). Then select the action you want to enforce: Allow or Block.
-
In the Resources column, click the add icon (+). Then select one of the resource labels that you created earlier.
-
The following video shows how to configure authentication policy in WLAN Template when using certificate-based (EAP-TLS ) authentication integrated with Azure AD.
Your rule configured, let's validate. Let's take a look at which policy is now being hit for this particular user. So we went in and did the client certificate check. Let's just refresh those events so we see them. All right, so we went in and client trusted the server cert. We trusted the client cert. We then did an IDP lookup, right? Same thing as your ID. We got the three IDP roles.
Now, let's look at this client access allowed. We got the VLAN 750. We got the user group or role called employee. And now we are actually hitting that different rule now. Because we have this additional context, additional visibility from the IDP, we can now do differentiated access policies for our clients.
Now, what you could do with this employee role - how can you use it on the wireless side? You could go to organization labels. You can create a label AAA attribute. Let's call it "Employee." You'll match on the user group. And what you'll do, you could go to your WLAN template. You can create a network policy now. You can say, OK, if the user is part of this employee role or employee group, we can now decide which resources it can or cannot access on the network. So we can say, OK, let's probably block Facebook for employees and hit Save. This is how you can extend the role that's being supplied by the NAC and then apply it on the AP to do some additional restrictions on which resources the user is able to access.