Configure MAC-Based Authentication and MAC Authentication Bypass (MAB)
Follow these steps to configure a wired device to authenticate devices based on their MAC addresses.
You can use MAC authentication along with certificate-based or credential-based authentication as an additional layer of security.
Juniper Mist Access Assurance supports MAC Authentication Bypass (MAB) for uniform access control across wired and wireless networks. This topic provides an example for configuring MAB for a wired device.
The example shows you how to create MAC authentication for a wired device in addition to certificate-based EAP-TLS authentication. The task also includes the steps to create an authentication policy for a wired-side device that does not support dot 1x (such as a Phillips hub).
Prerequisites
-
You must have already configured certificate-based authentication. See Configure Certificate-Based (EAP-TLS) Authentication for Wireless Network
-
A Juniper Networks EX Series Switch.
Configure MAC-Based Authentication for Wired Device
Learn how to configure and validate MAC-based authentication for wired devices by watching the following videos:
Well, what about wired devices? How do we authenticate an authorized wired client? Well, it turns out we could do it right here in the same place. So we could create a couple of more rules. So we can say OK, if we look at wired devices that are using certificates to authenticate , we could just call this rule wired certificate authentication. We can effectively apply the same matching criteria as for wireless. There's no difference whatsoever here.
On the right-hand side, we'll decide where we want to move these devices after authentication and the right policy match. And finally, what about non-.1x capable devices on the wired side? So for example, I have here a Phillips hub that does not support .1x. How can I authenticate a Phillips app? So I could create a label for the Phillips device. The label will be client list. And I'll just say approved Phillips app. And I'll just put the MAC address of that device in. Oh. And you could put a list of MAC addresses. You can put the list of Mac OUIs. And remember that all of these labels that I'm creating in the UI - they're all available through the REST API. So there is always an endless possibility of integration with existing, say, inventory management systems that can just put all the new device MAC addresses in those lists for authentication and authorization.
So we'll just click Create. Create this label. And we'll create a rule. We'll call it approved Phillips devices. And here we are matching on wired devices that are doing MAC address authentication bypass that are part of this client list label. And in this case, we will move them to - well, I don't want to move them to Corp VLAN. That's not what I want. I will create an IoT VLAN. And in our case, that's going to be VLAN 3000. And I'm going to add this to an IoT VLAN. And now, we have our authentication policies configuration done.
OK, so how do we validate, right? So we've connected a couple of clients to the switch. One is a laptop that's doing .1x using certificate. Another one is the Phillips Hue app. That doesn't do any .1x, and just doing MAC authentication. So we could see those two clients are connected.
Let's take a look at the laptop one. So we could click on the port. We see that there is a client with a username flashing up. Let's take a look at the wired client insights. And what we can see here is that the user has been authenticated. You could see the port up and down events from the switch side. We see all the authentication phases, same as we saw in the wireless side. The client trusts the server. The server trusts the client certificate. We get all the metadata here. We then are saying client access is allowed. And voila. We matched the same authentication policy rule. Great. So now, we know that this part is working.
Now, we go to switch back. And let's look at the Philips device. That device is not doing any form of .1x authentication. So let's just take a look at the wired client insights. Yeah, and we are seeing that here the user is authenticated. And there is a client access allowed event here as well. And in this case, the authentication type is Mac address bypass - the MAC address that we've added to the client list. And voila. We are matching the right approved Phillips device rule.
Use the following steps to set up MAC-based authentication in a network using the Juniper Mist portal:
-
Create authentication policies.
-
From the left menu of the Juniper Mist portal, select
Organization > Access > Auth
Policies.
Create a new rule to provide access to clients with valid certificates. See Configure Authentication Policy.Figure 1: Create Auth Policy for Wired Client
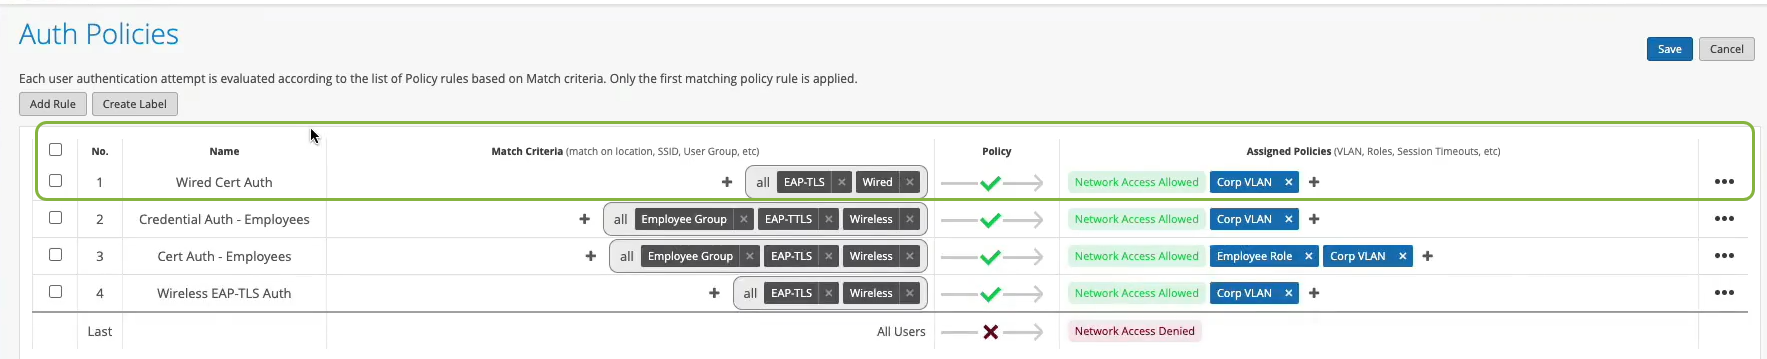 Define an authentication policy with the following details:
- Name—Enter the name for the policy (ex: Wired Cert Auth)
- Match Criteria—Select EAP-TLS and Wired.
- Policy—Select Allowed
- Policy action—Network Access Allowed
- Assigned VLAN—Corp VLAN
-
From the left menu of the Juniper Mist portal, select
Organization > Access > Auth
Policies.
-
To provide authentication for a non-dot1.x device on the LAN side, create a
new policy label.
-
On the Auth Policies page, select Create
Label and enter the details.
Figure 2: Label for Non-Dot1x device
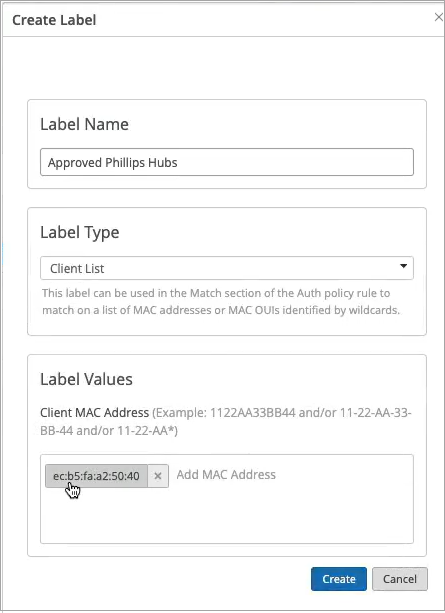 Enter the following information in the respective fields:
- Label Name—Enter the label name (example: Approved Phillips Hubs)
- Label Type—Select the type Client List
- Label Values—Enter MAC address of the device
-
On the Auth Policies page, select Create
Label and enter the details.
-
Create a new authentication policy.
-
Click Add Rule to create a new rule.
In this rule, use the label you created in the previous step for non-dot1x device. In this rule, use the label you created in the previous step for a non-dot1x device.Figure 3: Authentication Policy for Non-Dot1X devices
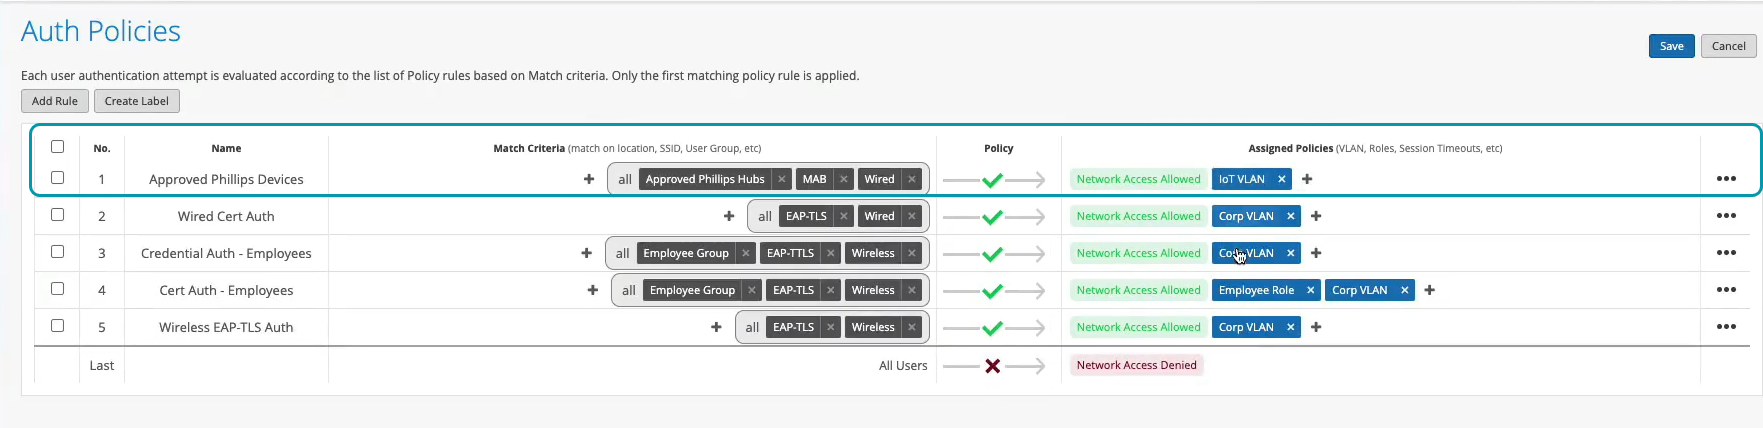 Enter the following information in the respective fields:
- Name—Enter Name. Example: Approved Phillips Devices.
- Match Criteria—Select Approved Phillips Hubs, MAB (MAC Authentication Bypass), and Wired.
- Policy—Select Allowed.
- Policy action—Select Network Access Allowed.
- Assigned Policies—Select IoT VLAN.
Now you have created a policy to authenticate non-dot1X device.
-
Click Add Rule to create a new rule.
-
Configure the switch to perform the authentication.
-
Scroll down to the Port Profile section and enter the
details.
Figure 4: Port Profile OptionsEnter the required information or select the required options in the following fields:
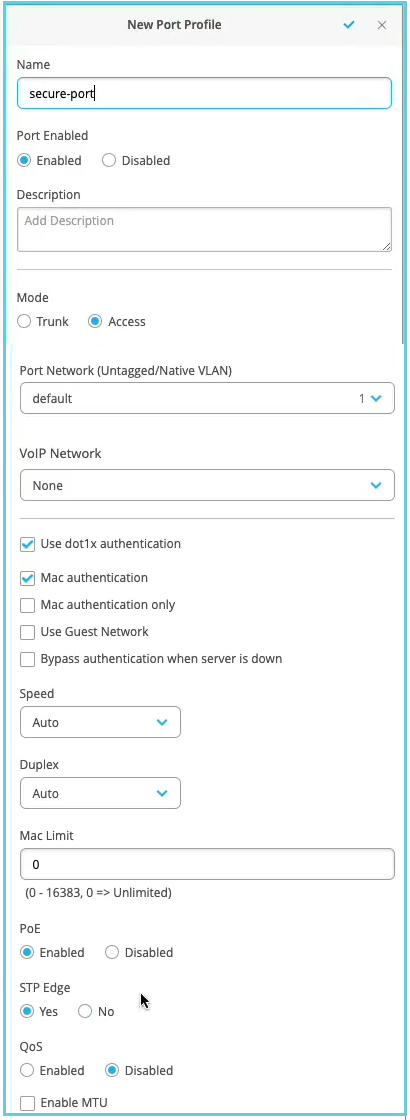
- Name—Enter a name (for example: secure-port).
- Mode—Select Access.
- Enable the Use dot1x authentication and Use MAC authentication options. If the client device supports 802.1X, the switch port performs 802.1X authentication. If the client device does not support 802.1X, the switch port performs MAC authentication.
- STP Edge—Select Yesto configure the port as a Spanning Tree Protocol (STP) edge port. This setting ensures that the port is treated as an edge port.
This example uses the default values for the remaining fields.
-
Assign a port profile to each port of the switch where the
connected wired clients require network access.
In the Select Switches Configuration section, on the Port Config tab, click Add Port Range to associate a port profile with a port.
Figure 5: Assign Port Profile to Port Ranges on a Switch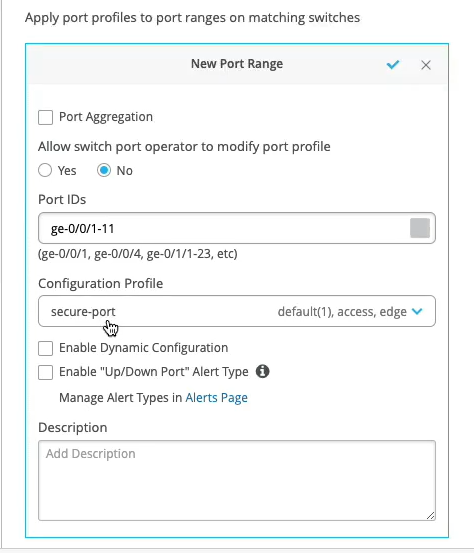
Enter a port ID and select the configuration profile that you created in the previous step.
-
Scroll down to the Port Profile section and enter the
details.
Now your network is ready to securely authenticate clients. The Juniper Mist cloud verifies the client certificates and grants access and authorization based on the authentication policy configuration.
You can view the associated clients on the Juniper Mist portal.
- Select Clients > Wired Clients to see client details
- Select Monitor > Service Levels > Insights to view client events.