Installing Data Collectors for Analytics
Overview
The Analytics functionality streams data from the network devices, via data collectors, to the NorthStar Controller where it is processed, stored, and made available for viewing in the web UI.
See the NorthStar Controller User Guide for information about collecting and viewing telemetry data.
Junos OS Release 15.1F6 or later is required to use Analytics. For hardware requirements for analytics nodes, see NorthStar Controller System Requirements. For supported deployment scenarios, see Platform and Software Compatibility.
If you are not using NorthStar application high availability (HA), you can install a data collector either in the same node where the NorthStar Controller application is installed (single-server deployment) or in one or more external nodes that are dedicated to log collection and storage. In both cases, the supplied install scripts take care of installing the required packages and dependencies.
In a NorthStar application HA environment, you have three options:
Configure an external analytics node.
Configure an external analytics cluster. An analytics cluster provides backup nodes in the event of an analytics node failure. This cluster can be local (within the same data center) or geo-diverse (analytics geo-HA).
Install data collectors in the same nodes that make up the NorthStar cluster. In this scenario, the NorthStar application cluster nodes are also analytics cluster nodes.
The configuration options from the analytics processes are read from the /opt/northstar/data/northstar.cfg file. In a single-server deployment, no special changes are required because the parameters needed to start up the collector are part of the default configuration. For your reference, Table 1 lists some of the settings that the analytics processes read from the file.
Setting |
Description |
|---|---|
mq_host |
Points to the IP address or virtual IP (VIP) (for multiple NorthStar node deployments) of hosts running the messaging bus service (the NorthStar application node). Defaults to localhost if not present. |
mq_username |
Username used to connect to the messaging bus. Defaults to northstar. |
mq_password_enc |
Password used to connect to the messaging bus. There is no default; the service fails to start if this is not configured. On single-server deployments, the password is set during the normal application install process. |
mq_port |
TCP port number used by the messaging bus. Defaults to 5672. |
es_port |
TCP port used by Elasticsearch. Defaults to 9200. |
es_cluster_name |
Used by Elasticsearch in HA scenarios to form a cluster. Nodes in the same cluster must be configured with the same cluster name. Defaults to NorthStar. |
Two additional settings are relevant to collector processes, but are not part of northstar.cfg. These parameters configure analytics port numbers and are configurable using the NorthStar CLI:
If you make port number changes, you must restart logstash using supervisorctl restart analytics:logstash for those changes to take effect.
rpm-statistics-port
Port used to read the syslog messages that are generated from the device, containing the results of the RPM stats. The default is 1514. To modify the port, use the NorthStar CLI command set northstar analytics log-collector rpm-statistics-port port-number.
jti-port
UDP port number to which the collector listens for telemetry packets from the devices. The default is 3000. To modify the port, use the NorthStar CLI command set northstar analytics log-collector jti-port port-number.
If you are upgrading NorthStar from a release earlier than NorthStar 4.3.0, and you are using NorthStar analytics, you must upgrade NorthStar manually using the procedure described in Upgrading from Pre-4.3 NorthStar with Analytics.
If you are upgrading NorthStar from a release earlier than NorthStar 6.0.0, you must redeploy the analytics settings after you upgrade the NorthStar application nodes. This is done from the Analytics Data Collector Configuration Settings menu described later in this topic. This is to ensure that netflowd can communicate with cMGD (necessary for the NorthStar CLI).
Analytics Geo-HA
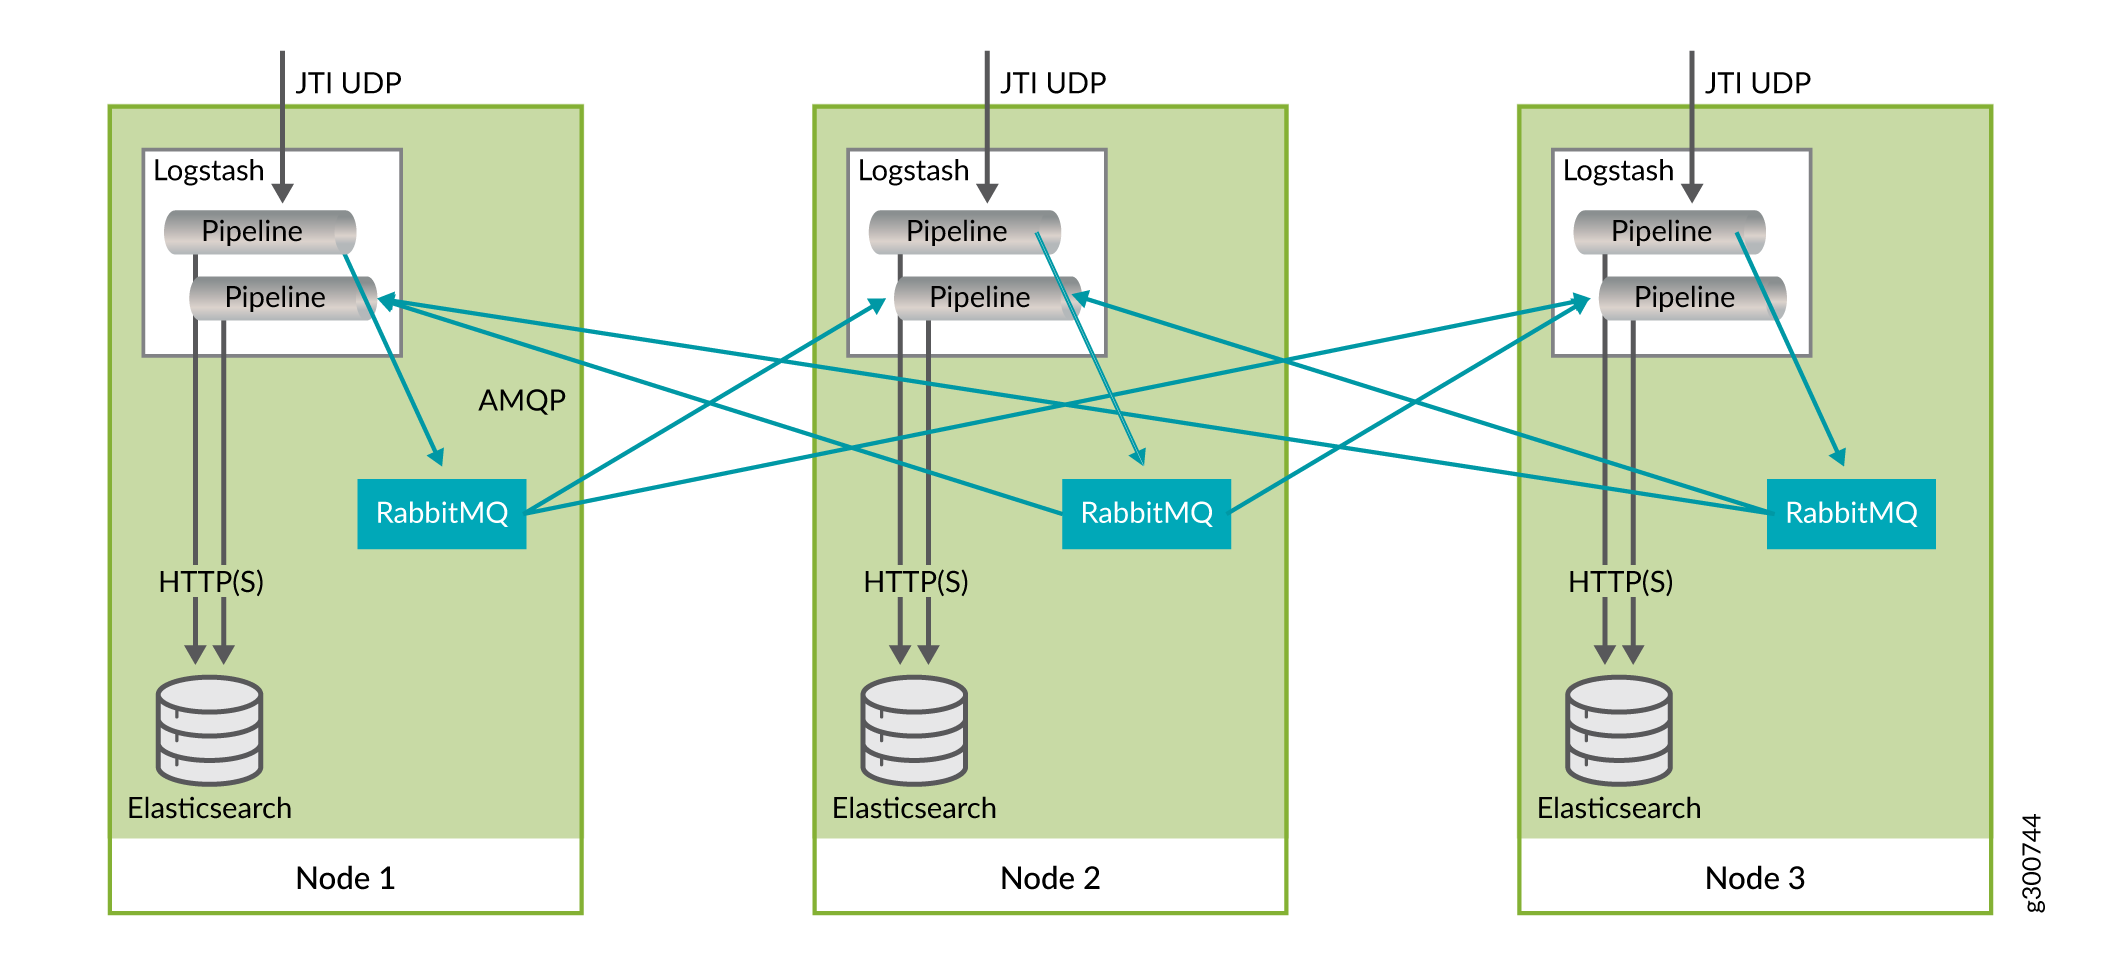
NorthStar Controller supports analytics geo-HA as of release 5.1.0. While original analytics HA was designed for local clusters (same data center), geo-HA makes all data available on all nodes, to better serve networks where the nodes are geographically remote from one another. To achieve this, a local RabbitMQ (messaging bus) is installed on each analytics (ElasticSearch) node. This improves the tolerance for latency and helps compensate for the tendency of remote nodes to become out of sync.
The remote ElasticSearch nodes use JTI logstash to retrieve and process the data from the other ElasticSearch nodes. The replication pipeline creates a named queue on each remote server. The queues are persistent so that if any ElasticSearch node goes down, it can recover by resuming the processing of data pushed onto the remote queue. Figure 1 shows the interactions within a node and between nodes.
The Analytics Collector Configuration Settings menu within the net_setup.py script has an option to prepare and deploy Geo-HA.
Single-Server Deployment–No NorthStar HA
To install the data collector together with the NorthStar application in a single-server deployment (without NorthStar HA), use the following procedure:
On the NorthStar application node, install the NorthStar Controller bundle, using the install.sh script. See the Installing the NorthStar Controller.
On the same node, run the install-analytics.sh script.
[root@ns ~]# cd /opt/northstar/northstar_bundle_x.x.x/
[root@ns northstar_bundle_x.x.x]# ./install-analytics.sh
groupadd: group 'pcs' already exists
package NorthStar-libUtils is not installed
Loaded plugins: fastestmirror
Setting up Install Process
Loading mirror speeds from cached hostfile
northstar_bundle                 | 2.9 kB     00:00 ...
Resolving Dependencies
--> Running transaction check
---> Package NorthStar-libUtils.x86_64 0:3.1.0-20161127_68470_213 will be installed
--> Finished Dependency Resolution

Dependencies Resolved
.
.
.
Verify that the three analytics processes are installed and running by executing supervisorctl status on the PC Server:
[root@ns ~]# supervisorctl status
analytics:elasticsearch          RUNNING   pid 7073, uptime 21:57:29
analytics:esauthproxy            RUNNING   pid 7072, uptime 21:57:29
analytics:logstash               RUNNING   pid 7231, uptime 21:57:26
External Analytics Node(s)–No NorthStar HA
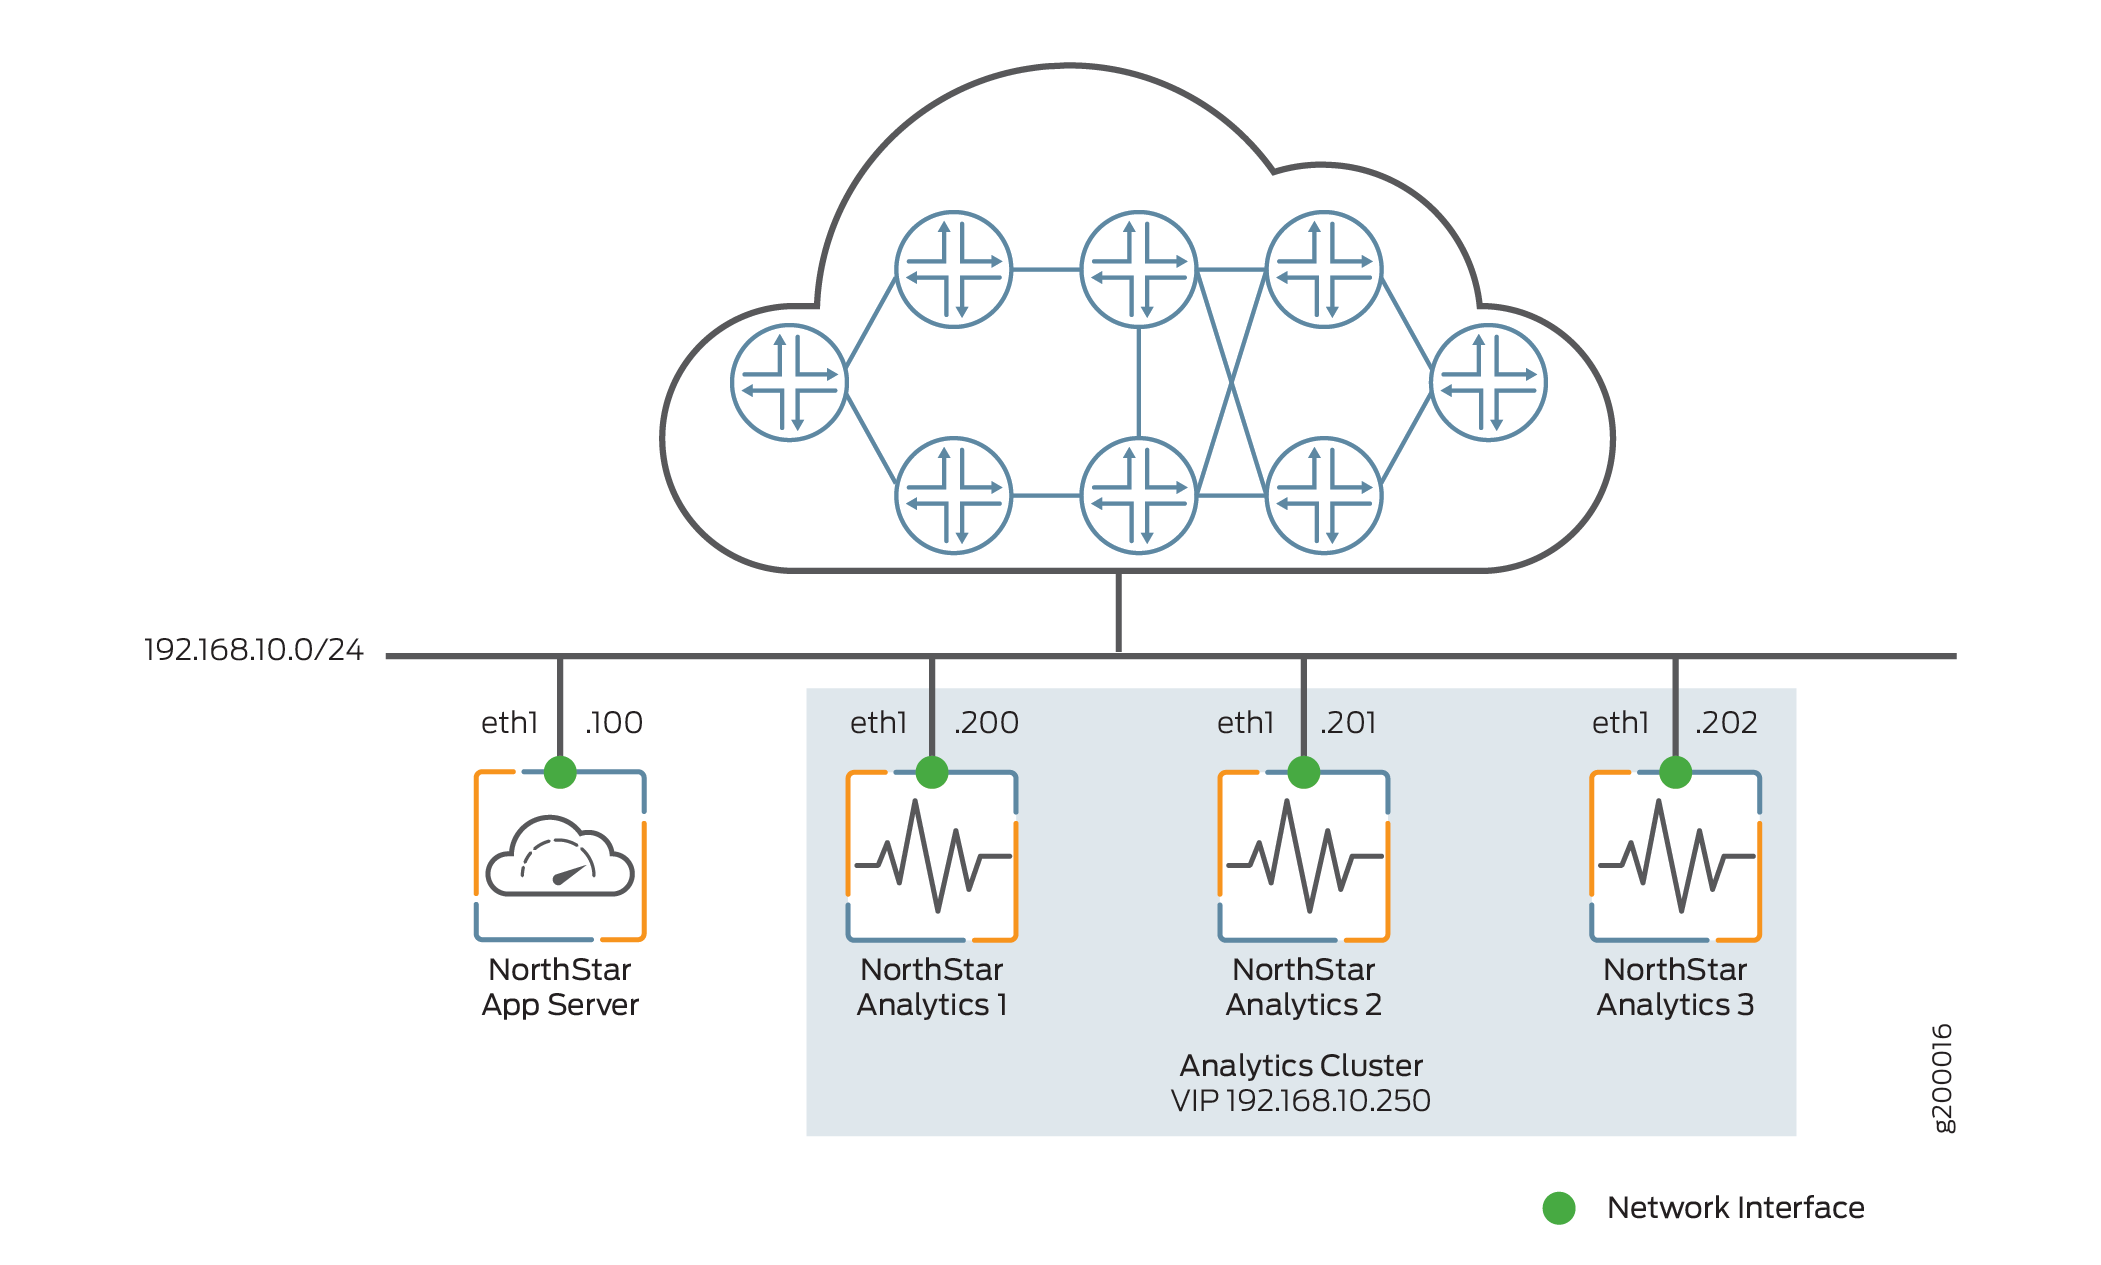
Figure 2 shows a sample configuration with a single NorthStar application node and three analytics nodes comprising an analytics cluster. All the nodes connect to the same Ethernet network, through the eth1 interface. Optionally, you could have a single analytics node rather than creating an analytics cluster. The instructions in this section cover both a single external analytics node and an external analytics cluster.
To install one or a cluster of external analytics nodes, use the following procedure:
On the NorthStar application node, install the NorthStar Controller application, using the install.sh script. See Installing the NorthStar Controller.
On each analytics node, install northstar_bundle.rpm, but do not run the install.sh script. Instead, run the install-analytics.sh script. The script installs all required dependencies such as NorthStar-JDK, NorthStar-Python, and so on. For NorthStar Analytics1, it would look like this:
[root@NorthStarAnalytics1]# rpm -Uvh <rpm-filename>
[root@NorthStarAnalytics1]# cd /opt/northstar/northstar_bundle_x.x.x/
[root@NorthStarAnalytics1 northstar_bundle_x.x.x]# ./install-analytics.sh
groupadd: group 'pcs' already exists
package NorthStar-PCS is not installed
Loaded plugins: fastestmirror
Setting up Update Process
Loading mirror speeds from cached hostfile
northstar_bundle            | 2.9 kB     00:00 ...
No Packages marked for Update
Loaded plugins: fastestmirror
Setting up Update Process
Loading mirror speeds from cached hostfile
No Packages marked for Update
Loaded plugins: fastestmirror
Setting up Update Process
.
.
.
The next configuration steps require you to run the net_setup.py script to configure the NorthStar node and the analytics nodes(s) so they can connect to each other. But before you do that, we recommend that you copy the public SSH key of the node where the net_setup.py script is to be executed to all other nodes. The net_setup.py script can be run on either the NorthStar application node or one of the analytics nodes to configure all the nodes. This is not a required step, but it saves typing the passwords of all the systems later when the script is deploying the configurations or testing the connectivity to the different nodes.
[root@NorthStarAnalytics1 network-scripts]# ssh-copy-id root@192.168.10.200
root@192.168.10.200's password:
Try logging into the machine using
ssh root@192.168.10.200and check in with.ssh/authorized_keys.Repeat this process for all nodes (192.168.10.100, 192.168.10.200, 192.168.10.201, and 192.168.10.202 in our example).
Run net_setup.py on the NorthStar application node or on one of the analytics nodes. The Main Menu is displayed:
Main Menu:
    .............................................
    A.) Host Setting
    .............................................
    B.) JunosVM Setting
    .............................................
    C.) Check Network Setting
    .............................................
    D.) Maintenance & Troubleshooting
    .............................................
    E.) HA Setting
    .............................................
    F.) Collect Trace/Log
    .............................................
    G.) Analytics Data Collector Setting
      (External standalone/cluster analytics server)
    .............................................
    H.) Setup SSH Key for external JunosVM  setup
    .............................................
    I.) Internal Analytics Setting (HA)
    .............................................
    X.) Exit
    .............................................
Please select a letter to execute.
Select G Analytics Data Collector Setting. The Data Collector Configuration Settings menu is displayed.
    Analytics Data Collector Configuration Settings:
        (External standalone/cluster analytics server)
    ********************************************************
    Note: This configuration only applicable for data collector
    installation in separate server
    ********************************************************
    .........................................................

        NorthStar App #1
             Hostname                                 :
             Interface
                  Name                                : external0
                  IPv4                                :
    .........................................................
        Analytics Collector #1
             Hostname                                 :
             Priority                                 : 0
             Interface
                  Name                                : external0
                  IPv4                                :

    1. ) Add NorthStar App
    2. ) Add analytics data collector
    3. ) Modify NorthStar App
    4. ) Modify analytics data collector
    5A.) Remove NorthStar App
    5B.) Delete NorthStar App data
    6A.) Remove analytics data collector
    6B.) Delete analytics data collector data
    ..........................................................
    7A.) Virtual IP for Northstar App                  :
    7B.) Delete Virtual IP for Northstar App
    8A.) Virtual IP for Analytics Collector                      :
    8B.) Delete Virtual IP for Analytics Collector
    ..........................................................
    9. ) Test Analytics Data Collector Connectivity
    A. ) Prepare and Deploy SINGLE Data Collector Setting
    B. ) Prepare and Deploy HA Analytics Data Collector Setting
    C. ) Prepare and Deploy GEO-HA Analytics Data Collector Setting
    D. ) Copy Collector setting to other nodes
    E. ) Add a new Collector node to existing cluster
    F. ) Sync Config with NorthStar App
    ..........................................................

    Please select a number to modify.
    [<CR>=return to main menu]:
Select options from the Data Collector Configuration Settings menu to make the following configuration changes:
Select 3 to modify the NorthStar application node settings, and configure the NorthStar server name and IP address. For example:
Please select a number to modify.
[CR=return to main menu]:
3
NorthStar App ID : 1

current NorthStar App #1 hostname (without domain name) :
new NorthStar App #1 hostname (without domain name) : NorthStarAppServer

current NorthStar App #1 interface name : external0
new NorthStar App #1 interface name : eth1

current NorthStar App #1 interface IPv4 address :
new NorthStar App #1 interface IPv4 address : 192.168.10.100


Press any key to return to menu
Select 4 to modify the analytics node IP address. For example:
Please select a number to modify.
[CR=return to main menu]:
4
Collector ID : 1

current collector #1 hostname (without domain name) :
new collector #1 hostname (without domain name) : NorthStarAnalytics1

current collector #1 node priority : 0
new collector #1 node priority : 10

current collector #1 interface name : external0
new collector #1 interface name : eth1

current collector #1 interface IPv4 address :
new collector #1 interface IPv4 address : 192.168.10.200


Press any key to return to menu
Select 2 to add additional analytics nodes as needed. In our analytics cluster example, two additional analytics nodes would be added:
Please select a number to modify.
[CR=return to main menu]:
2
New collector ID : 2

current collector #2 hostname (without domain name) :
new collector #2 hostname (without domain name) : NorthStarAnalytics2

current collector #2 node priority : 0
new collector #2 node priority : 20

current collector #2 interface name : external0
new collector #2 interface name : eth1

current collector #2 interface IPv4 address :
new collector #2 interface IPv4 address : 192.168.10.201


Press any key to return to menu

Please select a number to modify.
[CR=return to main menu]:
2
New collector ID : 3

current collector #3 hostname (without domain name) :
new collector #3 hostname (without domain name) : NorthStarAnalytics3

current collector #3 node priority : 0
new collector #3 node priority : 30

current collector #3 interface name : external0
new collector #3 interface name : eth1

current collector #3 interface IPv4 address :
new collector #3 interface IPv4 address : 192.168.10.202


Press any key to return to menu
Select 8A to configure a VIP address for the cluster of analytics nodes. This is required if you have an analytics cluster. If you have a single external analytics node only (not a cluster), you can skip this step.
Please select a number to modify.
[CR=return to main menu]:
8A
current Virtual IP for Collector :
new Virtual IP for Collector : 192.168.10.250

Press any key to return to menu
This VIP serves two purposes:
It allows the NorthStar server to send queries to a single endpoint. The VIP will be active on one of the analytics nodes, and will switch over in the event of a failure (a full node failure or failure of any of the processes running on the analytics node).
Devices can send telemetry data to the VIP, ensuring that if an analytics node fails, the telemetry data can still be processed by whichever non-failing node takes ownership of the VIP.
The configuration for our analytics cluster example should now look like this:
    Analytics Data Collector Configuration Settings:
    (External standalone/cluster analytics server)
    ********************************************************
    Note: This configuration only applicable for analytics
    data collector installation in separate server
    ********************************************************
    .........................................................
        NorthStar App #1
             Hostname                                 : NorthStarAppServer
             Interface
                  Name                                : eth1
                  IPv4                                : 192.168.10.100
    .........................................................
        Analytics Collector #1
             Hostname                                 : NorthStarAnalytics1
             Priority                                 : 10
             Interface
                  Name                                : eth1
                  IPv4                                : 192.168.10.200
        Analytics Collector #2
             Hostname                                 : NorthStarAnalytics2
             Priority                                 : 20
             Interface
                  Name                                : eth1
                  IPv4                                : 192.168.10.201
        Analytics Collector #3
             Hostname                                 : NorthStarAnalytics3
             Priority                                 : 30
             Interface
                  Name                                : eth1
                  IPv4                                : 192.168.10.202

    1. ) Add NorthStar App
    2. ) Add analytics data collector
    3. ) Modify NorthStar App
    4. ) Modify analytics data collector
    5A.) Remove NorthStar App
    5B.) Delete NorthStar App data
    6A.) Remove analytics data collector
    6B.) Delete analytics data collector data
    ..........................................................
    7A.) Virtual IP for Northstar App                  :
    7B.) Delete Virtual IP for Northstar App
    8A.) Virtual IP for Analytics Collector            : 192.168.10.250
    8B.) Delete Virtual IP for Analytics Collector
    ..........................................................
    9. ) Test Analytics Data Collector Connectivity
    A. ) Prepare and Deploy SINGLE Data Collector Setting
    B. ) Prepare and Deploy HA Analytics Data Collector Setting
    C. ) Prepare and Deploy GEO-HA Analytics Data Collector Setting
    D. ) Copy Collector setting to other nodes
    E. ) Add a new Collector node to existing cluster
    F. ) Sync Config with NorthStar App
    ..........................................................

    Please select a number to modify.
    [<CR>=return to main menu]:
Select 9 to test connectivity between nodes. This is applicable whenever you have external analytics nodes, whether just one or a cluster of them. For example:
Please select a number to modify.
[CR=return to main menu]:
9
Validate NorthStar App configuration interface
Validate Collector configuration interface

Verifying the NorthStar version on each NorthStar App node:
NorthStar App #1 NorthStarAppServer: NorthStar-Bundle-3.1.0-20170517_195239_70090_547.x86_64

Collector #1 NorthStarAnalytics1 :
NorthStar-Bundle-3.1.0-20170517_195239_70090_547.x86_64
Collector #2 NorthStarAnalytics2 :
NorthStar-Bundle-3.1.0-20170517_195239_70090_547.x86_64
Collector #3 NorthStarAnalytics3 :
NorthStar-Bundle-3.1.0-20170517_195239_70090_547.x86_64

Checking NorthStar App connectivity...
NorthStar App #1 interface name eth1 ip 192.168.10.100: OK

Checking collector connectivity...
Collector #1 interface name eth1 ip 192.168.10.200: OK
Collector #2 interface name eth1 ip 192.168.10.201: OK
Collector #3 interface name eth1 ip 192.168.10.202: OK
Press any key to return to menu
Select A (for a single analytics node), B (for an analytics cluster), or C for analytics geo-HA to configure the node(s) for deployment.
Note:This option restarts the web process in the NorthStar application node.
For our example, select B:
Please select a number to modify.
[CR=return to main menu]:
B
Setup mode set to "cluster"

Validate NorthStar App configuration interface
Validate Collector configuration interface

Verifying the NorthStar version on each NorthStar App node:
NorthStar App #1 NorthStarAppServer: NorthStar-Bundle-3.1.0-20170517_195239_70090_547.x86_64

Verifying the NorthStar version on each Collector node:
Collector #1 NorthStarCollector1 :
NorthStar-Bundle-3.1.0-20170517_195239_70090_547.x86_64
Collector #2 NorthStarCollector2 :
NorthStar-Bundle-3.1.0-20170517_195239_70090_547.x86_64
Collector #3 NorthStarCollector3 :
NorthStar-Bundle-3.1.0-20170517_195239_70090_547.x86_64

WARNING !
The selected menu will restart nodejs process in Northstar App node
Type YES to continue...

YES
Checking NorthStar App connectivity...
NorthStar App #1 interface name eth1 ip 192.168.10.100: OK

Checking collector connectivity...
Collector #1 interface name eth1 ip 192.168.10.200: OK
Collector #2 interface name eth1 ip 192.168.10.201: OK
Collector #3 interface name eth1 ip 192.168.10.202: OK

Checking analytics process in NorthStar App node ...
Detected analytics is not in NorthStar App node #1: OK

Checking analytics process in collector node ...
Detected analytics in collector node #1: OK
Detected analytics in collector node #2: OK
Detected analytics in collector node #3: OK

External data collector set to "yes"

Sync configuration for NorthStar App #1: OK

Sync configuration for Collector #1: OK

Sync configuration for Collector #2: OK

Sync configuration for Collector #3: OK

Preparing collector #1 basic configuration ..

Uploading config files to collector01

Preparing collector #2 basic configuration ..

Uploading config files to collector02

Preparing collector #3 basic configuration ..

Uploading config files to collector03

Applying data collector config files

Applying data collector config files at NorthStar App
Deploying NorthStar App #1 collector configuration ...

Applying data collector config files at collector
Deploying collector #1 collector configuration ...
Deploying collector #2 collector configuration ...
Deploying collector #3 collector configuration ...

Deploying collector #1 zookeeper configuration ...
Wait 2 minutes before adding new node
...10 seconds
...20 seconds
...30 seconds
...40 seconds
...50 seconds
...60 seconds
...70 seconds
...80 seconds
...90 seconds
...100 seconds
...110 seconds

Deploying collector #2 zookeeper configuration ...
Wait 2 minutes before adding new node
...10 seconds
...20 seconds
...30 seconds
...40 seconds
...50 seconds
...60 seconds
...70 seconds
...80 seconds
...90 seconds
...100 seconds
...110 seconds

Deploying collector #3 zookeeper configuration ...


Restart ZooKeeper at collector #1 collector01

Restart ZooKeeper at collector #2 collector02

Restart ZooKeeper at collector #3 collector03


Restart Analytics at collector #1 collector01

Restart Analytics at collector #2 collector02

Restart Analytics at collector #3 collector03


Restart HA Agent at collector #1 collector01
Please wait for HA Agent process initialization
...10 seconds
...20 seconds

Restart HA Agent at collector #2 collector02
Please wait for HA Agent process initialization
...10 seconds
...20 seconds

Restart HA Agent at collector #3 collector03
Please wait for HA Agent process initialization
...10 seconds
...20 seconds


Restart Nodejs at Northstar App #1 pcs


Collector configurations has been applied successfully

Press any key to return to menu
This completes the installation, and telemetry data can now be sent to the analytics nodes via the analytics VIP.
Note:If you opt to send telemetry data to an individual node instead of using the VIP of the analytics cluster, and that node goes down, the streams to the node are lost. If you opt to install only one analytics node instead of an analytics cluster that uses a VIP, you run the same risk.
External Analytics Node(s)–With NorthStar HA
Figure 3 shows a sample configuration with a NorthStar HA cluster of three nodes and three analytics nodes comprising an analytics cluster, for a total of six nodes. All the nodes connect to the same Ethernet network, through the eth1 interface. In a NorthStar HA environment, you could also opt to have a single analytics node, for a total of four nodes, but analytics collection would not be protected in the event of analytics node failure.
For this scenario, you first configure the NorthStar application HA cluster according to the instructions in Configuring a NorthStar Cluster for High Availability.
Once the NorthStar HA cluster is configured, set up the external analytics cluster. The setup steps for the external analytics cluster are exactly the same as in the previous section, External Analytics Node(s)–No NorthStar HA. Once you complete them, the configuration should look like this:
    Analytics Data Collector Configuration Settings:
    (External standalone/cluster analytics server)
    ********************************************************
    Note: This configuration only applicable for analytics
    data collector installation in separate server
    ********************************************************
    .........................................................
        NorthStar App #1
             Hostname                                 : NorthStarAppServer1
             Interface
                  Name                                : eth1
                  IPv4                                : 192.168.10.100
        NorthStar App #2
             Hostname                                 : NorthStarAppServer2
             Interface
                  Name                                : eth1
                  IPv4                                : 192.168.10.101
        NorthStar App #3
             Hostname                                 : NorthStarAppServer3
             Interface
                  Name                                : eth1
                  IPv4                                : 192.168.10.102
    .........................................................
        Analytics Collector #1
             Hostname                                 : NorthStarAnalytics1
             Priority                                 : 10
             Interface
                  Name                                : eth1
                  IPv4                                : 192.168.10.200
        Analytics Collector #2
             Hostname                                 : NorthStarAnalytics2
             Priority                                 : 20
             Interface
                  Name                                : eth1
                  IPv4                                : 192.168.10.201
        Analytics Collector #3
             Hostname                                 : NorthStarAnalytics3
             Priority                                 : 30
             Interface
                  Name                                : eth1
                  IPv4                                : 192.168.10.202

    1. ) Add NorthStar App
    2. ) Add analytics data collector
    3. ) Modify NorthStar App
    4. ) Modify analytics data collector
    5A.) Remove NorthStar App
    5B.) Delete NorthStar App data
    6A.) Remove analytics data collector
    6B.) Delete analytics data collector data
    ..........................................................
    7A.) Virtual IP for Northstar App                  : 192.168.10.249
    7B.) Delete Virtual IP for Northstar App
    8A.) Virtual IP for Analytics Collector            : 192.168.10.250
    8B.) Delete Virtual IP for Analytics Collector
    ..........................................................
    9. ) Test Analytics Data Collector Connectivity
    A. ) Prepare and Deploy SINGLE Data Collector Setting
    B. ) Prepare and Deploy HA Analytics Data Collector Setting
    C. ) Prepare and Deploy GEO-HA Analytics Data Collector Setting
    D. ) Copy Collector setting to other nodes
    E. ) Add a new Collector node to existing cluster
    F. ) Sync Config with NorthStar App
    ..........................................................

    Please select a number to modify.
    [<CR>=return to main menu]:
Test connectivity between nodes by selecting 9 from the menu.
Configure the nodes for deployment by selecting B for HA analytics or C for Geo-HA analytics. This restarts the web process in the NorthStar application node.
Verifying Data Collection When You Have External Analytics Nodes
Verify that data collection is working by checking that all services are running. Only the relevant processes are shown below.
[root@NorthStarAnalytics1 ~]# supervisorctl status
analytics:elasticsearch          RUNNING   pid 4406, uptime 0:02:06
analytics:esauthproxy            RUNNING   pid 4405, uptime 0:02:06
analytics:logstash               RUNNING   pid 4407, uptime 0:02:06
infra:ha_agent                   RUNNING   pid 4583, uptime 0:00:19
infra:healthmonitor              RUNNING   pid 3491, uptime 1:01:09
infra:zookeeper                  RUNNING   pid 4324, uptime 0:03:16
listener1:listener1_00           RUNNING   pid 4325, uptime 0:03:16
The analytics node(s) should start processing all records from the network, and pushing statistics to the NorthStar node through RabbitMQ. Check the pcs.log in the NorthStar node to see the statistics being pushed to the PC server. For example:
11-28T13:18:02.174126 30749 PCServer  [NorthStar][PCServer][<-AMQP] msg=0x00004018 routing_key = ns_tunnel_traffic
11-28T13:18:02.174280 30749 PCServer  [NorthStar][PCServer][Traffic] msg=0x00005004  EF1-PE1-PE2@PE1 111094
11-28T13:18:02.174429 30749 PCServer  [NorthStar][PCServer][Traffic] msg=0x00005004  EF1-PE1-PE3@PE1 824
11-28T13:18:02.174764 30749 PCServer  [NorthStar][PCServer][Traffic] msg=0x00005004  CS1-PE3-PE3@PE3 0
11-28T13:18:02.174930 30749 PCServer  [NorthStar][PCServer][Traffic] msg=0x00005004  CS2-PE3-PE2@PE3 0
11-28T13:18:02.175067 30749 PCServer  [NorthStar][PCServer][Traffic] msg=0x00005004  EF2-PE3-PE3@PE3 0
11-28T13:18:02.175434 30749 PCServer  [NorthStar][PCServer][Traffic] msg=0x00005004  EF2-PE3-PE1@PE3 0
11-28T13:18:02.175614 30749 PCServer  [NorthStar][PCServer][Traffic] msg=0x00005004  EF1-PE3-PE1@PE3 0
11-28T13:18:02.175749 30749 PCServer  [NorthStar][PCServer][Traffic] msg=0x00005004  CS2-PE3-PE3@PE3 0
11-28T13:18:02.175873 30749 PCServer  [NorthStar][PCServer][Traffic] msg=0x00005004  CS1-PE3-PE1@PE3 0
11-28T13:18:02.175989 30749 PCServer  [NorthStar][PCServer][Traffic] msg=0x00005004  CS1-PE3-PE2@PE3 0
11-28T13:18:02.176128 30749 PCServer  [NorthStar][PCServer][Traffic] msg=0x00005004  CS2-PE3-PE1@PE3 824
11-28T13:18:02.176256 30749 PCServer  [NorthStar][PCServer][Traffic] msg=0x00005004  EF1-PE3-PE3@PE3 0
11-28T13:18:02.176393 30749 PCServer  [NorthStar][PCServer][Traffic] msg=0x00005004  EF1-PE2-PE1@PE2 112552
11-28T13:18:02.176650 30749 PCServer  [NorthStar][PCServer][Traffic] msg=0x00005004  AF1-PE2-PE1@PE2 0
11-28T13:18:02.176894 30749 PCServer  [NorthStar][PCServer][Traffic] msg=0x00005004  AF2-PE2-PE1@PE2 0
11-28T13:18:02.177059 30749 PCServer  [NorthStar][PCServer][Traffic] msg=0x00005004  EF12-PE2-PE1@PE2 0
You can also use the REST APIs to get some aggregated statistics. This tests the path from client to nodejs to Elasticsearch.
curl --insecure -X POST -H "Authorization: Bearer 7IEvYhvABrae6m1AgI+zi4V0n7UiJNA2HqliK7PfGhY=" -H "Content-Type: application/json" -d '{
"endTime": "now",
"startTime": "now-1h",
"aggregation": "avg",
"counter": "interface_stats.egress_stats.if_bps"
}' "https://localhost:8443/NorthStar/API/v2/tenant/1/statistics/device/top"
[
{
"id": {
"statisticType": "device",
"name": "vmx105",
"node": {
"topoObjectType": "node",
"hostName": "vmx105"
}
},
"interface_stats.egress_stats.if_bps": 525088
},
{
"id": {
"statisticType": "device",
"name": "PE1",
"node": {
"topoObjectType": "node",
"hostName": "PE1"
}
},
"interface_stats.egress_stats.if_bps": 228114
},
{
"id": {
"statisticType": "device",
"name": "PE2",
"node": {
"topoObjectType": "node",
"hostName": "PE2"
}
},
"interface_stats.egress_stats.if_bps": 227747
},
{
"id": {
"statisticType": "device",
"name": "PE3",
"node": {
"topoObjectType": "node",
"hostName": "PE3"
}
},
"interface_stats.egress_stats.if_bps": 6641
},
{
"id": {
"statisticType": "device",
"name": "PE4",
"node": {
"topoObjectType": "node",
"hostName": "PE4"
}
},
"interface_stats.egress_stats.if_bps": 5930
}
]Replacing a Failed Node in an External Analytics Cluster
On the Data Collector Configuration Settings menu, options D and E can be used when physically replacing a failed node. They allow you to replace a node without having to redeploy the entire cluster.
While a node is being replaced in a three-node cluster, HA for analytics data is not guaranteed.
Replace the physical node in the network and install northstar_bundle.rpm on the replacement node. In our example, the replacement node is NorthStarAnalytics3.
Run the install-analytics.sh script to install all required dependencies such as NorthStar-JDK, NorthStar-Python, and so on. For NorthStarAnalytics3, it would look like this:
[root@NorthStarAnalytics3]# rpm -Uvh <rpm-filename>
[root@NorthStarAnalytics3]# cd /opt/northstar/northstar_bundle_x.x.x/
[root@NorthStarAnalytics3 northstar_bundle_x.x.x]# ./install-analytics.sh
groupadd: group 'pcs' already exists
package NorthStar-PCS is not installed
Loaded plugins: fastestmirror
Setting up Update Process
Loading mirror speeds from cached hostfile
northstar_bundle            | 2.9 kB     00:00 ...
No Packages marked for Update
Loaded plugins: fastestmirror
Setting up Update Process
Loading mirror speeds from cached hostfile
No Packages marked for Update
Loaded plugins: fastestmirror
Setting up Update Process
.
.
.
Set up the SSH key from an anchor node to the replacement node. The anchor node can be a NorthStar application node or one of the analytics cluster nodes (other than the replacement node). Copy the public SSH key from the anchor node to the replacement node, from the replacement node to the other nodes (NorthStar application nodes and analytics cluster nodes), and from the other nodes (NorthStar application nodes and analytics cluster nodes) to the replacement node.
For example:
[root@NorthStarAnalytics1 network-scripts]# ssh-copy-id root@192.168.10.202
root@192.168.10.202's password:
Try logging into the machine using
ssh root@192.168.10.202and check in with.ssh/authorized_keys.Run net_setup.py on the node you selected. The Main Menu is displayed:
Main Menu:
    .............................................
    A.) Host Setting
    .............................................
    B.) JunosVM Setting
    .............................................
    C.) Check Network Setting
    .............................................
    D.) Maintenance & Troubleshooting
    .............................................
    E.) HA Setting
    .............................................
    F.) Collect Trace/Log
    .............................................
    G.) Analytics Data Collector Setting
      (External standalone/cluster analytics server)
    .............................................
    H.) Setup SSH Key for external JunosVM  setup
    .............................................
    I.) Internal Analytics Setting (HA)
    .............................................
    X.) Exit
    .............................................
Please select a letter to execute.
Select G Data Collector Setting. The Data Collector Configuration Settings menu is displayed.
    Analytics Data Collector Configuration Settings:
         (External standalone/cluster analytics server)
    ********************************************************
    Note: This configuration only applicable for analytics
    data collector installation in separate server
    ********************************************************
    .........................................................
        NorthStar App #1
             Hostname                                 : NorthStarAppServer1
             Interface
                  Name                                : eth1
                  IPv4                                : 192.168.10.100
    .........................................................
        NorthStar App #2
             Hostname                                 : NorthStarAppServer2
             Interface
                  Name                                : eth1
                  IPv4                                : 192.168.10.101
    .........................................................
        NorthStar App #3
             Hostname                                 : NorthStarAppServer3
             Interface
                  Name                                : eth1
                  IPv4                                : 192.168.10.102
    .........................................................
        Analytics Collector #1
             Hostname                                 : NorthStarAnalytics1
             Priority                                 : 10
             Interface
                  Name                                : eth1
                  IPv4                                : 192.168.10.200
    .........................................................
        Analytics Collector #2
             Hostname                                 : NorthStarAnalytics2
             Priority                                 : 20
             Interface
                  Name                                : eth1
                  IPv4                                : 192.168.10.201
    .........................................................
        Analytics Collector #3
             Hostname                                 : NorthStarAnalytics3
             Priority                                 : 30
             Interface
                  Name                                : eth1
                  IPv4                                : 192.168.10.202

    1. ) Add NorthStar App
    2. ) Add analytics data collector
    3. ) Modify NorthStar App
    4. ) Modify analytics data collector
    5A.) Remove NorthStar App
    5B.) Delete NorthStar App data
    6A.) Remove analytics data collector
    6B.) Delete analytics data collector data
    ..........................................................
    7A.) Virtual IP for Northstar App                  : 192.168.10.249
    7B.) Delete Virtual IP for Northstar App
    8A.) Virtual IP for Collector                      : 192.168.10.250
    8B.) Delete Virtual IP for Analytics Collector
    ..........................................................
    9. ) Test Analytics Data Collector Connectivity
    A. ) Prepare and Deploy SINGLE Data Collector Setting
    B. ) Prepare and Deploy HA Analytics Data Collector Setting
    C. ) Prepare and Deploy GEO-HA Analytics Data Collector Setting
    D. ) Copy Collector setting to other nodes
    E. ) Add a new Collector node to existing cluster
    F. ) Sync Config with NorthStar App
    ..........................................................
    Please select a number to modify.
    [<CR>=return to main menu]:
Select option 9 to test connectivity to all NorthStar application nodes and analytics cluster nodes.
Checking NorthStar App connectivity...
NorthStar App #1 interface name eth1 ip 192.168.10.100: OK
NorthStar App #2 interface name eth1 ip 192.168.10.101: OK
NorthStar App #3 interface name eth1 ip 192.168.10.102: OK

Checking collector connectivity...
Collector #1 interface name eth1 ip 192.168.10.200: OK
Collector #2 interface name eth1 ip 192.168.10.201: OK
Collector #3 interface name eth1 ip 192.168.10.202: OK
Select option D to copy the analytics settings to the other nodes.
Validate NorthStar App configuration interface
Validate Collector configuration interface

Verifying the NorthStar version on each NorthStar App node:
NorthStar App #1 NorthStarAppServer1 : NorthStar-Bundle-3.1.0-20170517_195239_70090_547.x86_64
NorthStar App #2 NorthStarAppServer2 : NorthStar-Bundle-3.1.0-20170517_195239_70090_547.x86_64
NorthStar App #3 NorthStarAppServer3 : NorthStar-Bundle-3.1.0-20170517_195239_70090_547.x86_64

Verifying the NorthStar version on each Collector node:
Collector #1 NorthStarAnalytics1 : NorthStar-Bundle-3.1.0-20170517_195239_70090_547.x86_64
Collector #2 NorthStarAnalytics2 : NorthStar-Bundle-3.1.0-20170517_195239_70090_547.x86_64
Collector #3 NorthStarAnalytics3 : NorthStar-Bundle-3.1.0-20170517_195239_70090_547.x86_64

Checking NorthStar App connectivity...
NorthStar App #1 interface name eth1 ip 192.168.10.100: OK
NorthStar App #2 interface name eth1 ip 192.168.10.101: OK
NorthStar App #3 interface name eth1 ip 192.168.10.102: OK

Checking collector connectivity...
Collector #1 interface name eth1 ip 192.168.10.200: OK
Collector #2 interface name eth1 ip 192.168.10.201: OK
Collector #3 interface name eth1 ip 192.168.10.202: OK

Sync configuration for NorthStar App #1: OK
Sync configuration for NorthStar App #2: OK
Sync configuration for NorthStar App #3: OK

Sync configuration for Collector #1: OK
Sync configuration for Collector #2: OK
Sync configuration for Collector #3: OK
Select option E to add the replacement node to the cluster. Specify the node ID of the replacement node.
On any analytics cluster node, use the following command to check Elasticsearch cluster status. Verify that the status is “green” and the number of nodes is correct.
[root@NorthStarAnalytics1]# curl -XGET 'localhost:9200/_cluster/health?pretty'
{
"cluster_name" : "NorthStar",
"status" : "green",
"timed_out" : false,
"number_of_nodes" : 3,
"number_of_data_nodes" : 3,
"active_primary_shards" : 10,
"active_shards" : 10,
"relocating_shards" : 0,
"initializing_shards" : 0,
"unassigned_shards" : 0,
"delayed_unassigned_shards" : 0,
"number_of_pending_tasks" : 0,
"number_of_in_flight_fetch" : 0,
"task_max_waiting_in_queue_millis" : 0,
"active_shards_percent_as_number" : 100.0
}
Collectors Installed on the NorthStar HA Cluster Nodes
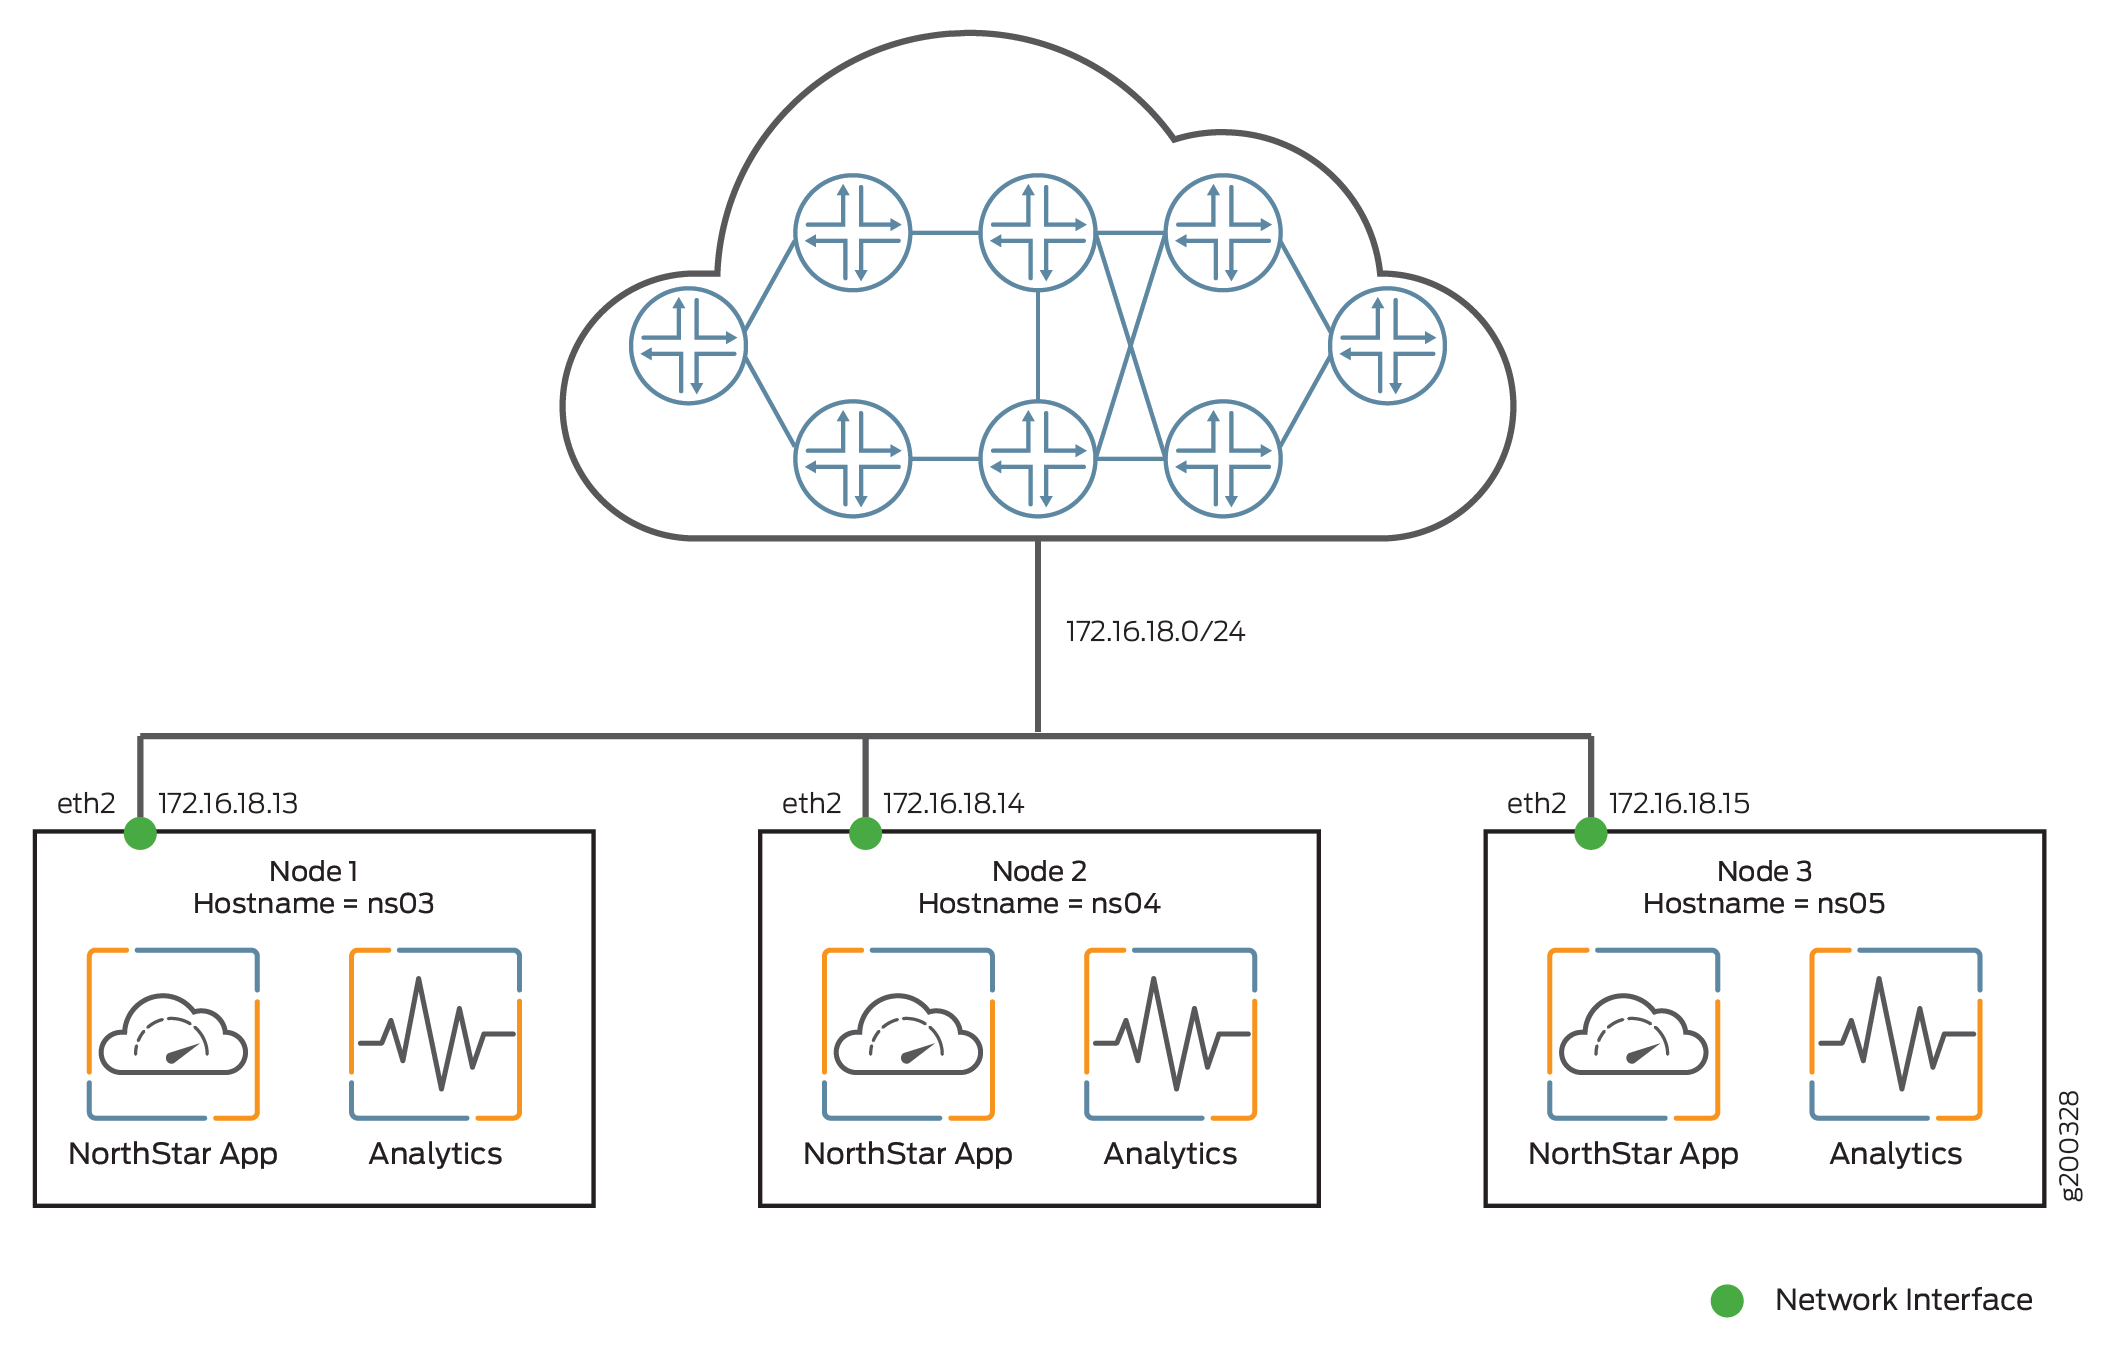
In a NorthStar HA environment, you can achieve failover protection simultaneously for the NorthStar application and for analytics by setting up each node in the NorthStar cluster to also serve as an analytics node. Because nothing is external to the NorthStar cluster, your total number of nodes is the number in the NorthStar cluster (minimum of three). Figure 4 shows this installation scenario.
To set up this scenario, you first install both the NorthStar application and analytics on each of the standalone nodes, configure the nodes to be an HA cluster, and finally, configure the nodes to be an analytics cluster. Follow these steps:
On each NorthStar application node, install the NorthStar Controller application, using the install.sh script. See the Installing the NorthStar Controller.
On each node, install northstar_bundle.rpm, and run the install-analytics.sh script. The script installs all required dependencies such as NorthStar-JDK, NorthStar-Python, and so on. For node ns03 in the example, it would look like this:
[root@ns03]# rpm -Uvh <rpm-filename>
[root@ns03]# cd /opt/northstar/northstar_bundle_x.x.x/
[root@ns03 northstar_bundle_x.x.x]# ./install-analytics.sh
groupadd: group 'pcs' already exists
package NorthStar-PCS is not installed
Loaded plugins: fastestmirror
Setting up Update Process
Loading mirror speeds from cached hostfile
northstar_bundle            | 2.9 kB     00:00 ...
No Packages marked for Update
Loaded plugins: fastestmirror
Setting up Update Process
Loading mirror speeds from cached hostfile
No Packages marked for Update
Loaded plugins: fastestmirror
Setting up Update Process
.
.
.
Use the following command on each node to ensure that the three analytics processes are installed and running:
[root@ns03 ~]# supervisorctl status | grep analytics:*
analytics:elasticsearch          RUNNING   pid 16238, uptime 20:58:37
analytics:esauthproxy            RUNNING   pid 16237, uptime 20:58:37
analytics:logstash               RUNNING   pid 3643, uptime 20:13:08
Follow the instructions in Configuring a NorthStar Cluster for High Availability to configure the nodes for NorthStar HA. This involves running the net_setup.py utility, selecting E to access the HA Setup menu, and completing the HA setup steps using that menu.
From the HA Setup menu, press Enter to return to the main net_setup.py menu. The Main Menu is displayed:
Main Menu:
    .............................................
    A.) Host Setting
    .............................................
    B.) JunosVM Setting
    .............................................
    C.) Check Network Setting
    .............................................
    D.) Maintenance & Troubleshooting
    .............................................
    E.) HA Setting
    .............................................
    F.) Collect Trace/Log
    .............................................
    G.) Data Collector Setting
      (External standalone/cluster analytics server)
    .............................................
    H.) Setup SSH Key for external JunosVM  setup
    .............................................
    I.) Internal Analytics Setting (HA)
    .............................................
    X.) Exit
    .............................................
Please select a letter to execute.
Select I to proceed. This menu option applies the settings you have already configured for your NorthStar HA cluster, so you do not need to make any changes.
Internal Analytics Configuration HA Settings: ******************************************************** Note: This configuration only applicable for analytics installation in the same server ******************************************************** .......................................................... Node #1 Hostname : ns03 Priority : 10 Cluster Communication Interface : eth2 Cluster Communication IP : 172.16.18.13 Interfaces Interface #1 Name : eth2 IPv4 : 172.16.18.13 Switchover : yes Interface #2 Name : mgmt0 IPv4 : Switchover : yes Interface #3 Interface #4 Interface #5 Node #2 Hostname : ns04 Priority : 20 Cluster Communication Interface : eth2 Cluster Communication IP : 172.16.18.14 Interfaces Interface #1 Name : eth2 IPv4 : 172.16.18.14 Switchover : yes Interface #2 Name : mgmt0 IPv4 : Switchover : yes Interface #3 Interface #4 Interface #5 Node #3 Hostname : ns05 Priority : 30 Cluster Communication Interface : eth2 Cluster Communication IP : 172.16.18.15 Interfaces Interface #1 Name : eth2 IPv4 : 172.16.18.15 Switchover : yes Interface #2 Name : mgmt0 IPv4 : Switchover : yes Interface #3 Interface #4 Interface #5 .......................................................... 1.) Prepare and Deploy Internal Analytics HA configs .......................................................... Please select a number to modify. [<CR>=return to main menu]:Note:Depending on the geographical location of the nodes, you might want to use analytics geo-HA instead of setting up internal analytics. In that case, instead of selecting I, you would select G to access the Analytics Data Collector Configuration Settings. After updating those settings, select C (Prepare and Deploy GEO-HA Analytics Data Collector Setting). Step 7 below would not apply.
Select 1 to set up the NorthStar HA cluster for analytics.
WARNING !
The selected menu will restart analytics processes in each cluster member
Type YES to continue...
YES

Checking connectivity of cluster_communication_interface...
Cluster communications status for node ns03 cluster interface eth2 ip 172.16.18.13: OK
Cluster communications status for node ns04 cluster interface eth2 ip 172.16.18.14: OK
Cluster communications status for node ns05 cluster interface eth2 ip 172.16.18.15: OK


Verifying the NorthStar version on each node:
ns03 : NorthStar-Bundle-18.1.0-20180412_071430_72952_187.x86_64
ns04 : NorthStar-Bundle-18.1.0-20180412_071430_72952_187.x86_64
ns05 : NorthStar-Bundle-18.1.0-20180412_071430_72952_187.x86_64

Checking analytics process in each node ...
Detected analytics in node #1 ns03: OK
Detected analytics in node #2 ns04: OK
Detected analytics in node #3 ns05: OK

Applying analytics config files
Deploying analytics configuration in node #1 ns03
Deploying analytics configuration in node #2 ns04
Deploying analytics configuration in node #3 ns05


Restart Analytics at node #1 ns03

Restart Analytics at node #2 ns04

Restart Analytics at node #3 ns05


Internal analytics configurations has been applied successfully

Press any key to return to menu
On any analytics node, use the following command to check elasticsearch cluster status. Verify that the status is “green” and the number of nodes is correct.
[root@ns03 ~]# curl -XGET 'localhost:9200/_cluster/health?pretty'
{
  "cluster_name" : "NorthStar",
  "status" : "green",
  "timed_out" : false,
  "number_of_nodes" : 3,
  "number_of_data_nodes" : 3,
  "active_primary_shards" : 10,
  "active_shards" : 10,
  "relocating_shards" : 0,
  "initializing_shards" : 0,
  "unassigned_shards" : 0,
  "delayed_unassigned_shards" : 0,
  "number_of_pending_tasks" : 0,
  "number_of_in_flight_fetch" : 0,
  "task_max_waiting_in_queue_millis" : 0,
  "active_shards_percent_as_number" : 100.0
}
Troubleshooting Logs
The following logs are available to help with troubleshooting:
/opt/northstar/logs/elasticsearch.msg
/opt/northstar/logs/logstash.msg
/opt/northstar/logs/logstash.log
See Logs in the NorthStar Controller User Guide for more information.