Install Juniper Secure Connect on macOS
SUMMARY Learn about how to create rollout packages for Juniper Secure Connect application software and step-by-step procedures to install Juniper Secure Connect on macOS platform. If you want to install Juniper Secure Connect application, see Manual Installation of Juniper Secure Connect. If you are an administrator, see Create Rollout Packages for Juniper Secure Connect Installation section to prepare the installer for software rollout.
What's Next
Download the Juniper Secure Connect application software from here. See release notes for more details.
For more information on Juniper Secure Connect GUI elements, see Juniper Secure Connect GUI Elements.
For more information on Juniper Secure Connect features and how to configure the options, see Connection Menu, View Menu, Log Menu, and Help Menu.
Manual Installation of Juniper Secure Connect
Following are the steps to install the Juniper Secure Connect on your macOS machine.
Custom Branding Option (macOS)
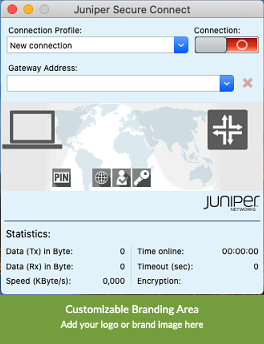
Juniper Secure Connect for macOS allows you to add your own logo or branding image. It also allows you to add HTML page for the branding image that would open when you click on the branding area in the Juniper Secure Connect. The HTML page is optional where you can provide any information you want. You should customise the installation package for branding your client. For detailed instructions, see Create Rollout Packages for Juniper Secure Connect Installation (macOS) .
Figure 12 is the sample screen, where the customizable branding area is highlighted:

Create Rollout Packages for Juniper Secure Connect Installation
As a system administrator, you can also build your own rollout packages, if required. Building the rollout packages is an optional step. When you create rollout packages for Juniper Secure Connect application, you can install the application across the organization. Read the following steps to learn how you, as a system administrator can prepare the Juniper Secure Connect installer for the software rollout.
Juniper Secure Connect provides the installer for macOS as a disk image (.dmg) file. First you need to mount the package that is located inside the .dmg file. To do this, double-click its icon in the Finder. It should then mount the image and display its contents. You can see the installer package and the uninstall program when you double-click the image file in the Finder window.
Note that the .dmg file is write-protected and as a system administrator you must first convert the .dmg file into a read or write format. You also must convert and resize the image before distributing the installer to users.
You’ve successfully created the rollout package and ready to distribute Juniper Secure Connect installer. The newly created .dmg file is the installer.


