示例:启用 BGP 路由通告
Junos OS 不会将从某个 EBGP 对等方获知的路由播发回同一个外部 BGP (EBGP) 对等方。此外,无论路由实例如何,软件都不会将这些路由播发至与始发对等方相同的自治系统 (AS) 中的任何 EBGP 对等方。您可以通过在配置中包含 advertise-peer-as 语句来修改此行为。
如果在配置中包含语句 advertise-peer-as ,则无论此检查如何,BGP 都会播发路由。
要恢复默认行为, no-advertise-peer-as 请在配置中包含该语句:
no-advertise-peer-as;
如果配置中包含路由 as-override 抑制缺省行为,则会禁用该语句。如果在配置中同时包含 and as-override no-advertise-peer-as 语句,则会忽略该 no-advertise-peer-as 语句。
要求
在配置此示例之前,不需要除设备初始化之外的特殊配置。
此示例已在 Junos 21.2R1 版上更新并重新验证。
概述
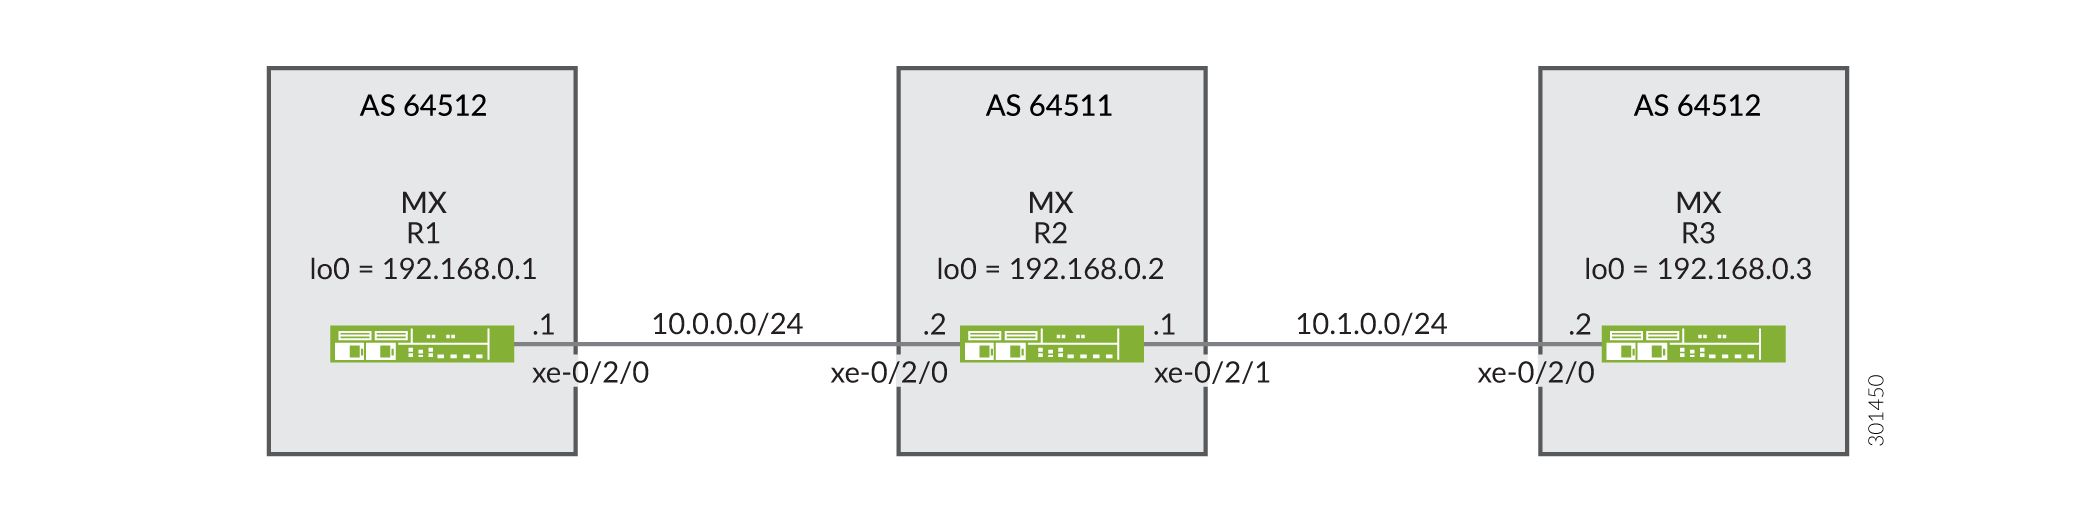
此示例显示了具有外部 BGP (EBGP) 连接的三个路由设备。设备 R2 有一个到设备 R1 的 EBGP 连接,另一个连接到设备 R3 的 EBGP 连接。尽管被位于 AS 64511 中的设备 R2 分隔,但设备 R1 和设备 R3 在同一 AS (AS 64512) 中。设备 R1 和设备 R3 向 BGP 直接路由播发至各自的环路接口地址。
设备 R2 接收这些环路接口路由,并且该 advertise peer-as 语句允许设备 R2 通告这些路由。具体而言,设备 R1 将 192.168.0.1 路由发送到设备 R2,由于设备 R2 已配置, advertise peer-as 因此设备 R2 可以将 192.168.0.1 路由发送到设备 R3。同样,设备 R3 将 192.168.0.3 路由发送到设备 R2,并使 advertise peer-as 设备 R2 能够将路由转发到设备 R1。
要使设备 R1 和设备 R3 接受在 AS 路径中包含其自己的 AS 编号的路由,需要对 loops 2 设备 R1 和设备 R3 使用该语句。
拓扑学
配置
CLI 快速配置
要快速配置此示例,请复制以下命令,将其粘贴到文本文件中,删除所有换行符,更改与您的网络配置匹配所需的任何详细信息,然后将命令复制并粘贴到层次结构级别的 CLI [edit] 中。
设备 R1
set interfaces xe-0/2/0 description R1-to-R2
set interfaces xe-0/2/0 unit 0 family inet address 10.0.0.1/30
set interfaces lo0 unit 0 family inet address 192.168.0.1/32
set protocols bgp family inet unicast loops 2
set protocols bgp group ext type external
set protocols bgp group ext export send-direct
set protocols bgp group ext peer-as 64511
set protocols bgp group ext neighbor 10.0.0.2
set policy-options policy-statement send-direct term 1 from protocol direct
set policy-options policy-statement send-direct term 1 then accept
set routing-options autonomous-system 64512
设备 R2
set interfaces xe-0/2/0 description R2-to-R1
set interfaces xe-0/2/0 unit 0 family inet address 10.0.0.2/30
set interfaces xe-0/2/1 description R2-to-R3
set interfaces xe-0/2/1 unit 0 family inet address 10.1.0.1/30
set interfaces lo0 unit 0 family inet address 192.168.0.2/32
set protocols bgp group ext type external
set protocols bgp group ext advertise-peer-as
set protocols bgp group ext export send-direct
set protocols bgp group ext neighbor 10.0.0.1 peer-as 64512
set protocols bgp group ext neighbor 10.1.0.2 peer-as 64512
set policy-options policy-statement send-direct term 1 from protocol direct
set policy-options policy-statement send-direct term 1 then accept
set routing-options autonomous-system 64511
设备 R3
set interfaces xe-0/2/0 description R3-to-R2
set interfaces xe-0/2/0 unit 0 family inet address 10.1.0.2/30
set interfaces lo0 unit 0 family inet address 192.168.0.3/32
set protocols bgp family inet unicast loops 2
set protocols bgp group ext type external
set protocols bgp group ext export send-direct
set protocols bgp group ext peer-as 64511
set protocols bgp group ext neighbor 10.1.0.1
set policy-options policy-statement send-direct term 1 from protocol direct
set policy-options policy-statement send-direct term 1 then accept
set routing-options autonomous-system 64512
程序
分步过程
以下示例要求您在配置层次结构中导航各个级别。有关导航 CLI 的信息,请参阅《Junos OS CLI 用户指南》中的在配置模式下使用 CLI 编辑器。
要配置设备 R1:
-
配置设备接口。
[edit interfaces]
user@R1# set xe-0/2/0 description R1-to-R2
user@R1# set xe-0/2/0 unit 0 family inet address 10.0.0.1/30
user@R1# set lo0 unit 0 family inet address 192.168.0.1/32
-
配置 BGP。
[edit protocols bgp group ext]
user@R1# set type external
user@R1# set peer-as 64511
user@R1# set neighbor 10.0.0.2
-
通过包含
loops 2语句,防止来自设备 R3 的路由在设备 R1 上被隐藏。该
loops 2语句意味着本地设备自己的 AS 编号最多可以在 AS 路径中出现一次,而不会导致路由被隐藏。如果在路径中检测到本地设备的 AS 编号两次或更多次,则路由将被隐藏。[edit protocols bgp family inet unicast] user@R1# set loops 2
-
配置发送直接路由的路由策略。
[edit policy-options policy-statement send-direct term 1]
user@R1# set from protocol direct
user@R1# set then accept
-
将导出策略应用于与设备 R2 的 BGP 对等会话。
[edit protocols bgp group ext]
user@R1# set export send-direct
-
配置自治系统 (AS) 编号。
[edit routing-options ]
user@R1# set autonomous-system 64512
分步过程
要配置设备 R2:
-
配置设备接口。
[edit interfaces]
user@R2# set xe-0/2/0 description R2-to-R1
user@R2# set xe-0/2/0 unit 0 family inet address 10.0.0.2/30
user@R2# set xe-0/2/1 description R2-to-R3
user@R2# set xe-0/2/1 unit 0 family inet address 10.1.0.1/30
user@R2# set lo0 unit 0 family inet address 192.168.0.2/32
-
配置 BGP。
[edit  protocols bgp group ext]
user@R2# set type external
user@R2# set neighbor 10.0.0.1 peer-as 64512
user@R2# set neighbor 10.1.0.2 peer-as 64512
-
配置设备 R2,以从一个 EBGP 对等方获知的路由播发至同一 AS 中的另一个 EBGP 对等方。
换句话说,播发至从设备 R3 获知的设备 R1 路由(反之亦然),即使设备 R1 和设备 R3 在同一 AS 中。
[edit  protocols bgp group ext]
user@R2# set advertise-peer-as
-
配置发送直接路由的路由策略。
[edit policy-options policy-statement send-direct term 1]
user@R2# set from protocol direct
user@R2# set then accept
-
应用导出策略。
[edit protocols bgp group ext]
user@R2# set export send-direct
-
配置 AS 编号。
[edit routing-options]
user@R2# set autonomous-system 64511
结果
在配置模式下,输入 show interfaces 、show protocols、show policy-options 和 show routing-options 命令,以确认您的配置。如果输出未显示预期的配置,请重复此示例中的说明,以便进行更正。
设备 R1
user@R1# show interfaces
xe-0/2/0 {
    description R1-to-R2;
    unit 0 {
        family inet {
            address 10.0.0.1/30;
        }
    }
}
lo0 {
    unit 0 {
        family inet {
            address 192.168.0.1/32;
        }
    }
}
user@R1# show protocols
bgp {
    family inet {
        unicast {
            loops 2;
        }
    }
    group ext {
        type external;
        export send-direct;
        peer-as 64511;
        neighbor 10.0.0.2;
    }
}
user@R1# show policy-options
policy-statement send-direct {
    term 1 {
        from protocol direct;
        then accept;
    }
}
user@R1# show routing-options
autonomous-system 64512;
设备 R2
user@R2# show interfaces
xe-0/2/0 {
    description R2-to-R1;
    unit 0 {
        family inet {
            address 10.0.0.2/30;
        }
    }
}
xe-0/2/1 {
    description R2-to-R3;
    unit 0 {
        family inet {
            address 10.1.0.1/30;
        }
    }
}
lo0 {
    unit 0 {
        family inet {
            address 192.168.0.2/32;
        }
    }
}
user@R2# show protocols
bgp {
    group ext {
        type external;
        advertise-peer-as;
        export send-direct;
        neighbor 10.0.0.1 {
            peer-as 64512;
        }
        neighbor 10.1.0.2 {
            peer-as 64512;
        }
    }
}
user@R2# show policy-options
policy-statement send-direct {
    term 1 {
        from protocol direct;
        then accept;
    }
}
user@R2# show routing-options
autonomous-system 64511;
如果完成设备配置,请从配置模式输入 commit 。
验证
确认配置工作正常。
验证 BGP 路由
目的
确保设备 R1 和设备 R3 上的路由表包含预期的路由。
操作
-
在设备 R2 上,停用
advertise-peer-asBGP 配置中的语句。[edit protocols bgp group ext] user@R2# deactivate advertise-peer-as user@R2# commit
-
在设备 R3 上,停用
loopsBGP 配置中的语句。[edit protocols bgp family inet unicast ] user@R3# deactivate unicast loops user@R3# commit
-
在设备 R1 上,检查向设备 R2 播发的路由。
user@R1> show route advertising-protocol bgp 10.0.0.2
inet.0: 5 destinations, 6 routes (5 active, 0 holddown, 0 hidden)
  Prefix                  Nexthop              MED     Lclpref    AS path
* 10.0.0.0/30             Self                                    I
* 192.168.0.1/32          Self                                    I
-
在设备 R2 上,检查从设备 R1 接收的路由。
user@R2> show route receive-protocol bgp 10.0.0.1
inet.0: 7 destinations, 9 routes (7 active, 0 holddown, 0 hidden)
  Prefix                  Nexthop              MED     Lclpref    AS path
  10.0.0.0/30             10.0.0.1                                64512 I
* 192.168.0.1/32          10.0.0.1                                64512 I
-
在设备 R2 上,检查向设备 R3 播发的路由。
user@R2> show route advertising-protocol bgp 10.1.0.2
inet.0: 7 destinations, 9 routes (7 active, 0 holddown, 0 hidden)
  Prefix                  Nexthop              MED     Lclpref    AS path
* 10.0.0.0/30             Self                                    I
* 10.1.0.0/30             Self                                    I
* 192.168.0.2/32          Self                                    I
-
在设备 R2 上,激活
advertise-peer-asBGP 配置中的语句。[edit protocols bgp group ext] user@R2# activate advertise-peer-as user@R2# commit
-
在设备 R2 上,重新检查播发到设备 R3 的路由。
user@R2> show route advertising-protocol bgp 10.1.0.2
inet.0: 7 destinations, 9 routes (7 active, 0 holddown, 0 hidden)
  Prefix                  Nexthop              MED     Lclpref    AS path
* 10.0.0.0/30             Self                                    I
* 10.1.0.0/30             Self                                    I
* 192.168.0.1/32          Self             64512 I
* 192.168.0.2/32          Self                                    I
* 192.168.0.3/32          10.1.0.2         64512 I
-
在设备 R3 上,检查从设备 R2 接收的路由。
user@R3> show route receive-protocol bgp 10.1.0.1
inet.0: 5 destinations, 6 routes (5 active, 0 holddown, 0 hidden)
  Prefix                  Nexthop              MED     Lclpref    AS path
* 10.0.0.0/30             10.1.0.1                                64511 I
  10.1.0.0/30             10.1.0.1                                64511 I
* 192.168.0.2/32          10.1.0.1                                64511 I
-
在设备 R3 上,激活
loopsBGP 配置中的语句。[edit protocols bgp family inet unicast ] user@R3# activate unicast loops user@R3# commit
-
在设备 R3 上,重新检查从设备 R2 接收的路由。
user@R3> show route receive-protocol bgp 10.1.0.1
inet.0: 6 destinations, 8 routes (6 active, 0 holddown, 1 hidden)
  Prefix                  Nexthop              MED     Lclpref    AS path
* 10.0.0.0/30             10.1.0.1                                64511 I
  10.1.0.0/30             10.1.0.1                                64511 I
* 192.168.0.1/32          10.1.0.1                                64511 64512 I
* 192.168.0.2/32          10.1.0.1                                64511 I
意义
首先停用 advertise-peer-as 语句和 loops 语句,以便可以检查默认行为。设备 R1 向设备 R2 发送指向设备 R1 环路接口地址 192.168.0.1/32 的路由。设备 R2 不会将此路由播发到设备 R3。激活 advertise-peer-as 语句后,设备 R2 会将 192.168.0.1/32 路由播发至设备 R3。设备 R3 在激活语句之前 loops 不接受此路由。