Help us improve your experience.

Let us know what you think.

Do you have time for a two-minute survey?


Configure Junos OS on the SRX4300

We ship the SRX4300 Firewall with preinstalled Junos OS, which is ready to be configured when you power on the device. You can use the J-Web GUI, Juniper® Security Director on Premise, Juniper® Security Director Cloud, or the CLI to perform the initial configuration.

Configuring the SRX4300 Using J-Web

The J-Web interface is a Web-based graphical interface that allows you to operate a firewall without commands.

To access the J-Web interface on a new device that has the factory-default configuration:

  1. Connect the management port (fxp0) port on your device to the Ethernet port on the management device (laptop or PC), using an RJ-45 cable.
  2. Manually configure the management device with a compatible IP address in the 192.168.1.0 network (for example, 192.168.1.2). Do not use the 192.168.1.1 IP address for the management device as this IP address is assigned to the fxp0 interface.
  3. Open a browser and enter https://192.168.1.1 in the address bar.

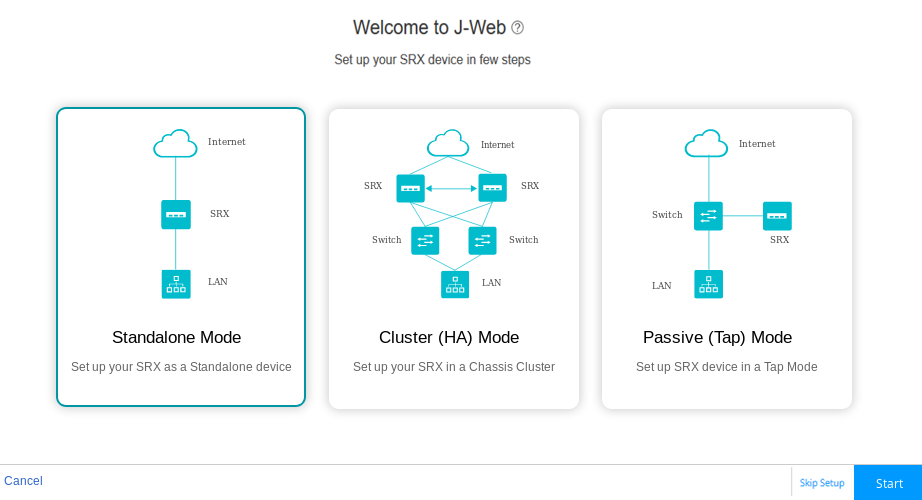
    The J-Web Setup page opens. You can choose one of the following setup modes to configure the device:

    • Standalone mode—In this mode, you can configure basic settings such as device credentials, time, management interface, zones and interfaces, and DNS servers and default gateways.

    • Cluster (HA) mode—In cluster mode, a pair of devices are connected and configured to operate like a single node, providing device, interface, and service level redundancy.

    • Passive (Tap) mode—TAP mode allows you to passively monitor traffic flows across a network. If intrusion prevention system (IPS) is enabled, then the TAP mode inspects the incoming and outgoing traffic to detect the number of threats.

  4. Select the setup mode that you want to use to configure the device and click Start.

    The Setup Wizard page appears.

  5. Follow the instructions in Configure SRX Devices Using the J-Web Setup Wizard to configure your device.

Configure the SRX4300 using Juniper® Security Director Cloud

Juniper® Security Director Cloud is a cloud-based software-as-a-solution (SaaS) portal that helps you securely migrate your network to a Secure Access Service Edge (SASE) architecture.

Follow the instructions in the Juniper Security Director Cloud Quick Start guide to configure your device.

Accessing the CLI on the SRX4300

To access the CLI on your device:
  1. Connect the management device to the serial console port as described in Connect Your Device to a Management Console Using an RJ-45 Connector.
  2. Start your asynchronous terminal emulation application (such as Microsoft Windows HyperTerminal) and select the appropriate COM port to use (for example, COM1).
  3. Configure the serial port settings with the following values:
    • Baud rate—9600

    • Parity—N

    • Data bits—8

    • Stop bits—1

    • Flow control—none

  4. Power on the device. You can start performing initial software configuration on the device after the device is up.
    Note:

    After you have completed the initial configuration, you can connect your device to a network for out-of-band management as described in Connect Your Device to a Network for Out-of-Band Management.

Configuring Root Authentication and the Management Interface from the CLI

You must perform the initial configuration of the device through the console port.

Gather the following information before configuring the device:

  • Root authentication

  • IP address of the management interface

  • Default route

To configure root authentication and the management interface:

  1. Log in as root. There is no password.
  2. Start the CLI and enter configuration mode.
  3. Set the root authentication password. You can enter a cleartext password, an encrypted password, or an SSH public key string (DSA or RSA).
  4. Commit the configuration to activate it on the device.
  5. Configure the IP address and prefix length for the Ethernet management interface on the device.
  6. Configure the default route.
  7. Enable Web access to launch J-Web.
  8. Commit the configuration changes.

Factory-Default Configuration of the SRX4300

Your firewall comes configured with a factory-default configuration. The default configuration includes the following security configuration:

  • Two security zones are created: trust and untrust.

  • A security policy is created that permits outbound traffic from the trust zone to the untrust zone.

  • Source Network Address Translation (NAT) is configured on the trust zone.

If the current active configuration fails, you can use the load factory-default command to revert to the factory-default configuration.

Viewing the SRX4300 Firewall Factory-Default Configuration

To view the factory-default configuration of the firewall using the CLI:

  1. Log in as the root user and provide your credentials.
  2. View the list of default configuration files:
  3. View the required default configuration file.