OS-Specific DoS Attack
OS-specific DoS attack focuses on one-packet or two-packet kills. These attacks include the Ping of Death attack, the Teardrop attack, and the WinNuke attack. The Junos OS has the capability to mitigate these attacks, For more information, see the following topics:
OS-Specific DoS Attacks Overview
If an attacker not only identifies the IP address and responsive port numbers of an active host but also its operating system (OS), instead of resorting to brute-force attacks, the attacker can launch more elegant attacks that can produce one-packet or two-packet “kills.”
OS-specific denial-of-service (DoS) attacks, including ping of death attacks, teardrop attacks, and WinNuke attacks, can cripple a system with minimal effort. If Junos OS is protecting hosts susceptible to these attacks, you can configure Junos OS to detect these attacks and block them before they reach their target.
Understanding Ping of Death Attacks
OS-specific DoS attacks, such as ping of death attacks, can cripple a system with minimal effort.
The maximum allowable IP packet size is 65,535 bytes, including the packet header, which is typically 20 bytes. An ICMP echo request is an IP packet with a pseudo header, which is 8 bytes. Therefore, the maximum allowable size of the data area of an ICMP echo request is 65,507 bytes (65,535 - 20 - 8 = 65,507).
However, many ping implementations allow the user to specify a packet size larger than 65,507 bytes. A grossly oversized ICMP packet can trigger a range of adverse system reactions such as denial of service (DoS), crashing, freezing, and rebooting.
When you enable the ping of death screen option, Junos OS detects and rejects such oversized and irregular packet sizes even when the attacker hides the total packet size by fragmenting it. See Figure 1.
For information about IP specifications, see RFC 791, Internet Protocol. For information about ICMP specifications, see RFC 792, Internet Control Message Protocol. For information about ping of death attacks, see http://www.insecure.org/sploits/ping-o-death.html.

Junos OS supports ping of death protection for both IPv4 and IPv6 packets.
Example: Protecting Against a Ping of Death Attack
This example shows how to protect against a ping-of-death attack.
Requirements
No special configuration beyond device initialization is required before configuring this feature.
Overview
In this example, you enable protection against a ping-of-death attack and specify the zone where the attack originates.
Configuration
Procedure
Step-by-Step Procedure
To enable protection against a ping of death:
Specify the screen object name.
[edit]
user@host# set security screen ids-option ping-death icmp ping-death
Set the security zone for zone screen.
[edit]
user@host# set security zones security-zone zone screen ping-death
If you are done configuring the device, commit the configuration.
[edit]
user@host# commit
Verification
To verify the configuration is working properly,
enter the show security screen ids-option ping-death and show security zones commands in operational mode.
Understanding Teardrop Attacks
OS-specific denial-of-service (DoS) attacks, such as teardrop attacks, can cripple a system with minimal effort.
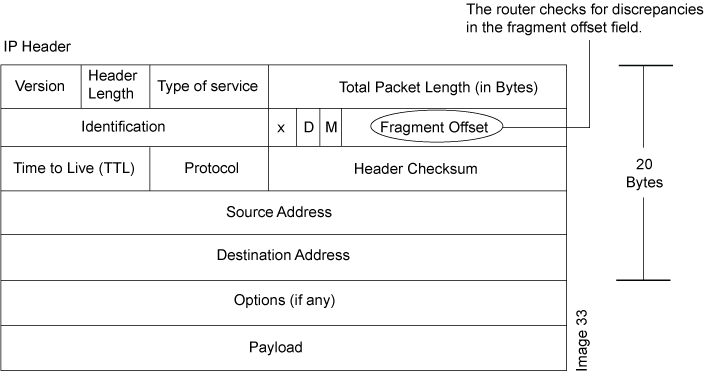
Teardrop attacks exploit the reassembly of fragmented IP packets. In the IP header, one of the fields is the fragment offset field, which indicates the starting position, or offset, of the data contained in a fragmented packet relative to the data of the original unfragmented packet. See Figure 2.

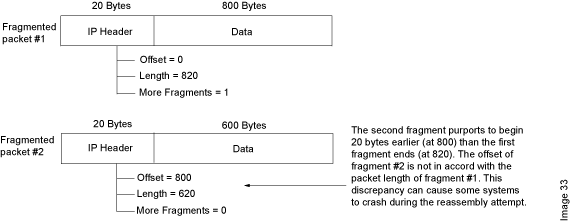
When the sum of the offset and size of one fragmented packet differ from that of the next fragmented packet, the packets overlap, and the server attempting to reassemble the packet can crash, especially if it is running an older OS that has this vulnerability. See Figure 3.

After you enable the teardrop attack screen option, whenever Junos OS detects this discrepancy in a fragmented packet, it drops it.
Junos OS supports teardrop attack prevention for both IPv4 and IPv6 packets.
Understanding WinNuke Attacks
OS-specific denial-of-service (DoS) attacks, such as WinNuke attacks, can cripple a system with minimal effort.
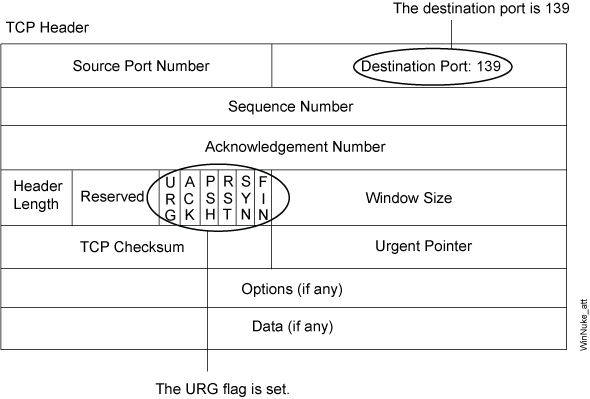
WinNuke is a DoS attack targeting any computer on the Internet running Windows. The attacker sends a TCP segment—usually to NetBIOS port 139 with the urgent (URG) flag set—to a host with an established connection (see Figure 4). This introduces a NetBIOS fragment overlap, which causes many machines running Windows to crash. After the attacked machine is rebooted, the following message appears, indicating that an attack has occurred:
An exception OE has occurred at 0028:[address] in VxD MSTCP(01) +
000041AE. This was called from 0028:[address] in VxD NDIS(01) +
00008660. It may be possible to continue normally.
Press any key to attempt to continue.
Press CTRL+ALT+DEL to restart your computer. You will lose any unsaved information in all applications.
Press any key to continue.

If you enable the WinNuke attack defense screen option, Junos OS scans any incoming Microsoft NetBIOS session service (port 139) packets. If Junos OS observes that the URG flag is set in one of those packets, it unsets the URG flag, clears the URG pointer, forwards the modified packet, and makes an entry in the event log noting that it has blocked an attempted WinNuke attack.
Junos OS supports WinNuke attack protection for both IPv4 and IPv6 traffic.
Example: Protecting Against a WinNuke Attack
This example shows how to protect against a WinNuke attack.
Requirements
No special configuration beyond device initialization is required before configuring this feature.
Overview
In this example, you enable protection against a WinNuke attack and specify the zone where the attack originates.
Configuration
Procedure
Step-by-Step Procedure
To enable protection against WinNuke attack:
Specify the screen name.
[edit]
user@host# set security screen ids-option winnuke tcp winnuke
Associate the screen with a security zone.
[edit]
user@host# set security zones security-zone zone screen winnuke
If you are done configuring the device, commit the configuration.
[edit]
user@host# commit
Verification
To verify the configuration is working properly,
enter the show security screen ids-option winnuke and show security zones commands in operational mode.
