Configure Aruba ClearPass
Learn how to configure the SRX Series Firewall to include security policies with Aruba ClearPass.
Example: Enforce Security Policy with Aruba ClearPass
This example covers how to configure security to protect your resources and control access to the internet using the SRX Series Firewall integrated ClearPass authentication and enforcement feature, which relies on the Aruba ClearPass Policy Manager as its authentication source. The SRX Series integrated ClearPass feature allows you to configure security policies that control access to company resources and the Internet by identifying users by username, group name, or the name of a role that ties together a group of users and a device type.
Today’s network environments are more open to attacks of various kinds because they support anywhere, anytime, any device access, to a greater or lesser degree, and they allow a user to use multiple concurrently network-connected devices. Because it allows you identify the user by username, the integrated ClearPass authentication and enforcement feature narrows the security gap that these capabilities introduce.
For details on how user authentication and identity information is conveyed from the CPPM to the SRX Series Firewall, see the following topics:
The example covers the following processes:
How to control access at the user level based on username or group name, not device IP address.
You can use the source-identity parameter in a security policy to specify the name of a user or the name of a group of users whose authentication is provided by the CPPM. The policy is applied to traffic generated by the users when they attempt to access a protected resource or the Internet regardless of the device used. The access control is tied to the user’s name, and not directly to the IP address of the user’s device.
You can configure different security policies for a single user that specify different actions, differentiated by the zones and the destination addresses specified or a group that the user belongs to.
How to display and interpret the contents of the ClearPass authentication table.
The SRX Series Firewall creates the ClearPass authentication table to contain user authentication and identity information that it receives from the CPPM. The device refers to the table to authenticate a user who requests access to a resource.
The ClearPass authentication table contents are dynamic. They are modified to reflect user activity in response to various events and also in regard to security policies that reference groups.
For example, when a user logs out of the network or in to the network, the ClearPass authentication table is modified, as is the case when a user is removed from a group or a referenced security policy that specifies a group that the user belongs to is deleted. In the latter case, the user entry no longer shows the user as belonging to that group.
In this example, the ClearPass authentication table contents are displayed to depict changes made because of two events. The content for the users is displayed:
Before and after a specific user logs out of the network
Before and after a referenced security policy is deleted
The entry for the user who belonged to the group referenced by the security policy is displayed before and after the policy is deleted.
Requirements
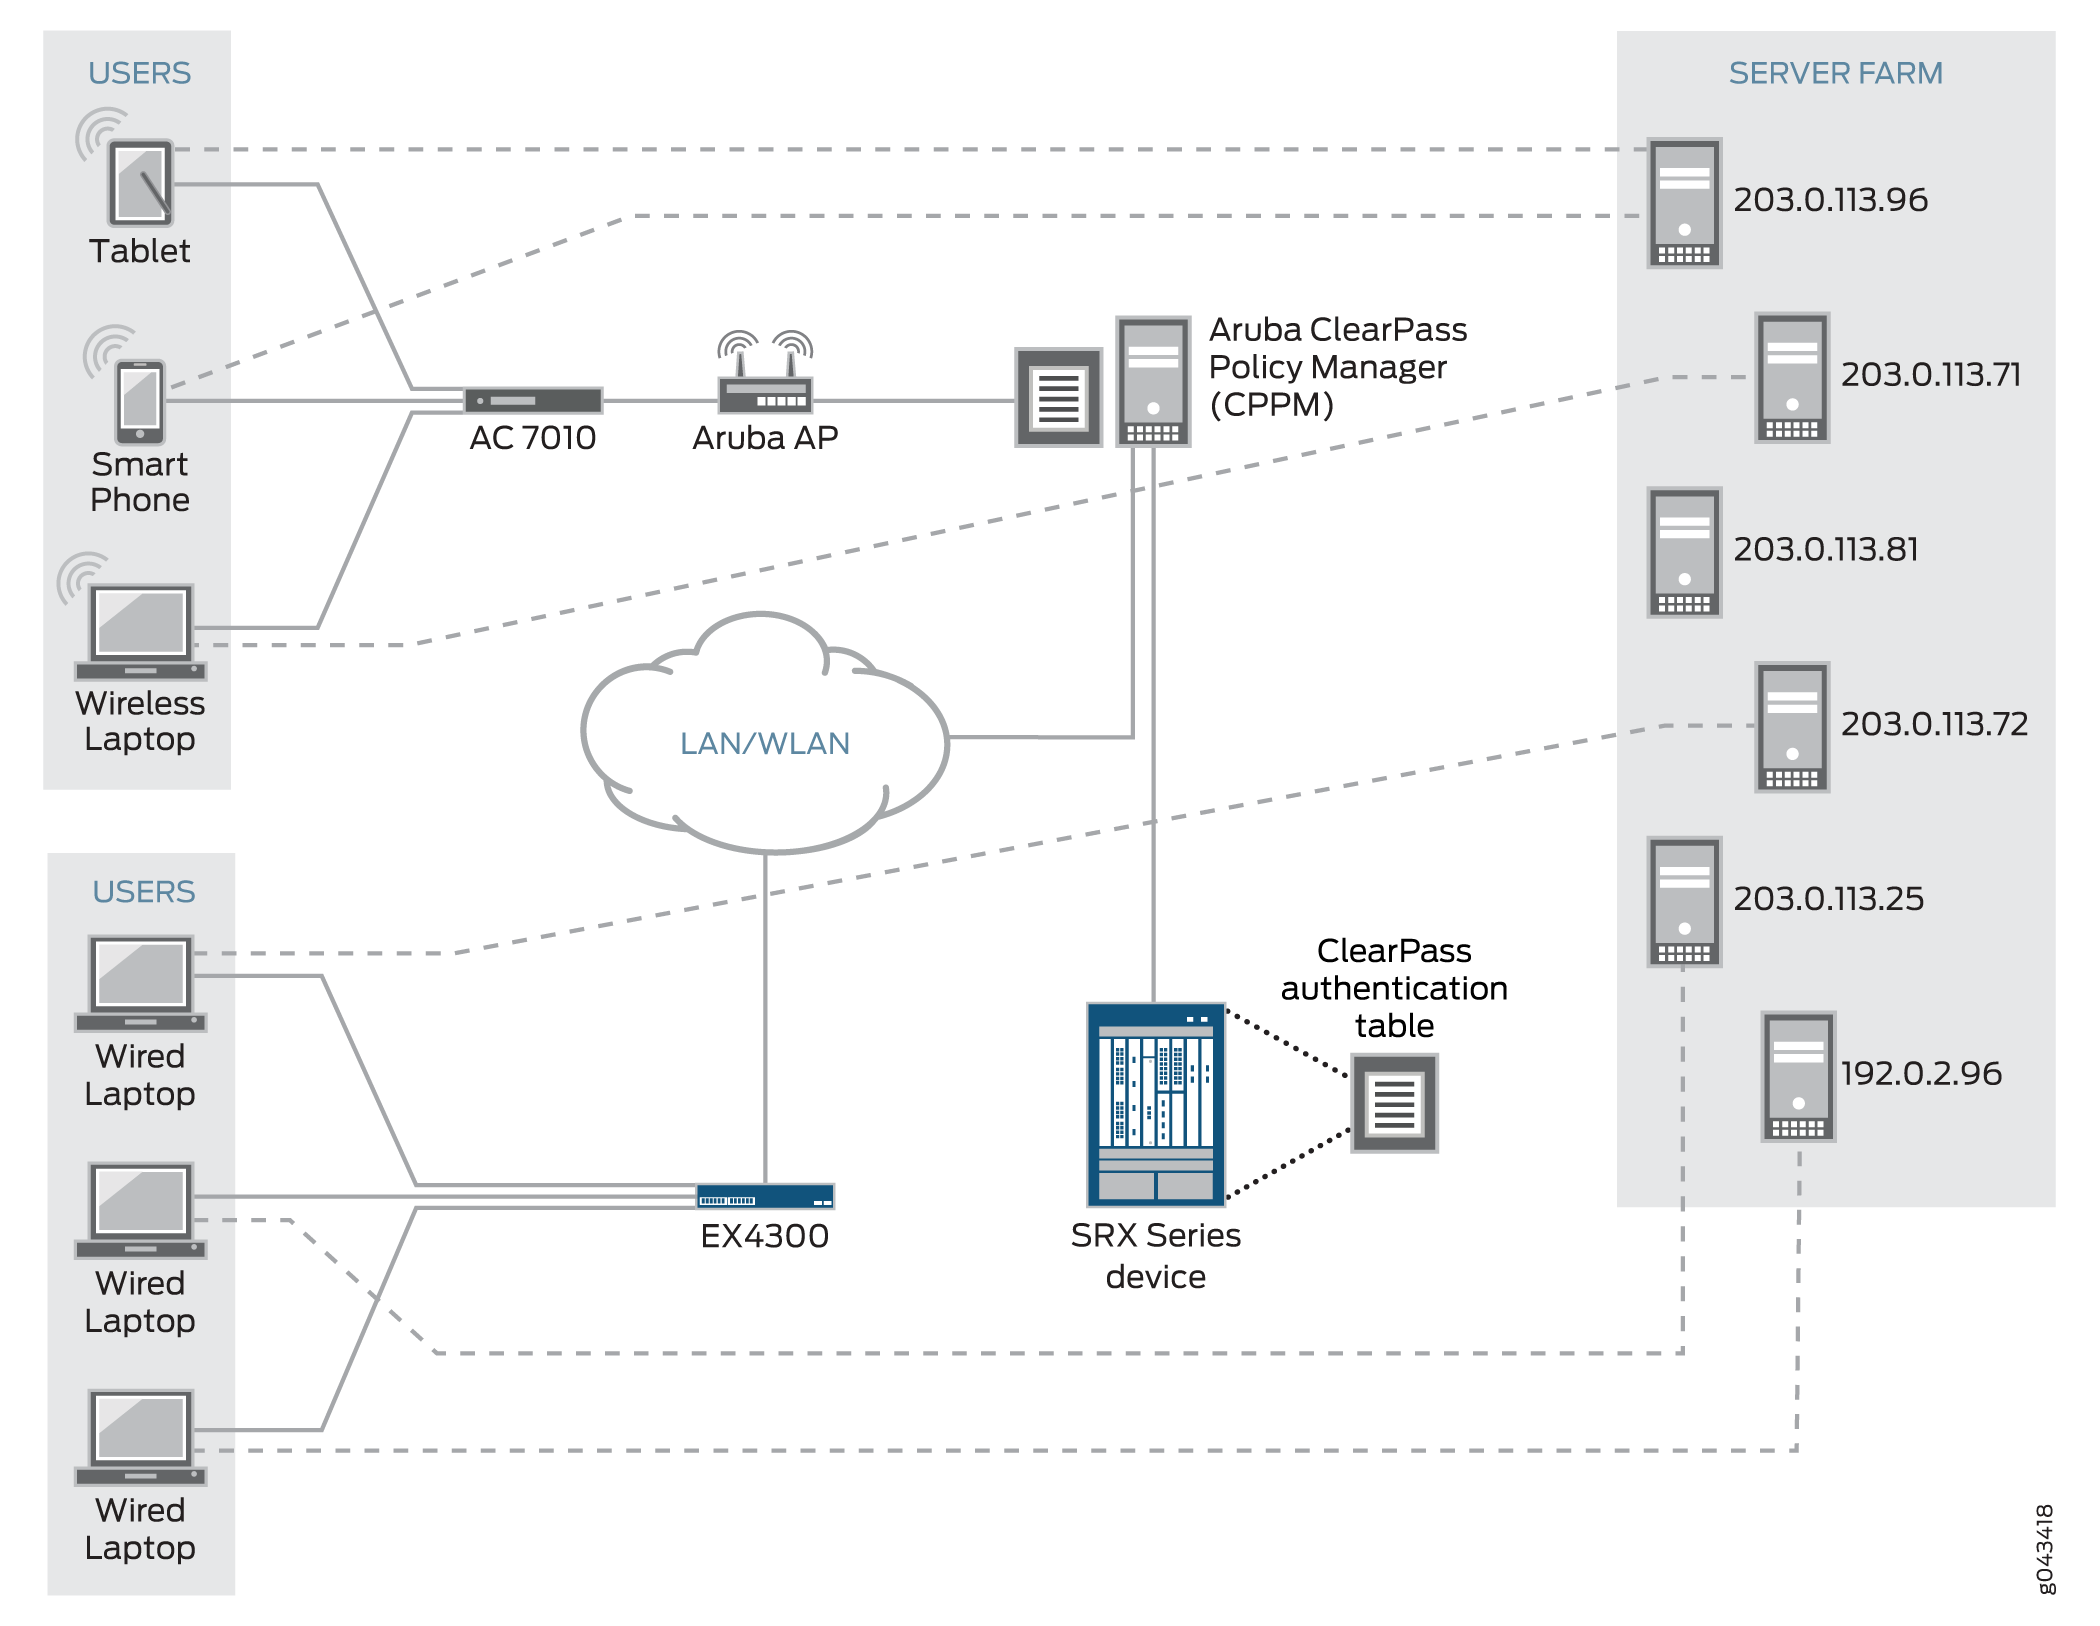
This section defines the software and hardware requirements for the topology for this example. See Figure 1 for the topology design.
The hardware and software components are:
Aruba ClearPass. The ClearPass Policy Manager (CPPM) is configured to use its local authentication source to authenticate users.
It is assumed that the CPPM is configured to provide the SRX Series Firewall with user authentication and identity information, including the username, a list of the names of any groups that the user belongs to, the IP addresses of the devices used, and the device posture token.
SRX Series Firewall running Junos OS that includes the integrated ClearPass feature.
A server farm composed of six servers, all in the servers-zone:
marketing-server-protected (203.0.113.23 )
human-resources-server (203.0.113.25 )
accounting-server (203.0.113.72)
public-server (203.0.113.62)
corporate-server (203.0.113.71)
sales-server (203.0.113.81)
AC 7010 Aruba Cloud Services Controller running ArubaOS.
Aruba AP wireless access controller running ArubaOS.
The Aruba AP is connected to the AC7010.
Wireless users connect to the CPPM through the Aruba AP.
Juniper Networks EX4300 switch used as the wired 802.1 access device.
Wired users connect to the CPPM using the EX4300 switch.
Six end-user systems:
Three wired network-connected PCs running Microsoft OS
Two BYOD devices that access the network through the Aruba AP access device
One wireless laptop running Microsoft OS
Overview
In its capacity as the authentication source for the integrated ClearPass feature, the CPPM posts to the SRX Series Firewall user authentication and identity information. When it receives this information, the SRX Series UserID daemon processes it and generates entries for the authenticated users in the Routing Engine authentication table and then synchronizes that information to the ClearPass authentication table on the Packet Forwarding Engine side.
The SRX Series Firewall requires the user authentication and identity information to verify that a user is authenticated when the user makes an access request and the traffic generated from the user’s device arrives at the SRX Series Firewall. If a security policy exists that specifies in the source-identity parameter the username or the name of a group that the user belongs to, the SRX Series Firewall searches the contents of its ClearPass authentication table for an entry for that user.
If it does not find an entry for the user in its ClearPass authentication table, the SRX Series Firewall can search its other authentication tables, if you have configured a search order that includes them. See Table 1 for information about the authentication table search order.
The integrated ClearPass feature allows you to create identity-aware security policies configured to match traffic issued by users based on their username or the name of a group that they belong to.
You configure role mappings on the CPPM, not on the SRX Series Firewall.
For example, a device type role mapping might tie user identities to company-owned computers. You could specify this role as a group in a security policy configured to apply to all users who are mapped to the rule. In this case, the conditions set by CPPM for the rule—use of company-owned computer—would apply to all users mapped to the rule. The SRX Series Firewall does not consider the conditions, but rather accepts the rule from the CPPM.
The following configurations included in this example cover security policies that are applicable based on the type of device used as defined by the CPPM through rule mappings. It is assumed that the CPPM posted to the SRX Series Firewall the following mapped rules that are used as groups in security policies:
marketing-access-for-pcs-limited-group
Maps jxchan to the device type PC.
The policy that specifies marketing-access-for-pcs-limited-group in its source-identity field allows jxchan, and other users who are mapped to it, access to the marketing-server-protected server using their PC, whether it is company owned or not.
accounting-grp-and-company-device
Maps users who belong to accounting groups using company devices. The CPPM sends the role accounting-grp-and-company-device to the SRX Series Firewall. The mapping is done on the CPPM by role mapping rules.
The policy that specifies accounting-grp-and-company-device in its source identity field allows users who are mapped to the rule to access protected resources on the accounting-server. The group accounting-grp is mapped to the rule. Therefore the mapped rule applies to the members of accounting-grp.
The user viki2 belongs to accounting-grp. If all conditions apply—that is, if viki2 is using a company-owned device and the policy permits access—she is allowed access to the resources on accounting-server. But, recall that the SRX Series Firewall does not analyze the rule. Rather it applies it to all users who are mapped to it by the CPPM.
guest-device-byod
Maps the guest group to the device type byod—that is, any user-owned device brought to the network.
The policy that specifies guest-device-byod in its source identity field denies users who are mapped to the rule access to all servers in the server zone if they are using smartphones or other user-owned devices. The username guest2 is mapped to this rule by the CPPM.
For all cases, if the users are allowed or denied access according to the security policy conditions, you can assume that the following conditions exist:
The CPPM posted the correct authentication information for the users and groups to the SRX Series Firewall.
The SRX Series Firewall processed the authenticated user information correctly and generated entries for the users and groups in its ClearPass authentication table.
Starting with Junos OS Release 15.1X49-D130, the SRX Series Firewall supports the use of IPv6 addresses associated with source identities in security policies. If IPv4 or IPv6 entry exists, policies matching that entry are applied to the traffic and access is allowed or denied.
Table 1 summarizes the users, their groups, and the zones to which they belong. All users belong to the default GLOBAL domain.
User |
Group |
Zone |
|---|---|---|
Abe (abew1) |
|
marketing-zone |
John (jxchan) |
|
marketing-zone |
Lin (lchen1) |
|
human-resources-zone |
Viki (viki2) |
|
accounting-zone |
guest1 |
|
public-zone |
guest2 |
|
public-zone |
Topology
Figure 1 shows the topology for this example.
Configuration
This section covers how to configure the SRX Series Firewall to include security policies that match traffic issued by users authenticated by the CPPM.
- CLI Quick Configuration
- Configuring Interfaces, Zones, and an Address Book
- Configuring Identity-Aware Security Policies to Control User Access to Company Resources
- Results
CLI Quick Configuration
To quickly configure this example, copy the following statements, paste them into a text file, remove any line breaks, change any details necessary to match your network configuration, copy and paste the statements into the CLI at the [edit] hierarchy level, and then enter commit from configuration mode.
set interfaces ge-0/0/3 vlan-tagging
set interfaces ge-0/0/3.0 vlan-id 300 family inet address 203.0.113.45/24
set interfaces ge-0/0/3.1 vlan-id 310 family inet address 192.0.2.18/24
set interfaces ge-0/0/3.2 vlan-id 320 family inet address 192.0.2.14/24
set interfaces ge-0/0/4 vlan-tagging
set interfaces  ge-0/0/4.0 vlan-id 400 family inet address 192.0.2.16/24
set interfaces  ge-0/0/4.1 vlan-id 410 family inet address 192.0.2.19/24
set security zones security-zone marketing-zone interfaces ge-0/0/3.0 host-inbound-traffic system-services all
set security zones security-zone marketing-zone interfaces ge-0/0/3.0 host-inbound-traffic protocols all
set security zones security-zone accounting-zone interfaces ge-0/0/3.1 host-inbound-traffic system-services all
set security zones security-zone accounting-zone interfaces ge-0/0/3.1 host-inbound-traffic protocols all
set security zones security-zone human-resources-zone interfaces ge-0/0/3.2 host-inbound-traffic system-services all
set security zones security-zone human-resources-zone interfaces ge-0/0/3.2 host-inbound-traffic protocols all
set security zones security-zone public-zone interfaces ge-0/0/4.0 host-inbound-traffic system-services all
set security zones security-zone public-zone interfaces ge-0/0/4.0 host-inbound-traffic protocols all
set security zones security-zone servers-zone interfaces ge-0/0/4.1 host-inbound-traffic system-services all
set security zones security-zone servers-zone interfaces ge-0/0/4.1 host-inbound-traffic protocols all
set security address-book servers-zone-addresses address marketing-server-protected 203.0.113.23
set security address-book servers-zone-addresses address human-resources-server 203.0.113.25
set security address-book servers-zone-addresses address accounting-server 203.0.113.72
set security address-book servers-zone-addresses address corporate-server 203.0.113.71
set security address-book servers-zone-addresses address public-server 203.0.113.91
set security address-book servers-zone-addresses attach zone servers-zone
set security policies from-zone marketing-zone to-zone servers-zone policy marketing-p1 match source-address any destination address any
set security policies from-zone marketing-zone to-zone servers-zone policy marketing-p1 match application any
set security policies  from-zone marketing-zone to-zone servers-zone policy marketing-p1 match source-identity “global\marketing-access-for-pcs-limited-group”
set security policies  from-zone marketing-zone to-zone servers-zone policy marketing-p1 then permit
set security policies from-zone marketing-zone to-zone servers-zone policy marketing-p2 match source-address any destination address marketing-zone-protected
set security policies from-zone marketing-zone to-zone servers-zone policy marketing-p2 match application any
set security policies  from-zone marketing-zone to-zone servers-zone policy marketing-p2 match source-identity “global\abew1”
set security policies from-zone marketing-zone to-zone servers-zone policy marketing-p2 then permit
set security policies from-zone accounting-zone to-zone servers-zone policy acct-cp-device match source-address any destination-address accounting-server
set security policies from-zone accounting-zone to-zone servers-zone policy acct-cp-device match application any
set security policies from-zone accounting-zone to-zone servers-zone policy acct-cp-device match source-identity “global\accounting-grp-and-company-device”
set security policies from-zone accounting-zone to-zone servers-zone policy acct-cp-device then permit
set security policies from-zone human-resources-zone to-zone servers-zone policy human-resources-p1 match source-address any destination-address corporate-server
set security policies from-zone human-resources-zone to-zone servers-zone policy human-resources-p1 match application any
set security policies from-zone human-resources-zone to-zone servers-zone policy human-resources-p1 match source-identity “global\corporate-limited”
set security policies from-zone human-resources-zone to servers-zone policy human-resources-p1  then permit
set security policies from-zone marketing-zone to-zone servers-zone policy marketing-p0 match source-address any destination-address corporate-server
set security policies from-zone marketing-zone to-zone servers-zone policy marketing-p0 match application any
set security policies from-zone marketing-zone to-zone servers-zone policy marketing-p0 match source-identity “global\marketing-access-limited-grp”
set security policies from-zone marketing-zone to-zone servers-zone policy marketing-p0 then permit
set security policies from-zone marketing-zone to-zone servers-zone policy marketing-p3 match source-address any destination-address human-resources-server
set security policies from-zone marketing-zone to-zone servers-zone policy marketing-p3 match application any
set security policies from-zone marketing-zone to-zone servers-zone policy marketing-p3 match source-identity “global\sales-limited-group”
set security policies from-zone marketing-zone to-zone servers-zone policy marketing-p3 then permit
set security policies from-zone public-zone to-zone servers-zone policy guest-allow-access match source-address any destination address public-server
set security policies from-zone public-zone to-zone servers-zone policy guest-allow-access match application any
set security policies from-zone public-zone to-zone servers-zone policy guest-allow-access  match source-identity “global\guest”
set security policies from-zone public-zone to-zone servers-zone policy guest-allow-access then permit
set security policies from-zone public-zone to-zone servers-zone policy guest-deny-access match source-address any destination-address any
set security policies from-zone public-zone to-zone servers-zone policy guest-deny-access match application any
set security policies from-zone public-zone to-zone servers-zone policy guest-deny-access  match source-identity “global\guest-device-byod”
set security policies from-zone public-zone to-zone servers-zone policy guest-deny-access then deny
Configuring Interfaces, Zones, and an Address Book
Step-by-Step Procedure
The following example requires you to navigate various levels in the configuration hierarchy. For instructions on how to do that, see Using the CLI Editor in Configuration Mode.
Configure the following interfaces and assign them to zones:
ge-0/0/3.0 > marketing-zone
ge-0/0/3.1 > human-resources-zone
ge-0/0/3.2> accounting-zone
ge-0/0/4.0 > public-zone
ge-0/0/4.1 > servers-zone
Because this example uses logical interfaces, you must configure VLAN tagging.
-
Configure interfaces for the SRX Series Firewall:
[edit interfaces]
set ge-0/0/3 vlan-tagging
set ge-0/0/3.0 vlan-id 300 family inet address 203.0.113.45/24
set ge-0/0/3.1 vlan-id 310 family inet address 192.0.2.18/24
set ge-0/0/3.2 vlan-id 320 family inet address 192.0.2.14/24
set ge-0/0/4 vlan-tagging
set ge-0/0/4.0 vlan-id 400 family inet address 192.0.2.16/24
set ge-0/0/4.1 vlan-id 410 family inet address 192.0.2.19/24
Configure zones.
[edit security zones]
user@host#set security-zone marketing-zone interfaces ge-0/0/3.0 host-inbound-traffic system-services all
user@host#set security-zone marketing-zone interfaces ge-0/0/3.0 host-inbound-traffic protocols all
user@host#set security-zone accounting-zone interfaces ge-0/0/3.1 host-inbound-traffic system-services all
user@host#set security-zone accounting-zone interfaces ge-0/0/3.1 host-inbound-traffic protocols all
user@host#set security-zone human-resources-zone interfaces ge-0/0/3.2 host-inbound-traffic system-services all
user@host#set security-zone human-resources-zone interfaces ge-0/0/3.2 host-inbound-traffic protocols all
user@host#set security-zone public-zone interfaces ge-0/0/4.0 host-inbound-traffic system-services all
user@host#set security-zone public-zone interfaces ge-0/0/4.0 host-inbound-traffic protocols all
user@host#set security-zone servers-zone interfaces ge-0/0/4.1 host-inbound-traffic system-services all
user@host#set security-zone servers-zone interfaces ge-0/0/4.1 host-inbound-traffic protocols all
Configure an address book containing the IP addresses of the servers to use as destination addresses in security policies.
[edit security address-book servers-zone-addresses]
user@host# set address marketing-server-protected 203.0.113.23
user@host# set address human-resources-server 203.0.113.25
user@host# set address accounting-server 203.0.113.72
user@host# set address corporate-server 203.0.113.71
user@host# set address public-server 203.0.113.91
Attach the servers-zone-addresses address book to servers-zone.
[edit security address-book]
user@host# set servers-zone-addresses attach zone servers-zone
Results
From configuration mode, confirm your configuration for interfaces by entering the show interfaces command. If the output does not display the intended configuration, repeat the instructions in this example to correct the configuration.
ge-0/0/3 {
    unit 0 {
        vlan-id 300;
        family inet {
            address 203.0.113.45/24;
        }
    }
    unit 1 {
        vlan-id 310;
        family inet {
            address 192.0.2.18/24;
        }
    }
    unit 2 {
        vlan-id 320;
        family inet {
            address 192.0.2.14/24;
        }
    }
}
ge-0/0/4 {
    vlan-tagging;
    unit 0 {
        vlan-id 400;
        family inet {
            address 192.0.2.16/24;
        }
    }
    unit 1 {
        vlan-id 410;
        family inet {
            address 192.0.2.19/24;
        }
    }
}
From configuration mode, confirm your configuration for zones by entering the show security zones command. If the output does not display the intended configuration, repeat the instructions in this example to correct the configuration.
security-zone human-resources-zone {
    interfaces {
        ge-0/0/3.2 {
            host-inbound-traffic {
                system-services {
                    all;
                }
                protocols {
                    all;
                }
            }
        }
    }
}
security-zone accounting-zone {
    interfaces {
        ge-0/0/3.1 {
            host-inbound-traffic {
                system-services {
                    all;
                }
                protocols {
                    all;
                }
            }
        }
    }
}
security-zone marketing-zone {
    interfaces {
        ge-0/0/3.0 {
            host-inbound-traffic {
                system-services {
                    all;
                }
                protocols {
                    all;
                }
            }
        }
    }
}
security-zone servers-zone {
    interfaces {
        ge-0/0/4.1 {
            host-inbound-traffic {
                system-services {
                    all;
                }
                protocols {
                    all;
                }
            }
        }
    }
}
security-zone public-zone {
    interfaces {
        ge-0/0/4.0 {
            host-inbound-traffic {
                system-services {
                    all;
                }
                protocols {
                    all;
                }
            }
        }
    }
}
From configuration mode, confirm your configuration for the address book by entering the show security address-book command. If the output does not display the intended configuration, repeat the instructions in this example to correct the configuration.
servers-zone-addresses {
    address marketing-zone-protected 203.0.113.23 /32;
    address human-resources-server 203.0.113.25 /32;
    address accounting-server 203.0.113.72/32;
    address corporate-server 203.0.113.71/32;
    address public-server 203.0.113.91/32;
    attach {
        zone servers-zone;
    }
}
Configuring Identity-Aware Security Policies to Control User Access to Company Resources
Step-by-Step Procedure
This task entails configuring security policies that apply to a user’s access to resources based on username or group name, and not the IP address of the device used.
Note that all users belong to the default GLOBAL domain.
Configure a security policy that specifies marketing-access-for-pcs-limited-group as the source-identity. It allows the user jxchan, who belongs to this group, access to any of the servers in the servers-zones when he is using a PC, whether it is a personal device or a company-owned device. The username jxchan is mapped by the CPPM to the rule marketing-access-for-pcs-limited-group.
[edit security policies]
user@host# set from-zone marketing-zone to-zone servers-zone policy marketing-p1 match source-address any destination address any
user@host# set from-zone marketing-zone to-zone servers-zone policy marketing-p1 match application any
user@host# set from-zone marketing-zone to-zone servers-zone policy marketing-p1 match source-identity “global\marketing-access-for-pcs-limited-group”
user@hoset from-zone marketing-zone to-zone servers-zone policy marketing-p1 then permit
Configure a security policy that allows the user abew1 access to the marketing-zone-protected server (IP address 203.0.113.23 ) in the servers-zone regardless of the device that he uses.
[edit security policies]
user@host# set from-zone marketing-zone to-zone servers-zone policy marketing-p2 match source-address any destination address marketing-zone-protected
user@host# set from-zone marketing-zone to-zone servers-zone policy marketing-p2 match application any
user@host# set from-zone marketing-zone to-zone servers-zone policy marketing-p2 match source-identity “global\abew1”
user@host# set from-zone marketing-zone to-zone servers-zone policy marketing-p2 then permit
Configure a security policy that allows the user viki2 access to the accounting-server (IP address 203.0.113.72) in the servers-zone when she is using a company-owned device. The user viki2 belongs to accounting-grp which is mapped to the company-owned-device rule (accounting-grp-and-company-device) by the CPPM.
[edit security policies]
user@host# set from-zone accounting-zone to-zone servers-zone policy acct-cp-device match source-address any destination-address accounting-server
user@host# set from-zone accounting-zone to-zone servers-zone policy acct-cp-device match application any
user@host# set from-zone accounting-zone to-zone servers-zone policy acct-cp-device match source-identity “global\accounting-grp-and-company-device”
user@host# set from-zone accounting-zone to-zone servers-zone policy acct-cp-device then permit
Configure a security policy that allows users who belong to the corporate-limited group limited access to the corporate-server server (IP address 203.0.113.71) in the servers-zone when they are initiating a request from the human-resources zone.
If the source-address were specified as “any”, the policy would apply to other users who also belong to the corporate-limited group.
[edit security policies]
user@host# set from-zone human-resources-zone to-zone servers-zone policy human-resources-p1 match source-address any destination-address corporate-server
user@host# set from-zone human-resources-zone to-zone servers-zone policy human-resources-p1 match application any
user@host# set from-zone human-resources-zone to-zone servers-zone policy human-resources-p1 match source-identity “global\corporate-limited”
user@host# set from-zone human-resources-zone to servers-zone policy human-resources-p1  then permit
Configure a security policy that allows the user abew1 access to the corporate-server (IP address 203.0.113.71) server in the servers-zone. The user abew1 belongs to marketing-access-limited-grp to which the security policy applies.
[edit security policies]
user@host# set from-zone marketing-zone to-zone servers-zone policy marketing-p0 match source-address any destination-address corporate-server
user@host# set from-zone marketing-zone to-zone servers-zone policy marketing-p0 match application any
user@host# set from-zone marketing-zone to-zone servers-zone policy marketing-p0 match source-identity “global\marketing-access-limited-grp”
user@host# set from-zone marketing-zone to-zone servers-zone policy marketing-p0 then permit
Configure a security policy that allows users who belong to the sales-limited-group access to the human-resources-server (IP address 203.0.113.81) server when they initiate a request from the marketing-zone. The user jxchan belongs to sales-limited-group.
[edit security policies]
user@host# set from-zone marketing-zone to-zone servers-zone policy marketing-p3 match source-address any destination-address human-resources-server
user@host# set from-zone marketing-zone to-zone servers-zone policy marketing-p3 match application any
user@host# set from-zone marketing-zone to-zone servers-zone policy marketing-p3 match source-identity “global\sales-limited-group”
user@host# set from-zone marketing-zone to-zone servers-zone policy marketing-p3 then permit
Configure a security policy that allows users who belong to the guest group access to the public-server (IP address 203.0.113.91) in the servers-zone.
[edit security policies]
user@host# set from-zone public-zone to-zone servers-zone policy guest-allow-access match source-address any destination address public-server
user@host# set from-zone public-zone to-zone servers-zone policy guest-allow-access match application any
user@host# set from-zone public-zone to-zone servers-zone policy guest-allow-access  match source-identity “global\guest”
user@host# set from-zone public-zone to-zone servers-zone policy guest-allow-access then permit
Configure a security policy that denies users who belong to the guest-device-byod group access to any servers in the servers-zone when they use their own devices.
[edit security policies]
user@host# set from-zone public-zone to-zone servers-zone policy guest-deny-access match source-address any destination-address any
user@host# set from-zone public-zone to-zone servers-zone policy guest-deny-access match application any
user@host# user@host# set from-zone public-zone to-zone servers-zone policy guest-deny-access match source-identity “global\guest-device-byod”
user@host# set from-zone public-zone to-zone servers-zone policy guest-deny-access then deny
Results
From configuration mode, confirm your security policies configuration for integrated ClearPass by entering the show security policies command.
If the output does not display the intended configuration, repeat the configuration instructions in this example to correct it.
from-zone marketing-zone to-zone servers-zone {
    policy marketing-p1 {
        match {
            source-address any;
            destination-address any;
            application any;
            source-identity "global\marketing-access-for-pcs-limited-group";
        }
        then {
            permit;
        }
    }
    policy marketing-p2 {
        match {
            source-address any;
            destination-address marketing-zone-protected;
            application any;
            source-identity "global\abew1";
        }
        then {
            permit;
        }
    }
    policy marketing-p0 {
        match {
            source-address any;
            destination-address corporate-server;
            application any;
            source-identity "global\marketing-access-limited-grp";
        }
        then {
            permit;
        }
    }
    policy marketing-p3 {
        match {
            source-address any;
            destination-address human-resources-server;
            application any;
            source-identity "global\sales-limited-group";
        }
        then {
            permit;
        }
    }
}
from-zone accounting-zone to-zone servers-zone {
    policy acct-cp-device {
        match {
            source-address any;
            destination-address accounting-server;
            application any;
            source-identity "global\accounting-grp-and-company-device";
        }
        then {
            permit;
        }
    }
}
from-zone human-resources-zone to-zone servers-zone {
    policy human-resources-p1 {
        match {
            source-address any;
            destination-address corporate-server;
            application any;
            source-identity "global\corporate-limited";
        }
        then {
            permit;
        }
    }
}
from-zone public-zone to-zone servers-zone {
    policy guest-allow-access {
        match {
            source-address any;
            destination-address public-server;
            application any;
            source-identity “global\guest”;
        }
        then {
            permit;
        }
    }
    policy guest-deny-access {
        match {
            source-address any;
            destination-address any;
            application any;
            source-identity “global\guest-device-byod”;
        }
        then {
            deny;
        }
    }
}
Verification
This section verifies the ClearPass authentication table contents after certain events occur that cause some of its user authentication entries to be modified. It also shows how to ensure that the ClearPass authentication table has been deleted successfully after you issue the delete command. It includes the following parts:
- Displaying the ClearPass Authentication Table Contents Before and After an Authenticated User Logs Out of the Network
- Displaying the Authentication Table Contents Before and After a Referenced Security Policy Is Deleted
Displaying the ClearPass Authentication Table Contents Before and After an Authenticated User Logs Out of the Network
Purpose
Display the ClearPass authentication table contents when a specific, authenticated user is logged in to the network and after the user logs out.
Action
Enter the show services user-identification authentication-table authentication-source authentication-source command for the ClearPass authentication table, which is referred to as aruba-clearpass. Notice that the ClearPass authentication table includes an entry for the user viki2.
show services user-identification authentication-table authentication-source aruba-clearpass
Domain: GLOBAL
Total entries: 6
Source IP       Username       groups(Ref by policy)          state
203.0.113.21        viki2          accounting-grp-and-company-dev Valid
203.0.113.89        abew1          marketing-access-limited-grp   Valid
203.0.113.52        jxchan         marketing-access-for-pcs-limit Valid
203.0.113.53        lchen1         corporate-limited              Valid
203.0.113.54        guest1                                        Valid
203.0.113.55        guest2                                        Valid
Enter the same command again after viki2 logs out of the network. Notice that the ClearPass authentication table no longer contains an entry for viki2.
Domain: GLOBAL
Total entries: 6
Source IP       Username       groups(Ref by policy)          state
203.0.113.89        abew1          marketing-access-limited-grp   Valid
203.0.113.52        jxchan         marketing-access-for-pcs-limit Valid
203.0.113.53        lchen1         corporate-limited              Valid
203.0.113.54        guest1                                        Valid
203.0.113.55        guest2                                        Valid
Displaying the Authentication Table Contents Before and After a Referenced Security Policy Is Deleted
Purpose
Display the ClearPass authentication table contents for a specific user—lchen1—who belongs to a group that is referenced by a security policy. Delete that security policy, then display the entry for that user again.
Action
Enter the show service user-identification authentication-table authentication-source user user-name command to display the ClearPass authentication table entry for a specific user, lchen1. Notice that it includes the group corporate-limited.
show service user-identification authentication-table authentication-source user lchen1
Domain: GLOBAL
Source IP       Username       groups(Ref by policy)          state
203.0.113.53        lchen1         corporate-limited              Valid
The human-resources-p1 security policy source-identity field refers to the group corporate-limited. As shown above in the ClearPassauthentication entry for him, the user lchen1 belongs to that group. Here is the configuration for the human-resources-p1 referenced security policy:
from-zone human-resources-zone to-zone servers-zone {
    policy human-resources-p1 {
        match {
            source-address any;
            destination-address corporate-server;
            application any;
            source-identity "global\corporate-limited";
        }
        then {
            permit;
        }
    }
}
After you delete the human-resources-p1 security policy, whose source-identity parameter refers to the group called corporate-limited, enter the same command again. Notice that the authentication entry for lchen1 does not contain the corporate-limited group.
show service user-identification authentication-table authentication-source aruba-clearpass user lchen1
Domain: GLOBAL
Source IP       Username       groups(Ref by policy)          state
203.0.113.53        lchen1                                        Valid
Take a different approach in verifying the ClearPass authentication table state after the modification. Display the entire table to verify that the group—corporate-limited—is not included in any of the user entries. Note that if more than one user belonged to the corporate-limited group, authentication entries for all of the affected users would not show that group name.
From operational mode, enter the show services user-identification authentication-table authentication-source aruba-clearpass command.
show services user-identification authentication-table authentication-source aruba-clearpass
Domain: GLOBAL
Total entries: 6
Source IP       Username       groups(Ref by policy)          state
203.0.113.21        viki2          accounting-grp-and-company-dev Valid
203.0.113.89        abew1          marketing-access-limited-grp   Valid
203.0.113.52        jxchan         marketing-access-for-pcs-limit Valid
203.0.113.53        lchen1                                        Valid
203.0.113.54        guest1                                        Valid
203.0.113.55        guest2                                        Valid
Example: Configure Web API Function
The SRX Series Firewall and the ClearPass Policy Manager (CPPM) collaborate to control access to your protected resources and to the Internet. To carry this out, the SRX Series Firewall must authenticate users in conjunction with applying security policies that match their requests. For the integrated ClearPass authentication and enforcement feature, the SRX Series Firewall relies on ClearPass as its authentication source.
The Web API function, which this example covers, exposes to the CPPM an API that enables it to initiate a secure connection with the SRX Series Firewall. The CPPM uses this connection to post user authentication information to the SRX Series Firewall. In their relationship, the SRX Series Firewall acts as an HTTPS server for the CPPM client.
Requirements
This section defines the software and hardware requirements for the topology for this example. See Figure 3 for the topology design.
The hardware and software components are:
-
Aruba ClearPass Policy Manager (CPPM). The CPPM is configured to use its local authentication source to authenticate users.
Note:It is assumed that the CPPM is configured to provide the SRX Series Firewall with user authentication and identity information, including the username, a list of the names of any groups that the user belongs to, the IP addresses of the devices used, and the device posture token.
-
SRX Series Firewall running Junos OS that includes the integrated ClearPass feature.
-
A server farm composed of six servers, all in the servers-zone:
-
marketing-server-protected (203.0.113.23 )
-
human-resources-server (203.0.113.25 )
-
accounting-server (203.0.113.72)
-
public-server (192.0.2.96)
-
corporate-server (203.0.113.71)
-
sales-server (203.0.113.81)
-
-
AC 7010 Aruba Cloud Services Controller running ArubaOS.
-
Aruba AP wireless access controller running ArubaOS.
The Aruba AP is connected to the AC7010.
Wireless users connect to the CPPM through the Aruba AP.
-
Juniper Networks EX4300 switch used as the wired 802.1 access device.
Wired users connect to the CPPM using the EX4300 switch.
-
Six end-user systems:
-
Three wired network-connected PCs running Microsoft OS
-
Two BYOD devices that access the network through the Aruba AP access device
-
One wireless laptop running Microsoft OS
-
Overview
You can configure identity-aware security policies on the SRX Series Firewall to control a user’s access to resources based on username or group name, not the IP address of the device. For this feature, the SRX Series Firewall relies on the CPPM for user authentication. The SRX Series Firewall exposes to ClearPass its Web API (webapi) to allow the CPPM to integrate with it. The CCPM posts user authentication information efficiently to the SRX Series Firewall across the connection. You must configure the Web API function to allow the CPPM to initiate and establish a secure connection. There is no separate Routing Engine process required on the SRX Series Firewall to establish a connection between the SRX Series Firewall and the CPPM.
Figure 2 illustrates the communication cycle between the SRX Series Firewall and the CPPM, including user authentication.
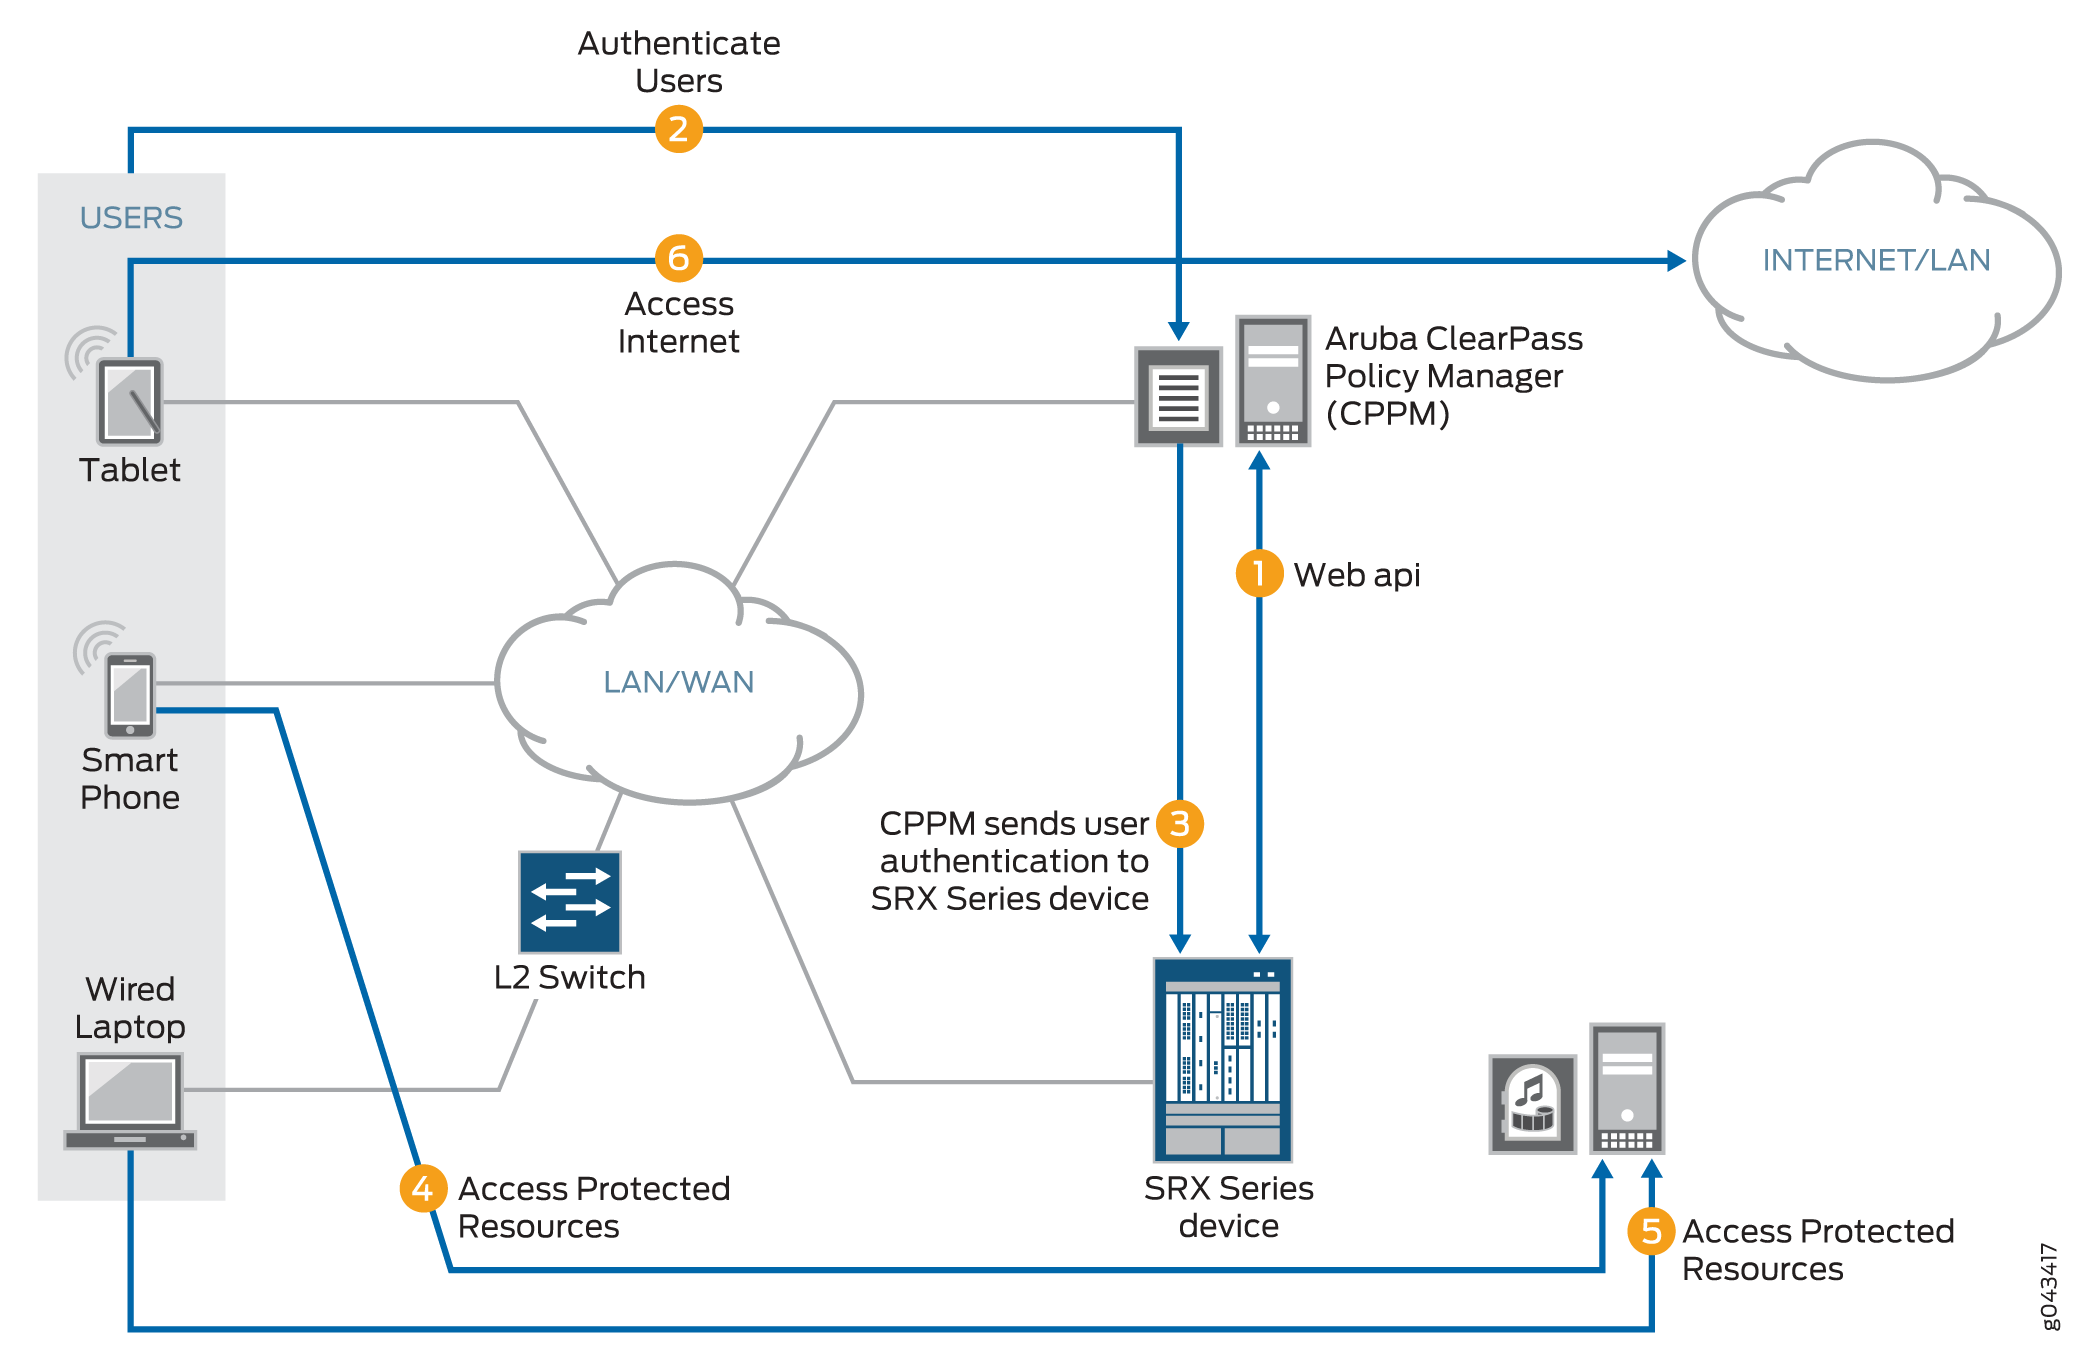
As depicted, the following activity takes place:
-
The CPPM initiates a secure connection with the SRX Series Firewall using Web API.
-
Three users join the network and are authenticated by the CPPM.
-
A tablet user joins the network across the corporate WAN.
-
A smartphone user joins the network across the corporate WAN.
-
A wireless laptop user joins the network from a wired laptop connected to a Layer 2 switch that is connected to the corporate LAN.
-
-
The CPPM sends the user authentication and identity information for the users who are logged in to the network to the SRX Series Firewall in POST request messages using the Web API.
When traffic from a user arrives at the SRX Series Firewall, the SRX Series Firewall:
-
Identifies a security policy that the traffic matches.
-
Locates an authentication entry for the user in the ClearPass authentication table.
-
Applies the security policy to the traffic after authenticating the user.
-
-
Traffic from the smartphone user who is requesting access to an internal, protected resource arrives at the SRX Series Firewall. Because all of the conditions identified in Step 3 are met and the security policy permits it, the SRX Series Firewall allows the user connection to the protected resource.
-
Traffic from the wired laptop user who is requesting access to a protected resource arrives at the SRX Series Firewall. Because all of the conditions identified in Step 3 are met and the security policy permits it, the SRX Series Firewall allows the user connection to the resource.
-
Traffic from the tablet user who is requesting access to the Internet arrives at the SRX Series Firewall. Because all of the conditions identified in Step 3 are met and the security policy permits it, the SRX Series Firewall allows the user connection to the Internet.
The Web API daemon is not enabled by default for security reasons. When you start up the Web API daemon, by default it opens either the HTTP (8080) or the HTTPS (8443) service port. You must ensure that one of these ports is configured, depending on which version of the HTTP protocol you want to use. We recommend that you use HTTPS for security reasons. Opening these ports makes the system more vulnerable to service attacks. To protect against service attacks that might use these ports, the Web API daemon will start up only after you enable it.
The Web API is a RESTful Web services implementation. However, it does not fully support the RESTful Web services. Rather, it acts as an HTTP or HTTPS server that responds to requests from the ClearPass client.
The Web API connection is initialized by the CPPM using the HTTP service port (8080) or HTTPS service port (8443). For ClearPass to be able to post messages, you must enable and configure the Web API daemon.
To mitigate abuse and protect against data tampering, the Web API daemon:
-
Requires ClearPass client authentication by HTTP or HTTPS basic user account authentication.
-
Allows data to be posted to it only from the IP address configured as the client source. That is, it allows HTTP or HTTPS POST requests only from the ClearPass client IP address, which in this example is 192.0.2.199.
-
Requires that posted content conforms to the established XML data format. When it processes the data, the Web API daemon ensures that the correct data format was used.
Note that if you deploy Web management and the SRX Series Firewall together, they must run on different HTTP or HTTPS service ports.
See Web API Function for further information on how this feature protects against data tampering.
The SRX Series UserID daemon processes the user authentication and identity information and synchronizes it to the ClearPass authentication table on the Packet Forwarding Engine. The SRX Series Firewall creates the ClearPass authentication table to be used for information received only from the CPPM. The ClearPass authentication table does not contain user authentication information from other authentication sources. The SRX Series Firewall checks the ClearPass authentication table to authenticate users attempting to access protected network resources on the Internet using wired or wireless devices and local network resources.
For the CPPM to connect to the SRX Series Firewall and post authentication information, it must be certified using HTTPS authentication. The Web API daemon supports three methods that can be used to refer to an HTTPS certificate: a default certificate, a PKI local certificate, and a customized certificate implemented through the certificate and certificate-key configuration statements. These certificate methods are mutually exclusive.
This example uses HTTPS for the connection between the CPPM and the SRX Series Firewall. To ensure security, the integrated ClearPass feature default certificate key size is 2084 bits.
Whether you use any method—the default certificate, a PKI-generated certificate, or a custom certificate—for security reasons, you must ensure that the certificate size is 2084 bits or greater.
The following example shows how to generate a certificate and key using PKI:
user@host>request security pki generate-key-pair certificate-id aruba size 2048
user@host>request security pki local-certificate generate-self-signed certificate-id aruba domain-name mycompany.net email jxchan@mycompany.net ip-address 192.51.100.21 subject “CN=John Doe,OU=Sales ,O=mycompany.net ,L=MyCity ,ST=CA,C=US"
Topology
Figure 3 shows the topology used for the integrated ClearPass deployment examples.
Configuration
This section covers how to enable and configure the SRX Series Web API.
You must enable the Web API. It is not enabled by default.
- CLI Quick Configuration
- Configuring the SRX Series Web API Daemon
- Configuring the ClearPass Authentication Table Entry Timeout and Priority
CLI Quick Configuration
To quickly configure this example, copy the following statements, paste them into a text file, remove any line breaks, change any details necessary to match your network configuration, copy and paste the statements into the CLI at the [edit] hierarchy level, and then enter commit from configuration mode.
set system services webapi user sunny password i4%rgd
set system services webapi client 192.0.2.199
set system services webapi https port 8443
set system services webapi https pki-local-certificate aruba
set system services webapi debug-level alert
set interfaces ge-0/0/3.4 vlan-id 340 family inet address 192.51.100.21
set security zones security-zone trust interfaces ge-0/0/3.4 host-inbound-traffic system-services webapi-ssl
set security user-identification authentication-source aruba-clearpass priority 110
set security user-identification authentication-source local-authentication-table priority 120
set security user-identification authentication-source active-directory-authentication-table priority 125
set security user-identification authentication-source firewall-authentication priority 150
set security user-identification authentication-source unified-access-control priority 200
Configuring the SRX Series Web API Daemon
Step-by-Step Procedure
Configuring the Web API allows the CPPM to initialize a connection to the SRX Series Firewall. No separate connection configuration is required.
It is assumed that the CPPM is configured to provide the SRX Series Firewall with authenticated user identity information, including the username, the names of any groups that the user belongs to, the IP addresses of the devices used, and a posture token.
Note that the CPPM might have configured role mappings that map users or user groups to device types. If the CPPM forwards the role mapping information to the SRX Series Firewall, the SRX Series Firewall treats the role mappings as groups. The SRX Series Firewall does not distinguish them from other groups.
To configure the Web API daemon:
-
Configure the Web API daemon (webapi) username and password for the account.
This information is used for the HTTPS certification request.
[edit system services]
user@host# set webapi user sunny password  i4%rgd
-
Configure the Web API client address–that is, the IP address of the ClearPass webserver’s data port.
The SRX Series Firewall accepts information from this address only.
Note:The ClearPass webserver data port whose address is configured here is the same one that is used for the user query function, if you configure that function.
[edit system services]
user@host# set webapi client 192.0.2.199
Note:Starting with Junos OS Release 15.1X49-D130, SRX Series Firewall supports IPv6 addresses to configure the Web API client address. Prior to Junos OS Release 15.1X49-D130, only IPv4 addresses were supported.
-
Configure the Web API daemon HTTPS service port.
If you enable the Web API service on the default TCP port 8080 or 8443, you must enable host inbound traffic on that port.
In this example, the secure version of the Web API service is used (webapi-ssl), so you must configure the HTTPS service port, 8443.
[edit system services]
user@host# set webapi https port 8443
-
Configure the Web API daemon to use the HTTPS default certificate.
[edit system services]
user@host# set webapi https pki-local-certificate aruba
-
Configure the trace level for the Web API daemon.
The supported trace levels are notice, warn, error, crit, alert, and emerg. The default value is error.
[edit system services]
user@host# webapi debug-level alert
-
Configure the interface to use for host inbound traffic from the CPPM.
user@host# set interfaces ge-0/0/3.4 vlan-id 340 family inet address 192.51.100.21
-
Enable the Web API service over HTTPS host inbound traffic on TCP port 8443.
[edit security zones]
user@host# set security-zone trust interfaces ge-0/0/3.4 host-inbound-traffic system-services webapi-ssl
Results
From configuration mode, confirm your Web API configuration by entering the show system services webapi command. If the output does not display the intended configuration, repeat the instructions in this example to correct the configuration.
user {
    sunny;
    password "$ABC123"; ## SECRET-DATA
}
client {
    192.0.2.199;
}
https {
    port 8443;
    pki-local-certificate aruba;
}
debug-level {
    alert;
}
From configuration mode, confirm the configuration for the interface used for host inbound traffic from the CPPM by entering the show interfaces ge-0/0/3.4 command. If the output does not display the intended configuration, repeat the verification process in this example to correct it.
vlan-id 340;
family inet {
    address 192.51.100.21/32;
}
From configuration mode, confirm your security zone configuration that allows host-inbound traffic from the CPPM using the secure Web API service (web-api-ssl) by entering the show security zones security-zone trust command. If the output does not display the intended configuration, repeat the verification process in this example to correct it.
    interfaces {
        ge-0/0/3.4 {
            host-inbound-traffic {
                system-services {
                    webapi-ssl;
                }
            }
        }
    }
If you are done configuring the device, enter commit from configuration mode.
Configuring the ClearPass Authentication Table Entry Timeout and Priority
Step-by-Step Procedure
This procedure configures the following information:
-
The timeout parameter that determines when to age out idle authentication entries in the ClearPass authentication table.
-
The ClearPass authentication table as the first authentication table in the lookup order for the SRX Series Firewall to search for user authentication entries. If no entry is found in the ClearPass authentication table and there are other authentication tables configured, the SRX Series Firewall will search them, based on the order that you set.
-
Set the timeout value that is used to expire idle authentication entries in the ClearPass authentication table to 20 minutes.
[edit services user-identification]
user@host# set authentication-source aruba-clearpass authentication-entry-timeout 20
The first time that you configure the SRX Series Firewall to integrate with an authentication source, you must specify a timeout value to identify when to expire idle entries in the ClearPass authentication table. If you do not specify a timeout value, the default value is assumed.
-
default = 30 minutes
-
range = If set, the timeout value should be within the range [10,1440 minutes]. A value of 0 means that the entry will never expire.
-
-
Set the authentication table priority order to direct the SRX Series Firewall to search for user authentication entries in the ClearPass authentication table first. Specify the order in which other authentication tables are searched if an entry for the user is not found in the ClearPass authentication table.
Note:You need to set this value if the ClearPass authentication table is not the only authentication table on the Packet Forwarding Engine.
[edit security user-identification]
user@host# set authentication-source aruba-clearpass priority 110
user@host# set authentication-source local-authentication-table priority 120
user@host# set authentication-source active-directory-authentication-table priority 125
user@host# set authentication-source firewall-authentication priority 150
user@host# set authentication-source unified-access-control priority 200
The default priority value for the ClearPass authentication table is 110. You must change the local authentication table entry from 100 to 120 to direct the SRX Series Firewall to check the ClearPass authentication table first if there are other authentication tables on the Packet Forwarding Engine. Table 2 shows the new authentication table search priority.
Table 2: SRX Series Firewall Authentication Tables Search Priority Assignment SRX Series Authentication Tables
Set Value
ClearPass authentication table
110
Local authentication table
120
Active Directory authentication table
125
Firewall authentication table
150
UAC authentication table
200
Results
From configuration mode, confirm that the timeout value set for aging out ClearPass authentication table entries is correct. Enter the show services user-identification command. If the output does not display the intended configuration, repeat the instructions in this example to correct the configuration.
authentication-source aruba-clearpass {
    authentication-entry-timeout 20;
}
Example: Configure User Query Function
This example covers how to configure the SRX Series Firewall to enable it to query Aruba ClearPass automatically for user authentication and identity information for an individual user when that information is not available.
The user query function is supplementary to the Web API method of obtaining user authentication and identity information, and it is optional.
Requirements
This section defines the software and hardware requirements for the overall topology that includes user query requirements. See Figure 5 for the topology. For details on the user query process, see Figure 4.
The hardware and software components are:
Aruba ClearPass (CPPM). The CPPM is configured to use its local authentication source to authenticate users.
Note:It is assumed that the CPPM is configured to provide the SRX Series Firewall with user authentication and identity information, including the username, a list of the names of any groups that the user belongs to, the IP addresses of the devices used, and the device posture token.
SRX Series Firewall running Junos OS that includes the integrated ClearPass feature.
A server farm composed of six servers, all in the servers-zone:
marketing-server-protected (203.0.113.23 )
human-resources-server (203.0.113.25 )
accounting-server (203.0.113.72)
public-server (203.0.113.91)
corporate-server (203.0.113.71)
sales-server (203.0.113.81)
AC 7010 Aruba Cloud Services Controller running ArubaOS.
Aruba AP wireless access controller running ArubaOS.
The Aruba AP is connected to the AC7010.
Wireless users connect to the CPPM through the Aruba AP.
Juniper Networks EX4300 switch used as the wired 802.1 access device.
Wired users connect to the CPPM using the EX4300 switch.
Six end-user systems:
Three wired network-connected PCs running Microsoft OS
Two BYOD devices that access the network through the Aruba AP access device
One wireless laptop running Microsoft OS
Overview
You can configure the user query function to enable the SRX Series Firewall to obtain authenticated user identity information from the CPPM for an individual user when the device’s ClearPass authentication table does not contain an entry for that user. The SRX Series Firewall bases the query on the IP address of the user’s device that generated the traffic issuing from the access request.
There are a number of reasons why the device might not already have authentication information from the CPPM for a particular user. For example, it can happen that a user has not already been authenticated by the CPPM. This condition could occur if a user joined the network through an access layer that is not on a managed switch or WLAN.
The user query function provides a means for the SRX Series Firewall to obtain user authentication and identity information from the CPPM for a user for whom the CPPM did not post that information to the SRX Series Firewall using the Web API. When the device receives an access request from a user for which there is not an entry in its ClearPass authentication table, it will automatically query the CPPM for it if this function is configured.
Figure 4 shows the user query flow process, which encompasses the following steps:
-
A user attempts to access a resource. The SRX Series Firewall receives the traffic requesting access. The device searches for an entry for the user in its ClearPass authentication table, but none is found.
The device requests authentication for the user from the CPPM.
The CPPM authenticates the user and returns the user authentication and identity information to the device.
The device creates an entry for the user in its ClearPass authentication table, and grants the user access to the Internet.
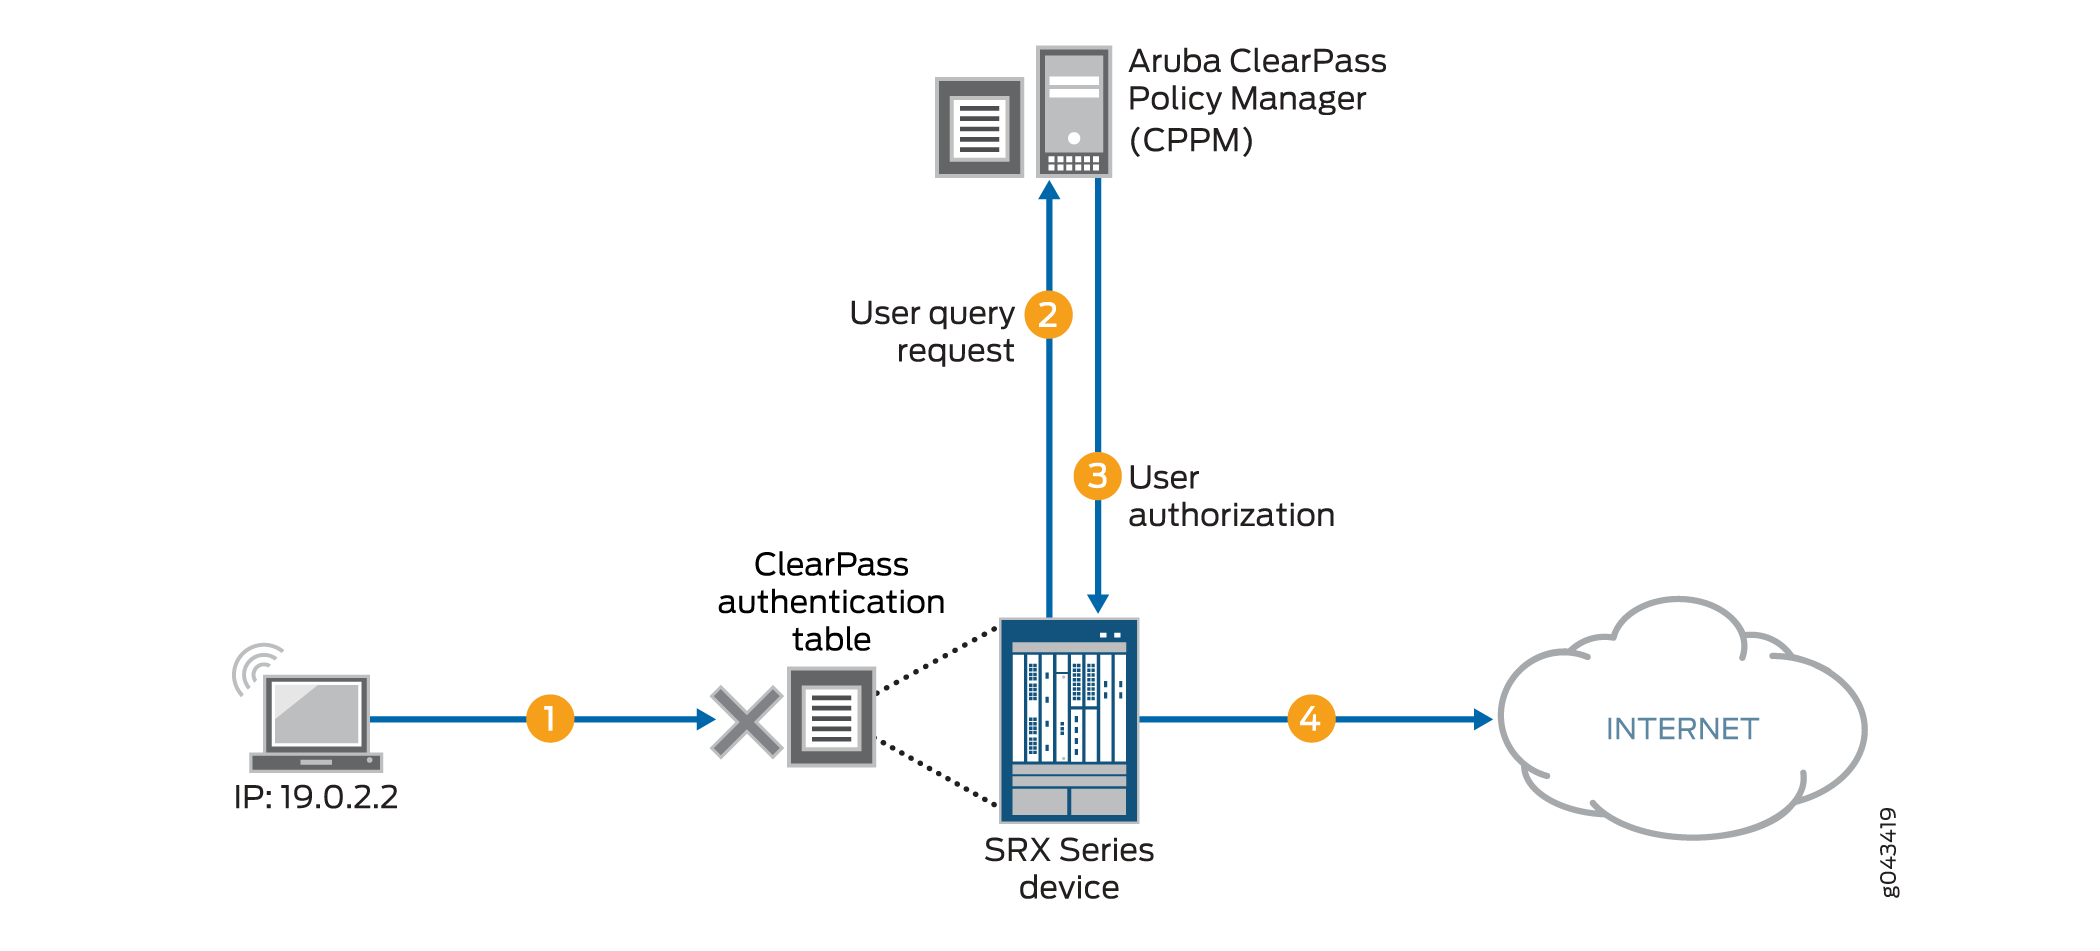
For details on the parameters that you can use to control when the device issues the query, see Understanding the Integrated ClearPass Authentication and Enforcement User Query Function.
You can also manually query the CPPM for authentication information for an individual user when this feature is configured.
The ClearPass endpoint API requires use of OAuth (RFC 6749) to authenticate and authorize access to it. For the device to be able to query the CPPM for individual user authentication and authorization information, it must acquire an access token. For this purpose, the device uses the Client Credentials access token grant type, which is one of the two types that ClearPass supports.
As administrator of the ClearPass Policy Manager (CPPM), you must create an API client on the CPPM with the grant_type set to “client_credentials”. You can then configure the device to use that information to obtain an access token. Here is an example of the message format for doing this:
curl https://{$Server}/api/oauth – – insecure – – data
“grant_type=client_credentials&client_id=Client2&client_secret= m2Tvcklsi9je0kH9UTwuXQwIutKLC2obaDL54/fC2DzC"
A successful request from the device to obtain an access token results in a response that is similar to the following example:
{
“access_token”:”ae79d980adf83ecb8e0eaca6516a50a784e81a4e”,
“expires_in”:2880,
“token_type”:”Bearer”,
“scope”=nu;
}
Before the access token expires, the device can obtain a new token using the same message.
Topology
Figure 5 shows the overall topology for this deployment, which encompasses the user query environment.
Configuration
To enable and configure the user query function, perform these tasks:
- CLI Quick Configuration
- Configure the User Query Function (Optional)
- Manually Issuing a Query to the CPPM for Individual User Authentication Information (Optional)
CLI Quick Configuration
To quickly configure this example, copy the following statements, paste them into a text file, remove any line breaks, change any details necessary to match your network configuration, copy and paste the statements into the CLI at the [edit] hierarchy level, and then enter commit from configuration mode.
set services user-identification authentication-source aruba-clearpass user-query web-server cp-webserver address 192.0.2.199
set services user-identification authentication-source aruba_clearpass user-query ca-certificate RADUISServerCertificate.crt
set services user-identification authentication-source aruba-clearpass user-query client-id client-1
set services user-identification authentication-source aruba-clearpass user-query client-secret 7cTr13#
set services user-identification authentication-source aruba-clearpass user-query token-api “api/oauth”
set services user-identification authentication-source aruba-clearpass user-query IP address “api/vi/insight/endpoint/ip/$IP$”
Configure the User Query Function (Optional)
Step-by-Step Procedure
Configure the user query function to allow the SRX Series Firewall to connect automatically to the ClearPass client to make requests for authentication information for individual users.
The user query function supplements input from the CPPM sent using the Web API. The Web API daemon does not need to be enabled for the user query function to work. For the user query function, the SRX Series Firewall is the HTTP client. By it sends HTTPS requests to the CPPM on port 443.
To enable the SRX Series Firewall to make individual user queries automatically:
Configure Aruba ClearPass as the authentication source for user query requests, and configure the ClearPass webserver name and its IP address. The device requires this information to contact the ClearPass webserver.
Starting with Junos OS Release 15.1X49-D130, you can configure Aruba Clearpass server IP address with IPv6 address, in addition to IPv4 address. Prior to Junos OS Release 15.1X49-D130, IPv4 address was only supported.
Note:You must specify aruba-clearpass as the authentication source.
[edit services user-identification]
user@host# set authentication-source aruba-clearpass user-query web-server cp-webserver address 192.0.2.199
Note:You can configure only one ClearPass webserver.
Optionally, configure the port number and connection method, or accept the following values for these parameters. This example assumes the default values.
connect-method (default is HTTPS)
port (by default, the device sends HTTPS requests to the CPPM on port 443
However, if you were to explicitly configure the connection method and port, you would use these statements:
set services user-identification authentication-source aruba-clearpass user-query web-server cp-webserver connect method <https/http>
set services user-identification authentication-source aruba-clearpass user-query web-server cp-webserver port port-number
-
(Optional) Configure the ClearPass CA certificate file for the device to use to verify the ClearPass webserver. (The default certificate is assumed if none is configured.)
[edit services user-identification]
user@host# set authentication-source aruba_clearpass user-query ca-certificate RADUISServerCertificate.crt
The ca-certificate enables the SRX Series Firewall to verify the authenticity of the ClearPass webserver and that it is trusted.
Before you configure the certificate, as administrator of the ClearPass device you must take the following actions:
-
Export the ClearPass webserver’s certificate from CPPM and import the certificate to the device.
-
Configure the ca-certificate as the path, including its CA filename, as located on the SRX Series Firewall. In this example, the following path is used:
/var/tmp/RADUISServerCertificate.crt
-
-
Configure the client ID and the secret that the SRX Series Firewall requires to obtain an access token required for user queries.
[edit services user-identification]
user@host# set authentication-source aruba-clearpass user-query client-id client-1
user@host# set authentication-source aruba-clearpass user-query client-secret 7cTr13#
The client ID and the client secret are required values. They must be consistent with the client configuration on the CPPM.
Tip:When you configure the client on the CPPM, copy the client ID and secret to use in the device configuration.
Configure the token API that is used in generating the URL for acquiring an access token.
Note:You must specify the token API. It does not have a default value.
[edit services user-identification]
user@host# set authentication-source aruba-clearpass user-query token-api “api/oauth”
In this example, the token API is
api/oauth. It is combined with the following information to generate the complete URL for acquiring an access tokenhttps://192.0.2.199/api/oauthThe connection method is HTTPS.
In this example, the IP address of the ClearPass webserver is 192.0.2.199.
Configure the query API to use for querying individual user authentication and identity information.
[edit services user-identification]
user@host# set authentication-source aruba-clearpass user-query query-api ’api/vi/insight/endpoint/ip/$IP$’
In this example, the query-api is
api/vi/insight/endpoint/ip/$IP$. It is combined with the URLhttps://192.0.2.199/api/oauthresulting inhttps://192.0.2.199/api/oauth/api/vi/insight/endpoint/ip/$IP$.The $IP variable is replaced with the IP address of the end-user’s device for the user whose authentication information the SRX Series is requesting.
Configure the amount of time in seconds to delay before the device sends the individual user query.
[edit services user-identification]
user@host# set authentication-source aruba-clearpass user-query delay-query-time 10
Manually Issuing a Query to the CPPM for Individual User Authentication Information (Optional)
Step-by-Step Procedure
Configure the following statement to manually request authentication information for the user whose device’s IP address is 203.0.113.46.
root@device>request service user-identification authentication-source aruba-clearpass user-query address 203.0.113.46
Verification
Use the following procedures to verify that the user query function is behaving as expected:
- Verifying That the ClearPass Webserver Is Online
- Enabling Trace and Checking the Output
- Determining If the User Query Function Is Executing Normally
- Determining If a Problem Exists by Relying on User Query Counters
Verifying That the ClearPass Webserver Is Online
Purpose
Ensure that the ClearPass webserver is online, which is the first mean of verifying that the user query request can complete successfully.
Action
Enter the show service user-identification authentication-source authentication-source user-query status command to verify that ClearPass is online.
show service user-identification authentication-source aruba-clearpass user-query status

Authentication source: aruba-clearpass
Web server Address: 192.0.2.199
Status: Online
Current connections: 0
Enabling Trace and Checking the Output
Purpose
Display in the trace log any error messages generated by the user query function.
Action
Set the trace log file name and enable trace using the following commands:
set system services webapi debug-log trace-log-1
set services user-identification authentication-source aruba-clearpass traceoptions flag user-query
Determining If the User Query Function Is Executing Normally
Purpose
Determine if there is a problem with user query function behavior.
Action
Check syslog messages to determine if the user query request failed.
If it failed, the following error message is reported:
LOG1: sending user query for IP <ip-address> to ClearPass web server failed.
:reason
The reason might be “server unconnected” or “socket error”.
Determining If a Problem Exists by Relying on User Query Counters
Purpose
Display the user query counters to home in on the problem, if one exists, by entering the show service user-identification authentication-source authentication-source user-query counters command.
The timestamp returned by ClearPass in response to the user query request can be specified in any of the ISO 8601 formats, including the format that includes a time zone.
Action
show service user-identification authentication-source aruba-clearpass user-query counters

Authentication source: aruba-clearpass

    Web server Address: Address: ip-address
    Access token: token-string
    RE quest sent number: counter
    Routing received number: counter
    Time of last response: timestamp
Example: Configure ClearPass to Filter and Rate-limit Threat and Attack Logs
The SRX Series Firewall can dynamically send to the ClearPass Policy Manager (CPPM) information about threats and attacks identified by its security modules that protect network resources. It detects attack and attack threats that pertain to the activity of specific devices and their users, and it generates corresponding logs. To control this transmission, you must configure the type of logs to be sent and the rate at which they are sent. You can then use this information in setting policy rules on the CPPM to harden your network security.
This example shows how to configure the SRX Series integrated ClearPass authentication and enforcement feature to filter and transmit only threat and attack logs to the CPPM and to control the volume and rate at which the SRX Series Firewall transmits them.
Requirements
The topology for this example uses the following hardware and software components:
Aruba CPPM implemented in a virtual machine (VM) on a server. The CPPM is configured to use its local authentication source to authenticate users.
SRX Series Firewall running Junos OS that includes the integrated ClearPass feature. The SRX Series Firewall is connected to the Juniper Networks EX4300 switch and to the Internet. The SRX Series Firewall communicates with ClearPass over a secure connection.
Juniper Networks EX4300 switch used as the wired 802.1 access device. The EX4300 Layer 2 switch connects the endpoint users to the network. The SRX Series Firewall is connected to the switch.
Wired, network-connected PC running Microsoft OS. The system is directly connected to the EX4300 switch.
Threat and attack logs are written for activity from these devices triggered by events that the security features catch and protect against.
Overview
The SRX Series integrated ClearPass authentication and enforcement feature participates with Aruba ClearPass in protecting your company’s resources against actual and potential attacks. The SRX Series Firewall informs the CPPM about threats to your network resources and attacks against them through logs that it sends. You can then use this information to assess configuration of your security policy on the CPPM. Based on this information, you can harden your security in regard to individual users or devices.
To control the behavior of this feature, you must configure the SRX Series Firewall to filter for attack and threat log entries and set rate-limiting conditions.
You can tune the behavior of this function in the following ways:
Set a filter to direct the SRX Series Firewall to send only threat and attack logs to the CPPM. This filter allows you to ensure that the SRX Series Firewall and the log server do not need to handle irrelevant logs.
Establish rate limit conditions to control the volume of logs that are sent.
You set the rate-limit parameter to control the volume and rate that logs are sent. For example, you can set the rate-limit parameter to 1000 to specify that a maximum of 1000 logs are sent to ClearPass in 1 second. In this case, if there is an attempt to send 1015 logs, the number of logs over the limit—15 logs, in this case—would be dropped. The logs are not queued or buffered.
You can configure a maximum of three log streams with each individual log defined by its destination, log format, filter, and rate limit. Log messages are sent to all configured log streams. Each stream is individually rate-limited.
To support rate-limiting, log messages are sent out from the device’s local SPU at a divided rate. In the configuration process, the Routing Engine assigns a divided rate to each SPU. The divided rate is equal to the configured rate divided by the number of SPUs on the device:
divided-rate = configured-rate/number-of-SPUs
Topology
Figure 6shows the topology for this example.
Configuration
This example covers how to configure a filter to select threat and attack logs to be sent to ClearPass. It also covers how to set a rate limiter to control the volume of logs sent during a given period. It includes these parts:
- CLI Quick Configuration
- Configuring Integrated ClearPass Authentication and Enforcement to Filter for Threat and Attack Logs Sent to the CPPM
- Results
CLI Quick Configuration
To quickly configure this example, copy the following statements, paste them into a text file, remove any line breaks, change any details necessary to match your network configuration, copy and paste the statements into the CLI at the [edit] hierarchy level, and then enter commit from configuration mode.
set security log stream threat-attack-logs host 203.0.113.47
set security log mode stream
set security log source-interface ge-0/0/1.0
set security log stream to_clearpass format sd-syslog
set security log stream to_clearpass filter threat-attack
set security log stream to_clearpass rate-limit 1000
Configuring Integrated ClearPass Authentication and Enforcement to Filter for Threat and Attack Logs Sent to the CPPM
Step-by-Step Procedure
Specify a name for the log stream and the IP address of its destination.
[edit security]
user@host# set security log stream threat-attack-logs host 203.0.113.47
Set the log mode to stream.
[edit security]
user@host# set log mode stream
Set the host source interface number.
[edit security]
user@host#set log source-interface ge-0/0/1.0
Set the log stream to use the structured syslog format for sending logs to ClearPass through syslog.
[ edit security]
user@host# set log stream to_clearpass format sd-syslog
Specify the type of events to be logged.
[edit security]
user@host# set log stream to_clearpass filter threat-attack
Note:This configuration is mutually exclusive in relation to the current category set for the filter.
Set rate limiting for this stream. The range is from 1 through 65,535.
This example specifies that up to 1000 logs per second can be sent to ClearPass. When the maximum is reached, any additional logs are dropped.
[ edit security]
user@host# set  log stream to_clearpass rate-limit 1000
Results
From configuration mode, confirm your configuration for interfaces by entering the show interfaces command. If the output does not display the intended configuration, repeat the instructions in this example to correct the configuration.
mode stream;
source-interface ge-0/0/1.0;
stream threat-attack-logs {
    host {
        203.0.113.47;
    }
}
stream to_clearpass {
    format sd-syslog;
    filter threat-attack;
    rate-limit {
        1000;
    }
}
Example: Configure ClearPass with JIMS
This example shows how to enable Juniper Identity Management Service (JIMS) and ClearPass at the same time for user identity information, and verify how JIMS and ClearPass works at the same time. Also, this example explains which authentication entries are given first preference and how the timeouts behave for JIMS and ClearPass.
Requirements
This example uses the following hardware and software components:
An SRX Series Firewall.
An IP address of the JIMS server.
ClearPass client IP address.
Aruba ClearPass Policy Manager (CPPM). The CPPM is configured to use its local authentication source to authenticate users.
Note:It is assumed that the CPPM is configured to provide the SRX Series Firewall with user authentication and identity information, including the username, a list of the names of any groups that the user belongs to, the IP addresses of the devices used, and the device posture token.
Overview
An SRX Series Firewall obtains the user or device identity information from different authentication sources. After the SRX Series Firewall obtains the device identity information, it creates an entry in the device identity authentication table. The SRX Series Firewall relies on JIMS and ClearPass for user identity information. By enabling JIMS and ClearPass at the same time, an SRX Series Firewall queries JIMS to obtain user identity information from Active Directory and the exchange servers, and CPPM pushes the user authentication and identity information to the SRX Series Firewall through Web API.
When both JIMS IP query and ClearPass user query are enabled, SRX Series Firewall always queries
ClearPass first. When the IP-user or group mapping is received from both JIMS and
CPPM, an SRX Series Firewall considers the latest authentication entries and
overwrites the existing authentication entries. You can set a
delay-query-time parameter, specified in seconds, that allows
the SRX Series Firewall to wait for a period of time before sending the query. When
JIMS and ClearPass are enabled, the delay time should be the same value for each
other. Otherwise, an error message is displayed and the commit check fails.
Configuration
CLI Quick Configuration
To quickly configure this example, copy the
following commands, paste them into a text file, remove any line breaks,
change any details necessary to match your network configuration,
and then copy and paste the commands into the CLI at the [edit] hierarchy level.
set services user-identification identity-management connection primary address 192.0.2.0
set services user-identification identity-management connection primary client-id otest
set services user-identification identity-management connection primary client-secret test
set services user-identification authentication-source aruba-clearpass user-query web-server cp-server
set services user-identification authentication-source aruba-clearpass user-query address 198.51.100.0
set services user-identification authentication-source aruba-clearpass user-query client-id otest
set services user-identification authentication-source aruba-clearpass user-query client-secret test
set services user-identification authentication-source aruba-clearpass user-query token-api oauth_token/oauth
set services user-identification authentication-source aruba-clearpass user-query query-api "user_query/v1/ip/$IP$"
set system services webapi user root
set system services webapi user password “$ABC123"
set system services webapi client 203.0.113.0
set system services webapi https port 8443
set system services webapi https default-certificate
set services user-identification authentication-source aruba-clearpass authentication-entry-timeout 30
set services user-identification authentication-source aruba-clearpass invalid-authentication-entry-timeout 30
set services user-identification identity-management authentication-entry-timeout 30
set services user-identification identity-management invalid-authentication-entry-timeout 30
set services user-identification identity-management ip-query query-delay-time 15
set services user-identification authentication-source aruba-clearpass user-query delay-query-time 15
Procedure
Step-by-Step Procedure
To configure JIMS and ClearPass at the same time, use the following configurations:
Configure the IP address of the primary JIMS server.
[edit services]
user@host# set user-identification identity-management connection primary address 192.0.2.0
Configure the client ID that the SRX Series provides to the JIMS primary server as part of its authentication.
[edit services]
user@host# set user-identification identity-management connection primary client-id otest
Configure the client secret that the SRX Series provides to the JIMS primary server as part of its authentication.
[edit services]
user@host# set user-identification identity-management connection primary client-secret test
-
Configure Aruba ClearPass as the authentication source for user query requests, and configure the ClearPass webserver name and its IP address. The SRX Series Firewall requires this information to contact the ClearPass webserver.
[edit services]
user@host# set user-identification authentication-source aruba-clearpass user-query web-server cp-server address 198.51.100.0
-
Configure the client ID and the client secret that the SRX Series Firewall requires obtaining an access token required for user queries.
[edit services]
user@host# set user-identification authentication-source aruba-clearpass user-query client-id otest
user@host# set user-identification authentication-source aruba-clearpass user-query client-secret test
Configure the token API that is used in generating the URL for acquiring an access token.
[edit services]
user@host# set user-identification authentication-source aruba-clearpass user-query token-api oauth_token/oauth
Configure the query API to use for querying individual user authentication and identity information.
[edit services]
user@host# set user-identification authentication-source aruba-clearpass user-query query-api "user_query/v1/ip/$IP$"
Configure the Web API daemon username and password for the account.
[edit system services]
user@host# set webapi user user password “$ABC123"
Configure the Web API client address–that is, the IP address of the ClearPass webserver’s data port.
[edit system services]
user@host# set webapi client 203.0.113.0
Configure the Web API process HTTPS service port.
[edit system services]
user@host# set webapi https port 8443
user@host# set webapi https default-certificate
Configure an authentication entry timeout value for Aruba ClearPass.
[edit services]
user@host# set user-identification authentication-source aruba-clearpass invalid-authentication-entry-timeout 30
Configure an independent timeout value to be assigned to invalid user authentication entries in the SRX Series authentication table for Aruba ClearPass.
[edit services]
user@host# set user-identification identity-management authentication-entry-timeout 30
Configure an independent timeout value to be assigned to invalid user authentication entries in the SRX Series authentication table for JIMS.
[edit services]
user@host# set user-identification identity-management invalid-authentication-entry-timeout 30
-
Set a
query-delay-timeparameter, specified in seconds, that allows the SRX Series Firewall to wait for a period of time before sending the query.[edit services] user@host# set user-identification identity-management ip-query query-delay-time 15
-
Set a
query-delay-timeparameter, specified in seconds, that allows the SRX Series Firewall to wait for a period of time before sending the query.[edit services] user@host# set user-identification authentication-source aruba-clearpass user-query delay-query-time 15
Results
From configuration mode, confirm your configuration
by entering the show system services webapi, command. If
the output does not display the intended configuration, repeat the
instructions in this example to correct the configuration.
[edit ]
user@host# show system services webapi
user {
    device;
    password "$ABC123"; ## SECRET-DATA
}
client {
    203.0.113.0;
}
https {
    port 8443;
    default-certificate;
}
From configuration mode, confirm your configuration by entering
the show services user-identification authentication-source aruba-clearpass command. If the output does not display the intended configuration,
repeat the instructions in this example to correct the configuration.
[edit ]
user@host# show services user-identification authentication-source aruba-clearpass
authentication-entry-timeout 30;
invalid-authentication-entry-timeout 30;
user-query {
    web-server {
        cp-server;
        address 10.208.164.31;
    }
    client-id otest;
    client-secret "$ABC123"; ## SECRET-DATA
    token-api oauth_token/oauth;
    query-api "user_query/v1/ip/$IP$";
    delay-query-time 15;
}
From configuration mode, confirm your configuration by entering
the show services user-identification identity-management command. If the output does not display the intended configuration,
repeat the instructions in this example to correct the configuration.
[edit ]
user@host# show services user-identification identity-management
authentication-entry-timeout 30;
invalid-authentication-entry-timeout 30;
        connection {
            primary {
                address 10.208.164.137;
                client-id otest;
                client-secret "$ABC123"; ## SECRET-DATA
            }
        }
        ip-query {
            query-delay-time 15;
        }
If you are done configuring the devices, enter commit from configuration mode.
Verification
Confirm that the configuration is working properly.
- Verifying JIMS Authentication Entries
- Verifying ClearPass Authentication Entries
- Verifying Device Entries by Domain
- Verifying ClearPass Webserver Is Online
- Verifying JIMS Server Is Online
Verifying JIMS Authentication Entries
Purpose
Verify that the device identity authentication table for JIMS is updated.
Action
Enter the show services user-identification authentication-table
authentication-source identity-management source-name "JIMS - Active
Directory" node 0 command.
show services user-identification authentication-table authentication-source identity-management source-name "JIMS - Active Directory" node 0 node0: -------------------------------------------------------------------------- Logical System: root-logical-system Domain: ad-jims-2008.com Total entries: 5 Source IP Username groups(Ref by policy) state 192.0.2.2 administrator dow_group_00001,dow_group_0000 Valid 192.0.2.4 administrator dow_group_00001,dow_group_0000 Valid 192.0.2.5 administrator dow_group_00001,dow_group_0000 Valid 192.0.2.7 administrator dow_group_00001,dow_group_0000 Valid 192.0.2.11 administrator dow_group_00001,dow_group_0000 Valid
Meaning
The output displays the authentication entries are updated.
Verifying ClearPass Authentication Entries
Purpose
Verify that the device identity authentication table for ClearPass is updated.
Action
Enter the show services user-identification authentication-table
authentication-source aruba-clearpass node 0 command to verify
that entries are updated.
show services user-identification authentication-table authentication-source aruba-clearpass node 0 node0: -------------------------------------------------------------------------- Logical System: root-logical-system Domain: juniper.net Total entries: 1 Source IP Username groups(Ref by policy) state 2001:db8::::63bf:3fff:fdd2 ipv6_user01 ipv6_group1 Valid
Meaning
The output displays the authentication entries are getting updated for ClearPass.
Verifying Device Entries by Domain
Purpose
Verify that all authenticated devices belong to the domain.
Action
Enter the show services user-identification device-information
table all domain juniper.net node 0 command.
show services user-identification device-information table all domain juniper.net node 0 node0: -------------------------------------------------------------------------- Domain: juniper.net Total entries: 1 Source IP Device ID Device-Groups 2001:db8:4136:e378:8000:63bf:3fff:fdd2 dev01 device_group1
Meaning
The output displays all authenticated devices that belong to the domain.
Verifying ClearPass Webserver Is Online
Purpose
Verify that the ClearPass webserver is online.
Action
Enter the show services user-identification authentication-source
aruba-clearpass user-query status command.
show services user-identification authentication-source
aruba-clearpass user-query status
node1:
--------------------------------------------------------------------------
Authentication source: aruba-clearpass
Web server Address: 198.51.100.0
Status: Online
Current connections: 0
Meaning
The output displays the ClearPass webserver is online.
Verifying JIMS Server Is Online
Purpose
Verify that the JIMS server is online.
Action
Enter the show services user-identification identity-management
status command.
show services user-identification identity-management
status
node1:
--------------------------------------------------------------------------
Primary server :
Address : 192.0.2.0
Port : 443
Connection method : HTTPS
Connection status : Online
Secondary server :
Address : 192.0.2.1
Port : 443
Connection method : HTTPS
Connection status : Offline
Last received status message : OK (200)
Access token : P1kAlMiG2Kb7FzP5tM1QBI6DSS92c31Apgjk9lV
Token expire time : 2018-04-12 06:57:37
Meaning
The output displays the JIMS server is online.