Appendix: Test Cases to Be Performed
In this chapter, we are sharing information about the major test cases performed for this JVD and how you can repeat and review them in your own environment.
Authentication MAB Wired Client
To test MAC address-based authentication of a wired client, execute the following steps one by one.
First, we need to configure the port on the access switch where
the wired client is attached to use the profile for MAB that we
defined in the switch template in Figure 4. Change the configuration profile to
vlan1099-mab.

After this is applied, your wired clients will no longer be able to communicate with the network since we have not authenticated them yet.
(Optional) Remote Shell to the switch to review the configurations applied for RadSec, the certificate, and the port.
mist@switch1> show configuration | display set | match dot1x
set groups top access profile dot1x accounting-order radius
set groups top access profile dot1x authentication-order radius
set groups top access profile dot1x radius authentication-server 3.33.153.159
set groups top access profile dot1x radius authentication-server 15.197.139.214
set groups top access profile dot1x radius accounting-server 3.33.153.159
set groups top access profile dot1x radius accounting-server 15.197.139.214
set groups top access profile dot1x radius options nas-identifier 6ce2ec31-4db2-4d56-8aae-4047380273cb00cc34f37400
set groups top access profile dot1x accounting order radius
set groups top access profile dot1x accounting update-interval 600
set protocols dot1x authenticator authentication-profile-name dot1x
set protocols dot1x authenticator interface vlan1099-mab supplicant multiple
set protocols dot1x authenticator interface vlan1099-mab mac-radius restrict
set protocols dot1x authenticator interface vlan1099-mab mac-radius authentication-protocol pap
mist@switch1> show configuration | display set | match vlan1099-mab | match interfaces
set groups vlan1099-mab interfaces <*> unit 0 family ethernet-switching vlan members vlan1099
set interfaces interface-range vlan1099-mab member ge-0/0/0
set interfaces interface-range vlan1099-mab apply-groups vlan1099-mab
mist@switch1> show configuration | display set | match access
set groups top access radius-server 3.33.153.159 secret "$9$7HdYoJZj.mTGD.5F3tp"
set groups top access radius-server 3.33.153.159 timeout 5
set groups top access radius-server 3.33.153.159 radsec-destination 895
set groups top access radius-server 15.197.139.214 secret "$9$7HdYoJZj.mTGD.5F3tp"
set groups top access radius-server 15.197.139.214 timeout 5
set groups top access radius-server 15.197.139.214 radsec-destination 896
set groups top access profile dot1x accounting-order radius
set groups top access profile dot1x authentication-order radius
set groups top access profile dot1x radius authentication-server 3.33.153.159
set groups top access profile dot1x radius authentication-server 15.197.139.214
set groups top access profile dot1x radius accounting-server 3.33.153.159
set groups top access profile dot1x radius accounting-server 15.197.139.214
set groups top access profile dot1x radius options nas-identifier 6ce2ec31-4db2-4d56-8aae-4047380273cb00cc34f37400
set groups top access profile dot1x accounting order radius
set groups top access profile dot1x accounting update-interval 600
set groups top access radsec destination 895 address 3.33.153.159
set groups top access radsec destination 895 port 2083
set groups top access radsec destination 895 tls-certificate mist-nac-device-cert
set groups top access radsec destination 895 tls-force-ciphers low
set groups top access radsec destination 895 tls-min-version v1.2
set groups top access radsec destination 895 tls-peer-name aws-production.cdd0e7d1-e1f2-4280-86cd-0327e6ce88ae
set groups top access radsec destination 895 tls-timeout 30
set groups top access radsec destination 896 address 15.197.139.214
set groups top access radsec destination 896 port 2083
set groups top access radsec destination 896 tls-certificate mist-nac-device-cert
set groups top access radsec destination 896 tls-force-ciphers low
set groups top access radsec destination 896 tls-min-version v1.2
set groups top access radsec destination 896 tls-peer-name aws-production.cdd0e7d1-e1f2-4280-86cd-0327e6ce88ae
set groups top access radsec destination 896 tls-timeout 30
mist@switch1> show security pki ca-certificate
LSYS: root-logical-system
CA profile: mist-vpn-ca
Certificate identifier: mist-vpn-ca
Issued to: cdd0e7d1-e1f2-4280-86cd-0327e6ce88ae, Issued by: C = US, O = Mist, OU = OrgCA, CN = cdd0e7d1-e1f2-4280-86cd-0327e6ce88ae
Validity:
Not before: 08-28-2023 09:37 UTC
Not after: 08-25-2033 09:37 UTC
Public key algorithm: rsaEncryption(4096 bits)
Keypair Location: Keypair generated locally
mist@switch1> show security pki local-certificate
LSYS: root-logical-system
Certificate identifier: mist-nac-device-cert
Issued to: 00cc34f37400, Issued by: C = US, O = Mist, OU = OrgCA, CN = cdd0e7d1-e1f2-4280-86cd-0327e6ce88ae
Validity:
Not before: 08-23-2024 10:11 UTC
Not after: 08-23-2025 10:11 UTC
Public key algorithm: rsaEncryption(2048 bits)
Keypair Location: Keypair generated locally
mist@switch1> show system connections | match 2083
tcp4 0 0 10.33.33.19.59751 15.197.139.214.2083 ESTABLISHED
tcp4 0 0 10.33.33.19.65050 3.33.153.159.2083 ESTABLISHED
mist@switch1> show dot1x interface ge-0/0/0
802.1X Information:
Interface Role State MAC address User
ge-0/0/0.0 Authenticator Connecting
mist@switch1> show dot1x interface ge-0/0/0 detail
ge-0/0/0.0
Role: Authenticator
Administrative state: Auto
Supplicant mode: Multiple
Number of retries: 3
Quiet period: 60 seconds
Transmit period: 30 seconds
Mac Radius: Enabled
Mac Radius Restrict: Enabled
Mac Radius Authentication Protocol: PAP
Reauthentication: Enabled
Reauthentication interval: 3600 seconds
Supplicant timeout: 30 seconds
Server timeout: 30 seconds
Maximum EAPOL requests: 2
Guest VLAN member: not configured
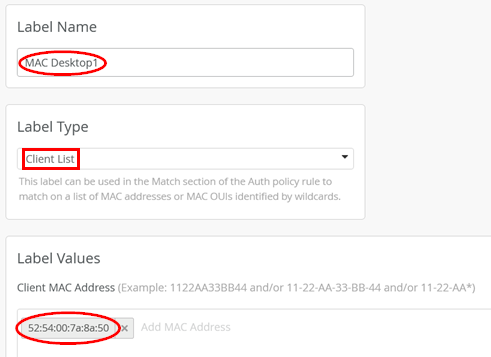
Number of connected supplicants: 0You must know the MAC address you want to authenticate. The following example shows the retrieval of this information from a Linux client.
root@desktop1:~# ip a
1: lo: <LOOPBACK,UP,LOWER_UP> mtu 65536 qdisc noqueue state UNKNOWN group default qlen 1000
link/loopback 00:00:00:00:00:00 brd 00:00:00:00:00:00
inet 127.0.0.1/8 scope host lo
valid_lft forever preferred_lft forever
inet6 ::1/128 scope host
valid_lft forever preferred_lft forever
.
4: ens5: <BROADCAST,MULTICAST,UP,LOWER_UP> mtu 1500 qdisc fq_codel state UP group default qlen 1000
    link/ether 52:54:00:7a:8a:50 brd ff:ff:ff:ff:ff:ff
    inet 10.99.99.99/24 brd 10.99.99.255 scope global ens5
       valid_lft forever preferred_lft forever
    inet6 fe80::5054:ff:fe7a:8a50/64 scope link
       valid_lft forever preferred_lft forever
Next, go to Organization > Auth Policy Labels and create a label identifying this MAC address:
- Label Name=
MAC Desktop1 - Label Type=
Client List - Label Values=
<your-MAC>
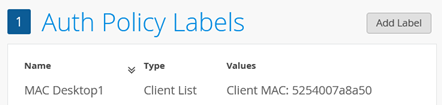
You should only see this label right now.
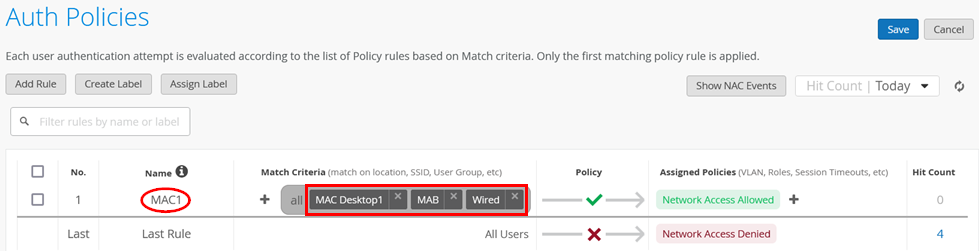
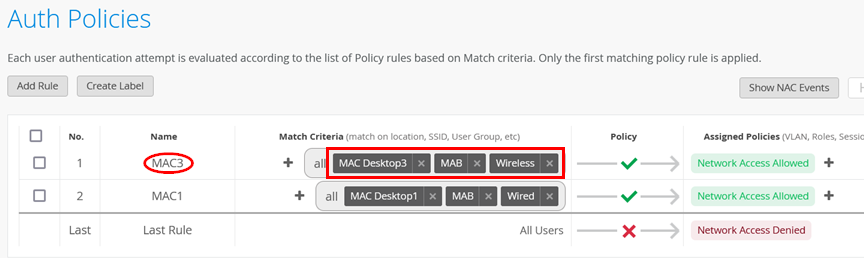
Then, go to Organization > Auth Policies and create the following rule:
- Position=
1 - Name=
MAC1 - Match Criteria=
MAC Desktop1andMABand (optional)Wired - Policy Pass=
Pass - Assigned Policies=
Network Access Allowed
The session reauthentication interval for MAC addresses is set to 10 minutes by default. If you do not change this interval value using additional CLI configuration and a MAC address is not initially authenticated, it can take up to 10 minutes to get a successful MAC authentication.
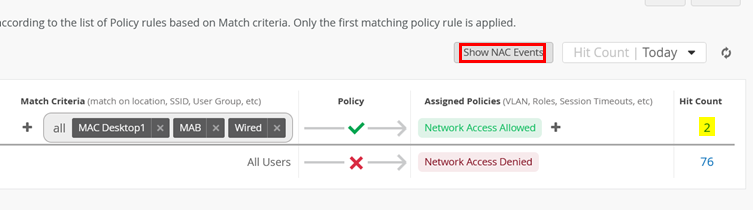
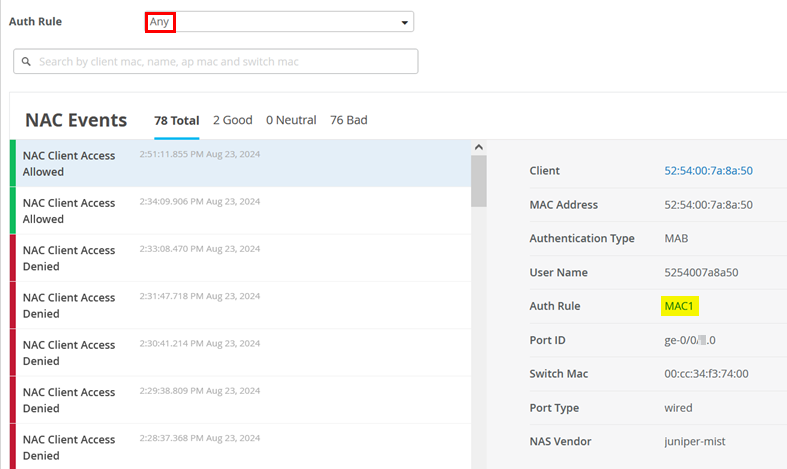
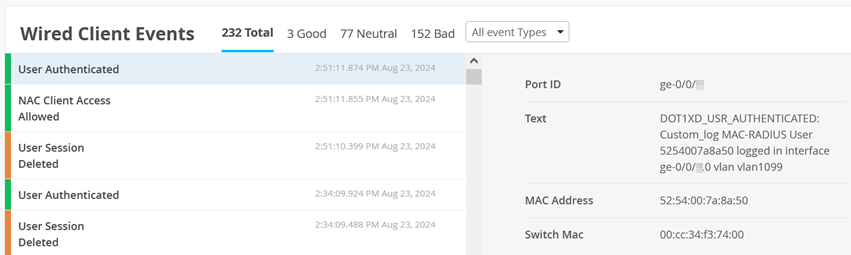
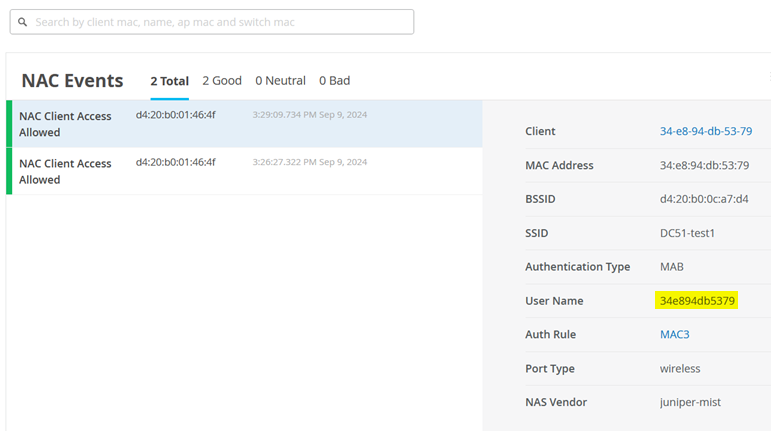
You can confirm the success of your authentication policy in this window when it increments the Hit Count value. Also, select Show NAC Events.
You can see the information about your client here:
You can also go to Clients > Wired Clients.
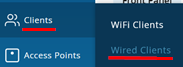
Then, find your client in the list and click Wired Client Insights.
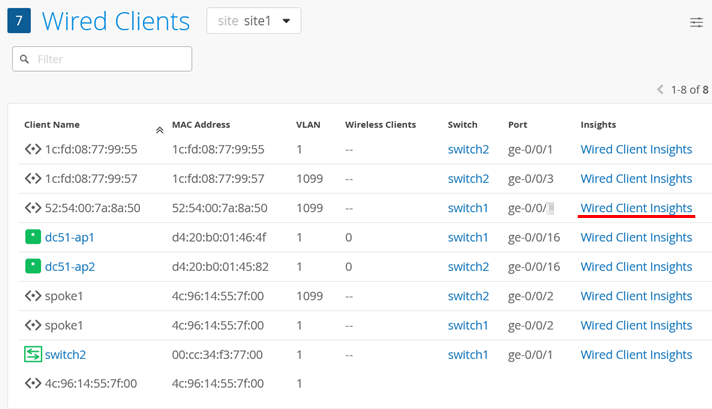
Then, you can inspect the Wired Client Events for NAC Client Access Allowed events.
Also see User Authenticated events.
(Optional) You can Remote Shell to the switch and run the commands shown below:
root@switch1> show dot1x interface ge-0/0/0
802.1X Information:
Interface     State          MAC address         Method             Vlan  User
ge-0/0/0.0    Authenticated  52:54:00:7A:8A:50   Mac Radius         1099  5254007a8a50
root@switch1> show dot1x interface ge-0/0/0 detail
ge-0/0/0.0
  Role: Authenticator
  Administrative state: Auto
  Supplicant mode: Multiple
  Number of retries: 3
  Quiet period: 60 seconds
  Transmit period: 30 seconds
  Mac Radius: Enabled
  Mac Radius Restrict: Enabled
  Mac Radius Authentication Protocol: PAP
  Reauthentication: Enabled
  Reauthentication interval: 3600 seconds
  Supplicant timeout: 30 seconds
  Server timeout: 30 seconds
  Maximum EAPOL requests: 2
  Guest VLAN member: not configured
  Number of connected supplicants: 1
    Supplicant: 5254007a8a50, 52:54:00:7A:8A:50
      Operational state: Authenticated
      Backend Authentication state: Idle
      Authentication method: Mac Radius
      Authenticated VLAN: vlan1099
      Session Reauth interval: 3600 seconds
      Reauthentication due in 3483 seconds
      Session Accounting Interim  Interval: 36000 seconds
      Accounting Update  due in 35883 seconds
      Eapol-Block: Not In Effect
      Domain: Data
Authentication MAB Wireless Client
In this example, we use MAC address-based authentication for wireless clients. We combine it with PSK authentication to achieve some minimal traffic encryption over the air as MAC addresses are easy to spot and mimic by a potential attacker.
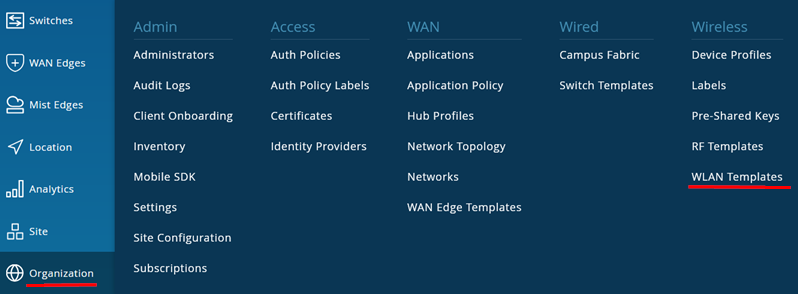
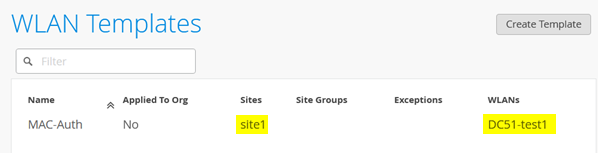
An SSID for wireless can be configured in several ways. In our example, we use a WLAN template by first navigating to Organization > WLAN Templates.
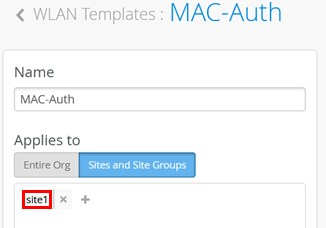
Create a new template with the following settings:
- Name=
MAC-Auth - Applies to:
- Sites and Site Groups=
site1
- Sites and Site Groups=
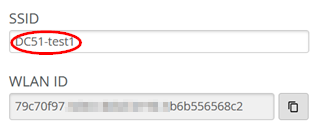
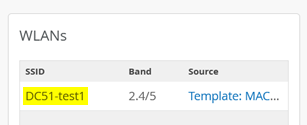
Create an SSID similar to the figure shown below:
Under Security, configure the following:
- Security Type=
WPA2andPersonal (PSK) - Passphrase=
10881088(or anything else you remember) - MAC address authentication by RADIUS
lookup=
Checked. This is important for our test!
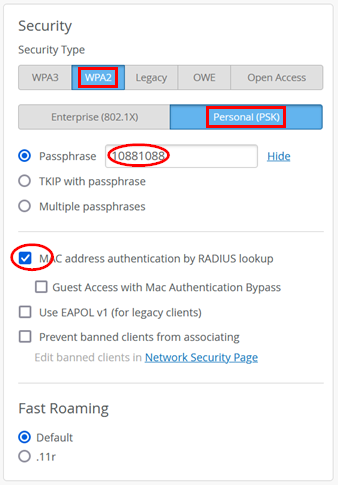
Then, configure the following settings:
- Authentication Servers=
Mist Auth - VLAN=
Tagged - VLAN ID=
1088
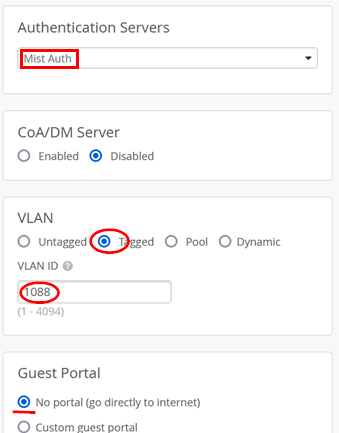
After saving the template, you should see the following configuration:
Next, go Access Points and select your site to review the APs. Select one AP.
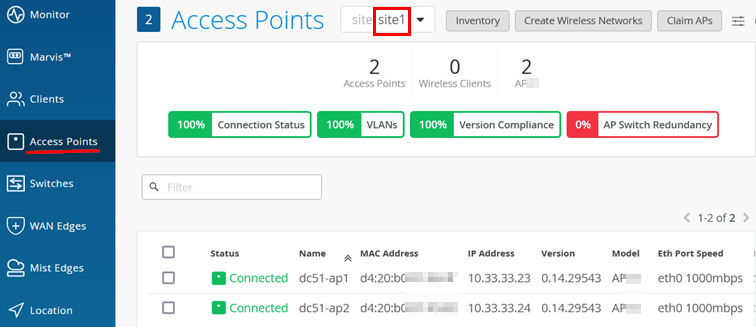
Review the AP configuration applied and ensure the SSID from the template appears in the WLANs tab.
The next step is to determine a wireless client’s MAC address and allow it to use this SSID. There are several ways to do this, and they are different for every client OS. The below example shows how to retrieve the wireless interfaces available on a Linux client and use that information to find the MAC address of that client:
root@desktop3:~# iwconfig
ens3      no wireless extensions.
wlx34e894db5379  unassociated  Nickname:"WIFI@RTL8821AU"
          Mode:Managed  Frequency=2.412 GHz  Access Point: Not-Associated
          Sensitivity:0/0
          Retry:off   RTS thr:off   Fragment thr:off
          Encryption key:off
          Power Management:off
          Link Quality:0  Signal level:0  Noise level:0
          Rx invalid nwid:0  Rx invalid crypt:0  Rx invalid frag:0
          Tx excessive retries:0  Invalid misc:0   Missed beacon:0
lo        no wireless extensions.
root@desktop3:~# ip a
.
.
3: wlx34e894db5379: <NO-CARRIER,BROADCAST,MULTICAST,UP,LOWER_UP> mtu 1500 qdisc mq state DORMANT group default qlen 1000
link/ether 34:e8:94:db:53:79 brd ff:ff:ff:ff:ff:ffA mobile client OS may frequently change the Wi-Fi adapter’s MAC address, making it impossible to manage the device using its MAC address. Sometimes this option can be disabled, but you need to know how to change this configuration on the device.
Next, we need to specify a label that identifies this MAC address by navigating to Organization > Auth Policy Labels and creating the following label identifying this MAC address:
- Label Name=
MAC Desktop3 - Label Type=
Client List - Label Values=
<your-MAC>
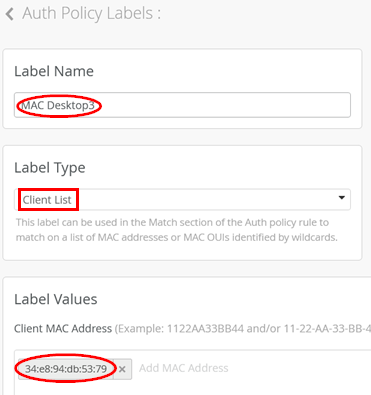
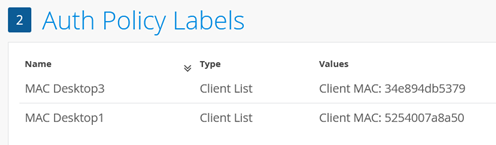
You should now have two MAC address labels.
Then, go to Organization > Auth Policies and create the following rule:
- Position=
1 - Name=
MAC3 - Match Criteria=
MAC Desktop3andMABand (optional)Wireless - Policy Pass=
Pass - Assigned Policies=
Network Access Allowed
After saving the new ruleset, you are ready to have the wireless client use the configured SSID and attach to the AP. Again, this example shows a Linux client using the wpa_supplicant:
# write a wpa supplicant configuration file
cat <<EOF >/etc/wpa_supplicant/wpa_supplicant.conf
ctrl_interface=DIR=/var/run/wpa_supplicant
ctrl_interface_group=wheel
ap_scan=1
network={
        ssid="DC51-test1"
        psk="10881088"
}
EOF
# run the supplicant in foreground so that we can see its debugging messages
root@desktop3:~# rm -f /var/run/wpa_supplicant/wlx34e894db5379
root@desktop3:~# wpa_supplicant -c /etc/wpa_supplicant/wpa_supplicant.conf -D nl80211 -i wlx34e894db5379
.
Successfully initialized wpa_supplicant
wlx34e894db5379: Trying to associate with d4:20:b0:0c:a7:d4 (SSID='DC51-test1' freq=5260 MHz)
wlx34e894db5379: CTRL-EVENT-STARTED-CHANNEL-SWITCH freq=5260 ht_enabled=1 ch_offset=1 ch_width=40 MHz cf1=5270 cf2=0
wlx34e894db5379: Associated with d4:20:b0:0c:a7:d4
wlx34e894db5379: CTRL-EVENT-SUBNET-STATUS-UPDATE status=0
wlx34e894db5379: CTRL-EVENT-REGDOM-CHANGE init=COUNTRY_IE type=COUNTRY alpha2=US
wlx34e894db5379: WPA: Key negotiation completed with d4:20:b0:0c:a7:d4 [PTK=CCMP GTK=CCMP]
wlx34e894db5379: CTRL-EVENT-CONNECTED - Connection to d4:20:b0:0c:a7:d4 completed [id=0 id_str=]
Through a second shell, obtain a DHCP lease and check the AP assignment:
root@desktop3:~# dhclient wlx34e894db5379
root@desktop3:~# ip r
default via 10.88.88.1 dev wlx34e894db5379
10.88.88.0/24 dev wlx34e894db5379 proto kernel scope link src 10.88.88.10
root@desktop3:~# iwconfig
ens3      no wireless extensions.
wlx34e894db5379  IEEE 802.11AC  ESSID:"DC51-test1"  Nickname:"WIFI@RTL8821AU"
          Mode:Managed  Frequency:5.26 GHz  Access Point: D4:20:B0:0C:A7:D4
          Bit Rate:200 Mb/s   Sensitivity:0/0
          Retry:off   RTS thr:off   Fragment thr:off
          Encryption key:****-****-****-****-****-****-****-****   Security mode:open
          Power Management:off
          Link Quality=58/100  Signal level=75/100  Noise level=0/100
          Rx invalid nwid:0  Rx invalid crypt:0  Rx invalid frag:0
          Tx excessive retries:0  Invalid misc:0   Missed beacon:0
lo        no wireless extensions.
Return to Organization > Auth Policies and you should see the Hit Count for the rule incremented like in the figure shown below:

Click on this link and you should see information like the figure shown below:
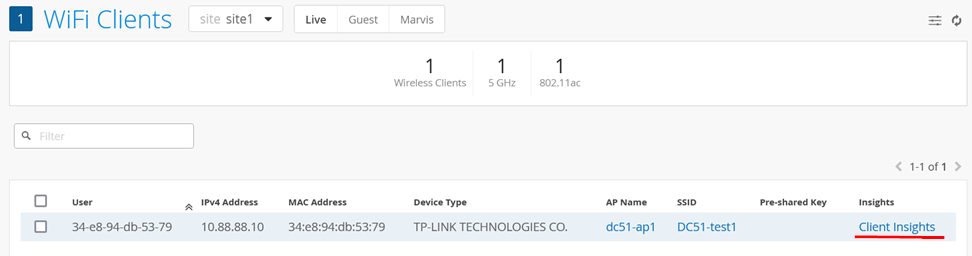
Another way to review information about the wireless client is to go to Clients > WiFi Clients.
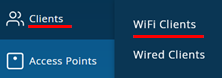
You should see your client, and where it is attached. Click on Client Insights.
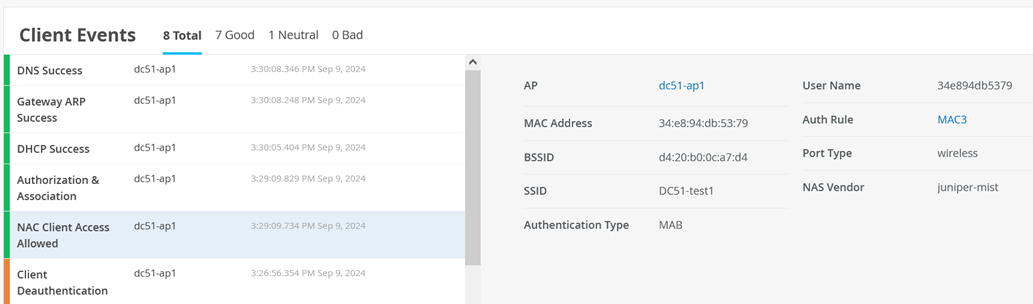
In the Client Events section, you will see information about the MAC address-based authentication process.
EAP-TLS Authentication of a Wired Client
To test EAP-TLS wired client-based authentication of a wired client, execute the following steps one by one.
First, we need to change the port on the access switch where the
wired client is attached to use the profile for 802.1X that we
defined in the switch template in Figure 5. Change the configuration profile to
vlan1099-eap:
After this is applied, your wired clients will not be able to communicate further with the network as we have not authenticated them yet.
(Optional) Remote Shell to the switch to review the configurations applied for RadSec, the certificate, and the port.
mist@switch1> show configuration | display set | match dot1x
set groups top access profile dot1x accounting-order radius
set groups top access profile dot1x authentication-order radius
set groups top access profile dot1x radius authentication-server 3.33.153.159
set groups top access profile dot1x radius authentication-server 15.197.139.214
set groups top access profile dot1x radius accounting-server 3.33.153.159
set groups top access profile dot1x radius accounting-server 15.197.139.214
set groups top access profile dot1x radius options nas-identifier 6ce2ec31-4db2-4d56-8aae-4047380273cb00cc34f37700
set groups top access profile dot1x accounting order radius
set groups top access profile dot1x accounting update-interval 600
set protocols dot1x authenticator authentication-profile-name dot1x
set protocols dot1x authenticator interface vlan1099-eap
mist@switch1> show configuration | display set | match vlan1099-eap | match interfaces
set groups vlan1099-eap interfaces <*> unit 0 family ethernet-switching vlan members vlan1099
set interfaces interface-range vlan1099-eap member ge-0/0/0
set interfaces interface-range vlan1099-eap apply-groups vlan1099-eap
mist@switch1> show configuration | display set | match access
set groups top access radius-server 3.33.153.159 secret "$9$gnaDk.mTn6AP5nCu0hc"
set groups top access radius-server 3.33.153.159 timeout 5
set groups top access radius-server 3.33.153.159 radsec-destination 895
set groups top access radius-server 15.197.139.214 secret "$9$gnaDk.mTn6AP5nCu0hc"
set groups top access radius-server 15.197.139.214 timeout 5
set groups top access radius-server 15.197.139.214 radsec-destination 896
set groups top access profile dot1x accounting-order radius
set groups top access profile dot1x authentication-order radius
set groups top access profile dot1x radius authentication-server 3.33.153.159
set groups top access profile dot1x radius authentication-server 15.197.139.214
set groups top access profile dot1x radius accounting-server 3.33.153.159
set groups top access profile dot1x radius accounting-server 15.197.139.214
set groups top access profile dot1x radius options nas-identifier 6ce2ec31-4db2-4d56-8aae-4047380273cb00cc34f37700
set groups top access profile dot1x accounting order radius
set groups top access profile dot1x accounting update-interval 600
set groups top access radsec destination 895 address 3.33.153.159
set groups top access radsec destination 895 port 2083
set groups top access radsec destination 895 tls-certificate mist-nac-device-cert
set groups top access radsec destination 895 tls-force-ciphers low
set groups top access radsec destination 895 tls-min-version v1.2
set groups top access radsec destination 895 tls-peer-name aws-production.cdd0e7d1-e1f2-4280-86cd-0327e6ce88ae
set groups top access radsec destination 895 tls-timeout 30
set groups top access radsec destination 896 address 15.197.139.214
set groups top access radsec destination 896 port 2083
set groups top access radsec destination 896 tls-certificate mist-nac-device-cert
set groups top access radsec destination 896 tls-force-ciphers low
set groups top access radsec destination 896 tls-min-version v1.2
set groups top access radsec destination 896 tls-peer-name aws-production.cdd0e7d1-e1f2-4280-86cd-0327e6ce88ae
set groups top access radsec destination 896 tls-timeout 30
mist@switch1> show security pki ca-certificate
LSYS: root-logical-system
  CA profile: mist-vpn-ca
Certificate identifier: mist-vpn-ca
  Issued to: cdd0e7d1-e1f2-4280-86cd-0327e6ce88ae, Issued by: C = US, O = Mist, OU = OrgCA, CN = cdd0e7d1-e1f2-4280-86cd-0327e6ce88ae
  Validity:
    Not before: 08-28-2023 09:37 UTC
    Not after: 08-25-2033 09:37 UTC
  Public key algorithm: rsaEncryption(4096 bits)
  Keypair Location: Keypair generated locally
mist@switch1> show security pki local-certificate
LSYS: root-logical-system
Certificate identifier: mist-nac-device-cert
  Issued to: 00cc34f37400, Issued by: C = US, O = Mist, OU = OrgCA, CN = cdd0e7d1-e1f2-4280-86cd-0327e6ce88ae
  Validity:
    Not before: 08-23-2024 10:11 UTC
    Not after: 08-23-2025 10:11 UTC
  Public key algorithm: rsaEncryption(2048 bits)
  Keypair Location: Keypair generated locally
mist@switch1> show system connections | match 2083
tcp4       0      0  10.33.33.19.59751                             15.197.139.214.2083                           ESTABLISHED
tcp4       0      0  10.33.33.19.65050                             3.33.153.159.2083                             ESTABLISHED
mist@switch1> show dot1x interface ge-0/0/0
802.1X Information:
Interface     Role           State           MAC address          User
ge-0/0/0.0    Authenticator  Connecting
mist@switch1> show dot1x interface ge-0/0/0 detail
ge-0/0/0.0
  Role: Authenticator
  Administrative state: Auto
  Supplicant mode: Single
  Number of retries: 3
  Quiet period: 60 seconds
  Transmit period: 30 seconds
  Mac Radius: Disabled
  Mac Radius Restrict: Disabled
  Reauthentication: Enabled
  Reauthentication interval: 3600 seconds
  Supplicant timeout: 30 seconds
  Server timeout: 30 seconds
  Maximum EAPOL requests: 2
  Guest VLAN member: not configured
  Number of connected supplicants: 0
We do not need to specify a label as we only use the authentication type and the port location for identification of the client in this example. So, go to Organization > Auth Policies and create the following rule:
- Position=
1 - Name=
TLS-Wired - Match Criteria=
EAP-TLSandWired - Policy Pass=
Pass - Assigned Policies=
Network Access Allowed
If you have not done it already, you must perform the enterprise PKI integration and let the Juniper Mist authentication cloud learn the root CA and install a TLS server certificate/key for the RADIUS server. Refer to the examples in the section Juniper Mist Authentication Cloud Certificate Installation.
For this test, ensure that you have not configured any IdP yet since we rely only on the validity of the certificates on both the RADIUS and supplicant sides.
Next, perform an EAP-TLS authentication with a wired supplicant relevant to your client operating system. We have shared examples of configurations for Windows and Linux clients in the section Configure Client Supplicants with Certificates and Necessary EAP Methods.
Upon successful completion of the EAP-TLS authentication, you should see the Hit Count incremented similar to the figure shown below:

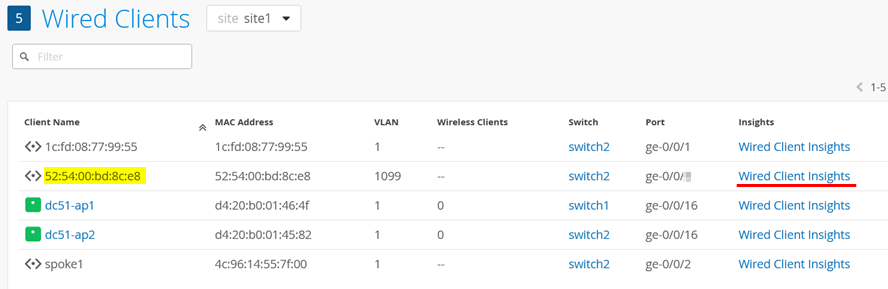
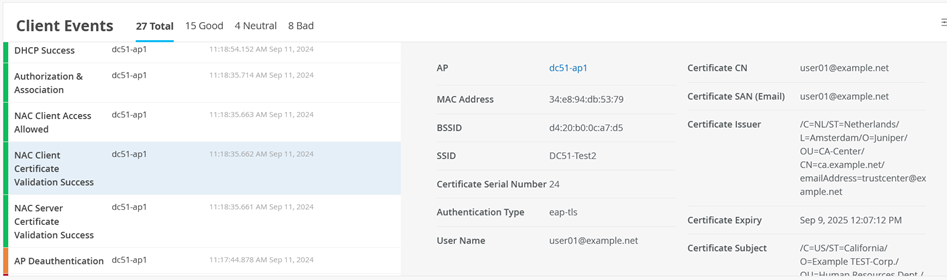
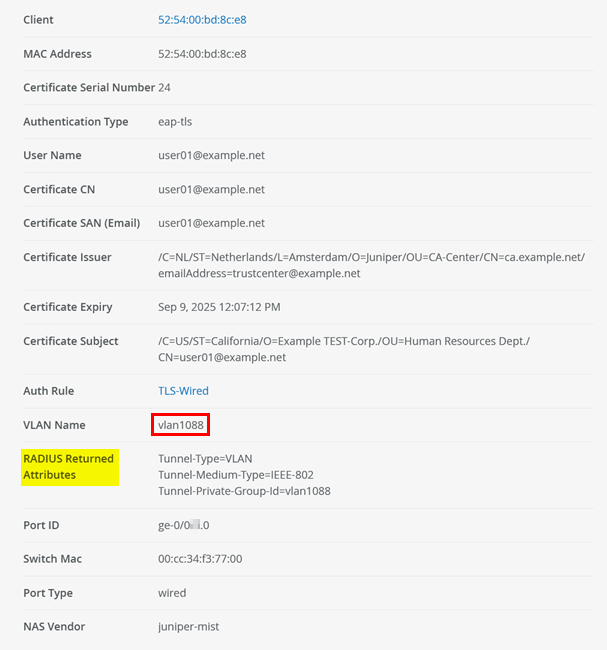
You can see the information about your client:
You can also go to Clients > Wired Clients.
.png)
Then, find your client and select Wired Client Insights.
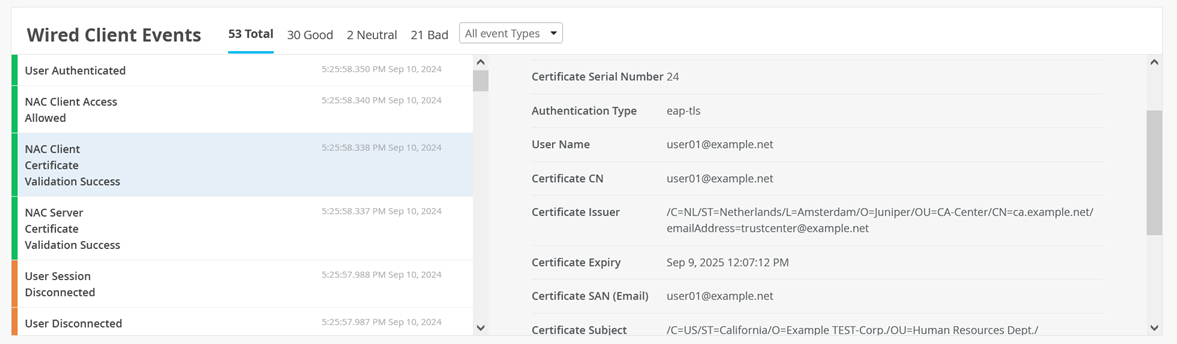
Then, you can inspect the Wired Client Events for NAC Server Certificate Validation Success events.
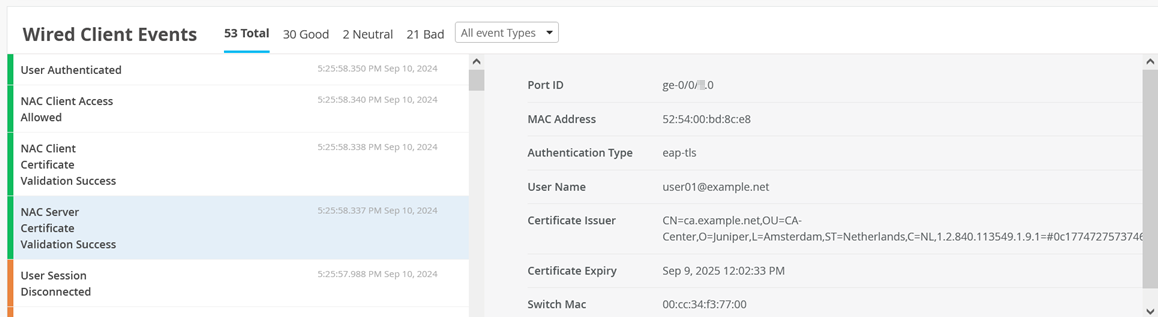
Also see NAC Client Certificate Validation Success events.
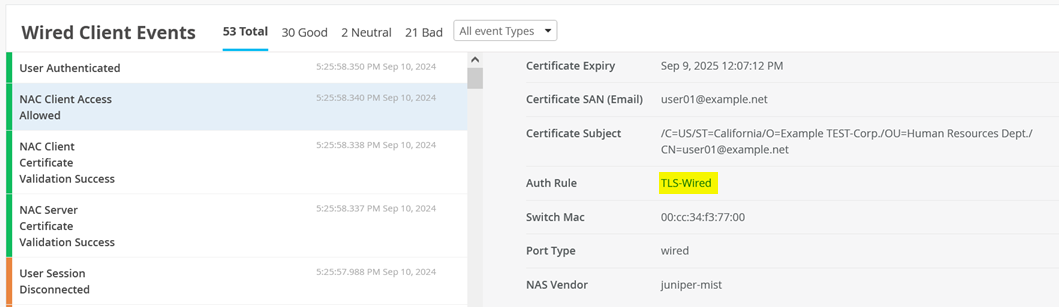
And NAC Client Access Allowed events.
And User Authenticated events.

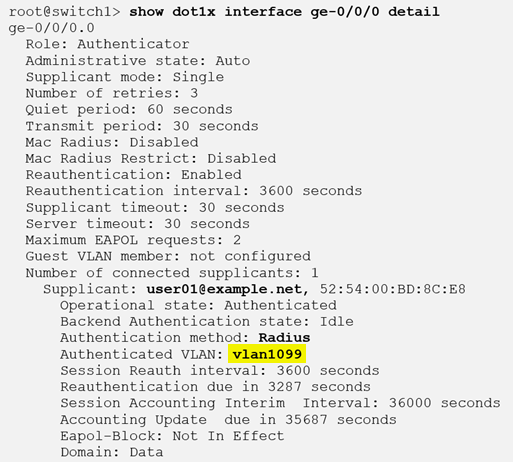
(Optional) Remote Shell to the switch and check the client authentication status using commands like those shown below:
root@switch1> show dot1x interface ge-0/0/0
802.1X Information:
Interface     Role           State           MAC address          User
ge-0/0/0.0    Authenticator  Authenticated   52:54:00:BD:8C:E8    user01@example.net
root@switch1> show dot1x interface ge-0/0/0 detail
ge-0/0/0.0
  Role: Authenticator
  Administrative state: Auto
  Supplicant mode: Single
  Number of retries: 3
  Quiet period: 60 seconds
  Transmit period: 30 seconds
  Mac Radius: Disabled
  Mac Radius Restrict: Disabled
  Reauthentication: Enabled
  Reauthentication interval: 3600 seconds
  Supplicant timeout: 30 seconds
  Server timeout: 30 seconds
  Maximum EAPOL requests: 2
  Guest VLAN member: not configured
  Number of connected supplicants: 1
    Supplicant: user01@example.net, 52:54:00:BD:8C:E8
      Operational state: Authenticated
      Backend Authentication state: Idle
      Authentication method: Radius
      Authenticated VLAN: vlan1099
      Session Reauth interval: 3600 seconds
      Reauthentication due in 3287 seconds
      Session Accounting Interim  Interval: 36000 seconds
      Accounting Update  due in 35687 seconds
      Eapol-Block: Not In Effect
      Domain: Data
EAP-TLS Authentication of a Wireless Client
In this example, we use EAP-TLS for 802.1X-based authentication of wireless clients.
An SSID for wireless can be configured in several ways. In our example, we use a WLAN template by first navigating to Organization > WLAN Templates.
.png)
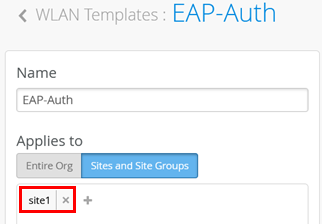
Create a new template with the following settings:
- Name=
EAP-Auth - Applies to:
- Sites and Site Groups=
site1
- Sites and Site Groups=
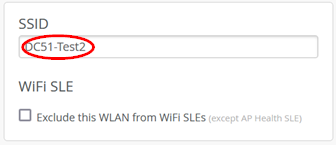
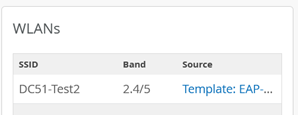
Create an SSID like the figure shown below:
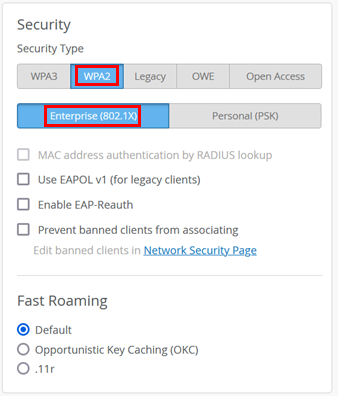
Under Security, configure the following settings:
- Security Type=
WPA2andEnterprise (802.1X)
Then, configure the following settings:
- Authentication Servers=
Mist Auth - VLAN=
Tagged - VLAN ID=
1088
.png)
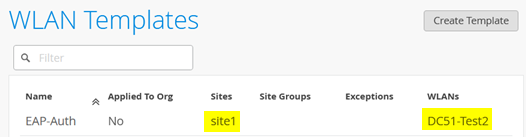
After saving the template, you should see the following configuration:
Next, go Access Points and select your site to review the APs. Select one AP.
.png)
Review the AP configuration applied, making sure the SSID from the template appears in the WLANs tab:
We do not need to specify a label as we only use the authentication type and the port location for identification of the client in this example. So, go to Organization > Auth Policies and create the following rule:
- Position=
1 - Name=
TLS-Wireless - Match Criteria=
EAP-TLSandWireless - Policy Pass=
Pass - Assigned Policies=
Network Access Allowed

If you have not done it already you must perform the enterprise PKI integration and let the Juniper Mist authentication cloud learn the root CA and install a TLS server certificate/key for the RADIUS server. Refer to the examples in the section Mist Authentication Cloud Certificate Installation.
For this test, ensure that you have not configured any IdP yet since we only rely on the validity of the certificates on the RADIUS and supplicant sides.
.png)
Next, perform EAP-TLS authentication with a wireless supplicant relevant to your client operating system. We have shared examples of configurations for Windows and Linux clients in the section Configure Client Supplicants with Certificates and Necessary EAP Methods.
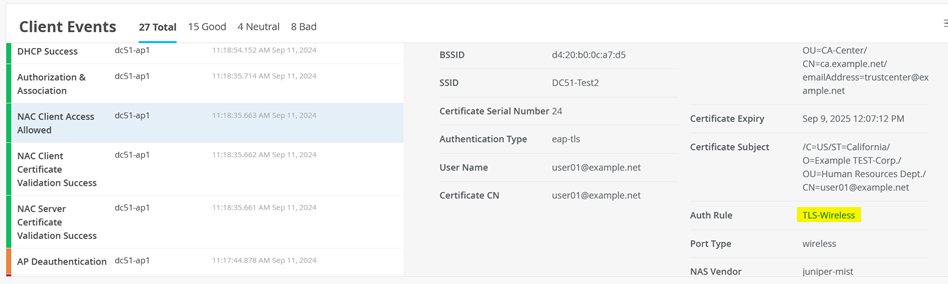
Upon successful completion of the EAP-TLS authentication, you should see the Hit Count increment like the figure shown below:

When you click this link, you will see information about the authentication event:
Another way to review information about the wireless client is to go to Clients > WiFi Clients.
.png)
You should see your client and where it is attached. Click on Client Insights.
In the Client Events section, you will see information about the EAP-TLS-based authentication process. For instance, the NAC Server Certificate Validation Success event.
Also see NAC Client Certificate Validation Success events.
And NAC Client Access Allowed events.
EAP-TTLS Authentication of a Wired Client
To test EAP-TTLS client-based authentication of a wired client, execute the following steps one by one.
First, we need to change the port on the access switch where the
wired client is attached to use the profile for 802.1X that we
defined in the switch template in Figure 5. Change the configuration profile to
vlan1099-eap.
.png)
After this is applied, your wired clients will not be able to communicate further with the network as we have not authenticated them yet.
(Optional) Remote Shell to the switch to review the configuration applied for RadSec, the certificate, and the port.
mist@switch1> show configuration | display set | match dot1x
set groups top access profile dot1x accounting-order radius
set groups top access profile dot1x authentication-order radius
set groups top access profile dot1x radius authentication-server 3.33.153.159
set groups top access profile dot1x radius authentication-server 15.197.139.214
set groups top access profile dot1x radius accounting-server 3.33.153.159
set groups top access profile dot1x radius accounting-server 15.197.139.214
set groups top access profile dot1x radius options nas-identifier 6ce2ec31-4db2-4d56-8aae-4047380273cb00cc34f37700
set groups top access profile dot1x accounting order radius
set groups top access profile dot1x accounting update-interval 600
set protocols dot1x authenticator authentication-profile-name dot1x
set protocols dot1x authenticator interface vlan1099-eap
mist@switch1> show configuration | display set | match vlan1099-eap | match interfaces
set groups vlan1099-eap interfaces <*> unit 0 family ethernet-switching vlan members vlan1099
set interfaces interface-range vlan1099-eap member ge-0/0/0
set interfaces interface-range vlan1099-eap apply-groups vlan1099-eap
mist@switch1> show configuration | display set | match access
set groups top access radius-server 3.33.153.159 secret "$9$gnaDk.mTn6AP5nCu0hc"
set groups top access radius-server 3.33.153.159 timeout 5
set groups top access radius-server 3.33.153.159 radsec-destination 895
set groups top access radius-server 15.197.139.214 secret "$9$gnaDk.mTn6AP5nCu0hc"
set groups top access radius-server 15.197.139.214 timeout 5
set groups top access radius-server 15.197.139.214 radsec-destination 896
set groups top access profile dot1x accounting-order radius
set groups top access profile dot1x authentication-order radius
set groups top access profile dot1x radius authentication-server 3.33.153.159
set groups top access profile dot1x radius authentication-server 15.197.139.214
set groups top access profile dot1x radius accounting-server 3.33.153.159
set groups top access profile dot1x radius accounting-server 15.197.139.214
set groups top access profile dot1x radius options nas-identifier 6ce2ec31-4db2-4d56-8aae-4047380273cb00cc34f37700
set groups top access profile dot1x accounting order radius
set groups top access profile dot1x accounting update-interval 600
set groups top access radsec destination 895 address 3.33.153.159
set groups top access radsec destination 895 port 2083
set groups top access radsec destination 895 tls-certificate mist-nac-device-cert
set groups top access radsec destination 895 tls-force-ciphers low
set groups top access radsec destination 895 tls-min-version v1.2
set groups top access radsec destination 895 tls-peer-name aws-production.cdd0e7d1-e1f2-4280-86cd-0327e6ce88ae
set groups top access radsec destination 895 tls-timeout 30
set groups top access radsec destination 896 address 15.197.139.214
set groups top access radsec destination 896 port 2083
set groups top access radsec destination 896 tls-certificate mist-nac-device-cert
set groups top access radsec destination 896 tls-force-ciphers low
set groups top access radsec destination 896 tls-min-version v1.2
set groups top access radsec destination 896 tls-peer-name aws-production.cdd0e7d1-e1f2-4280-86cd-0327e6ce88ae
set groups top access radsec destination 896 tls-timeout 30
mist@switch1> show security pki ca-certificate
LSYS: root-logical-system
  CA profile: mist-vpn-ca
Certificate identifier: mist-vpn-ca
  Issued to: cdd0e7d1-e1f2-4280-86cd-0327e6ce88ae, Issued by: C = US, O = Mist, OU = OrgCA, CN = cdd0e7d1-e1f2-4280-86cd-0327e6ce88ae
  Validity:
    Not before: 08-28-2023 09:37 UTC
    Not after: 08-25-2033 09:37 UTC
  Public key algorithm: rsaEncryption(4096 bits)
  Keypair Location: Keypair generated locally
mist@switch1> show security pki local-certificate
LSYS: root-logical-system
Certificate identifier: mist-nac-device-cert
  Issued to: 00cc34f37400, Issued by: C = US, O = Mist, OU = OrgCA, CN = cdd0e7d1-e1f2-4280-86cd-0327e6ce88ae
  Validity:
    Not before: 08-23-2024 10:11 UTC
    Not after: 08-23-2025 10:11 UTC
  Public key algorithm: rsaEncryption(2048 bits)
  Keypair Location: Keypair generated locally
mist@switch1> show system connections | match 2083
tcp4       0      0  10.33.33.19.59751                             15.197.139.214.2083                           ESTABLISHED
tcp4       0      0  10.33.33.19.65050                             3.33.153.159.2083                             ESTABLISHED
mist@switch1> show dot1x interface ge-0/0/0
802.1X Information:
Interface     Role           State           MAC address          User
ge-0/0/0.0    Authenticator  Connecting
mist@switch1> show dot1x interface ge-0/0/0 detail
ge-0/0/0.0
  Role: Authenticator
  Administrative state: Auto
  Supplicant mode: Single
  Number of retries: 3
  Quiet period: 60 seconds
  Transmit period: 30 seconds
  Mac Radius: Disabled
  Mac Radius Restrict: Disabled
  Reauthentication: Enabled
  Reauthentication interval: 3600 seconds
  Supplicant timeout: 30 seconds
  Server timeout: 30 seconds
  Maximum EAPOL requests: 2
  Guest VLAN member: not configured
  Number of connected supplicants: 0
We do not need to specify a label as we only use the authentication type and the port location for identification of the client in this example. So, go to Organization > Auth Policies and create the following rule:
- Position=
1 - Name=
TTLS-Wired - Match Criteria=
EAP-TTLSandWired - Policy Pass=
Pass - Assigned Policies=
Network Access Allowed
If you have not done it already you must perform the enterprise PKI integration and let the Juniper Mist authentication cloud learn the root CA and install a TLS server certificate/key for the RADIUS server. Refer to the examples in the section Juniper Mist Authentication Cloud Certificate Installation.
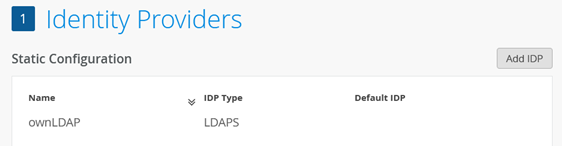
For this test, it is mandatory to have at least one IdP specified since we need to perform a credential check. Hence, the RADIUS server needs to be able to contact a credential database. In our example, we leverage a simplistic LDAP repository. In a production-grade environment, you would probably use Azure or Okta instead. Remember that we have provided examples for those integrations in the section Configuration Examples of Public Identity Provider Database Integration.
Next, you need to perform EAP-TTLS authentication with a wired supplicant relevant to your client operating system. We have shared examples of such configurations for Windows and Linux clients in the section Configure Client Supplicants with Certificates and Necessary EAP Methods.
Upon successful completion of the EAP-TTLS authentication, you should see the Hit Count incremented like in the figure shown below:

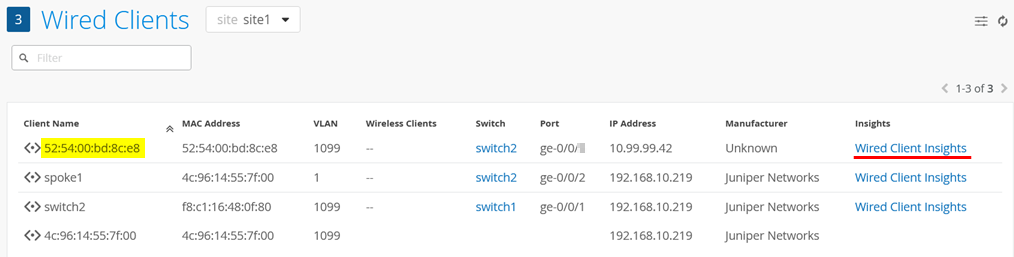
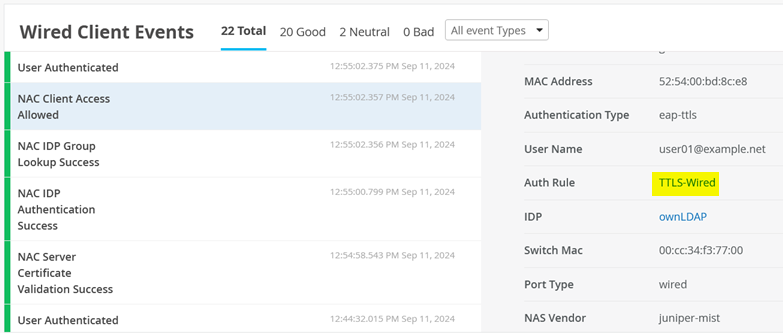
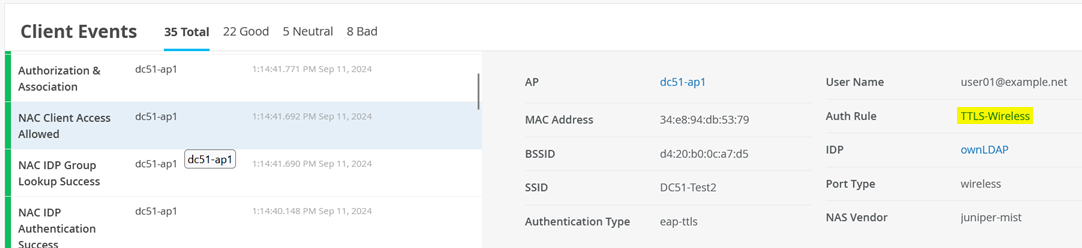
You can see the information about your client:
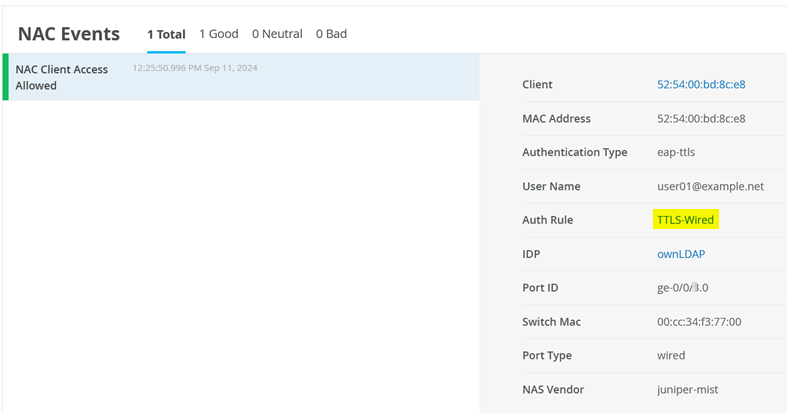
You can also go to Clients > Wired Clients.
.png)
Then, look for your client and select Wired Client Insights.
Then, you can inspect the Wired Client Events for NAC Server Certificate Validation Success events.
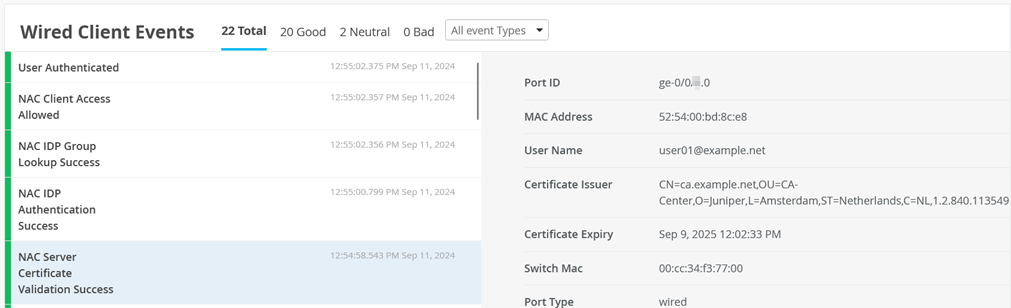
Also see NAC IDP Authentication Success events.
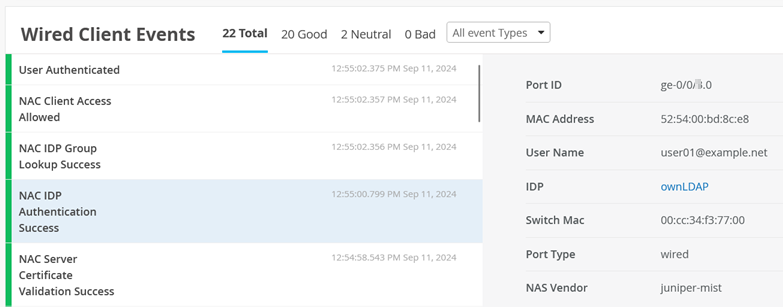
And NAC IDP Group Lookup Success events.
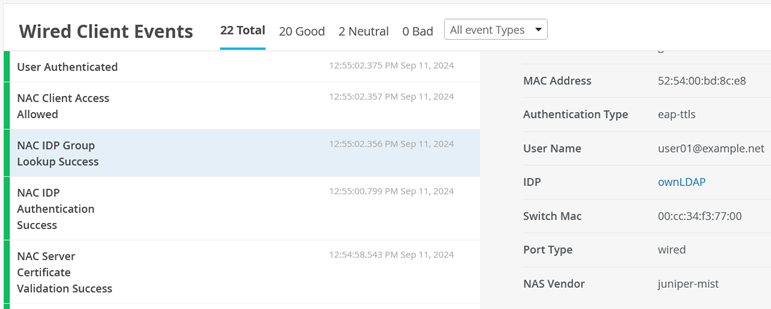
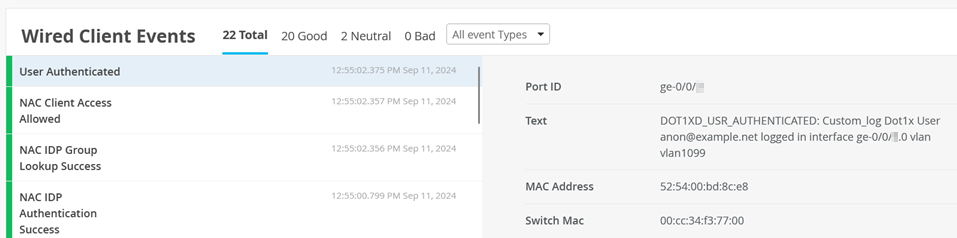
And NAC Client Access Allowed events.
And User Authenticated events.
(Optional) Remote Shell to the switch and check the client authentication status using commands like those shown below:
root@switch1> show dot1x interface ge-0/0/0
802.1X Information:
Interface     Role           State           MAC address          User
ge-0/0/0.0    Authenticator  Authenticated   52:54:00:BD:8C:E8    user01@example.net
root@switch1> show dot1x interface ge-0/0/0 detail
ge-0/0/0.0
  Role: Authenticator
  Administrative state: Auto
  Supplicant mode: Single
  Number of retries: 3
  Quiet period: 60 seconds
  Transmit period: 30 seconds
  Mac Radius: Disabled
  Mac Radius Restrict: Disabled
  Reauthentication: Enabled
  Reauthentication interval: 3600 seconds
  Supplicant timeout: 30 seconds
  Server timeout: 30 seconds
  Maximum EAPOL requests: 2
  Guest VLAN member: not configured
  Number of connected supplicants: 1
    Supplicant: anon@example.net, 52:54:00:BD:8C:E8
      Radius supplicant: user01@example.net
      Operational state: Authenticated
      Backend Authentication state: Idle
      Authentication method: Radius
      Authenticated VLAN: vlan1099
      Session Reauth interval: 3600 seconds
      Reauthentication due in 3486 seconds
      Session Accounting Interim  Interval: 36000 seconds
      Accounting Update  due in 35886 seconds
      Eapol-Block: Not In Effect
      Domain: Data
EAP-TTLS Authentication of a Wireless Client
In this example, we use EAP-TTLS as an 802.1X-based authentication of wireless clients.
An SSID for wireless can be configured in several ways. In our example, we use a WLAN template by first navigating to Organization > WLAN Templates.
.png)
Create a new template with the following settings:
- Name=
EAP-Auth - Applies to:
- Sites and Site Groups=
site1
- Sites and Site Groups=
.png)
Create an SSID with a name like the figure shown below:
.png)
Under Security, configure the following settings:
- Security Type=
WPA2andEnterprise (802.1X)
.png)
Then, configure the following settings:
- Authentication Servers=
Mist Auth - VLAN=
Tagged - VLAN ID=
1088
.png)
After saving your template, you should see the following configuration:
.png)
Next, go Access Points and select your site to review the APs. Select one AP.
.png)
Review the AP configuration applied making sure the SSID from the template appears in the WLANs tab:
.png)
We do not need to specify a label as we only use the authentication type and the port location for identification of the client in this example. So, go to Organization > Auth Policies and create the following rule:
- Position=
1 - Name=
TTLS-Wireless - Match Criteria=
EAP-TTLSandWireless - Policy Pass=
Pass - Assigned Policies=
Network Access Allowed
If you have not done it already, you must perform the enterprise PKI integration and let the Juniper Mist authentication cloud learn the root CA and install a TLS server certificate/key for the RADIUS server. Refer to the examples in the section Juniper Mist Authentication Cloud Certificate Installation.
For this test, it is mandatory to have at least one IdP specified since we need to perform a credential check, Hence, the RADIUS server needs to be able to contact a credential database. In our example, we leverage a simplistic LDAP repository. In a production-grade environment, you would probably use Azure or Okta instead. Remember that we have provided examples for those integrations in the section Configuration Examples of Public Identity Provider Database Integration.
.png)
Next, you need to perform EAP-TTLS authentication with a wireless supplicant relevant to your client operating system. We have already shared examples of such configurations for Windows and Linux clients in the section Configure Client Supplicants with Certificates and Necessary EAP Methods.
Upon successful completion of the EAP-TTLS authentication, you should see the Hit Count increment as in the figure shown below:

When you click on this link, you will see information about the EAP-TTLS authentications performed.
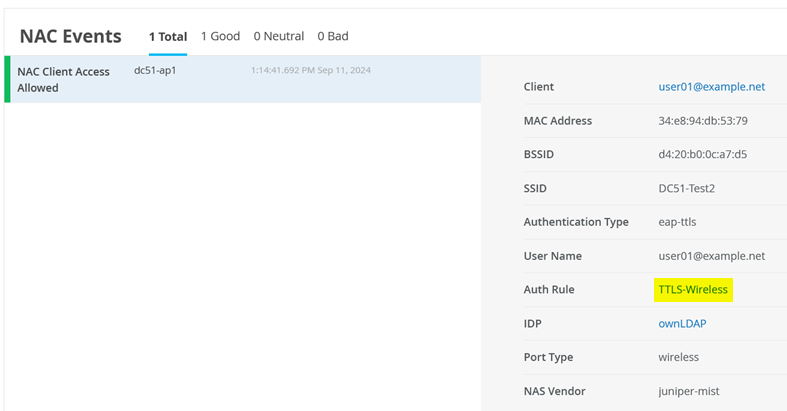
Another way to review information about the wireless client is to go to Clients > WiFi Clients.
.png)
You should see your client listed and where it is attached. Click on Client Insights.
.png)
In the Client Events section, you will see information about the EAP-TTLS-based authentication process. For instance, the NAC Server Certificate Validation Success event.
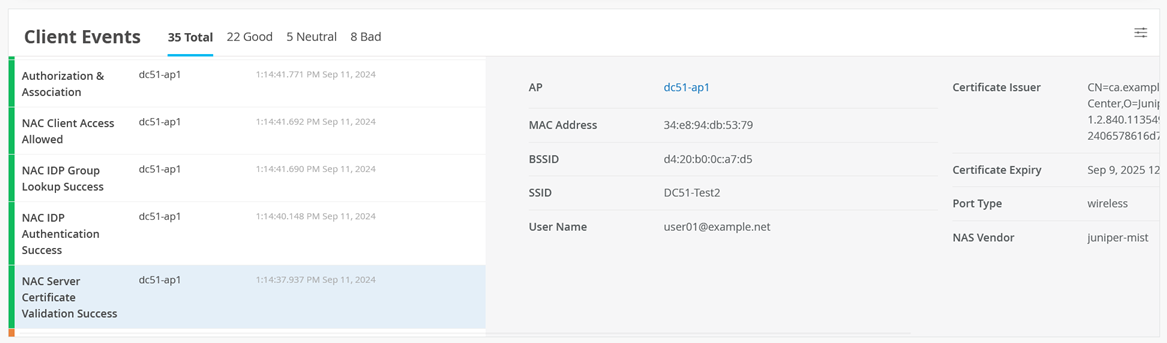
Also see NAC IDP Authentication Success events.
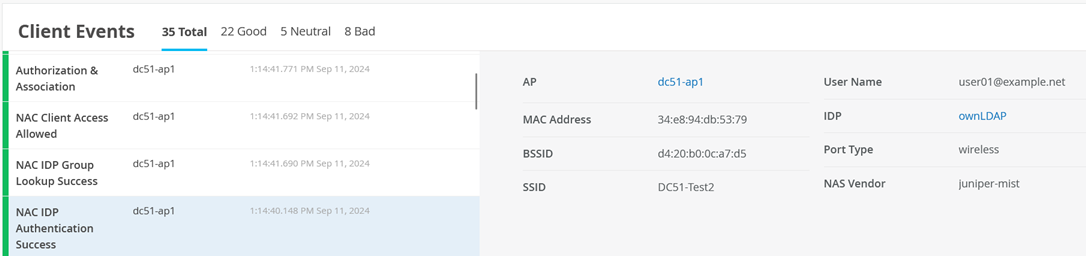
And NAC IDP Group Lookup Success events.
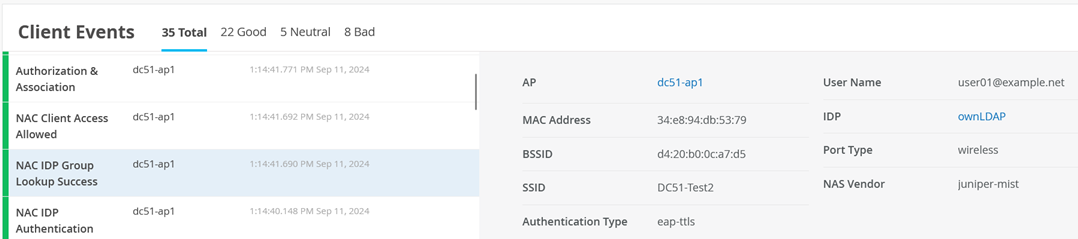
And NAC Client Access Allowed events.
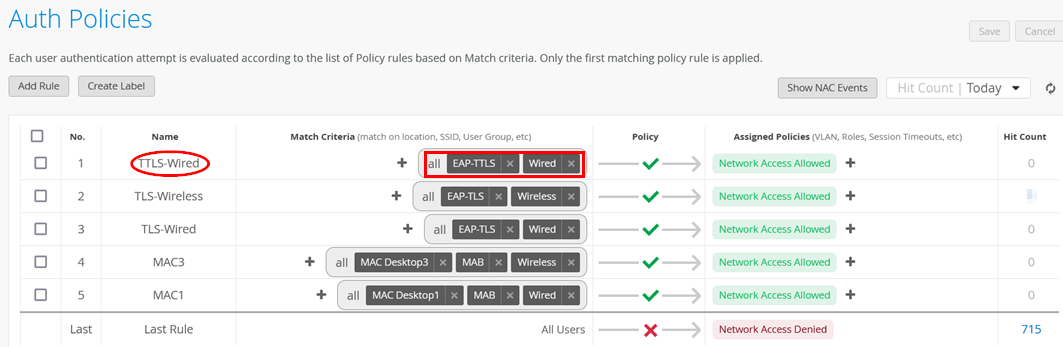
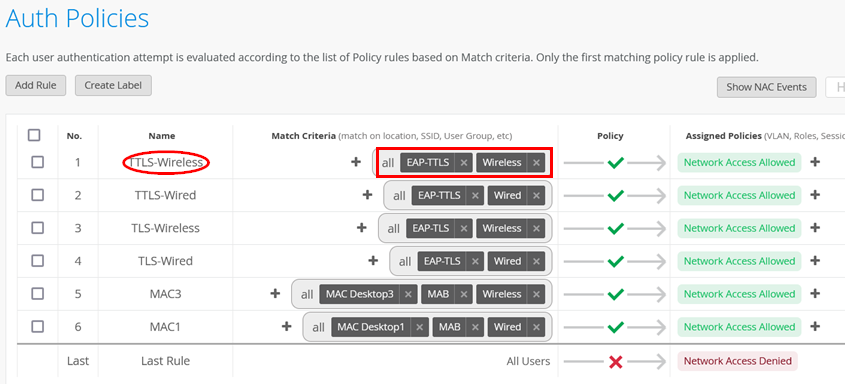
Policy Match Criteria Checking
When creating an authentication policy, you must define one or more match criteria for the evaluation of the policy to be performed. For a certain policy, all defined match criteria must be present to match the policy. They are defined as logical AND conditions. During the authentication tests, a list such as that shown in Figure 1 was created.
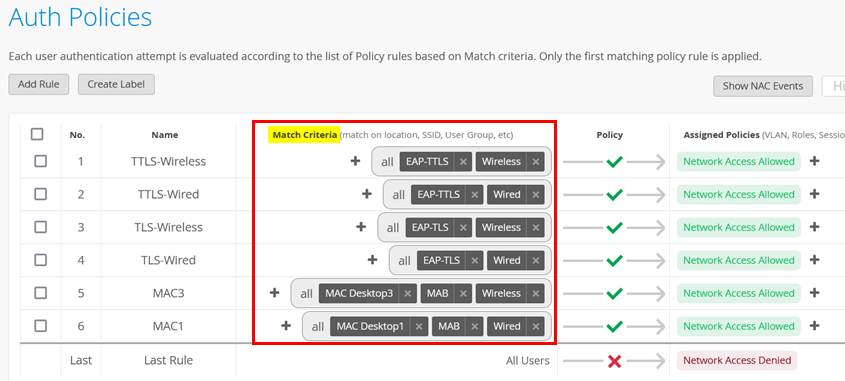
There are, however, more match criteria available than shown in the figure above. The complete list of all available match criteria is:
- Authentication type:
- MAB (MAC address-based authentication)
- EAP-TLS
- EAP-TTLS
- TEAP
- PSK (for wireless only)
- Admin Auth
- Port type (over which the client authentication is performed):
- Wired
- Wireless
- RADIUS attribute-based (you can also use an auth label
definition for these):
- Check the vendor list for RADIUS AVPs
- Sites and site groups (location)
- Auth label-based (provides the most flexibility):
- Certificate attribute—Checks the supplicant attributes. Note: EAP-TTLS does not support this as it does not use client certificates.
- Client list—MAC addresses or OUI definitions when doing MAB.
- Directory attribute—Requires integration with an IdP database.
- SSID—Cannot be used for wired clients.
- MDM Compliance—This requires integration with an IdP database and an MDM.
- Client Label—These labels can be assigned when a wireless client uses a Juniper AP.
In the authentication test cases, we used the following match criteria with reference to Figure 1:
- Authentication Type=
MABandEAP-TLSandEAP-TTLS - Port Type=
WiredandWireless - Auth Label=
Client Listwith two different MAC addresses
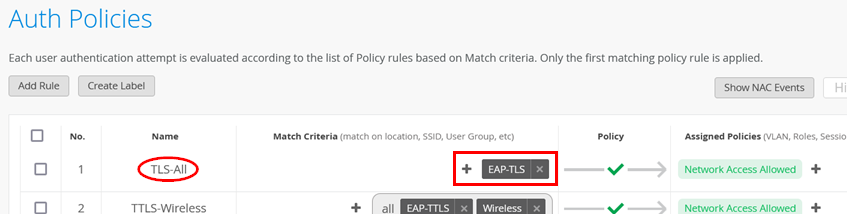
We added an example of match criteria in this section and will demonstrate how to properly implement certificate attribute checking for EAP-TLS.
First, we need to determine which certificate attributes are used by the supplicant when it authenticates with EAP-TLS. Two possible methods to determine this information are as follows:
- Obtain the information when reviewing the certificate after it’s installed on the supplicant.
- The recommended method is:
- Create a generic EAP-TLS authentication policy.
- Perform a successful EAP-TLS authentication with your client.
- Review the Client Events and check the certificate attributes that are logged.
- Create an auth label based on these certificate attributes.
- Create a new authentication policy (with a priority over the generic policy) using the new auth label.
- Perform the EAP-TLS authentication with your client again.
- Confirm that the more specific authentication policy is being matched instead.
We begin with the generic rule. Go to Organization > Auth Policies and create the following rule:
- Position=
1 - Name=
TLS-All - Match Criteria=
EAP-TLS - Policy Pass=
Pass - Assigned Policies=
Network Access Allowed
Now, perform any EAP-TLS client authentication using either wired or wireless.
After the authentication has been performed, you should notice that the policy Hit Count has increased.
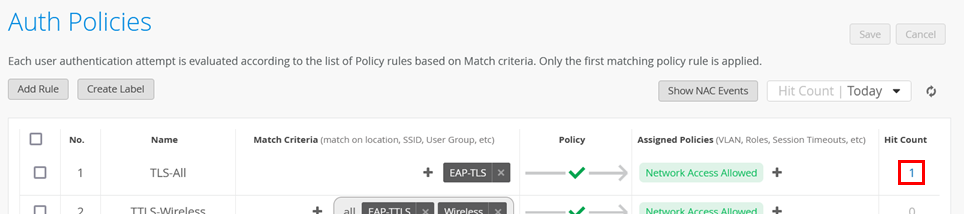
Among other logged information, you will now see various information about the client certificate used on the supplicant.
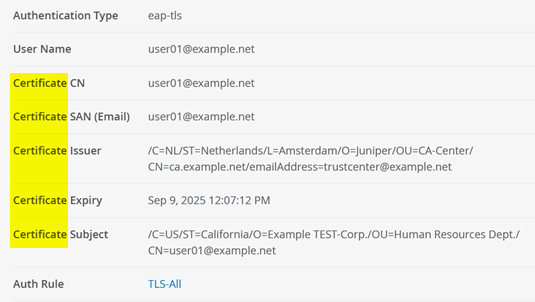
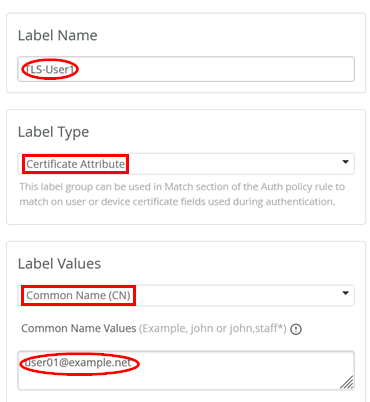
This information allows you to create an auth label specific to the user. In the example, we copy and paste the reported common name (CN) certificate attribute to a new label by navigating to Organization > Auth Policy Labels:
- Label Name=
TLS-User1 - Label Type=
Certificate Attribute - Label Values=
Common Name (CN) - Common Name Values=
user01@example.net
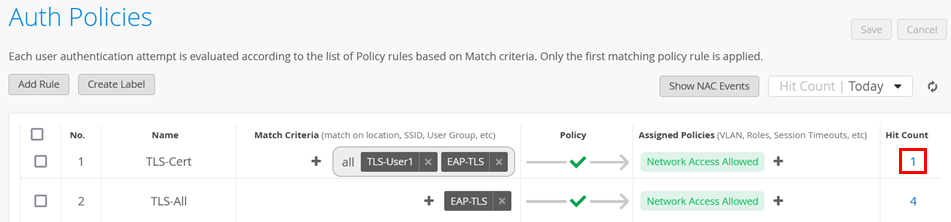
Then, create a more specific rule using the new label and position it above the previous rule. Go to Organization > Auth Policies and create the following rule:
- Position=
1 - Name=
TLS-Cert - Match Criteria=
EAP-TLSandTLS-User1 - Policy Pass=
Pass - Assigned Policies=
Network Access Allowed

Next, perform a new EAP-TLS client authentication with the client again.
With the right certificate attribute in place, this policy should now get a hit, and the other more generic rule will be used for any other clients not having the expected certificate attribute.
Authorization and Assigned Policies
So far, we have not used any assigned policies. However, they are critical for enabling the RADIUS server to not just approve authentication, but in its response, to optionally instruct the network access device (the switch or AP) to enforce any limitations on the network access provided to the attached client. Every client may not have the same network access rights after being authenticated. As a result, we need to be able to enforce different levels of access rights where the client ingresses the network. We achieve this by adding rules when we allow network access to a certain authentication policy.

When defining any authorization parameters, we must do this by creating an auth label:
- Label Type=AAA Attribute
- Label values to choose from:
- VLAN—Allows you to specify a single VLAN for this client
to access. This is a very commonly used option. It usually
leverages the standard RADIUS
AVP=
Tunnel-Private-Group-ID - GBP Tag—Used in IP Clos fabrics, this allows you to
specify the number of a group-based policy (GBP) tag to be
dynamically assigned. It leverages the Juniper RADIUS
AVP=
Juniper-Switching-Filterwith a string containing the GBP-Tag configuration. - Session Timeout—Allows you to shorten or lengthen the time a client is allowed access to the network before a new authentication must be performed.
- Custom Vendor Specific Attribute—Allows you to use non-standard RADIUS AVPs. You need to know that the vendor of the network access device supports a custom attribute.
- Custom Standard RADIUS Attribute—Allows you to use standard RADIUS AVPs.
- Dynamic Wired Port Configuration—Allows you to configure
trunk and native VLANs as a list of VLANs to be configured. It
usually leverages the standard RADIUS
AVP=
Egress-VLAN-Namemultiple times.
- VLAN—Allows you to specify a single VLAN for this client
to access. This is a very commonly used option. It usually
leverages the standard RADIUS
AVP=
You may see other RADIUS attributes to select, but they only make sense when the auth label is used for a match criteria. So, ignore “Role”, “Realm”, and “User Name”, for example.
Care must be taken when using RADIUS attributes to configure one
or more VLANs that are not configured on the port beforehand. By
default, the system does not configure a VLAN at the time
it’s needed using a dynamic configuration option. Especially
when using campus fabric, there may be a situation where the ports
you have defined for an access switch or Virtual Chassis do not use
a certain VLAN. Hence, the fabric renderer will not provide a
configuration for this VLAN locally to the access switch or Virtual
Chassis and when you configure a VLAN as an authorization
parameter, it’s not actually configured on the port. In this
case, you must use the Dynamic VLAN option on the port
profile and add all potential VLANs you might use for future
dynamic assignments, as described in the example below. This will
instruct the fabric renderer to configure those VLANs ahead of time
before you can use them dynamically via RADIUS.
Assigned Policy of a Single Dynamic VLAN
In this example, upon authentication, we dynamically change the
local VLAN a client gets assigned to. Review the test case for EAP-TLS Authentication of a Wired Client.
You will find that at the end of that process, the client was
assigned to vlan1099 because this was the default VLAN
in that port profile.
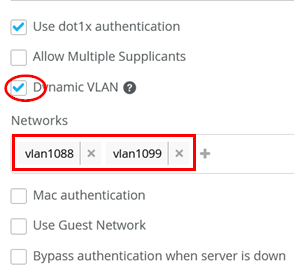
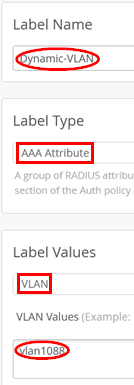
Now let’s assume that we want to have vlan1088 assigned to the client instead. In this case, define an auth label for this by first navigating to Organization > Auth Policy Labels and configuring the following settings:
- Label Name=
Dynamic-VLAN - Label Type=
AAA Attribute - Label Values=
VLAN -
VLAN Values=vlan1088
Then, change the existing auth policy rule to add our label to
the existing TLS-Wired auth policy like in the figure
shown below:

Next, perform EAP-TLS client authentication for your wired client.
After the new authentication is successful, check the policy hit and confirm that the dynamic VLAN is used instead as indicated in the figure below:
(Optional) You can also see the effects when opening a Remote Shell on the switch:
              show dot1x interface ge-0/0/0 detail
ge-0/0/0.0
  Role: Authenticator
  Administrative state: Auto
  Supplicant mode: Single
  Number of retries: 3
  Quiet period: 60 seconds
  Transmit period: 30 seconds
  Mac Radius: Disabled
  Mac Radius Restrict: Disabled
  Reauthentication: Enabled
  Reauthentication interval: 3600 seconds
  Supplicant timeout: 30 seconds
  Server timeout: 30 seconds
  Maximum EAPOL requests: 2
  Guest VLAN member: not configured
  Number of connected supplicants: 1
    Supplicant: user01@example.net, 52:54:00:BD:8C:E8
      Operational state: Authenticated
      Backend Authentication state: Idle
      Authentication method: Radius
      Authenticated VLAN: vlan1088
      Session Reauth interval: 3600 seconds
      Reauthentication due in 3592 seconds
      Session Accounting Interim  Interval: 36000 seconds
      Accounting Update  due in 35992 seconds
      Eapol-Block: Not In Effect
      Domain: Data
show vlans vlan1088 detail
Routing instance: default-switch
VLAN Name: vlan1088                       State: Active
Tag: 1088
Internal index: 3, Generation Index: 3, Origin: Static
MAC aging time: 300 seconds
VXLAN Enabled : No
Interfaces:
    ge-0/0/3.0*,tagged,trunk
    ge-0/0/0.0*,untagged,access
Number of interfaces: Tagged 1    , Untagged 1
Total MAC count: 1
Assigned Policy for Multiple VLANs on a Trunk Port and AP as Supplicant
In this example, we demonstrate a few features at the same time:
- The capability to reuse the automatically generated and deployed certificate, which the AP uses to authenticate the RadSec tunnel connecting to the Juniper Mist cloud, as a certificate for itself as a supplicant.
- The capability of the Juniper AP to function as an 802.1X supplicant by utilizing a device certificate for EAP-TLS authentication with a switch.
- The ability to dynamically assign all required trunk VLANs for connected clients, as well as the AP's native management VLAN, upon successful authentication of the AP.
The benefit of this feature combination allows us to not only strongly authenticate the clients on the network but also the attached infrastructure, including APs. Without such protection of switch ports, an attacker could disable an AP, attach its ethernet cable to their own laptop or AP and access any VLAN configured on the port. An additional advantage of this feature combination is the increased flexibility in using switch ports for various devices and clients. By enabling EAP 802.1X authentication on all switch ports, the appropriate VLANs are automatically assigned to a port when a recognized client or AP is connected. This avoids static configuration and the reservation of precious infrastructure switch ports.
The supplicant feature on Juniper APs is not supported by the models AP21, AP41 and AP61 which have been announced for EOL. All other models need firmware 0.14.x or higher.
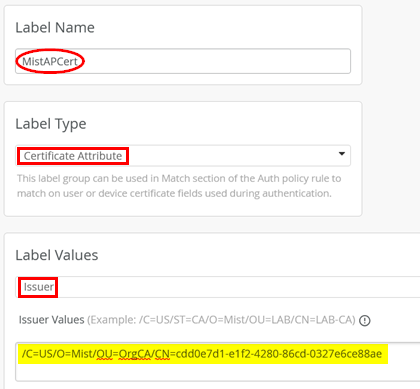
The first step of this configuration is to remember that as part of the configuration in section Juniper Mist Authentication Cloud Certificate Installation, we have configured the Mist CA as an additional root CA. We need to extract the issuer to be able to identify the certificates the AP will use for authentication.

From the extracted issuer, you need to delete all of the space
characters and commas, then use / as a new delimiter.
In our example, the result looks like:
/C=US/O=Mist/OU=OrgCA/CN=cdd0e7d1-e1f2-4280-86cd-0327e6ce88aeWith that information, define a new label with the following settings by navigating to Organization > Auth Policy Labels:
- Label Name=
MistAPCert - Label Type=
Certificate Attribute - Label Values=
Issuer - Issuer Values=
<insert your own issuer>
Continue with the next label that defines which client VLANs this AP will use:
- Label Name=
AP-role - Label Type=
AAA Attribute - Label Values=
Dynamic Wired Port Configuration- Name1=
2default - Name2=
1vlan1088 - Name3=
1vlan1099
- Name1=

When entering the VLAN names, it is critical to know that the first character defines whether the VLAN needs to be tagged or not. Use “2” for the native, untagged VLAN that is usually used to manage the AP itself and use “1” for tagged VLANs.
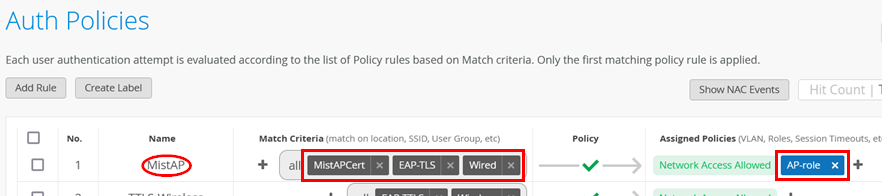
Next, create the necessary auth policy. Go to Organization -> Auth Policies and create the following rule:
- Position=
1 - Name=
MistAP - Match Criteria=
MistAPCertandEAP-TLSandWired - Policy Pass=
Pass - Assigned Policies=
Network Access AllowedandAP-role
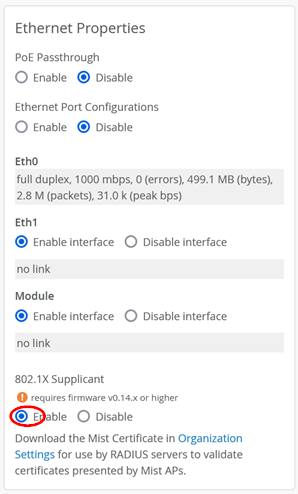
Next, we must enable the AP as a supplicant using the same certificate it uses for its RadSec tunnel towards the Juniper Mist cloud. To do so, go to Access Points > <your AP> and enable the 802.1X supplicant under Ethernet Properties as shown in the figure below:
Next, change the AP-attached port on the access switch to use
the configuration profile defined for 802.1X in Figure 5 in the switch template. Change
the configuration profile to vlan1099-eap.
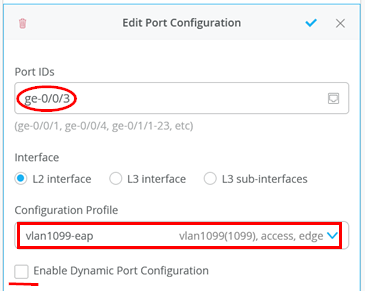
The RADIUS-based dynamic VLAN configuration does not require enabling the checkbox you see for Dynamic Port Configuration in the figure above. Leave this unchecked since it’s meant for a different kind of dynamic port configuration the Juniper switch supports.
Next, the AP should authenticate through the switch using EAP-TLS and receive a dynamically assigned VLAN through RADIUS.
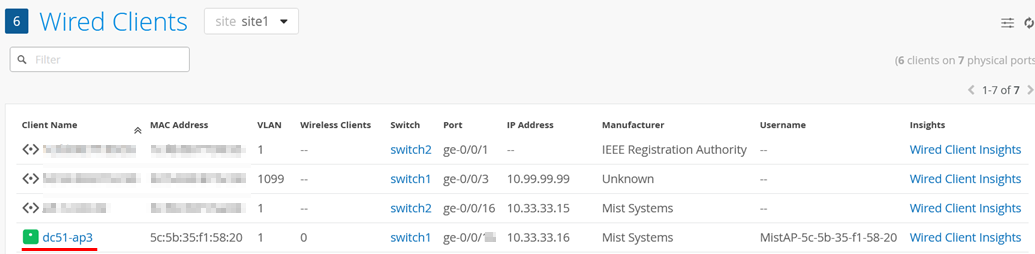
You should see the AP as a wired client:
You can see that the issuer of the RADIUS certificate is your own organization’s PKI:
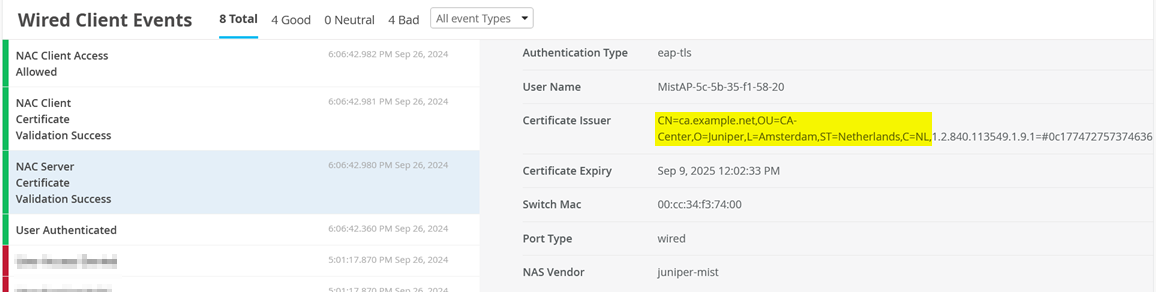
The AP client certificate should get validated:

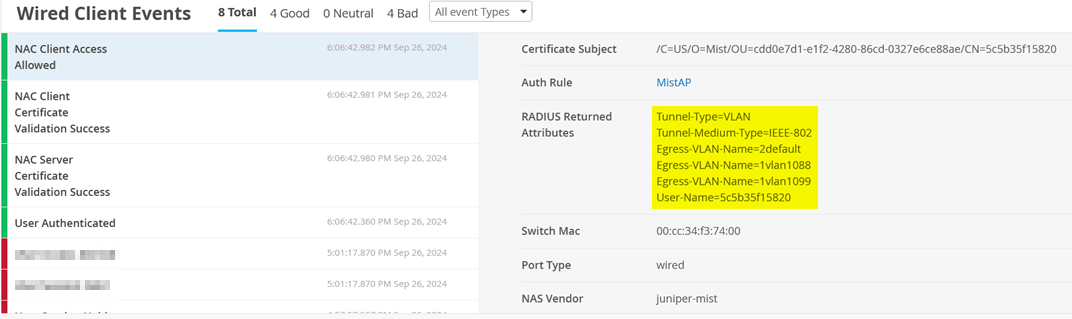
Finally, the AP is allowed to access the network and the other VLANs are assigned to this port through the auth rule and dynamic VLAN assignments:
(Optional) Using Remote Shell, you should see the following information on the switch:
root@access1> show dot1x interface ge-0/0/3
802.1X Information:
Interface     Role           State           MAC address          User
ge-0/0/3.0    Authenticator  Authenticated   5C:5B:35:F1:58:20    5c5b35f15820
root@access1> show dot1x interface ge-0/0/3 detail
ge-0/0/3.0
  Role: Authenticator
  Administrative state: Auto
  Supplicant mode: Single
  Number of retries: 3
  Quiet period: 60 seconds
  Transmit period: 30 seconds
  Mac Radius: Disabled
  Mac Radius Restrict: Disabled
  Reauthentication: Enabled
  Reauthentication interval: 3600 seconds
  Supplicant timeout: 30 seconds
  Server timeout: 30 seconds
  Maximum EAPOL requests: 2
  Guest VLAN member: not configured
  Number of connected supplicants: 1
    Supplicant: MistAP-5c-5b-35-f1-58-20, 5C:5B:35:F1:58:20
      Radius supplicant: 5c5b35f15820
      Operational state: Authenticated
      Backend Authentication state: Idle
      Authentication method: Radius
      Authenticated VLAN: default
      Session Reauth interval: 3600 seconds
      Reauthentication due in 3530 seconds
      Egress Vlan: 1, 1088, 1099
      Session Accounting Interim  Interval: 36000 seconds
      Accounting Update  due in 35930 seconds
      Eapol-Block: Not In Effect
      Domain: Data
root@access1> show vlans
Routing instance        VLAN name             Tag          Interfaces
default-switch          default               1
                                                           ae0.0*
.
                                                           ge-0/0/3.0*
.
default-switch          vlan1088              1088
                                                           ae0.0*
                                                           ge-0/0/3.0*
default-switch          vlan1099              1099
                                                           ae0.0*
                                                           ge-0/0/0.0*
                                                           ge-0/0/3.0*
Assigned Policy by Referencing a Filter-ID
When using the standard RADIUS AVP Filter-Id, you
can dynamically assign EX Switch firewall filters to wired clients
upon their authentication. This capability and the configuration
options of EX Switch firewall filters are explained here.
For this test case, first apply a minimalistic firewall filter that enables policing and counting packets for a dynamic wired client. We recommend applying this configuration to all switches at a site using a switch template. Alternatively, you can apply the below ruleset locally using additional Junos OS CLI commands to the switch.
delete firewall policer p1
set firewall policer p1 if-exceeding bandwidth-limit 1m
set firewall policer p1 if-exceeding burst-size-limit 2k
set firewall policer p1 then discard
delete firewall family ethernet-switching filter filter1
set firewall family ethernet-switching filter filter1 term t1 from source-address 10.99.99.0/24
set firewall family ethernet-switching filter filter1 term t1 then count counter1
set firewall family ethernet-switching filter filter1 term t1 then policer p1
set firewall family ethernet-switching filter filter1 term t1 then log
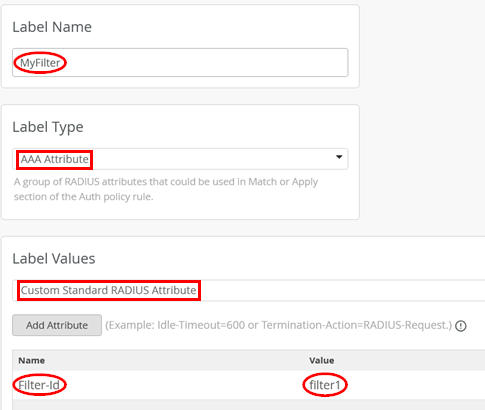
The next step is to create a new label by going to Organization > Auth Policy Labels and configuring the following settings:
- Label Name=
MyFilter - Label Type=
AAA Attribute - Label Values=
Custom Standard RADIUS Attribute - Name1=
Filter-Id - Value1=
filter1
Then, change the existing auth policy rule to add the label to
the existing TLS-Wired auth policy like in the figure
shown below:

Next, perform EAP-TLS client authentication for the wired client.
After the client authenticates, check the policy hit and confirm that the filter-ID attribute was used as indicated in the figure below:
(Optional) Remote Shell to the switch and execute the two commands shown in the figure below to confirm that the filter was applied correctly and works as expected:
show dot1x interface ge-0/0/0 detail
ge-0/0/0.0
Role: Authenticator
Administrative state: Auto
Supplicant mode: Single
Number of retries: 3
Quiet period: 60 seconds
Transmit period: 30 seconds
Mac Radius: Disabled
Mac Radius Restrict: Disabled
Reauthentication: Enabled
Reauthentication interval: 3600 seconds
Supplicant timeout: 30 seconds
Server timeout: 30 seconds
Maximum EAPOL requests: 2
Guest VLAN member: not configured
Number of connected supplicants: 1
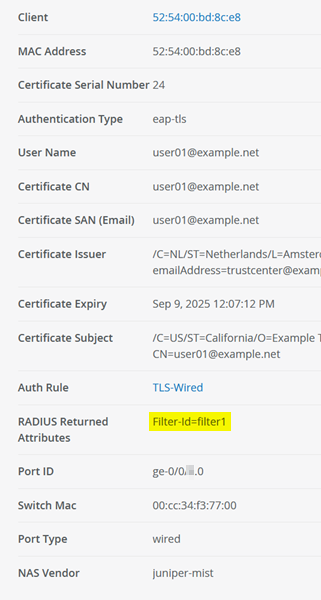
Supplicant: user01@example.net, 52:54:00:BD:8C:E8
Operational state: Authenticated
Backend Authentication state: Idle
Authentication method: Radius
Authenticated VLAN: vlan1099
Dynamic Filter: filter1
Session Reauth interval: 3600 seconds
Reauthentication due in 3423 seconds
Session Accounting Interim Interval: 36000 seconds
Accounting Update due in 35823 seconds
Eapol-Block: Not In Effect
Domain: Data
show dot1x firewall
Filter name: dot1x_ge-0/0/0
Counters:
Name Bytes Packets
counter1__dot1x_ge-0/0/0-filter1-t1 3430 34
Filter name: dot1x_ge-0/0/0
Policer:
Name Packets
p1-t1 33