Proxmox Virtual Environment
As another option, you can consider building a lab in Proxmox VE. Internally, the hypervisor on EVE-NG, Ubuntu native KVM with libvirtd, and Proxmox VE is the same. In all three environments, QEMU runs the VM. Each environment has its own CLI and GUI and uses either Debian or Ubuntu Linux distributions.
Proxmox VE benefits against EVE-NG and Ubuntu native KVM with libvirtd are:
- Easy to build clusters of hypervisors, which limits the scope of a single BMS.
- Easy to attach shared storage such as Ceph.
- Virtualize networks amongst servers using SDN option.
- REST API operates your systems.
Disadvantages of Proxmox VE benefits against EVE-NG and Ubuntu native KVM with libvirtd are:
- Building an UKSM kernel cannot save RAM usage of multiple vJunos-switch instances. Hence, each vJunos-switch VM needs 5 GB RAM.
- Does not run compressed or backing qcow2 images, instead they are expanded as raw image on the storage option. Hence, each vJunos-switch VM needs 32 GB storage.
This document includes examples of creating vJunos-switch VMs on Proxmox VE with a locally configured single Proxmox server and the standard Linux bridges. This helps to compare with the previously described other two environments. As you've not used the Proxmox GUI for VM, you must run configuration changes locally after creating juniper.conf images and Linux Bridge and VM interface post VM creation changes on Proxmox VE. The CLI example makes it easier for you to include it in a script to launch multiple vJunos-switch VMs.
For scale out labs with multiple servers, we recommend using SDN with VXLAN as network transport option instead of local Linux bridges.
Proxmox VE Preparations
After installing the hypervisor, create the networks to use for vJunos-switch VMs and others in your lab. As in the example above, use the Proxmox GUI to create standard Linux bridges as the three shown below and ensure that they are activated.
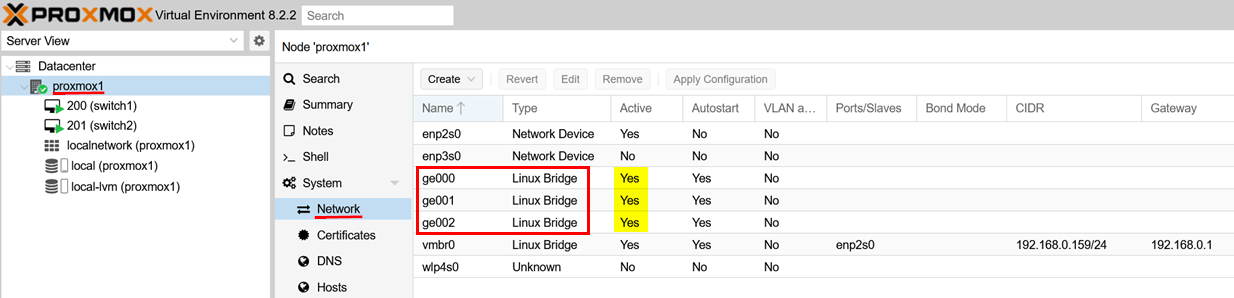
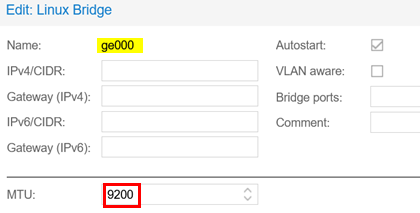
Assign a name to each Linux bridge and you can optionally set the MTU to 9200. You can change the MTU value using the script after you create the VM. Avoid populating/changing any of the other values.
For all the remaining steps, use SSH to the server to run BASH commands locally. First, you download the qcow2-image of vJunos-switch to the server.
mkdir -p /root/download
Now, download your free copy of vJunos-switch VM to the directory using URL: https://support.juniper.net/support/downloads/?p=vjunos and then verify if the copy is downloaded.
ls -l /root/download/
-rw-r--r-- 1 root root 3966631936 Aug  1  2023 vJunos-switch-23.2R1.14.qcow2
Deploy a vJunos-switch VM on Proxmox VE
Avoid creating the initial vJunos-switch VM using the Proxmox GUI as GUI might add additional parameters causing the VM to not to work properly. Instead, create the initial VM through CLI and set it as a template. Then, use this template to launch all further VMs from the GUI.
Using BASH, perform the next steps on the server locally:
- Configure VM individually:
- The VM ID/Number. In the example, it is
200. - The storage where the image of the VM runs from. In the
example, it is storage
local-lvm.
- The VM ID/Number. In the example, it is
- Delete if an existing VM with the same ID is running. This is useful if you made an error and want to retry.
- Create the new vJunos-switch VM with all required parameters to
start it correctly later:
- Name of the VM. In the example,
vswitch. You can change the name. - RAM and CPU. Do not change.
- Special BIOS and CPU options that are required for this VM to come up correctly. Do not change the options.
- Boot order and serial screen. Do not change.
- First, network
net0that gets assigned to the fxp0 interface of the VM. Change, if required but ensure that network can provide a DHCP lease for the VM. - Second, more networks starting with
net1, which will be the interfacege-0/0/0of the vJunos-switch VM. You will need to change that according to your lab design using more interfaces and other Linux bridges. We recommend that you keep the optionfirewall=0for each of those interfaces to not overcomplicate the internal design.
- Name of the VM. In the example,
- Import the vJunos-switch qcow2-image into the selected storage option. You might need to change the vJunos-switch qcow2 image file location.
- Import the configuration image location to extract to a BASH variable.
- Add the image location to the created VM to boot from.
- Create a default
juniper.confwith our initial Junos OS configuration for this VM. - Use the
make-config.shscript to create an image that embeds your individualjuniper.conffile. - Import the Junos OS configuration image to the selected storage option.
- Import the configuration image location to extract to a BASH variable.
- Add the configuration image location to the created VM.
- Check and review the complete configuration of the VM.
- Optional: Use the VM as template for future launches of
vJunos-switch:
- Define the current VM as template.
- Select a new VMID for the clone.
- Create a clone VM to use it later.
- Change the interface assignments for the clone if required.
- Launch the VM or its clone.
- Review the Linux bridge assignment locally for the started VM.
- Review on the Proxmox GUI if the VM has started and then access the console.
# configure the management ID for the VM and your storage location
VMID="200"
VMSTORAGE="local-lvm"
# make sure any prior instance of this VM is down and deleted
qm stop $VMID
qm destroy $VMID
# create a new VM without a virtual disk
qm create $VMID --name switch1 --memory 5120 --cores 4 \
--args "-machine accel=kvm:tcg -smbios type=1,product=VM-VEX -cpu 'host,kvm=on'" \
--boot order=virtio0 --serial0 socket \
--net0 virtio,bridge=vmbr0 \
--net1 virtio,bridge=ge000,firewall=0 \
--net2 virtio,bridge=ge001,firewall=0 \
--net3 virtio,bridge=ge002,firewall=0
# import the vJunos image as qcow2 format in proxmox
qm disk import $VMID /root/download/vJunos-switch-23.2R1.14.qcow2 $VMSTORAGE --format qcow2 | tee diskimport.txt
.
.
transferred 31.6 GiB of 31.8 GiB (99.52%)
transferred 31.8 GiB of 31.8 GiB (100.00%)
transferred 31.8 GiB of 31.8 GiB (100.00%)
Successfully imported disk as 'unused0:local-lvm:vm-200-disk-0'
# extract image location from import
VMIMAGE=`cat diskimport.txt | grep "imported disk" | awk '{print $5}' | sed 's/.:/ /' | awk '{print $2}' | sed 's/.$//'`
echo $VMIMAGE
local-lvm:vm-200-disk-0
# attach the qcow2 disk to the vm
qm set $VMID --virtio0 $VMIMAGE,iothread=1,size=32G
update VM 200: -virtio0 local-lvm:vm-200-disk-0,iothread=1,size=32G
Review the chapter Default Junos OS
Configuration for vJunos-switch. This chapter guides you with
the process of creating an individual Junos OS configuration for
your vJunos-switch VM, which is similar on the other environments.
This chapter also guides you to add an adopt configuration, which
allows each new vJunos-switch VMs automatically appear in the Mist
Cloud inventory. Here, without repeating the same steps, you used a
minimal startup configuration for remote SSH access as
root with the password ABC123 on the fxp0
interface.
cat <<EOF >juniper.conf
system {
    host-name vjunos;
    root-authentication {
        encrypted-password "\$6\$DOvFAxW9\$HpxgOaGEe5L6MtDJqbWepS5NT6EW23rCuu69gwwGVFr7BpzY2MHS34mPrR0LKRqoGI19tRgpz3vFJkEueW9mQ1"; ## SECRET-DATA
    }
    services {
        ssh {
            root-login allow;
            protocol-version v2;
        }
    }
    name-server {
        8.8.8.8;
        9.9.9.9;
    }
    arp {
        aging-timer 5;
    }
    syslog {
        file interactive-commands {
            interactive-commands any;
        }
        file messages {
            any notice;
            authorization info;
        }
    }
}
interfaces {
    fxp0 {
        unit 0 {
            family inet {
                dhcp force-discover;
            }
        }
    }
}
protocols {
    lldp {
        interface all;
    }
    lldp-med {
        interface all;
    }
}
EOF
At this point, you must have created an individual Junos OS startup configuration and continuing the process.
# download the make-config.sh script from the Juniper CDN if you do not have it yet
# https://webdownload.juniper.net/swdl/dl/anon/site/1/record/168885.html
chmod 777 make-config.sh
./make-config.sh juniper.conf myconfig.img
.
./config/juniper.conf
Cleaning up...
removed '/var/tmp/tmp.hhQ0rcM92K/config/juniper.conf'
removed directory '/var/tmp/tmp.hhQ0rcM92K/config'
removed directory '/var/tmp/tmp.hhQ0rcM92K'
removed directory '/var/tmp/tmp.gvCkmgmvXy'
Config disk myconfig.img created
# import the junos config image to proxmox storage
qm disk import $VMID myconfig.img $VMSTORAGE --format raw | tee diskimport.txt
.
transferred 1.0 MiB of 1.0 MiB (100.00%)
transferred 1.0 MiB of 1.0 MiB (100.00%)
Successfully imported disk as 'unused0:local-lvm:vm-200-disk-1'
# extract image location from import
VMIMAGE=`cat diskimport.txt | grep "imported disk" | awk '{print $5}' | sed 's/.:/ /' | awk '{print $2}' | sed 's/.$//'`
echo $VMIMAGE
local-lvm:vm-200-disk-1
# attach the config-image disk to the vm
qm set $VMID --ide0 $VMIMAGE,size=16M
update VM 200: -ide0 local-lvm:vm-200-disk-1,size=16M
Now, all our preparations are complete. You can review the resulting VM configuration.
# review the VM configuration made
qm config $VMID
args: -machine accel=kvm:tcg -smbios type=1,product=VM-VEX -cpu 'host,kvm=on'
boot: order=virtio0
cores: 4
ide0: local-lvm:vm-200-disk-1,size=4M
memory: 5120
meta: creation-qemu=8.1.5,ctime=1728988040
name: switch1
net0: virtio=BC:24:11:01:06:0E,bridge=vmbr0
net1: virtio=BC:24:11:6B:0B:84,bridge=ge000,firewall=0
net2: virtio=BC:24:11:7E:5C:07,bridge=ge001,firewall=0
net3: virtio=BC:24:11:FB:40:37,bridge=ge002,firewall=0
serial0: socket
smbios1: uuid=5b184467-bffe-45f3-8a4c-bb2182aa3aa5
virtio0: local-lvm:vm-200-disk-0,iothread=1,size=32524M
vmgenid: a3299ccf-293b-4df2-9458-b0fa444a9c61
As the VM does not contain any credentials or other limiting factors, use this VM as a template before you launch it for the first time. This allows you to launch multiple VMs as full or linked to the image clones later. Follow the steps below if you decide to proceed.
qm template $VMID
  Renamed "vm-200-disk-1" to "base-200-disk-1" in volume group "pve"
  Logical volume pve/base-200-disk-1 changed.
  WARNING: Combining activation change with other commands is not advised.
  Renamed "vm-200-disk-0" to "base-200-disk-0" in volume group "pve"
  Logical volume pve/base-200-disk-0 changed.
  WARNING: Combining activation change with other commands is not advised.
# select a new VMID for the clone
VMID2="201"
# create a clone of of your template VM
qm clone $VMID $VMID2 --name switch1
create linked clone of drive ide0 (local-lvm:base-200-disk-1)
  Logical volume "vm-201-disk-0" created.
create linked clone of drive virtio0 (local-lvm:base-200-disk-0)
  Logical volume "vm-201-disk-1" created.
#
# at this point you may change the interfaces assigned according to your topology
#
# review the VM configuration for the clone
qm config $VMID2
args: -machine accel=kvm:tcg -smbios type=1,product=VM-VEX -cpu 'host,kvm=on'
boot: order=virtio0
cores: 4
ide0: local-lvm:vm-201-disk-0,size=4M
memory: 5120
meta: creation-qemu=8.1.5,ctime=1729094281
name: switch1
net0: virtio=BC:24:11:87:61:1B,bridge=vmbr0
net1: virtio=BC:24:11:B2:11:52,bridge=ge000,firewall=0
net2: virtio=BC:24:11:79:0C:A1,bridge=ge001,firewall=0
net3: virtio=BC:24:11:DF:BC:BF,bridge=ge002,firewall=0
serial0: socket
smbios1: uuid=b81068a9-8f7e-423a-bbb8-7738da5f98df
virtio0: local-lvm:vm-201-disk-1,iothread=1,size=32524M
vmgenid: de47f143-5f48-44c4-8674-beb7d1b91bd2
# start the clone vJunos-switch VM
qm start $VMID2
brctl show
bridge name     bridge id               STP enabled     interfaces
ge000           8000.de5f3a3d3a9b       no              tap201i1
ge001           8000.da08ff719f7c       no              tap201i2
ge002           8000.8614a67130b7       no              tap201i3
vmbr0           8000.5847ca7543fe       no              enp2s0
                                                        tap201i0
If you have decided not to use a template/clone yet, then start the first vJunos-switch VM for testing now.
# start the new vJunos-switch VM
qm start $VMID
# review the linux-bridges and attached interfacs for our first VM
brctl show
bridge name bridge id STP enabled interfaces
ge000 8000.0ac0df72ec4b no tap200i1
ge001 8000.623437ae4bac no tap200i2
ge002 8000.72c0fc5f9933 no tap200i3
vmbr0 8000.5847ca7543fe no enp2s0
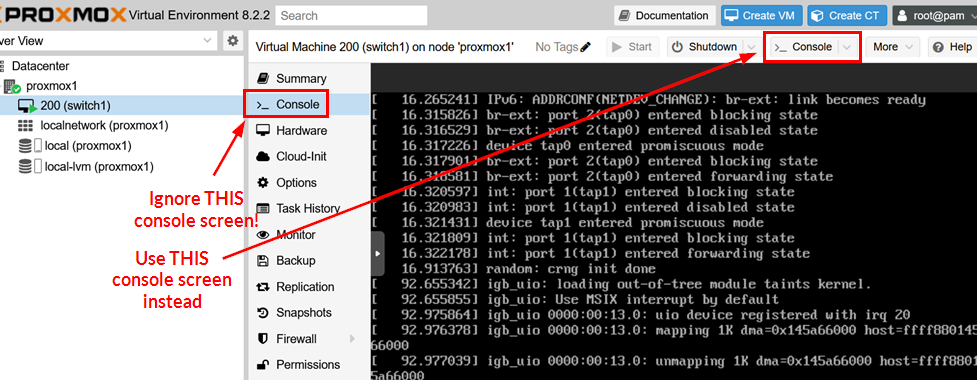
tap200i0You can now review the VM console in the Proxmox GUI. Ensure you use the correct button to avoid any changes to the outer VM screen on the Routing Engine. The Routing Engine is where all the Junos OS configuration starts and has its own screen. See the figure below for the Console options to select.
Linux Bridge and VM Interface Post VM Creation Changes on Proxmox VE
Launching the vJunos-switch VM does not meet the needs of most labs. You must tweak the standard Linux bridge used in the example after every new VM launch. For the detailed explanation, see chapter Linux Bridge and VM Interface Post VM Creation Changes. Hence, you do not need to repeat it here. EVE-NG automatically manages these tweaks.
Proxmox VE does not provide VM interfaces details and their
names through CLI locally. However, these details are available in
the REST API for the GUI. Using the provided command
pvesh, you can easily access the VM interface and
extract JSON based information about the created VM interfaces.
Hence, it is easier to rebuild a new script
vm-bridge-update.sh using pvesh and
jq commands and regular BASH programming. See the
instructions as shown below.
apt-get install jq
rm -f vm-bridge-update.sh
touch vm-bridge-update.sh
chmod 777 vm-bridge-update.sh
vi vm-bridge-update.sh
Copy and paste the below configuration to your editor. Then, save and close.
#!/bin/bash
# use API to get first nodename
pvesh get /nodes --output-format json | jq -r '.[].node' >nodes.txt
VMNODE=`cat nodes.txt | head -1`
echo 'We run this on node: '$VMNODE
# use API to get nic interfaces of our VM
pvesh get /nodes/$VMNODE/qemu/$1/status/current --output-format json | jq -r '.nics | keys[]' >/tmp/vminterfacelist.txt
# ignore first interface fxp0
cat /tmp/vminterfacelist.txt | tail -n +2 >/tmp/vminterfacelist2.txt
#cat /tmp/vminterfacelist2.txt
while IFS= read -r line
do
  INTERFACE="$line"
  #echo $INTERFACE
  BRIDGE=`find /sys/devices/virtual/net -name $INTERFACE | grep '/brif/' | sed 's/\// /g' | awk '{print $5}'`
  # change MTU to higher value
  RUNME="ip link set dev "$INTERFACE" mtu 9200"
  echo $RUNME
  eval $RUNME
  # enable LLDP and 802.1x on bridge
  RUNME="echo 65528 > /sys/class/net/"$BRIDGE"/bridge/group_fwd_mask"
  echo $RUNME
  eval $RUNME
  # enable LACP on link
  RUNME="echo 16388 > /sys/class/net/"$INTERFACE"/brport/group_fwd_mask"
  echo $RUNME
  eval $RUNME
done < /tmp/vminterfacelist2.txt
num=0
while IFS= read -r line
do
  INTERFACE="$line"
  BRIDGE=`find /sys/devices/virtual/net -name $INTERFACE | grep '/brif/' | sed 's/\// /g' | awk '{print $5}'`
  MTU=`cat /sys/class/net/$BRIDGE/mtu`
  if [ "$MTU" != "9200" ]; then
    echo 'Warning! Bridge:'$BRIDGE' did not follow new MTU setting of interface:'$INTERFACE' check other interfaces attached to same bridge and correct please!'
    num=1
  fi
done < /tmp/vminterfacelist2.txt
exit $num
With the new script, you can now update the Linux bridges and interfaces of the VM after it is started. The selected API’s first node is suitable for a single Proxmox VE installation. If you have a cluster, you might need to change the above script.
./vm-bridge-update.sh $VMID
We run this on node: proxmox1
ip link set dev tap200i1 mtu 9200
echo 65528 > /sys/class/net/ge000/bridge/group_fwd_mask
echo 16388 > /sys/class/net/tap200i1/brport/group_fwd_mask
ip link set dev tap200i2 mtu 9200
echo 65528 > /sys/class/net/ge001/bridge/group_fwd_mask
echo 16388 > /sys/class/net/tap200i2/brport/group_fwd_mask
ip link set dev tap200i3 mtu 9200
echo 65528 > /sys/class/net/ge002/bridge/group_fwd_mask
echo 16388 > /sys/class/net/tap200i3/brport/group_fwd_mask
To validate the first test for your Linux bridge enhancements,
check for LLDP neighbor announcements from your vJunos-switch VM.
With the juniper.conf instructions but without the
tweak, you do not see the announcements using tcpdump
). See the example below.
root@proxmox1:~# tcpdump -eni ge000
tcpdump: verbose output suppressed, use -v[v]... for full protocol decode
listening on ge000, link-type EN10MB (Ethernet), snapshot length 262144 bytes
13:47:37.917669 bc:24:11:6b:0b:84 > 01:80:c2:00:00:0e, ethertype LLDP (0x88cc), length 322: LLDP, length 308: vjunos
13:48:07.692425 bc:24:11:6b:0b:84 > 01:80:c2:00:00:0e, ethertype LLDP (0x88cc), length 322: LLDP, length 308: vjunos
To perform a final test, launch a second vJunos-switch connected 1:1 to the first VM. Then, establish a LAG with active LACP between the two VMs. The configuration for both virtual switches in the Mist Cloud GUI is shown below.
If you inspect locally on the vJunos-switch console, you should see LLDP neighbors and the established LACP links between the two switches. This step verifies that your lab works as expected.
root@switch1> show lldp neighbors
Local Interface    Parent Interface    Chassis Id          Port info          System Name
ge-0/0/0           ae0                 2c:6b:f5:3b:3b:c0   ge-0/0/0           switch2
ge-0/0/1           ae0                 2c:6b:f5:3b:3b:c0   ge-0/0/1           switch2
ge-0/0/2           ae0                 2c:6b:f5:3b:3b:c0   ge-0/0/2           switch2
root@switch1> show lacp interfaces
Aggregated interface: ae0
    LACP state:       Role   Exp   Def  Dist  Col  Syn  Aggr  Timeout  Activity
      ge-0/0/0       Actor    No    No   Yes  Yes  Yes   Yes     Fast    Active
      ge-0/0/0     Partner    No    No   Yes  Yes  Yes   Yes     Fast    Active
      ge-0/0/1       Actor    No    No   Yes  Yes  Yes   Yes     Fast    Active
      ge-0/0/1     Partner    No    No   Yes  Yes  Yes   Yes     Fast    Active
      ge-0/0/2       Actor    No    No   Yes  Yes  Yes   Yes     Fast    Active
      ge-0/0/2     Partner    No    No   Yes  Yes  Yes   Yes     Fast    Active
    LACP protocol:        Receive State  Transmit State          Mux State
      ge-0/0/0                  Current   Fast periodic Collecting distributing
      ge-0/0/1                  Current   Fast periodic Collecting distributing
      ge-0/0/2                  Current   Fast periodic Collecting distributing