Ubuntu KVM and libvirtd Server BMS Environment
The instructions and recommendations are valid for an Ubuntu 20.04.x installation and might also work for Ubuntu 22.04.x. It is known that for LACP bridge support, Ubuntu 16.04 does not support the tweaks used in chapter Linux Bridge and VM Interface Post VM Creation Changes.
Preparations Before You Deploy
Optional: Install KVM/Qemu if You Have Not Done It Yet
The following commands show how you install the KVM hypervisor and run the required checks. Ensure you are using root directory.
sudo -i
cd /root
lsb_release -a
No LSB modules are available.
Distributor ID: Ubuntu
Description:    Ubuntu 20.04.2 LTS
Release:        20.04
Codename:       focal
uname -a
Linux aide-glb-srv-2 5.4.0-88-generic #99-Ubuntu SMP Thu Sep 23 17:29:00 UTC 2021 x86_64 x86_64 x86_64 GNU/Linux
# MANDATORY CHECK FOR NEEDED CPU FLAGS
grep 'flags' /proc/cpuinfo | head -n1 | grep -E 'vmx|svm'
flags           : fpu vme de pse tsc msr pae mce cx8 apic sep mtrr pge mca cmov pat pse36 clflush dts acpi mmx fxsr sse sse2 ss ht tm pbe syscall nx pdpe1gb rdtscp lm constant_tsc arch_perfmon pebs bts rep_good nopl xtopology nonstop_tsc cpuid aperfmperf pni pclmulqdq dtes64 monitor ds_cpl vmx smx est tm2 ssse3 sdbg fma cx16 xtpr pdcm pcid dca sse4_1 sse4_2 x2apic movbe popcnt tsc_deadline_timer aes xsave avx f16c rdrand lahf_lm abm 3dnowprefetch cpuid_fault epb cat_l3 cdp_l3 invpcid_single pti intel_ppin ssbd ibrs ibpb stibp tpr_shadow vnmi flexpriority ept vpid ept_ad fsgsbase tsc_adjust bmi1 hle avx2 smep bmi2 erms invpcid rtm cqm rdt_a rdseed adx smap intel_pt xsaveopt cqm_llc cqm_occup_llc cqm_mbm_total cqm_mbm_local dtherm ida arat pln pts md_clear flush_l1d
apt-get update
apt-get -y upgrade
apt-get install -y qemu-kvm libvirt-daemon-system libvirt-clients net-tools bridge-utils virtinst virt-top genisoimage
usermod -aG libvirt $USER
usermod -aG kvm $USER
#chown libvirt-qemu /var/lib/libvirt/images
# MANDATORY CHECK
kvm-ok
INFO: /dev/kvm exists
KVM acceleration can be used
Optional: Create br0-bridge with DHCP Server
Once installed, the hypervisor automatically creates the default
virbr0 Linux bridge in the 192.168.122.0/24 prefix.
This bridge will source NAT the remaining network interfaces and
manage the DHCP server leases. You can connect the vJunos-switch VM
fxp0 interface for OOB management. A limitation of this default
virbr0 Linux bridge is that the DHCP lease handout is random and
unpredictable.
For your lab server, we recommend you create an additional
br0 Linux bridge. This Linux bridge must NAT external
interfaces to copy the same using the 192.168.10.0/24 prefix.
cat <<EOF >br0network.xml
<network>
  <name>br0network</name>
  <forward mode='nat'/>
  <bridge name='br0' stp='off' delay='0'/>
  <ip address='192.168.10.1' netmask='255.255.255.0'/>
</network>
EOF
virsh net-destroy br0network
virsh net-undefine br0network
virsh net-define --file /root/br0network.xml
virsh net-autostart br0network
virsh net-start br0network
virsh net-list
 Name         State    Autostart   Persistent
-----------------------------------------------
 br0network   active   yes         yes
 default      active   yes         yes
brctl show
bridge name     bridge id               STP enabled     interfaces
br0             8000.5254001a8a15       no              br0-nic
virbr0          8000.52540018df7d       yes             virbr0-nic
You’ve assigned a fixed IP to the vEX switches on fxp0 using DHCP, allowing you to SSH to the switches. The standard virbr0-bridge assigns a random IP address from the range 192.168.122.0/24. Instead, you create a simple DHCP server to provide static leases to known MAC addresses on br0 Linux bridge in the range 192.168.10.0/24. Then, start the vJunos-switch VM using one of the MAC addresses on the first interface to assign a predefined IP address to the fxp0 interface.
cat <<EOF > /root/br0-dnsmasq.conf
strict-order
user=root
pid-file=/tmp/br0-dnsmasq.pid
except-interface=lo
bind-dynamic
interface=br0
dhcp-range=192.168.10.150,192.168.10.250,255.255.255.0
dhcp-no-override
dhcp-authoritative
dhcp-option=3,192.168.10.1
dhcp-option=6,8.8.8.8
dhcp-host=52:54:00:6c:3c:00,aos-server,192.168.10.200
dhcp-host=52:54:00:6c:3c:01,sw-1,192.168.10.201
dhcp-host=52:54:00:6c:3c:02,sw-2,192.168.10.202
dhcp-host=52:54:00:6c:3c:03,sw-3,192.168.10.203
dhcp-host=52:54:00:6c:3c:04,sw-4,192.168.10.204
dhcp-host=52:54:00:6c:3c:05,sw-5,192.168.10.205
dhcp-host=52:54:00:6c:3c:06,sw-6,192.168.10.206
dhcp-host=52:54:00:6c:3c:07,sw-7,192.168.10.207
dhcp-host=52:54:00:6c:3c:08,sw-8,192.168.10.208
dhcp-host=52:54:00:6c:3c:09,sw-9,192.168.10.209
dhcp-host=52:54:00:6c:3c:0a,sw-10,192.168.10.210
dhcp-host=52:54:00:6c:3c:0b,sw-11,192.168.10.211
dhcp-host=52:54:00:6c:3c:0c,sw-12,192.168.10.212
dhcp-host=52:54:00:6c:3c:0d,sw-13,192.168.10.213
dhcp-host=52:54:00:6c:3c:0e,sw-14,192.168.10.214
dhcp-host=52:54:00:6c:3c:0f,sw-15,192.168.10.215
dhcp-host=52:54:00:6c:3c:10,sw-16,192.168.10.216
dhcp-host=52:54:00:6c:3c:99,wan-router,192.168.10.99
EOF
dnsmasq --conf-file=/root/br0-dnsmasq.conf
Create Linux Bridges to Simulate Network Links Between VMs
Use the default virbr0 or the new br0
Linux bridge when you connect the fxp0 interface of a vJunos-switch
VM. As all other links need new bridges, create virtual links
between devices. In this example, the bridge name tries to copy the
Junos OS interface naming conventions.
ip link add name ge000 type bridge
ip link set ge000 up
ip link add name ge001 type bridge
ip link set ge001 up
ip link add name ge002 type bridge
ip link set ge002 up
ip link add name ge003 type bridge
ip link set ge003 up
# OPTIONAL: check your Linux-bridges
brctl show
bridge name     bridge id               STP enabled     interfaces
br0             8000.525400938f81       no              br0-nic
                                                        vnet0
ge000           8000.000000000000       no
ge001           8000.000000000000       no
ge002           8000.000000000000       no
ge003           8000.000000000000       no
virbr0          8000.525400ffc947       yes             virbr0-nic
Default Junos OS Configuration for vJunos-switch
You might need to include a custom Junos OS configuration executed at the starting the vJunos-switch VM for the following main reasons:
- Create a root/supervisor account with a known password for a management system such as, Juniper Apstra to login. This avoids the need for a local DHCP server to push the customized configuration and supports SSH login for better debugging.
- Apply an adopt configuration for the Mist Cloud so the new switch appears in the inventory.
- Load an existing valid configuration from a previous lab at the starting of a new lab.
Customized Factory-Default
Here is an example of minimal Junos OS configuration that you
load when creating a file juniper.conf with the
following configurations:
- Username=
root - Password=
ABC123 - Expected to get a DHCP lease from fxp.0
- Enable LLDP on all interfaces
cat <<EOF >juniper.conf
system {
    host-name spine1;
    root-authentication {
        encrypted-password "\$6\$DOvFAxW9\$HpxgOaGEe5L6MtDJqbWepS5NT6EW23rCuu69gwwGVFr7BpzY2MHS34mPrR0LKRqoGI19tRgpz3vFJkEueW9mQ1"; ## SECRET-DATA
    }
    services {
        ssh {
            root-login allow;
            protocol-version v2;
        }
    }
    name-server {
        8.8.8.8;
        9.9.9.9;
    }
    arp {
        aging-timer 5;
    }
    syslog {
        file interactive-commands {
            interactive-commands any;
        }
        file messages {
            any notice;
            authorization info;
        }
    }
}
interfaces {
    fxp0 {
        unit 0 {
            family inet {
                dhcp force-discover;
            }
        }
    }
}
protocols {
    lldp {
        interface all;
    }
    lldp-med {
        interface all;
    }
}
EOF
Optional: Adding Junos OS Configuration for Adoption to Mist Cloud
In this step, you’ll add Junos OS configuration to make the switch appear automatically in the Mist Cloud.
- Go to Organization -> Inventory.

- Select Switches and then click Adopt
Switches.

- Click Copy to Clipboard.
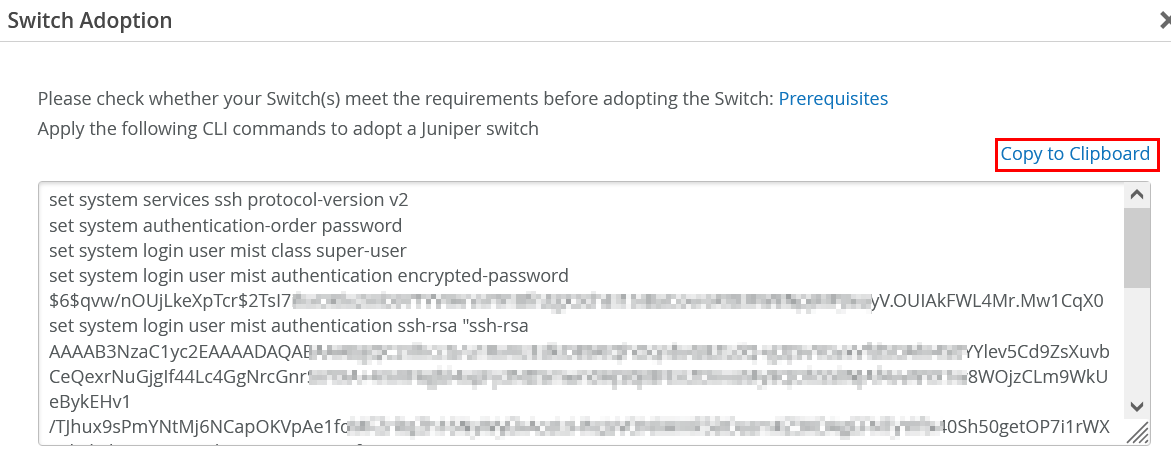
- Open a file
adopt-template.txtfrom your preferred editor and paste the gathered information in this file. Then, save and close the file.vi adopt-template.txt
Note:You can use the same Mist Cloud adoption code to onboard all switches in the same organization.
- Convert the information using a template to change it in a
different Junos OS configuration format. First, you must extract
five variables from the file
adopt-template.txtusing bash shell commands.MISTVAR1=`cat adopt-template.txt | sed 's/\"//g' | grep "set system login user mist authentication encrypted-password" | awk '{print $8}'` MISTVAR2=`cat adopt-template.txt | sed 's/\"//g' | grep "set system login user mist authentication ssh-rsa" | awk '{print $8 " " $9}'` MISTVAR3=`cat adopt-template.txt | sed 's/\"//g' | grep "set system services outbound-ssh client mist secret" | awk '{print $8}'` MISTVAR4=`cat adopt-template.txt | sed 's/\"//g' | grep "set system services outbound-ssh client mist" | grep "port" | awk '{print $7}'` MISTVAR5=`cat adopt-template.txt | sed 's/\"//g' | grep "set system services outbound-ssh client mist" | grep "device-id" | awk '{print $8}'`
In this step, you add back the Junos OS configuration, which does not depend on set commands.
cat <<EOF >>juniper.conf
system {
    login {
        user mist {
            class super-user;
            authentication {
                encrypted-password "$MISTVAR1";
                ssh-rsa "$MISTVAR2";
            }
        }
    }
    services {
        outbound-ssh {
            client mist {
                device-id "$MISTVAR5";
                secret "$MISTVAR3";
                keep-alive {
                    retry 12;
                    timeout 5;
                }
                services netconf;
                $MISTVAR4 {
                    port 2200;
                    retry 1000;
                    timeout 60;
                }
            }
        }
    }
}
EOF
# review the final config
cat juniper.conf
Creating Virtual Disk with Junos OS Configuration for VM
- Create an HD image to load your custom configuration using the
original bash script
make-config.shfrom the vJunos-switch support site..png)
- Download the image through a link. For example: https://webdownload.juniper.net/swdl/dl/anon/site/1/record/168885.html.
If you can’t find an image, use the copy below.
#!/bin/bash # # make-config.sh # # Copyright (c) 2023, Juniper Networks, Inc. # All rights reserved. # # Create a config metadisk from a supplied juniper.conf to attach # to a vJunos VM instance # usage() { echo "Usage : make-config.sh <juniper-config> <config-disk>" exit 0; } cleanup () { echo "Cleaning up..." umount -f -q $MNTDIR losetup -d $LOOPDEV rm -rfv $STAGING rm -rfv $MNTDIR } cleanup_failed () { cleanup; rm -rfv $2 exit 1 } if [ $# != 2 ]; then usage; fi STAGING=`mktemp -d -p /var/tmp` MNTDIR=`mktemp -d -p /var/tmp` mkdir $STAGING/config cp -v $1 $STAGING/config qemu-img create -f raw $2 1M LOOPDEV=`losetup --show -f $2` if [ $? != 0 ]; then cleanup_failed; fi mkfs.vfat -v -n "vmm-data" $LOOPDEV if [ $? != 0 ]; then echo "Failed to format disk $LOOPDEV; exiting" cleanup_failed; fi mount -t vfat $LOOPDEV $MNTDIR if [ $? != 0 ]; then echo "Failed to mount metadisk $LOOPDEV; exiting" cleanup_failed; fi echo "Copying file(s) to config disk $2" (cd $STAGING; tar cvzf $MNTDIR/vmm-config.tgz .) cleanup echo "Config disk $2 created" exit 0 - Create a qcow2-Image that includes your customized configuration using
make-config.sh../make-config.sh juniper.conf myconfig.qcow2 'juniper.conf' -> '/var/tmp/tmp.S9uwgranof/config/juniper.conf' Formatting 'myconfig.qcow2', fmt=raw size=1048576 mkfs.fat 4.1 (2017-01-24) mkfs.fat: warning - lowercase labels might not work properly with DOS or Windows /dev/loop7 has 64 heads and 32 sectors per track, hidden sectors 0x0000; logical sector size is 512, using 0xf8 media descriptor, with 2048 sectors; drive number 0x80; filesystem has 2 12-bit FATs and 4 sectors per cluster. FAT size is 2 sectors, and provides 502 clusters. There is 1 reserved sector. Root directory contains 512 slots and uses 32 sectors. Volume ID is 9136e65a, volume label vmm-data . Copying file(s) to config disk myconfig.qcow2 ./ ./config/ ./config/juniper.conf Cleaning up... removed '/var/tmp/tmp.S9uwgranof/config/juniper.conf' removed directory '/var/tmp/tmp.S9uwgranof/config' removed directory '/var/tmp/tmp.S9uwgranof' removed directory '/var/tmp/tmp.iz7I2RJJAI' Config disk myconfig.qcow2 created ls -l myconfig.qcow2 -rw-r--r-- 1 root root 1048576 Apr 19 19:46 myconfig.qcow2
- Copy your configuration image to the final destination for KVM
VMs.
cp myconfig.qcow2 /var/lib/libvirt/images/spine1-config.qcow2
- Insert the bold line as shown below to the VM virt-install
configuration when you create a new vJunos-switch VM. An example is
described in chapter Proxmox Virtual
Environment.
.
--disk path=/var/lib/libvirt/images/spine1.qcow2,cache=writeback,bus=virtio \
--disk path=/var/lib/libvirt/images/spine1-config.qcow2 \
--import \
.
Deployment of vJunos-switch VM Using virt-install CLI
For each vJunos-switch VM, you need an individual copy of the
base image for the system to write to it. The configuration below
uses the KVM backing file method to create an image with the
changes made and reads from the original image. This method speeds
up the VM start and saves storage. You might have to modify the
file /etc/libvirt/qemu.conf to add yourself as a user
and group. Then, run sudo systemctl restart libvirtd
to use this feature.
qemu-img create -b vjunos-switch-23.1R1.8.qcow2 -f qcow2 /var/lib/libvirt/images/spine1.qcow2
Backup files must always allow you to copy the image for each VM.
cp vjunos-switch-23.1R1.8.qcow2 /var/lib/libvirt/images/spine1.qcow2
Finally, you can successfully start the vJunos-switch VM in the configuration below without changing the parameters in bold. The VM first Ethernet interface is always fxp0. After you've set the MAC address and configured the DHCP server to assign 192.168.10.201 as static DHCP lease, you can directly start a remote shell later.
virt-install -n spine1 -r 5120 --vcpus=4 \
--sysinfo smbios,system.product=VM-VEX \
--hvm --cpu IvyBridge,require=vmx \
--disk path=/var/lib/libvirt/images/spine1.qcow2,cache=writeback,bus=virtio \
--import \
-w bridge=br0,model=virtio,mac="52:54:00:6c:3c:01" \
-w bridge=ge000,model=virtio \
-w bridge=ge001,model=virtio \
-w bridge=ge002,model=virtio \
-w bridge=ge003,model=virtio \
--nographics --noautoconsole
Starting install...
Domain creation completed.
virsh domiflist spine1
 Interface   Type     Source   Model    MAC
-----------------------------------------------------------
 vnet1       bridge   br0      virtio   52:54:00:6c:3c:01
 vnet2       bridge   ge000    virtio   52:54:00:ac:2f:63
 vnet3       bridge   ge001    virtio   52:54:00:90:ea:79
 vnet4       bridge   ge002    virtio   52:54:00:24:0f:1d
 vnet5       bridge   ge003    virtio   52:54:00:11:45:56
brctl show
bridge name     bridge id               STP enabled     interfaces
br0             8000.525400938f81       no              br0-nic
                                                        vnet0
                                                        vnet1
brtest          8000.000000000000       no
ge000           8000.fe5400ac2f63       no              vnet2
ge001           8000.fe540090ea79       no              vnet3
ge002           8000.fe5400240f1d       no              vnet4
ge003           8000.fe5400114556       no              vnet5
virbr0          8000.525400ffc947       yes             virbr0-nic
# OPTIONAL: check the xml config create with the official documentation
virsh dumpxml spine1
# OPTIONAL: open a console to the VM to see what it does
virsh console --force spine1
Deployment of vJunos-switch VM Using virt-manager GUI
For installing vJunos-switch through virt-manager GUI, you must manually change few XML based configuration files. So, the GUI does not provide any benefit for this VM.
- Obtain a copy of the base VM to the libvirtd image directory as
shown.
cp vjunos-switch-23.1R1.2.qcow2 /var/lib/libvirt/images/spine1.qcow2

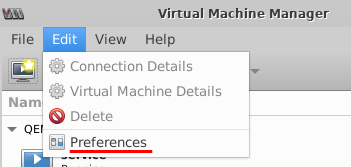
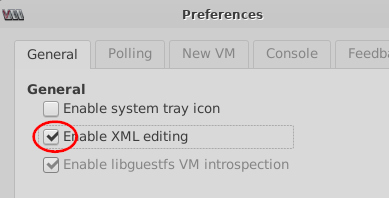
- Click Edit -> Preferences to enable XML
editing for this VM.
- Select Enable XML editing.
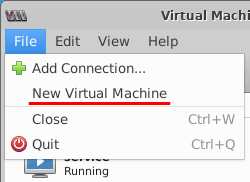
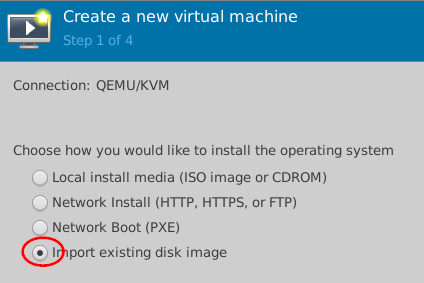
- Select File -> New Virtual Machine.
- Select Import existing disk image for
installation.
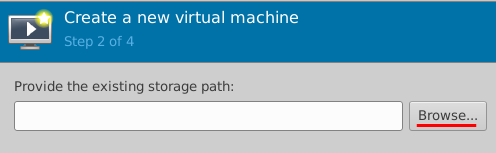
- Click Browse.
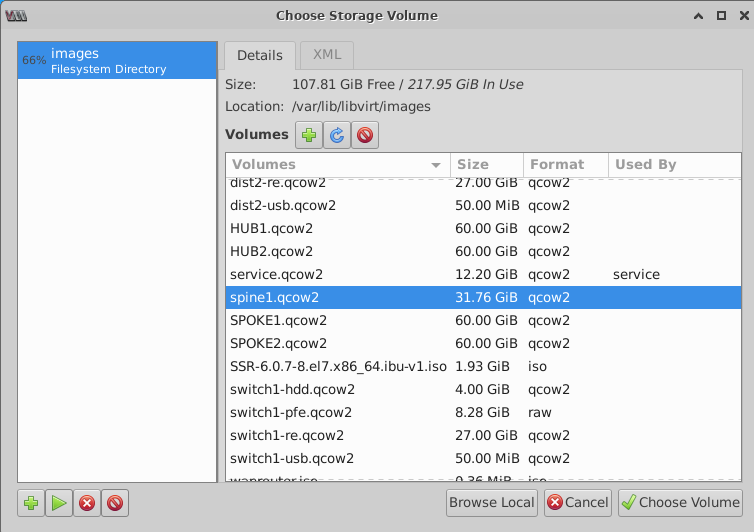
- Select the image that you have copied and click Choose
Volume.
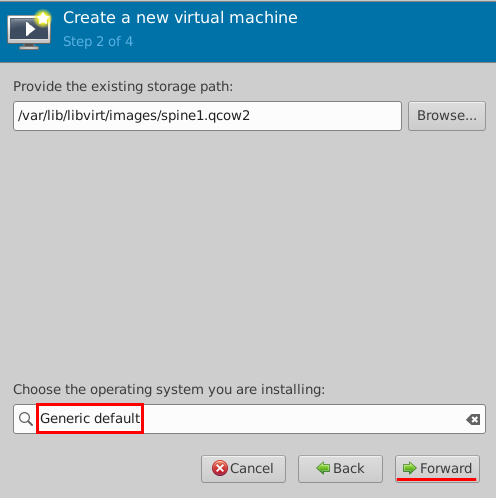
- Select Generic default for OS and click
Forward.
- Click + to configure:
- Memory=
5120 - CPUs=
4
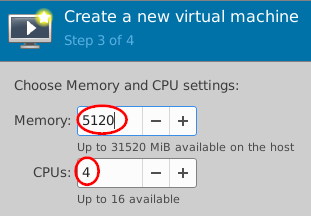
- Memory=
- Then, configure:
- Name=
spine1 - Select Customize configuration before install.
- Select Virtual network 'br0network': NAT for now. Network selection for the first interface (fxp0) must be a NAT network.
- Click Finish.
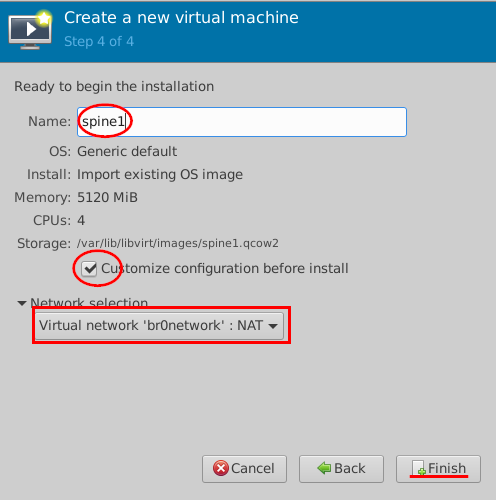
- Name=
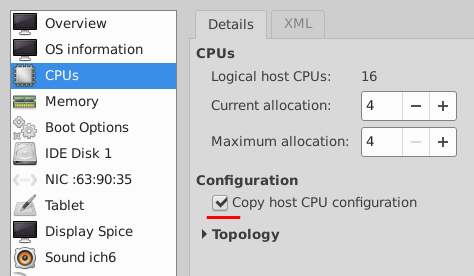
- Click CPUs.
The host CPU is configured. You can click XML to change the configuration later as the other options are not required.
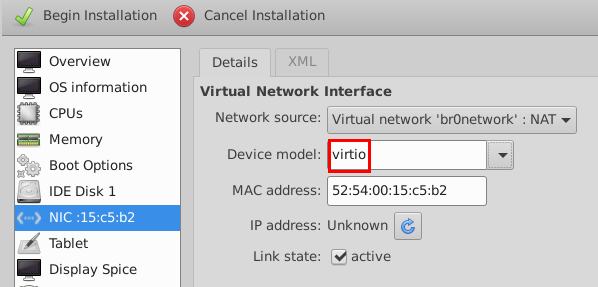
- Change the Device model as virtio for the
first interface.
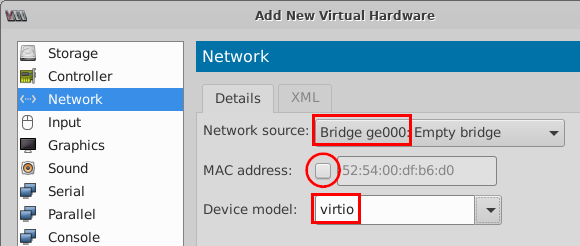
- Add a new network interface using the add
function for interfaces and configure:
- Network source=
Bridge ge000 - Uncheck=
MAC address - Device model=
virtio
- Network source=
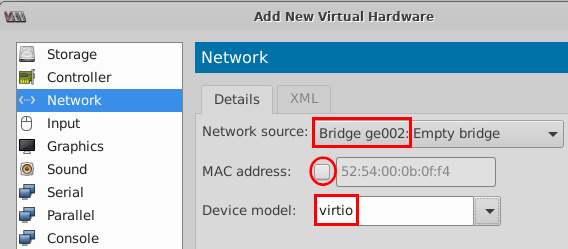
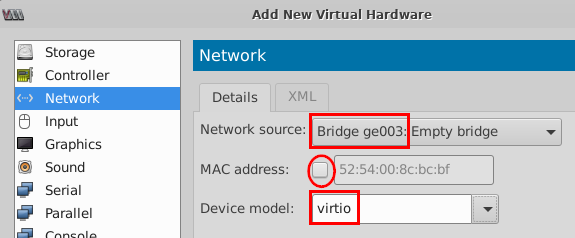
- Repeat Step 13 to add network source
Bridge ge001, Bridge ge002andBridge ge003.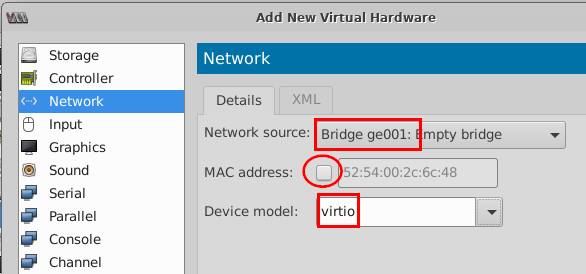
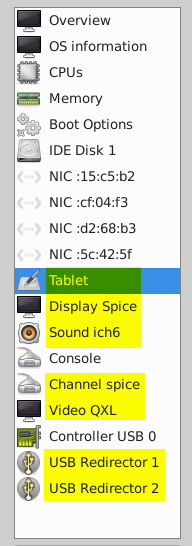
- Optionally, you can remove the default interface and options
highlighted in yellow in the figure below as they are not required
for vJunos-switch VM.
- Select OS information and then
XML for editing. Delete
everything between
<os>and</os>and replace it with the highlighted lines as show below. The replaced configuration instructs special BIOS command to ensure that the VM acts as a vEX9214 and not as a vMX.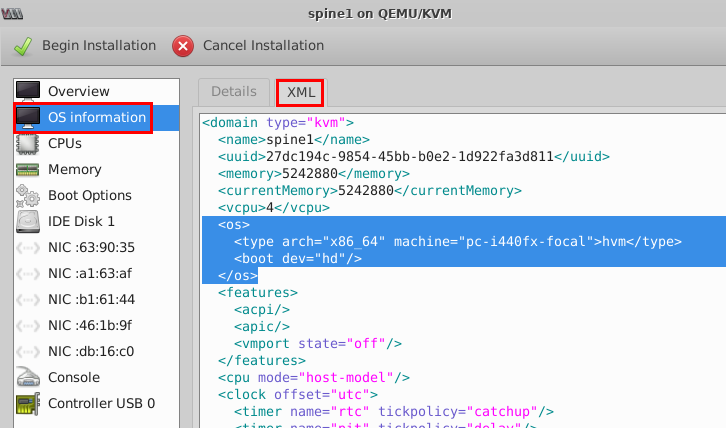
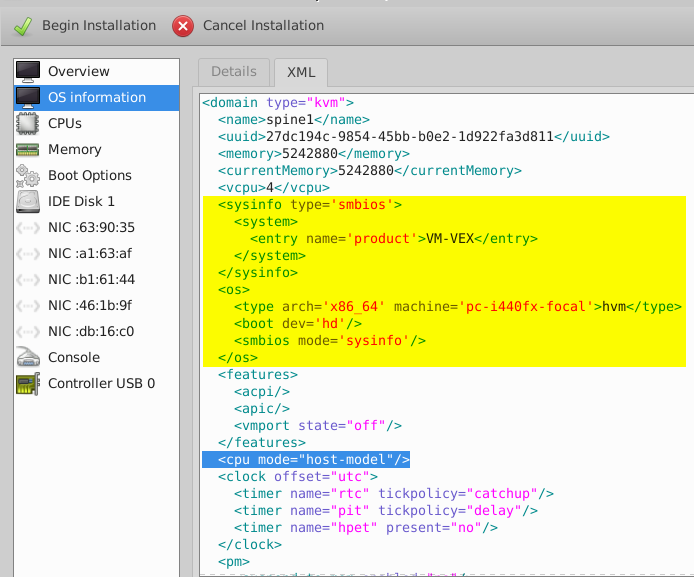
- Insert the following configuration as shown below:
  <sysinfo type='smbios'>
    <system>
      <entry name='product'>VM-VEX</entry>
    </system>
  </sysinfo>
  <os>
    <type arch='x86_64' machine='pc-i440fx-focal'>hvm</type>
    <boot dev='hd'/>
    <smbios mode='sysinfo'/>
  </os>
The replaced configuration is shown as highlighted in yellow in the figure below.
- Insert the following configuration from
<cpuas shown in the figure above.<cpu mode='custom' match='exact' check='full'> <model fallback='forbid'>IvyBridge</model> <feature policy='require' name='ibpb'/> <feature policy='require' name='md-clear'/> <feature policy='require' name='spec-ctrl'/> <feature policy='require' name='ssbd'/> <feature policy='require' name='vmx'/> <feature policy='require' name='hypervisor'/> <feature policy='require' name='arat'/> <feature policy='require' name='xsaveopt'/> </cpu>The replaced configuration is shown as highlighted in yellow in the figure below.
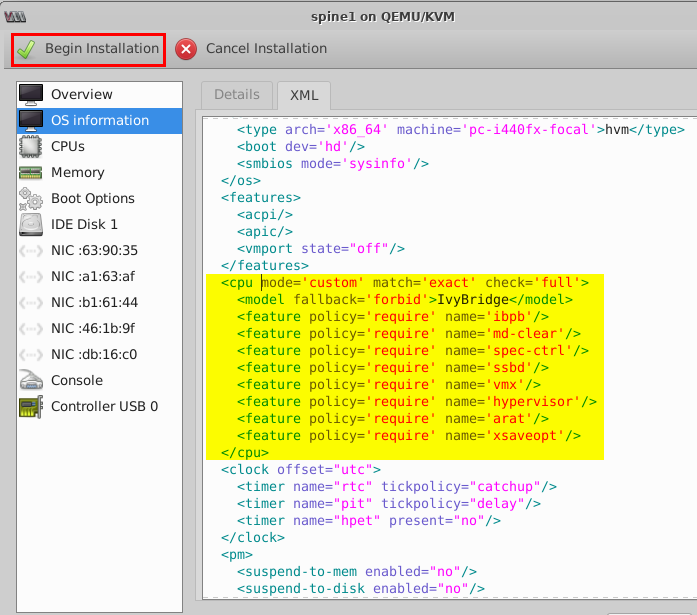
- Insert the following configuration as shown below:
- Click apply and Begin Installation.
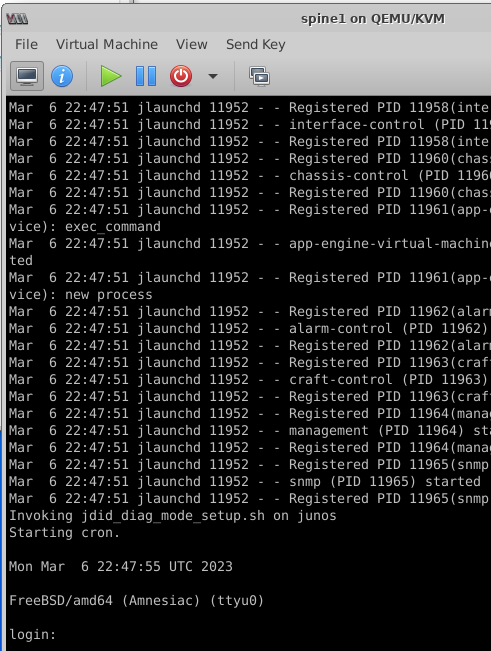
The installation process might take three minutes and you’ll be prompted with a VM login.
Linux Bridge and VM Interface Post VM Creation Changes
After the VM is launched, you must change the interface and Linux bridge configuration. The bridges that you created with the default configuration in chapter Preparations Before You Deploy, are applicable for an EVPN VXLAN fabric.
The default Linux bridge does not support:
- LLDP message transport, which means you cannot see any link neighbors.
- LACP 802.3ad message transport, which prevents you from building LAG.
- Large MTUs, which causes fragmentation of VXLAN messages. Using VXLAN, the fabric must have MTUs at least 50 bytes larger than the attached clients. Image the attached Desktop VM and all fabric links with same default MTU of 1500, where the transport links always add extra 50 bytes. The small packets such as, ICMP Ping works well but not when the clients use the full MTU of 1500 bytes.
- 802.1X wired client authentication is blocked.
Hence, you need to change the virtual interface and Linux bridges after creating the VM to support these features. This change ensures that you build a virtual EVPN VXLAN fabric smoothly.
- Create a bash script using the following commands to perform
all the required functions.
rm -f vm-bridge-update.sh
touch vm-bridge-update.sh
chmod 777 vm-bridge-update.sh
vi vm-bridge-update.sh
- Copy and paste the below configuration to your editor. Then,
save and close.
#!/bin/bash virsh domiflist $1 | tail -n +4 > /tmp/vmbridgelist.txt sed -i '/^$/d' /tmp/vmbridgelist.txt # cat /tmp/vmbridgelist.txt while IFS= read -r line do INTERFACE=`echo $line | awk '{ print $1 }'` NTYPE=`echo $line | awk '{ print $2 }'` BRIDGE=`echo $line | awk '{ print $3 }'` if [ "$NTYPE" == "bridge" ]; then # change MTU to higher value RUNME="ip link set dev "$INTERFACE" mtu 9200" echo $RUNME eval $RUNME # enable LLDP and 802.1x on bridge RUNME="echo 65528 > /sys/class/net/"$BRIDGE"/bridge/group_fwd_mask" echo $RUNME eval $RUNME # enable LACP on link RUNME="echo 16388 > /sys/class/net/"$INTERFACE"/brport/group_fwd_mask" echo $RUNME eval $RUNME fi done < /tmp/vmbridgelist.txt num=0 while IFS= read -r line do INTERFACE=`echo $line | awk '{ print $1 }'` NTYPE=`echo $line | awk '{ print $2 }'` BRIDGE=`echo $line | awk '{ print $3 }'` if [ "$NTYPE" == "bridge" ]; then MTU=`cat /sys/class/net/$BRIDGE/mtu` if [ "$MTU" != "9200" ]; then echo 'Warning! Bridge:'$BRIDGE' did not follow new MTU setting of interface:'$INTERFACE' check other interfaces attached to same bridge and correct please!' num=1 fi fi done < /tmp/vmbridgelist.txt exit $num - Run this script on a demonstration VM, where you can monitor the commands that are
required to apply the changes.
./vm-bridge-update.sh core1
ip link set dev vnet4 mtu 9200
echo 65528 > /sys/class/net/exfabric1/bridge/group_fwd_mask
echo 16388 > /sys/class/net/vnet4/brport/group_fwd_mask
ip link set dev vnet5 mtu 9200
echo 65528 > /sys/class/net/uplink1/bridge/group_fwd_mask
echo 16388 > /sys/class/net/vnet5/brport/group_fwd_mask
ip link set dev vnet6 mtu 9200
echo 65528 > /sys/class/net/fabric1/bridge/group_fwd_mask
echo 16388 > /sys/class/net/vnet6/brport/group_fwd_mask
ip link set dev vnet7 mtu 9200
echo 65528 > /sys/class/net/fabric2/bridge/group_fwd_mask
echo 16388 > /sys/class/net/vnet7/brport/group_fwd_mask
Warning! Bridge:uplink1 did not follow new MTU setting of interface:vnet5 check other interfaces attached to same bridge and correct please!
You’ve intentionally given a warning about the non-upgraded MTU on a certain interface. This warning implies that a Linux bridge always has the lowest MTU of any attached network interface. Hence, ensure to upgrade all interfaces attached to a single bridge. Else, your MTU changes are not implemented.
The script intentionally does not upgrade the first interface of a VM, which is usually fxp0. If you want to include this interface, change the second line to “virsh domiflist $1 | tail -n +3 > /tmp/vmbridgelist.txt”.
Tweaking Linux bridge works only with Ubuntu 20.04 or higher.
Optional: Optimizing Your KVM Server
Ultra Kernel Samepage Merging Kernel
Using a kernel that supports Ultra Kernel Samepage Merging can save 30 - 40% memory compared to the standard KSM support when launching multiple vJunos-switch VMs. This is beneficial for a lab and systems such as EVE-NG which includes this Kernel by default. If the system runs on Ubuntu 20.04.x, which does not support higher kernels, you can use the following configurations to build such a kernel from the official GitHub repository.
Ensure that you have disabled Secure Boot in the BIOS. If not, the unsigned kernel does not load.
lsb_release -a
No LSB modules are available.
Distributor ID: Ubuntu
Description:    Ubuntu 20.04.5 LTS
Release:        20.04
Codename:       focal

uname -r
5.4.0-135-generic

sudo apt-get install -y build-essential flex bison git libssl-dev libncurses-dev libelf-dev zstd
git clone https://github.com/dolohow/uksm.git
- Enter https://git.launchpad.net/~ubuntu-kernel/ubuntu/+source/linux/+git/focal/refs/
in a browser.
If a normal
5.4.xkernel is installed on your server, then run the following commands:rm -rf focal git clone --depth 1 --single-branch --branch Ubuntu-5.4.0-135.152 https://git.launchpad.net/\~ubuntu-kernel/ubuntu/+source/linux/+git/focal cd focal patch -p1 < ~/uksm/v5.x/uksm-5.4.patch
- If a newer kernel such as,
5.15.xwith Hardware Enablement Stack (HWE) support is installed on your server, then run the following commands:rm -rf focal git clone --depth 1 --single-branch --branch Ubuntu-hwe-5.15-5.15.0-57.63_20.04.1 https://git.launchpad.net/\~ubuntu-kernel/ubuntu/+source/linux/+git/focal cd focal patch -p1 < ~/uksm/v5.x/uksm-5.15.patch
- Regardless of your kernel version, proceed with the following configuration to build and
install the USKM kernel.
make oldconfig Enable KSM for page merging (KSM) [Y/n/?] y Choose UKSM/KSM strategy > 1. Ultra-KSM for page merging (UKSM) (NEW) 2. Legacy KSM implementation (KSM_LEGACY) (NEW) choice[1-2?]: 1 # patches for this kernel to compile scripts/config --disable DEBUG_INFO sed -i 's/CONFIG_SYSTEM_TRUSTED_KEYS="debian\/canonical-certs.pem"/CONFIG_SYSTEM_TRUSTED_KEYS=""/g' .config sed -i 's/CONFIG_SYSTEM_REVOCATION_KEYS="debian\/canonical-revoked-certs.pem"/CONFIG_SYSTEM_REVOCATION_KEYS=""/g' .config cat .config | grep _KEYS # The below command is slower but maybe used for debugging when building the kernel fails # make deb-pkg LOCALVERSION=-uksm make -j$(nproc) deb-pkg LOCALVERSION=-uksm ls -la ../*deb -rw-r--r-- 1 root root 11650688 Jan 7 13:11 ../linux-headers-5.4.212-uksm_5.4.212-uksm-1_amd64.deb -rw-r--r-- 1 root root 62563988 Jan 7 13:12 ../linux-image-5.4.212-uksm_5.4.212-uksm-1_amd64.deb -rw-r--r-- 1 root root 1072104 Jan 7 13:11 ../linux-libc-dev_5.4.212-uksm-1_amd64.deb cd .. sudo dpkg -i linux-headers-5.4.212-uksm_5.4.212-uksm-1_amd64.deb sudo dpkg -i linux-image-5.4.212-uksm_5.4.212-uksm-1_amd64.deb sudo update-grub sudo reboot - After the server is up again, check if you are running on the new kernel.
uname -r
5.4.212-uksm
Turn Off Security Mitigations
Avoid these instructions if your server is in production or accessible through the Internet. You can revise the security checks to gain CPU performance in your lab. You are warned.
To avoid 20% CPU performance loss, you’ll disable all mitigations against meltdown/spectre vulnerabilities. This server does not host VMs from different users. As you manage all the VMs in your lab and it’s not a public offered production-grade system, you prioritize performance over security.
#we ARE already a VM so to have most speed turn off security patches
#add mitigations=off to your kernel parameters like below
sudo vi /etc/default/grub
.
.
GRUB_CMDLINE_LINUX_DEFAULT=""
GRUB_CMDLINE_LINUX="mitigations=off"
# Uncomment to enable BadRAM filtering, modify to suit your needs
# This works with Linux (no patch required) and with any kernel that obtains
.
.
sudo update-grub
# make latest kernel >=5.4 active through reboot of VM
sudo reboot
# you should see the below now with disabled security tweaks
grep . /sys/devices/system/cpu/vulnerabilities/* | egrep -i 'meltdown|spectre'
/sys/devices/system/cpu/vulnerabilities/meltdown:Vulnerable
/sys/devices/system/cpu/vulnerabilities/spectre_v1:Vulnerable: __user pointer sanitization and usercopy barriers only; no swapgs barriers
/sys/devices/system/cpu/vulnerabilities/spectre_v2:Vulnerable, IBPB: disabled, STIBP: disabled