BGP Monitoring Protocol
Monitoring BGP Routing Information
Purpose
Use the monitoring functionality to monitor BGP routing information on the routing device.
Action
To view BGP routing information in the CLI, enter the following commands:
show bgp summaryshow bgp neighbor
See Also
Understanding the BGP Monitoring Protocol
The BGP Monitoring Protocol (BMP) is a protocol to allow a monitoring station to receive routes from a BGP-enabled device. The monitoring station receives all routes, not just the active routes. BMP uses route monitoring messages (which are essentially encapsulated BGP update messages) and a few other message types for statistics and state changes. All messages flow from the router to the monitoring station.
When an interface is disabled, the BMP that monitors the TCP session, is shut down for 240 seconds (4 minutes). This is an expected behavior.
The data is collected from the Adjacency-RIB-In routing tables. The
Adjacency-RIB-In tables are the pre-policy tables, meaning that the
routes in these tables have not been filtered or modified by routing policies.
The Local-RIB tables are the post-policy tables.
Starting in Junos OS Release 22.4R1, you can configure a policy to monitor routing information bases (RIBs) of type virtual router and virtual routing and forwarding (VRF). You can specify two separate sets of RIBs in the BGP Monitoring Protocol (BMP), one for monitoring and the other for reporting. With this feature, BMP can filter traffic based on the routes and routing instances.
See Also
Configuring BGP Monitoring Protocol Version 3
BGP Monitoring Protocol (BMP) allows the Junos OS to send the BGP route information from the router to a monitoring application on a separate device. The monitoring application is called the BMP monitoring station or BMP station. To deploy BMP in your network, you need to configure BMP on each router and you also need to configure at least one BMP station. This procedure describes how to configure BMP on a router.
You can specify these settings for all BMP stations by configuring
the statements described here at the [edit routing-options bmp] hierarchy
level. You can also configure settings for specific BMP stations by
configuring these statements at the [edit routing-options bmp
station station-name] hierarchy level.
The following procedure describes how to configure BMP version 3 on the router:
See Also
Configuring BGP Monitoring Protocol to Run Over a Different Routing Instance
Starting in Junos OS Release 18.3R1, you can specify which routing instance you want the BGP Monitoring Protocol (BMP) to use. Prior to Junos OS Release 18.3R1, you had to use the default routing instance. By default, in Junos OS, the management Ethernet interface (usually named fxp0 or em0) provides the out-of-band management network for the device. There is no clear separation between either out-of-band management traffic and in-band protocol control traffic, or user traffic at the routing-instance or routing-table level. Instead, all traffic is handled through the default routing instance, giving rise to concerns over security, performance, and how to troubleshoot.
Starting with Junos OS Release 17.3R1, you can configure the management interface in a non-default virtual routing and forwarding (VRF) instance, the mgmt_junos routing instance. Once you configure this management routing instance as described in Configuring the mgmt_junos Routing Instance, management traffic no longer has to share a routing table (that is, the default.inet.0 table) with other control or protocol traffic in the system. But it is only as of Junos OS Release 18.3R1 that you can use this non-default management instance for BMP. You can also use any configured routing instance for BMP. It no longer has to be the default routing instance.
Configuring a Nondefault Routing Instance for BMP
To modify the routing instance that BMP uses, you must configure the BMP station and the connection mode, which is either passive or active. In active mode, the router attempts to start the TCP connection with the BMP station. In passive mode the router waits for the BMP station to initiate the TCP session. You also must configure a port and the station address.
To use a non-default routing instance, you must configure
it under the [edit routing-instances] hierarchy level.
To configure a non-default routing instance for BMP:
Configuring mgmt_junos for BMP
To modify the routing instance that BMP uses, you must configure the BMP station and the connection mode, which is either passive or active. In active mode, the router attempts to start the TCP connection with the BMP station. In passive mode the router waits for the BMP station to initiate the TCP session. You also must configure a port and the station address.
To use the management routing instance, you must configure
it under the [edit routing-instances] hierarchy level,
and you must enable it using the management-instance configuration
statement.
To configure mgmt_junos as the routing-instance for BMP:
Example: Configuring the BGP Monitoring Protocol
This example shows how to enable the BGP Monitoring Protocol (BMP). The Junos OS implementation of BMP is based on RFC 8671.
Requirements
-
Configure the router interfaces.
Note:When an interface is disabled, the BMP that monitors the TCP session, is shut down for 240 seconds (4 minutes). This is an expected behaviour.
-
Configure an interior gateway protocol (IGP).
-
Configure BGP and routing policies.
-
Configure a monitoring station to listen on a particular TCP port.
Overview
To configure the monitoring station to which BMP data is sent, you must configure both the
station-address and station-port statements.
For the station address, you can specify either the IP address or the name of the
monitoring station. For
name
,
specify
the station name. For the station port, specify a TCP port. BMP
operates over TCP. The monitoring station is configured to listen on a particular
TCP port, and the router is configured to establish an active connection to that
port and to send messages on that TCP connection. You configure BMP in the default
routing instance only. However, BMP applies to routes in the default routing
instance and to routes in other routing instances.
You can optionally specify how often to send data to the monitoring station. The default is
1 minute.
To modify this interval, include the statistics-timeout
seconds
statement. For
seconds
, you can specify a value from 15
through 65,535.
Topology
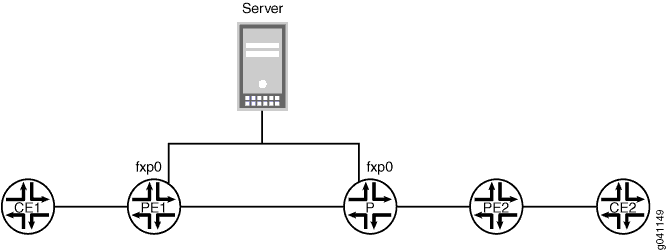
Figure 1 shows a sample topology. In this example, BMP is configured on Router PE1. The server address is 192.168.64.180. The listening TCP port on the server is port 11019.
Configuration
CLI Quick Configuration
To quickly configure this example, copy the
following commands, paste them into a text file, remove any line breaks,
change any details necessary to match your network configuration,
and then copy and paste the commands into the CLI at the [edit] hierarchy level.
set routing-options bmp station-address 192.168.64.180
set routing-options bmp station-port 11019
Procedure
Step-by-Step Procedure
The following example requires you to navigate various levels in the configuration hierarchy. For information about navigating the CLI, see Using the CLI Editor in Configuration Mode in the Junos OS CLI User Guide.
To configure BMP:
-
Configure the receiving station address.
[edit routing-options]
user@PE1# set bmp station-address 192.168.64.180
-
Configure the receiving station port.
[edit routing-options]
user@PE1# set bmp station-port 11019
Results
From configuration mode, confirm your configuration
by entering the show routing-options command. If the output
does not display the intended configuration, repeat the instructions
in this example to correct the configuration.
user@PE1# show routing-options
bmp {
    station-address 192.168.64.180;
    station-port 11019;
}
Verification
Verifying That BMP is Operating
Purpose
Run the
show bgp bmp
command to display a set of statistics and the current BMP
session state on the router.
Action
user@PE1> show bgp bmp
  BMP station address/port: 192.168.64.180+11019
  BMP session state: DOWN
   Statistics timeout: 15
Understanding Trace Operations for BGP Protocol Traffic
You can trace various BGP protocol traffic to help you debug
BGP protocol issues. To trace BGP protocol traffic, include the traceoptions statement at the [edit protocols bgp] hierarchy level. For routing instances, include the traceoptions statement at the [edit routing-instances routing-instance-name protocols bgp] hierarchy level.
traceoptions {
    file filename <files number> <size size> <world-readable | no-world-readable>;
    flag flag <flag-modifier> <disable>;
}
You can specify the following BGP protocol-specific trace
options using the flag statement:
4byte-as—4-byte AS events.bfd—BFD protocol events.damping—Damping operations.graceful-restart—Graceful restart events.keepalive—BGP keepalive messages.nsr-synchronization—Nonstop active routing synchronization events.open—BGP open packets. These packets are sent between peers when they are establishing a connection.packets—All BGP protocol packets.refresh—BGP refresh packets.update—BGP update packets. These packets provide routing updates to BGP systems.
Global tracing options are inherited from the configuration
set by the traceoptions statement at the [edit routing-options] hierarchy level. You can override the following global trace options
for the BGP protocol using the traceoptions flag statement
included at the [edit protocols bgp] hierarchy level:
all—All tracing operationsgeneral—All normal operations and routing table changes (a combination of the normal and route trace operations)normal—Normal eventspolicy—Policy processingroute—Routing informationstate—State transitionstask—Routing protocol task processingtimer—Routing protocol timer processing
You can optionally specify one or more of the following flag modifiers:
detail—Detailed trace information.filter—Filter trace information. Applies only torouteanddampingtracing flags.receive—Packets being received.send—Packets being transmitted.
Use the all trace flag and the detail flag modifier with caution because these might cause the CPU to
become very busy.
If you only enable the update flag, received
keepalive messages do not generate a trace message.
You can filter trace statements and display only the statement
information that passes through the filter by specifying the filter flag modifier. The filter modifier is only
supported for the route and damping tracing
flags.
The match-on statement specifies filter matches based
on prefixes. It is used to match on route filters.
Per-neighbor trace filtering is not supported on a BGP
per-neighbor level for route and damping flags.
Trace option filtering support is on a peer group level.
See Also
Example: Viewing BGP Trace Files on Logical Systems
This example shows how to list and view files that are stored on a logical system.
Requirements
You must have the view privilege for the logical system.
Configure a network, such as the BGP network shown in Example: Configuring Internal BGP Peering Sessions on Logical Systems.
Overview
Logical systems have their individual directory structure created in the /var/logical-systems/logical-system-name directory. It contains the following subdirectories:
/config—Contains the active configuration specific to the logical system.
/log—Contains system log and tracing files specific to the logical system.
To maintain backward compatibility for the log files with previous versions of Junos OS, a symbolic link (symlink) from the /var/logs/logical-system-name directory to the /var/logical-systems/logical-system-name directory is created when a logical system is configured.
/tmp—Contains temporary files specific to the logical system.
The file system for each logical system enables logical system users to view trace logs and modify logical system files. Logical system administrators have full access to view and modify all files specific to the logical system.
Logical system users and administrators can save and load configuration files at the logical-system level using the save and load configuration mode commands. In addition, they can also issue the show log, monitor, and file operational mode commands at the logical-system level.
This example shows how to configure and view a BGP trace file on a logical system. The steps can be adapted to apply to trace operations for any Junos OS hierarchy level that supports trace operations.
To view a list of hierarchy levels that support tracing operations, enter the help apropos traceoptions command in configuration mode.
Configuration
- CLI Quick Configuration
- Configuring Trace Operations
- Viewing the Trace File
- Deactivating and Reactivating Trace Logging
- Results
CLI Quick Configuration
To quickly configure this example, copy the following commands, paste them into a text file, remove any line breaks, change any details necessary to match your network configuration, and then copy and paste the commands into the CLI at the [edit] hierarchy level.
set logical-systems A protocols bgp group internal-peers traceoptions file bgp-log
set logical-systems A protocols bgp group internal-peers traceoptions file size 10k
set logical-systems A protocols bgp group internal-peers traceoptions file files 2
set logical-systems A protocols bgp group internal-peers traceoptions flag update detail
Configuring Trace Operations
Step-by-Step Procedure
The following example requires you to navigate various levels in the configuration hierarchy. For information about navigating the CLI, see Using the CLI Editor in Configuration Mode in the CLI User Guide.
To configure the trace operations:
Configure trace operations on the logical system.
[edit logical-systems A protocols bgp group internal-peers]
user@host# set traceoptions file bgp-log
user@host# set traceoptions file size 10k
user@host# set traceoptions file files 2
user@host# set traceoptions flag update detail
If you are done configuring the device, commit the configuration.
[edit]
user@host# commit
Viewing the Trace File
Step-by-Step Procedure
To view the trace file:
In operational mode on the main router, list the directories on the logical system.
user@host> file list /var/logical-systems/A
/var/logical-systems/A:
config/
log/
tmp/
In operational mode on the main router, list the log files on the logical system.
user@host> file list /var/logical-systems/A/log/
/var/logical-systems/A/log:
bgp-log
View the contents of the bgp-log file.
user@host> file show /var/logical-systems/A/log/bgp-log
Aug 10 17:12:01 trace_on: Tracing to "/var/log/A/bgp-log" started
Aug 10 17:14:22.826182 bgp_peer_mgmt_clear:5829: NOTIFICATION sent to 192.163.6.4 (Internal AS 17): code 6 (Cease) subcode 4 (Administratively Reset), Reason: Management session cleared BGP neighbor
Aug 10 17:14:22.826445 bgp_send: sending 21 bytes to 192.163.6.4 (Internal AS 17)
Aug 10 17:14:22.826499
Aug 10 17:14:22.826499 BGP SEND 192.168.6.5+64965 -> 192.163.6.4+179
Aug 10 17:14:22.826559 BGP SEND message type 3 (Notification) length 21
Aug 10 17:14:22.826598 BGP SEND Notification code 6 (Cease) subcode 4 (Administratively Reset)
Aug 10 17:14:22.831756 bgp_peer_mgmt_clear:5829: NOTIFICATION sent to 192.168.40.4 (Internal AS 17): code 6 (Cease) subcode 4 (Administratively Reset), Reason: Management session cleared BGP neighbor
Aug 10 17:14:22.831851 bgp_send: sending 21 bytes to 192.168.40.4 (Internal AS 17)
Aug 10 17:14:22.831901
Aug 10 17:14:22.831901 BGP SEND 192.168.6.5+53889 -> 192.168.40.4+179
Aug 10 17:14:22.831959 BGP SEND message type 3 (Notification) length 21
Aug 10 17:14:22.831999 BGP SEND Notification code 6 (Cease) subcode 4 (Administratively Reset)
...
Filter the output of the log file.
user@host> file show /var/logical-systems/A/log/bgp-log | match "flags 0x40"
Aug 10 17:14:54.867460 BGP SEND flags 0x40 code Origin(1): IGP
Aug 10 17:14:54.867595 BGP SEND flags 0x40 code ASPath(2) length 0: <null>
Aug 10 17:14:54.867650 BGP SEND flags 0x40 code NextHop(3): 192.168.6.5
Aug 10 17:14:54.867692 BGP SEND flags 0x40 code LocalPref(5): 100
Aug 10 17:14:54.884529 BGP RECV flags 0x40 code Origin(1): IGP
Aug 10 17:14:54.884581 BGP RECV flags 0x40 code ASPath(2) length 0: <null>
Aug 10 17:14:54.884628 BGP RECV flags 0x40 code NextHop(3): 192.163.6.4
Aug 10 17:14:54.884667 BGP RECV flags 0x40 code LocalPref(5): 100
Aug 10 17:14:54.911377 BGP RECV flags 0x40 code Origin(1): IGP
Aug 10 17:14:54.911422 BGP RECV flags 0x40 code ASPath(2) length 0: <null>
Aug 10 17:14:54.911466 BGP RECV flags 0x40 code NextHop(3): 192.168.40.4
Aug 10 17:14:54.911507 BGP RECV flags 0x40 code LocalPref(5): 100
Aug 10 17:14:54.916008 BGP SEND flags 0x40 code Origin(1): IGP
Aug 10 17:14:54.916054 BGP SEND flags 0x40 code ASPath(2) length 0: <null>
Aug 10 17:14:54.916100 BGP SEND flags 0x40 code NextHop(3): 192.168.6.5
Aug 10 17:14:54.916143 BGP SEND flags 0x40 code LocalPref(5): 100
Aug 10 17:14:54.920304 BGP RECV flags 0x40 code Origin(1): IGP
Aug 10 17:14:54.920348 BGP RECV flags 0x40 code ASPath(2) length 0: <null>
Aug 10 17:14:54.920393 BGP RECV flags 0x40 code NextHop(3): 10.0.0.10
Aug 10 17:14:54.920434 BGP RECV flags 0x40 code LocalPref(5): 100
View the tracing operations in real time.
user@host> clear bgp neighbor logical-system A
Cleared 2 connections
CAUTION:Clearing the BGP neighbor table is disruptive in a production environment.
Run the monitor start command with an optional match condition.
user@host> monitor start A/bgp-log | match 0.0.0.0/0
Aug 10 19:21:40.773467 BGP RECV         0.0.0.0/0
Aug 10 19:21:40.773685 bgp_rcv_nlri: 0.0.0.0/0
Aug 10 19:21:40.773778 bgp_rcv_nlri: 0.0.0.0/0 belongs to meshgroup
Aug 10 19:21:40.773832 bgp_rcv_nlri: 0.0.0.0/0 qualified bnp->ribact 0x0 l2afcb 0x0
Pause the monitor command by pressing Esc-Q. To unpause the output, press Esc-Q again.
Halt the monitor command by pressing Enter and typing monitor stop.
[Enter]
user@host> monitor stop
When you are finished troubleshooting, consider deactivating trace logging to avoid any unnecessary impact to system resources.
[edit protocols bgp group internal-peers]
user@host:A# deactivate traceoptions
user@host:A# commit
When configuration is deactivated, it appears in the configuration with the inactive tag.To reactivate trace operations, use the activate configuration-mode statement.
[edit protocols bgp group internal-peers]
user@host:A# show

type internal;
inactive: traceoptions {
    file bgp-log size 10k files 2;
    flag update detail;
    flag all;
}
local-address 192.168.6.5;
export send-direct;
neighbor 192.163.6.4;
neighbor 192.168.40.4;
To reactivate trace operations, use the activate configuration-mode statement.
[edit protocols bgp group internal-peers]
user@host:A# activate traceoptions
user@host:A# commit
Deactivating and Reactivating Trace Logging
Step-by-Step Procedure
To deactivate and reactivate the trace file:
When you are finished troubleshooting, consider deactivating trace logging to avoid an unnecessary impact to system resources.
[edit protocols bgp group internal-peers]
user@host:A# deactivate traceoptions
user@host:A# commit
When configuration is deactivated, the statement appears in the configuration with the inactive tag.
[edit protocols bgp group internal-peers]
user@host:A# show

type internal;
inactive: traceoptions {
    file bgp-log size 10k files 2;
    flag update detail;
    flag all;
}
local-address 192.168.6.5;
export send-direct;
neighbor 192.163.6.4;
neighbor 192.168.40.4;
To reactivate logging, use the activate configuration-mode statement.
[edit protocols bgp group internal-peers]
user@host:A# activate traceoptions
user@host:A# commit
Results
From configuration mode, confirm your configuration by entering the show logical-systems A protocols bgp group internal-peers command. If the output does not display the intended configuration, repeat the instructions in this example to correct the configuration.
user@host# show logical-systems A protocols bgp group internal-peers
traceoptions {
    file bgp-log size 10k files 2;
    flag update detail;
}
Example: Tracing Global Routing Protocol Operations
This example shows how to list and view files that are created when you enable global routing trace operations.
Requirements
You must have the view privilege.
Overview
To configure global routing protocol tracing, include
the traceoptions statement at the [edit routing-options] hierarchy level:
traceoptions {
    file filename <files number> <size size> <world-readable | no-world-readable>;
    flag flag <disable>;
}
The flags in a traceoptions flag statement are identifiers.
When you use the set command to configure a flag, any flags
that might already be set are not modified. In the following example,
setting the timer tracing flag has no effect on the already
configured task flag. Use the delete command to
delete a particular flag.
[edit routing-options traceoptions]
user@host# show
flag task;
user@host# set traceoptions flag timer
user@host# show
flag task;
flag timer;
user@host# delete traceoptions flag task
user@host# show
flag timer;
This example shows how to configure and view a trace file that tracks changes in the routing table. The steps can be adapted to apply to trace operations for any Junos OS hierarchy level that supports trace operations.
To view a list of hierarchy levels that support tracing
operations, enter the help apropos traceoptions command
in configuration mode.
Configuration
CLI Quick Configuration
To quickly configure this example, copy the
following commands, paste them into a text file, remove any line breaks,
change any details necessary to match your network configuration,
and then copy and paste the commands into the CLI at the [edit] hierarchy level.
set routing-options traceoptions file routing-table-changes
set routing-options traceoptions file size 10m
set routing-options traceoptions file files 10
set routing-options traceoptions flag route
set routing-options static route 1.1.1.2/32 next-hop 10.0.45.6
Configuring Trace Operations
Step-by-Step Procedure
The following example requires you to navigate various levels in the configuration hierarchy. For information about navigating the CLI, see Using the CLI Editor in Configuration Mode in the Junos OS CLI User Guide.
To configure the trace operations:
Configure trace operations.
[edit routing-options traceoptions]
user@host# set file routing-table-changes
user@host# set file size 10m
user@host# set file files 10
user@host# set flag route
Configure a static route to cause a change in the routing table.
[edit routing-options static]
user@host# set route 1.1.1.2/32 next-hop 10.0.45.6
If you are done configuring the device, commit the configuration.
[edit]
user@host# commit
Viewing the Trace File
Step-by-Step Procedure
To view the trace file:
In operational mode, list the log files on the system.
user@host> file list /var/log
/var/log:
...
routing-table-changes
...
View the contents of the routing-table-changes file.
user@host> file show /var/log/routing-table-changes
Dec 15 11:09:29 trace_on: Tracing to "/var/log/routing-table-changes" started
Dec 15 11:09:29.496507
Dec 15 11:09:29.496507 Tracing flags enabled: route
Dec 15 11:09:29.496507
Dec 15 11:09:29.533203 inet_routerid_notify: Router ID: 192.168.4.1
Dec 15 11:09:29.533334 inet_routerid_notify: No Router ID assigned
Dec 15 11:09:29.533381 inet_routerid_notify: No Router ID assigned
Dec 15 11:09:29.533420 inet_routerid_notify: No Router ID assigned
Dec 15 11:09:29.534915 inet_routerid_notify: Router ID: 192.168.4.1
Dec 15 11:09:29.542934 inet_routerid_notify: No Router ID assigned
Dec 15 11:09:29.549253 inet_routerid_notify: No Router ID assigned
Dec 15 11:09:29.556878 inet_routerid_notify: No Router ID assigned
Dec 15 11:09:29.582990 rt_static_reinit: examined 3 static nexthops, 0 unreferenced
Dec 15 11:09:29.589920
Dec 15 11:09:29.589920 task_reconfigure reinitializing done
...
Filter the output of the log file.
user@host> file show /var/log/routing-table-changes | match 1.1.1.2
Dec 15 11:15:30.780314 ADD      1.1.1.2/32          nhid 0 gw 10.0.45.6       Static   pref 5/0 metric  at-0/2/0.0 <ctive Int Ext>
Dec 15 11:15:30.782276 KRT Request: send len 216 v104 seq 0 ADD route/user af 2 table 0 infot 0 addr 1.1.1.2 nhop-type unicast nhindex 663
View the tracing operations in real time by running the
monitor startcommand with an optional match condition.user@host> monitor start routing-table-changes | match 1.1.1.2 Aug 10 19:21:40.773467 BGP RECV 0.0.0.0/0 Aug 10 19:21:40.773685 bgp_rcv_nlri: 0.0.0.0/0 Aug 10 19:21:40.773778 bgp_rcv_nlri: 0.0.0.0/0 belongs to meshgroup Aug 10 19:21:40.773832 bgp_rcv_nlri: 0.0.0.0/0 qualified bnp->ribact 0x0 l2afcb 0x0
Deactivate the static route.
user@host# deactivate routing-options static route 1.1.1.2/32
user@host# commit
*** routing-table-changes ***
Dec 15 11:42:59.355557 CHANGE   1.1.1.2/32          nhid 663 gw 10.0.45.6       Static   pref 5/0 metric  at-0/2/0.0 <Delete Int Ext>
Dec 15 11:42:59.426887 KRT Request: send len 216 v104 seq 0 DELETE route/user af 2 table 0 infot 0 addr 1.1.1.2 nhop-type discard filtidx 0
Dec 15 11:42:59.427366 RELEASE  1.1.1.2/32          nhid 663 gw 10.0.45.6       Static   pref 5/0 metric  at-0/2/0.0 <Release Delete Int Ext>
Halt the
monitorcommand by pressing Enter and typing monitor stop.[Enter] user@host> monitor stop
When you are finished troubleshooting, consider deactivating trace logging to avoid any unnecessary impact to system resources.
When configuration is deactivated, it appears in the configuration with the inactive tag.
[edit routing-options]
user@host# deactivate traceoptions
user@host# commit
[edit routing-options]
user@host# show

inactive: traceoptions {
    file routing-table-changes size 10m files 10;
    flag route;
}
static {
    inactive: route 1.1.1.2/32 next-hop 10.0.45.6;
}
To reactivate trace operations, use the activate configuration-mode statement.
[edit routing-options]
user@host# activate traceoptions
user@host# commit
Results
From configuration mode, confirm your configuration
by entering the show routing-options command. If the output
does not display the intended configuration, repeat the instructions
in this example to correct the configuration.
user@host# show routing-options
traceoptions {
    file routing-table-changes size 10m files 10;
    flag route;
}
static {
    route 1.1.1.2/32 next-hop 10.0.45.6;
}
Verification
Confirm that the configuration is working properly.
Tracing BMP Operations
You can trace BMP operations for all BMP stations by
configuring the traceoptions statement at the [edit
routing-options bmp] hierarchy level or for specific BMP stations
at the [edit routing-options bmp station station-name] hierarchy level.
To trace BMP operations, complete the following steps:
See Also
Change History Table
Feature support is determined by the platform and release you are using. Use Feature Explorer to determine if a feature is supported on your platform.