Returning the PTX10003 Chassis or Components
Locating the Serial Number on a PTX10003 Chassis or Component
If you are returning a PTX10003 or a PTX10003 field-replaceable unit to Juniper Networks for repair or replacement, you must locate the serial number of the router or field-replaceable unit. You must provide the serial number to the Juniper Networks Technical Assistance Center (JTAC) when you contact them to obtain a Return Materials Authorization (RMA). See Contact Customer Support to Obtain a Return Material Authorization.
If the PTX10003 is operational and you can access the command-line interface (CLI), you can list serial numbers for the router and some components with a CLI command. If you do not have access to the CLI or if the serial number for the field-replaceable unit does not appear in the command output, you can locate the serial number ID label on the router or field-replaceable unit.
If you want to find the serial number ID label on a component, you need to remove the component from the chassis, for which you must have the required parts and tools available.
You must remove the fan module to read the fan serial number from the serial number ID label. The fan module serial number cannot be viewed through the CLI. Fan Tray 2 refers to the third module from the left, counting from 0.
- Listing the PTX10003 Chassis and Component Details by Using the CLI
- Locating the PTX10003 Chassis Serial Number ID Label
- Locating the Serial Number ID Labels on PTX10003 Components
Listing the PTX10003 Chassis and Component Details by Using the CLI
To list the PTX10003 and components and their serial numbers,
use the show chassis hardware CLI operational mode command.
Here is a sample of the CLI output for the PTX10003-160C:
user@host> show chassis hardware

Hardware inventory:
Item             Version  Part number  Serial number     Description
Chassis                                JN1269142AJD      JNP10003-160C [PTX10003-160C]
FPM 0            REV 04   711-078358   BCAD0775          FPM-JNP10003
PDU 0            REV 03   711-081294   BCAD0815          PDU-JNP10003
PSM 2            REV 01   740-073765   1GE27460006       AC AFO 3000W PSU
PSM 3            REV 01   740-073765   1GE27500072       AC AFO 3000W PSU
Routing Engine 0 REV 05   750-080696   BCAG7004          RE-JNP10003-160C
CB 0             REV 06   750-077001   BCAG8104          Control Board
FPC 0            REV 07   750-077005   BCAG8283          FPC-JNP10003-MEZZ-C
  PIC 0                   BUILTIN      BUILTIN           4x400G/10x200G/20x100G
  PIC 1                   BUILTIN      BUILTIN           4x400G/10x200G/20x100G
FPC 1                     BUILTIN      BUILTIN           FPC-JNP10003-LOGICAL
  PIC 0                   BUILTIN      BUILTIN           4x400G/10x200G/20x100G
  PIC 1                   BUILTIN      BUILTIN           4x400G/10x200G/20x100G
FPC 2            REV 04   750-077004   BCAG7036          FPC-JNP10003-MEZZ-B
  PIC 0                   BUILTIN      BUILTIN           4x400G/10x200G/20x100G
  PIC 1                   BUILTIN      BUILTIN           4x400G/10x200G/20x100G
    Xcvr 5       REV 01   740-084673   SS1TY2A349003     QSFP28-DD-2X100GBASE-SR4
    Xcvr 6       REV 01   740-084673   2E1CY2A34901L     QSFP28-DD-2X100GBASE-SR4
    Xcvr 8       REV 01   740-084673   2E1CY2A34900C     QSFP28-DD-2X100GBASE-SR4
    Xcvr 9       REV 01   740-084673   SS1TY2A349002     QSFP28-DD-2X100GBASE-SR4
FPC 3            REV 04   750-077003   BCAG8098          FPC-JNP10003-MEZZ-A
  PIC 0                   BUILTIN      BUILTIN           4x400G/10x200G/20x100G
  PIC 1                   BUILTIN      BUILTIN           4x400G/10x200G/20x100G
SIB 0                     BUILTIN      BUILTIN           SIB-JNP10003
SIB 1                     BUILTIN      BUILTIN           SIB-JNP10003
Fan Tray 0       REV 03   750-077190   BCAD1337          JNP10003 Fan Tray, Front to Back Airflow - AFO
Fan Tray 1       REV 05   750-077190   BCAD1433          JNP10003 Fan Tray, Front to Back Airflow - AFO
Fan Tray 2       REV 05   750-077190   BCAD1359          JNP10003 Fan Tray, Front to Back Airflow - AFO
Fan Tray 3       REV 05   750-077190   BCAD1340          JNP10003 Fan Tray, Front to Back Airflow - AFO
Fan Tray 4       REV 03   750-077190   BCAD1435          JNP10003 Fan Tray, Front to Back Airflow - AFO
Here is an example of the CLI output for the PTX10003-80C:
Hardware inventory:
Item             Version  Part number  Serial number     Description
Chassis                                JN1268FE3AJD      JNP10003-80C [PTX10003-80C]
FPM 0            REV 08   711-078358   BCAJ8781          FPM-JNP10003
PDU 0            REV 06   711-081294   BCAH7428          PDU-JNP10003
PSM 1            REV 03   740-073765   1GE28340085       AC AFO 3000W PSU
PSM 2            REV 03   740-073765   1GE28340094       AC AFO 3000W PSU
Routing Engine 0 REV 57   750-080695   S                 RE-JNP10003-80C
CB 0             REV 18   750-077001   BCAP2631          Control Board
FPC 0            REV 14   750-077005   BCAP2645          FPC-JNP10003-MEZZ-C
  PIC 0                   BUILTIN      BUILTIN           4x400G/10x200G/20x100G
    Xcvr 0       REV 01   740-038625   APF18250052JTN    QSFP+-40G-CU5M
    Xcvr 1       REV 01   740-038625   APF18250052JTN    QSFP+-40G-CU5M
    Xcvr 2       REV 01   740-038625   APF18250052R7W    QSFP+-40G-CU5M
    Xcvr 3       REV 01   740-038625   APF18250052R7W    QSFP+-40G-CU5M
    Xcvr 4       REV 01   740-067442   1ACP13290K6       QSFP+-40G-SR4
    Xcvr 5       REV 01   740-052009   U03A7UM           QSFP+-40G-LR4
    Xcvr 6       REV 01   740-052009   U03A7RJ           QSFP+-40G-LR4
    Xcvr 7       REV 01   740-052009   U02ABHV           QSFP+-40G-LR4
    Xcvr 8       REV 01   740-052009   U03A1YC           QSFP+-40G-LR4
    Xcvr 9       REV 01   740-052009   U03A1WR           QSFP+-40G-LR4
  PIC 1                   BUILTIN      BUILTIN           4x400G/10x200G/20x100G
    Xcvr 0       REV 02   740-056706   1FCP8320016       QSFP+4x10G-IR (PSM4)
    Xcvr 1       REV 02   740-056706   1FCP831001V       QSFP+4x10G-IR (PSM4)
    Xcvr 2       REV 02   740-056706   1FCP832400D       QSFP+4x10G-IR (PSM4)
    Xcvr 3       REV 02   740-056706   1FCP832003C       QSFP+4x10G-IR (PSM4)
    Xcvr 4       REV 02   740-056706   1FCP832401B       QSFP+4x10G-IR (PSM4)
    Xcvr 5       REV 01   740-061408   1F2CQ5A3330S9     QSFP-100G-CWDM4
    Xcvr 6       REV 01   740-061408   1F2CQ5A3330W8     QSFP-100G-CWDM4
    Xcvr 7       REV 01   740-061408   1F2CQ5A3330R5     QSFP-100G-CWDM4
    Xcvr 8       REV 01   740-061408   1F2CQ5A3330R8     QSFP-100G-CWDM4
    Xcvr 9       REV 01   740-061408   1F2CQ5A33302Q     QSFP-100G-CWDM4
FPC 1                     BUILTIN      BUILTIN           FPC-JNP10003-LOGICAL
  PIC 0                   BUILTIN      BUILTIN           4x400G/10x200G/20x100G
    Xcvr 0       REV 01   740-038625   APF18250052R2P    QSFP+-40G-CU5M
    Xcvr 1       REV 01   740-038625   APF18250052R2P    QSFP+-40G-CU5M
    Xcvr 2       REV 01   740-038625   APF18250052R5V    QSFP+-40G-CU5M
    Xcvr 3       REV 01   740-038625   APF18250052R5V    QSFP+-40G-CU5M
    Xcvr 4       REV 01   740-067442   1ACP13290HX       QSFP+-40G-SR4
    Xcvr 5       REV 01   740-054053   XZS0AGM           QSFP+-4X10G-SR
    Xcvr 6       REV 01   740-054053   XZS0KT2           QSFP+-4X10G-SR
    Xcvr 7       REV 01   740-054053   XZS0AE9           QSFP+-4X10G-SR
    Xcvr 8       REV 01   740-054053   XZS0KT4           QSFP+-4X10G-SR
    Xcvr 9       REV 01   740-054053   XZS0AFY           QSFP+-4X10G-SR
  PIC 1                   BUILTIN      BUILTIN           4x400G/10x200G/20x100G
    Xcvr 0       REV 02   740-056705   1AMP23290CQ       QSFP+40GE-LX4
    Xcvr 1       REV 02   740-056705   1AMP23290C0       QSFP+40GE-LX4
    Xcvr 2       REV 02   740-056705   1AMP23290CE       QSFP+40GE-LX4
    Xcvr 3       REV 02   740-056705   1AMP232909A       QSFP+40GE-LX4
    Xcvr 4       REV 02   740-056705   1AMP23290AW       QSFP+40GE-LX4
    Xcvr 5       REV 02   740-054050   1FCPB322029       QSFP+-4X10G-LR
    Xcvr 6       REV 02   740-054050   1FCPB32106E       QSFP+-4X10G-LR
    Xcvr 7       REV 02   740-054050   1FCPB32201Y       QSFP+-4X10G-LR
    Xcvr 8       REV 02   740-054050   1FCPB32208S       QSFP+-4X10G-LR
    Xcvr 9       REV 02   740-054050   1FCPB321072       QSFP+-4X10G-LR
SIB 0                     BUILTIN      BUILTIN           SIB-JNP10003
SIB 1                     BUILTIN      BUILTIN           SIB-JNP10003
Fan Tray 1       REV 07   750-077190   BCAH7469          JNP10003 Fan Tray, Front to Back Airflow - AFO
Fan Tray 2       REV 07   750-077190   BCAH7525          JNP10003 Fan Tray, Front to Back Airflow - AFO
Fan Tray 3       REV 07   750-077190   BCAH7622          JNP10003 Fan Tray, Front to Back Airflow - AFO
Locating the PTX10003 Chassis Serial Number ID Label
The serial number ID label is located on a label on the top cover.
Locating the Serial Number ID Labels on PTX10003 Components
For each field-replaceable unit, you must remove the it from the chassis to see the serial number ID label. See Figure 1.
-
AC power supply—The serial number ID label is on the top of the AC power supply. See Figure 3.
-
DC power supply—The serial number ID label is on the top of the DC power supply. See Figure 4.
-
Fan module—The serial number ID label is on the top of the fan module. See Figure 5.
Figure 1: Locating the PTX10003-160C Chassis Serial Number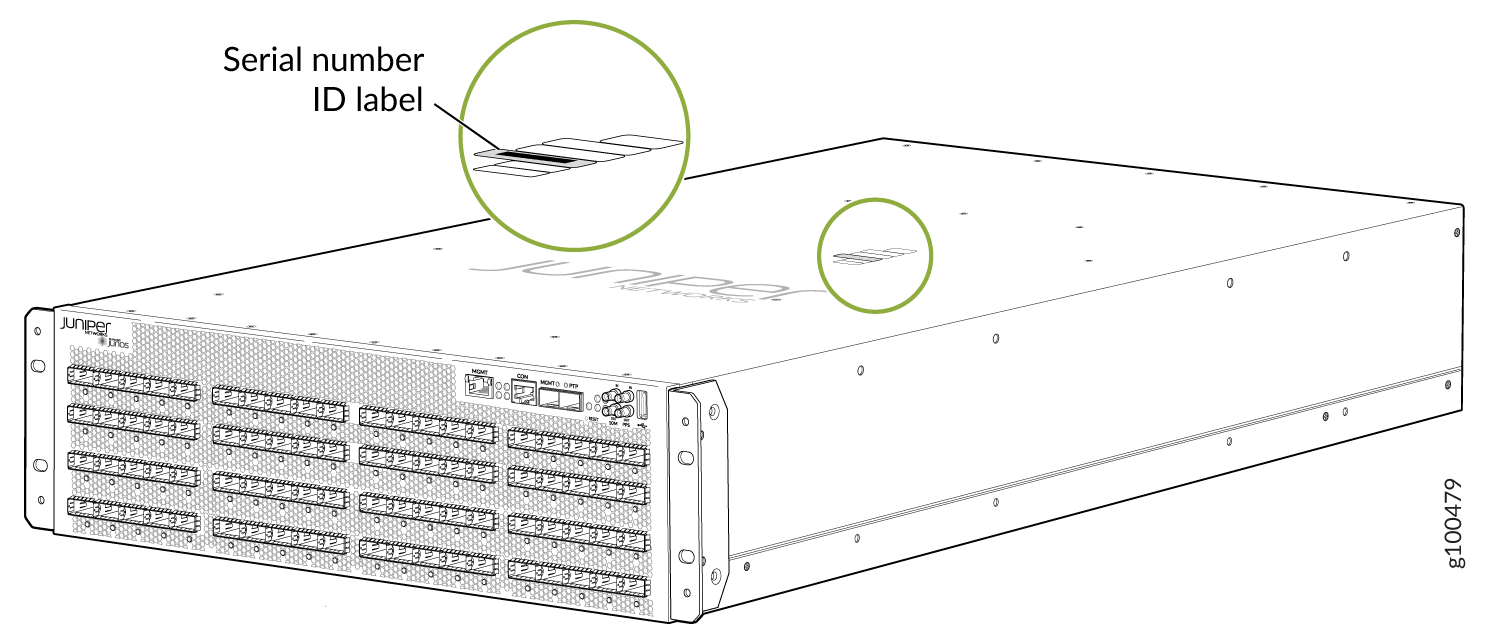 Figure 2: Locating the PTX10003-80C Chassis Serial Number
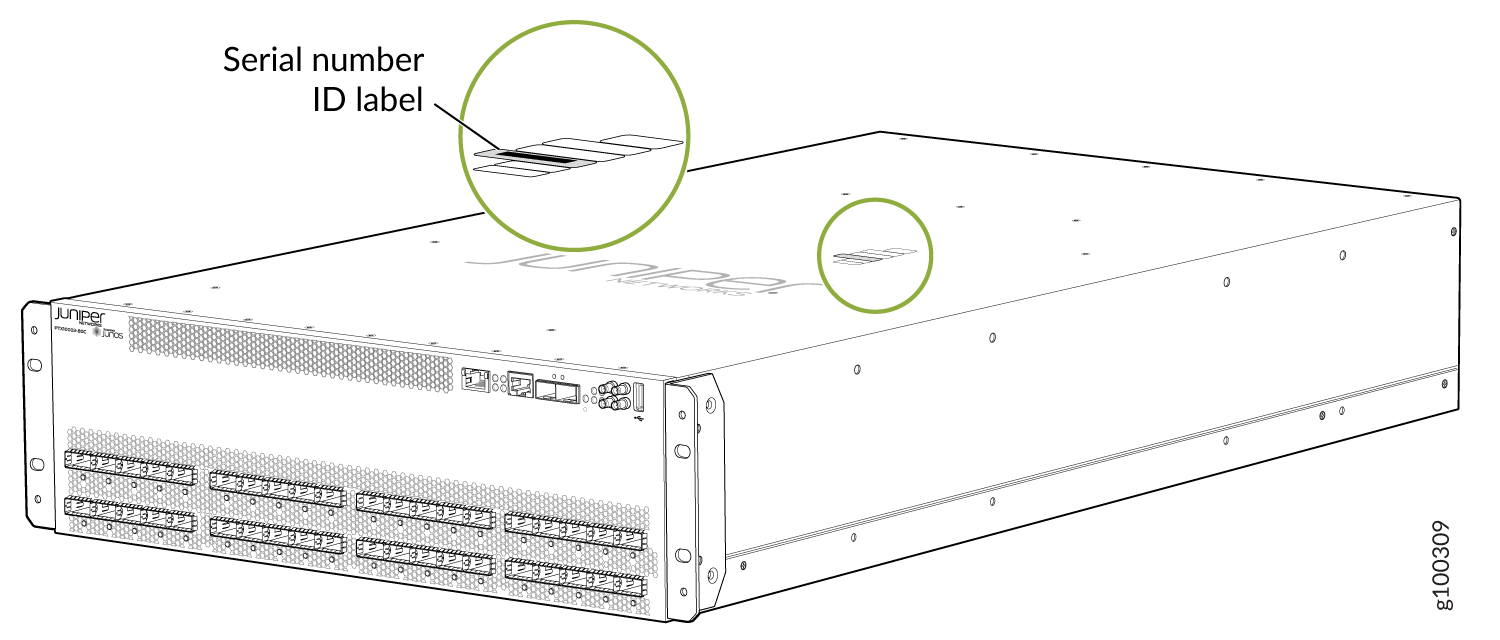 Figure 3: Locating the PTX10003 AC Power Supply Serial Number Label
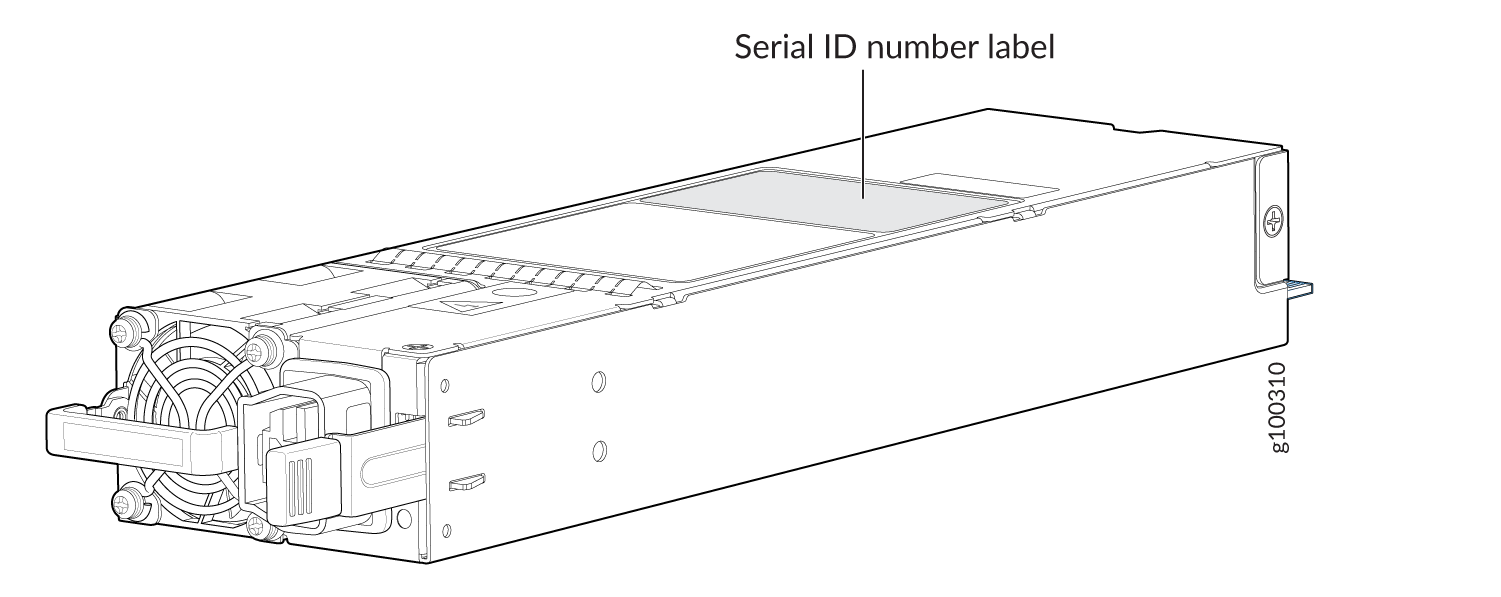 Figure 4: Locating the PTX10003 DC Power Supply Serial Number Label
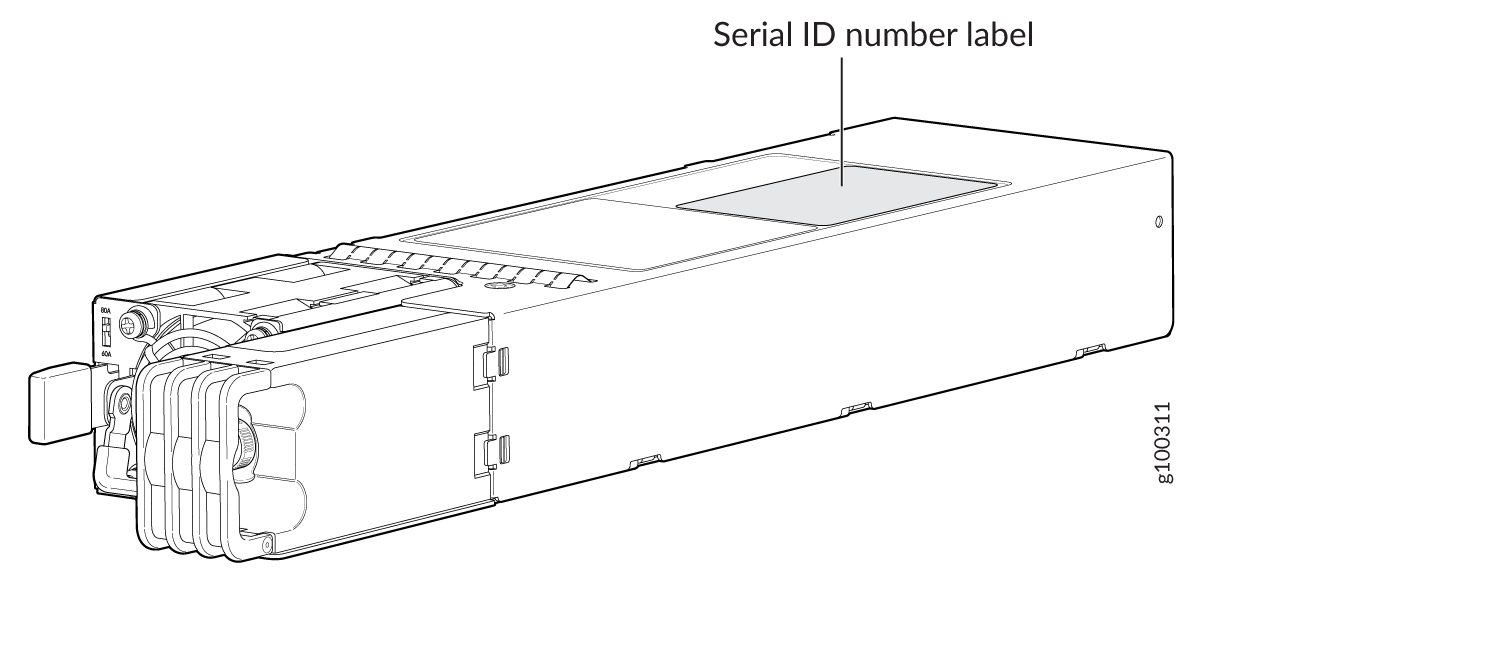 Figure 5: Locating the PTX10003 Fan Module Serial Number Label
Returning a PTX10003 or Component for Repair or Replacement
If you need to return a PTX10003 or component to Juniper Networks for repair or replacement, follow this procedure:
For more information about return and repair policies, see the customer support page at https://www.juniper.net/support/guidelines.html .
Contact Customer Support to Obtain a Return Material Authorization
If you need to return a device or hardware component to Juniper Networks for repair or replacement, obtain an RMA number from JTAC. You must obtain an RMA number before you attempt to return the component.
After locating the serial number of the device or hardware component you want to return, open a service request with the JTAC on the Web or by telephone.
Before you request an RMA number from JTAC, be prepared to provide the following information:
-
Your existing service request number, if you have one
-
Serial number of the component
-
Your name, organization name, telephone number, fax number, and shipping address
-
Details of the failure or problem
-
Type of activity being performed on the device when the problem occurred
-
Configuration data displayed by one or more
showcommands
You can contact JTAC 24 hours a day, seven days a week, on the Web or by telephone:
-
Service Request Manager: https://support.juniper.net/support
-
Telephone: +1-888-314-JTAC (+1-888-314-5822), toll free in U.S., Canada, and Mexico
For international or direct-dial options in countries without toll free numbers, see https://support.juniper.net/support.
If you are contacting JTAC by telephone, enter your 12-digit service request number followed by the pound (#) key for an existing case, or press the star (*) key to be routed to the next available support engineer.
The support representative validates your request and issues an RMA number for return of the component.
Packing a PTX10003 Chassis or Component for Shipping
If you are returning a PTX10003 chassis or component to Juniper Networks for repair or replacement, pack the item as described in this topic.
Before you pack the chassis or component:
-
Ensure that you have taken the necessary precautions to prevent electrostatic discharge (ESD) damage. See Prevention of Electrostatic Discharge Damage.
-
Retrieve the original shipping carton and packing materials. Contact your JTAC representative if you do not have these materials, to learn about approved packing materials (see Contact Customer Support).
Ensure that you have the following parts and tools available:
-
ESD grounding strap.
-
Antistatic bag, one for each component.
-
If you are returning the chassis, an appropriate screwdriver for the mounting screws used on your rack.
Packing a PTX10003 Chassis for Shipping
Here’s how to pack a PTX10003 for shipping:
Packing a PTX10003 Component for Shipping
Do not stack PTX10003 components. Return individual components in separate boxes if they do not fit together on one level in the shipping box.
Here’s how to pack a PTX10003 component for shipping:
- Place individual field-replaceable units in antistatic bags.
- Ensure that the components are adequately protected with packing materials and packed so that the pieces are prevented from moving around inside the carton.
- Close the top of the cardboard shipping box and seal it with packing tape.
- Write the RMA number on the exterior of the box to ensure proper tracking. See Contact Customer Support to Obtain a Return Material Authorization for instructions on obtaining an RMA number.