Maintaining the SRX4600 SSD
Replacing an SRX4600 Firewall SSD
This topic explains how to replace an Solid State-Drive (SSD) on your SRX4600 Firewall.
The two SSDs installed in the SRX4600 Firewall are field-replaceable unit (FRUs). You need to power off the SRX4600 Firewall to replace a SSD from the firewall.
When you are replacing a faulty SSD with a new SSD that has no Junos OS installed on it or if you have to reinstall the corrupted Junos OS image on the SSD, you should use a USB flash drive to install the Junos OS.
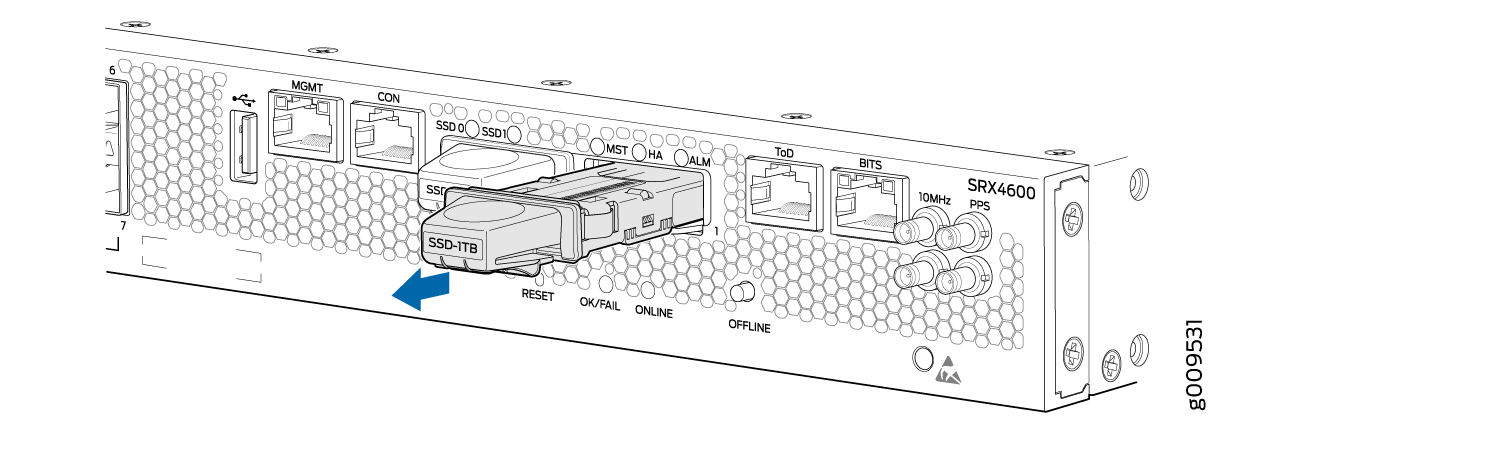
Removing an SSD from an SRX4600 Firewall
Ensure that you have the following equipment available:
-
Electrostatic discharge (ESD) grounding strap
-
An antistatic bag or an antistatic mat
-
SSD to replace
You need to power off the SRX4600 Firewall to remove a SSD from the firewall.
To remove an SSD, see (Figure 1):
- Attach an ESD grounding strap to your bare wrist and connect the strap to one of the ESD points on the chassis.
- Place the antistatic bag or the antistatic mat on a flat, stable surface.
- Place your thumb on the SSD handle and press the tab below the SSD handle with one finger to unlock the SSD from its slot.
- Pull the SSD firmly to slide it out of its slot.
- Place the SSD in the antistatic bag or on the antistatic mat placed on a flat, stable surface.
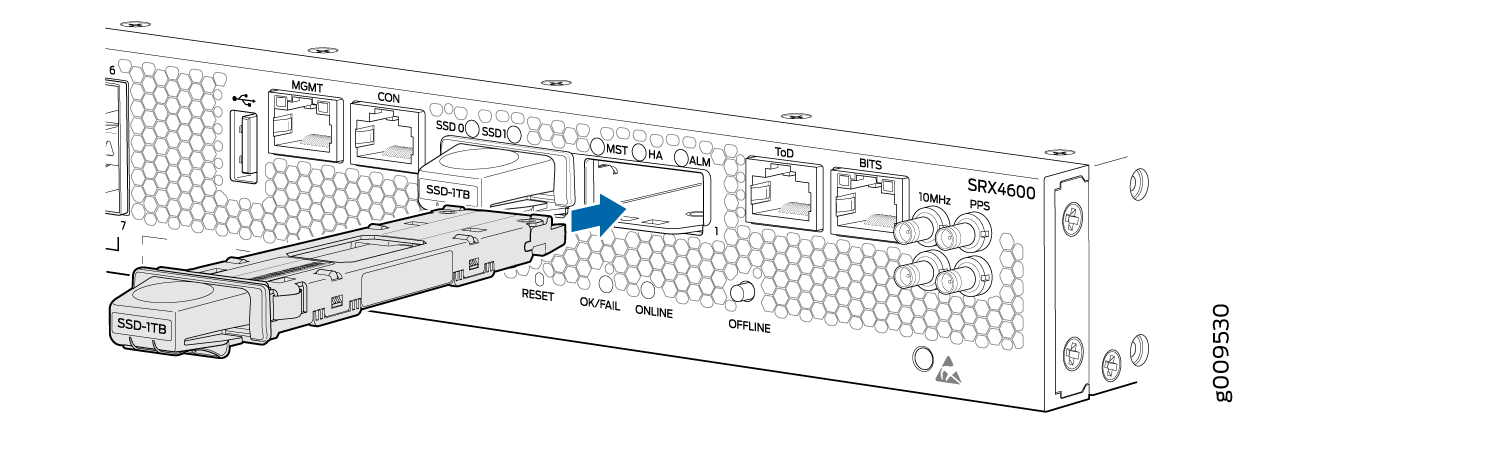
Installing an SSD in an SRX4600 Firewall
Ensure that you have the following equipment available:
-
ESD grounding strap
You need to power off the SRX4600 Firewall to install a SSD into the firewall.
To install an SSD, see (Figure 2):
- Attach an ESD grounding strap to your bare wrist and connect the strap to one of the ESD points on the chassis.
- Hold the SSD by its handle and slide it gently into its slot until the tab below the handle locks into the SSD slot.
- Follow the procedure in Creating a Bootable USB Flash Drive to Install Junos OS on an SRX4600 Firewall if the new SSD has no Junos OS installed on it.
Creating a Bootable USB Flash Drive to Install Junos OS on an SRX4600 Firewall
If Junos OS on the SRX4600 Firewall is damaged or if you are replacing a solid state-drive (SSD) that has no Junos OS installed on it, you can use a bootable USB flash drive to install Junos OS on the SSD.
This topic provides information on how to create a bootable USB flash drive and install Junos OS image on an SRX4600 Firewall.
- Creating a Bootable USB Flash-Drive
- Installing Junos OS on SRX4600 Firewall Using the Bootable USB Flash-Drive
Creating a Bootable USB Flash-Drive
You can create a bootable disk using any procedure listed below:
Before creating a bootable USB flash-drive, you must have the following items:
3 GB (or larger) USB flash-drive (formatted with a FAT 32 file system)
Junos OS image file
Example of the Install media:
junos-install-media-usb-srxhe-x86-64-17.4R1-S1.9.img.gz
Note:As the Junos OS image for USB flash-drive is in .gz compressed format, you must decompress the file before writing it onto the USB flash-drive.
When you create a bootable USB flash-drive, the contents of the USB flash-drive are deleted.
- Creating a Bootable USB Flash Drive using an SRX High-end Device
- Creating a Bootable USB Flash Drive using an SRX4600 Firewall
- Creating a Bootable USB Flash Drive using a using a Windows Device
- Creating a Bootable USB Flash Drive using a MAC OS X Device
Creating a Bootable USB Flash Drive using an SRX High-end Device
To create a bootable USB flash-drive using an SRX High-end device:
Connect to any SRX High-end device that has enough storage (approx. 3GB), through a console.
-
Copy the Junos OS image to the /var/tmp directory of the SRX High-end device.
In the example below, the junos install media is copied onto an SRX5800 Firewall:
user@srx5800% cd /var/tmp/
user@srx5800% ls -lrt *srxhe*
-rw-r--r--  1 root  wheel  2147483648 Jan  8 16:56 junos-install-media-usb-srxhe-x86-64-17.4R1-S1.9.img
Insert a USB flash drive into the USB port of the SRX High-end device and check if the USB flash drive is recognized.
For Example:
user@srx5800% umass0: Generic Mass Storage, rev 2.00/1.00, addr 3
da0 at umass-sim0 bus 0 target 0 lun 0
da0: Generic Flash Disk 8.07 Removable Direct Access SCSI-4 device
da0: 40.000MB/s transfers
da0: 15200MB (31129600 512 byte sectors: 255H 63S/T 1937C)
Configure the USB flash drive as a boot disk using the
ddcommands:To check if the system can read and write the USB flash drive, erase the initial sectors of the USB flash drive using the command
dd if=/dev/zero
                                        of=/dev/<Device Name> count=<n>
. For example: Device Name= the device name given to the USB flash drive (da0) and n = number of blocks.user@srx5800% dd if=/dev/zero of=/dev/da0 count=20 20+0 records in 20+0 records out 10240 bytes transferred in 0.016966 secs (603556 bytes/sec)
Copy the install-media image to the USB flash drive using the command
dd
                                        if=<LOCATION>/<junos-install-media>
                                        of=/dev/<Device Name> bs=<n>m
. For example: LOCATION = Locally where Junos OS image is stored (/var/tmp/), junos-install-media = Junos OS install media image, Device Name = the device name given to the USB flash drive (da0), bs = block size, and n = number of blocks.user@srx5800% dd if=/var/tmp/junos-install-media-usb-srxhe-x86-64-17.4R1-S1.9.img of=/dev/da0 bs=16m 128+0 records in 128+0 records out 2147483648 bytes transferred in 271.689162 secs (7904193 bytes/sec)
Remove the USB flash drive.
user@srx5800% umass0: at uhub1 port 1 (addr 3) disconnected
(da0:umass-sim0:0:0:0): lost device
(da0:umass-sim0:0:0:0): removing device entry
umass0: detached
The USB flash-drive is now ready to use as a bootable disk.
Creating a Bootable USB Flash Drive using an SRX4600 Firewall
To create a bootable USB flash-drive using an SRX4600 Firewall:
-
Connect to any SRX4600 Firewall that has enough storage (approx. 3GB), through a console and login with root credentials.
-
Copy the Junos OS install image to the /var/tmp directory of the SRX4600 Firewall.
Copy the install-media to hypervisor using the statement
scpExample:
root@SRX4600:~ # scp -JU __juniper_private4__
/var/tmp/junos-install-media-usb-srxhe-x86-64-17.4R1-S1.9.img root@192.168.1.1:/var/tmp
-
Insert a USB flash drive into the USB port of SRX4600 Firewall.
Enter hypervisor using the command
vhclient -sand check the image under /var/tmp/root@ SRX4600:~ # vhclient -s Last login: Sat Feb 3 01:32:07 UTC 2018 from summit1ru-vpnqa05 on pts/0 You have new mail. root@ SRX4600:/var/tmp# ls -lrt *usb* -rw-r--r-- 1 root root 2147483648 Feb 3 01:31 junos-install-media-usb-srxhe-x86-64-17.4R1-S1.9.img
Check if the USB flash drive is recognized.
root@ SRX4600:/var/tmp# lsscsi
[4:0:0:0]    disk    ATA      TS960GV8MD1YTJM  O122  /dev/sda
[5:0:0:0]    disk    ATA      TS960GV8MD1YTJM  O122  /dev/sdb
[6:0:0:0]    disk             USB DISK 2.0     PMAP  /dev/sdc
The USB flash drive name is sdc
Configure the USB flash drive as a boot disk using the
ddcommands:To check if the system can read and write the USB flash drive, erase the initial sectors of the USB flash drive using the command
dd if=/dev/zero
                                        of=/dev/<Device Name> count=<n>
. For example: Device Name = the device name given to the USB flash drive (sdc) and n = number of blocks.root@ SRX4600-node -node: /var/tmp# dd if=/dev/zero of=/dev/sdc count=20 20+0 records in 20+0 records out 10240 bytes (10 kB) copied, 0.0156234 s, 655 kB/s
Copy the install-media image to the USB flash drive using the command
dd
                                        if=<LOCATION>/<junos-install-media>
                                        of=/dev/<Device Name> bs=<n>m
. For example: LOCATION = Locally where Junos OS image is stored (/var/tmp/), junos-install-media = Junos OS install media image, Device Name = the node name given to the USB flash drive (da0), bs = block size and n = number of blocks.root@ SRX4600-node: /var/tmp# dd if=junos-install-media-usb-srxhe-x86-64-17.4R1-S1.9.img of=/dev/sdc bs=16M 128+0 records in 128+0 records out 2147483648 bytes (2.1 GB) copied, 618.131 s, 3.5 MB/s
Exit from the hypervisor.
root@ SRX4600-node:/var/tmp# exit
logout
rlogin: connection closed

root@ SRX4600:~ #
Remove the USB flash drive.
The USB flash-drive is now ready to use as a bootable disk.
Creating a Bootable USB Flash Drive using a using a Windows Device
To create a bootable USB flash-drive using using a Windows Device:
Install Win32 Disk Imager on your laptop or computer. You can download it from https://sourceforge.net/projects/win32diskimager/ .
Download the required Junos OS image from the Downloads page to the Documents directory of your laptop or computer.
Insert a USB flash drive into the USB port of your laptop or computer.
Open the win32diskimager application and in the Image File box type the path to the Documents directory or click the folder icon to navigate to the Documents directory and select the install media image.
Under Device, select the USB flash-drive and click Write and Confirm.
The Progress box shows the progress. Remove the USB flash drive once it is complete.
The USB flash-drive is now ready to use as a bootable disk.
Creating a Bootable USB Flash Drive using a MAC OS X Device
To create a bootable USB flash-drive using a MAC OS X device:
Copy the install media (.img format) to the /var/tmp/ directory of the MAC OS X device using the statement
scp.Run the
diskutil listcommand to get the list of devices on the MAC OS X device.Insert the USB flash-drive into the USB port of the MAC OS X device.
Run the
diskutil listcommand again to determine the device node assigned to USB flash-drive (e.g. /dev/disk2).Run the
diskutil unmountDisk /dev/diskNcommand (replace N with the disk number from the last command - in the previous example, N would be 2)Execute sudo dd if=/var/tmp/junos-install-media-usb-srxhe-x86-64-17.4R1-S1.9.img of=/dev/rdiskN bs=1m
Note:Using
/dev/rdiskinstead of/dev/diskmay be faster.Note:If you see the error
dd: Invalid number '1m', you are usingGNU dd. Use the same command but replacebs=1mwithbs=1M.Note:If you see the error
dd: /dev/diskN: Resource
busy
, make sure the disk is not in use. Start the 'Disk Utility.app' and unmount (don't eject) the USB flash-drive.Run the command
diskutil eject /dev/diskN.
Installing Junos OS on SRX4600 Firewall Using the Bootable USB Flash-Drive
Before installing Junos OS using a bootable USB flash-drive, you must first complete the steps in Creating a Bootable USB Flash-Drive .
-
Insert the USB flash drive into the USB port of the SRX4600 Firewall.
-
Connect to the SRX4600 Firewall through a console.
-
Power cycle (off/on) the SRX4600 Firewall and
Press Esc for boot
                            options
. Select
Boot Managerand press Enter key.From the
Boot Option Menu, select USB flash drive and press Enter key.In the
GRUB Menuselect“Install Juniper Linux with secure boot support”and press Enter key.-
Once prompted
“Remove the USB and press [Entre] key to
                            Reboot...”
, remove the USB flash drive and press Enter key. SRX4600 Firewall will reboot with new software.
Copying Files From or To an SRX4600 Firewall Using an USB Flash-Drive
This topic explains how to copy files from or to an SRX4600 Firewall using an USB flash-drive.
- Copying Files From an SRX4600 Firewall Using an USB Flash-Drive
- Copying Files To an SRX4600 Firewall Using an USB Flash-Drive
Copying Files From an SRX4600 Firewall Using an USB Flash-Drive
This procedure explains how to copy files from an SRX4600 Firewall to an USB flash-drive.
-
Connect to SRX4600 Firewall through a console and login with root credentials.
Insert the USB flash drive (Formatted with FAT32 file system) into the SRX4600 USB port.
Enter into hypervisor by using the
vhclient –scommand.root@srx4600:/var/tmp # vhclient -s Last login: Wed Nov 1 16:49:41 UTC 2017 from srx4600 on pts/0 You have new mail. root@srx4600-node:~#
Using the
lsscsicommand check if the USB flash-drive is being recognized.root@srx4600-node:~# lsscsi [4:0:0:0] disk ATA TS960GV8MD1YTJM O122 /dev/sda [5:0:0:0] disk ATA TS960GV8MD1YTJM O122 /dev/sdb [6:0:0:0] disk UFD 3.0 Silicon-Power8G 1100 /dev/sdc
Mount the USB flash-drive.
root@srx4600-node:~# mkdir /var/tmp/usb
root@srx4600-node:~# mount /dev/sdc1 /var/tmp/usb
Go back to Junos prompt by using the
exitcommand.root@srx4600-node:~# exit root@srx4600:/var/tmp #
Use the command
ls -lrtto list the files located at /var/tmp.root@srx4600:/var/tmp # ls -lrt -rw-r--r-- 1 root wheel 1226057800 Nov 1 14:20 File1.txt
File1.txt is the file located in /var/tmp
Copy the required file to the USB flash-drive as shown in the example below.
In the example below File1.txt is copied to the USB flash-drive:
root@srx4600:/var/tmp # scp -JU __juniper_private4__
File1.txt root@192.168.1.1:/var/tmp/usb/
File1.txt  100% 1169MB  30.0MB/s   00:39
root@srx4600:/var/tmp #
Go back to hypervisor.
root@srx4600:/var/tmp # vhclient -s
Last login: Wed Nov  1 16:56:32 UTC 2017 from srx4600 on pts/0
       You have new mail.

root@srx4600-node:~#
Unmount the USB flash-drive and exit hypervisor.
root@srx4600-node:~# umount /var/tmp/usb
root@srx4600-node:~# exit
root@srx4600-node:~#
Remove the USB flash-drive.
Copying Files To an SRX4600 Firewall Using an USB Flash-Drive
This procedure explains how to copy files from USB flash drive to a SRX4600 firewall /var/tmp/ folder.
-
Connect to SRX4600 Firewall through a console and login with root credentials.
Insert the USB flash drive (Formatted with FAT32 file system) into the SRX4600 USB port.
Enter into hypervisor by using the
vhclient –scommand.root@srx4600:/var/tmp # vhclient -s Last login: Wed Nov 1 16:49:41 UTC 2017 from srx4600 on pts/0 You have new mail. root@srx4600-node:~#
Using the
lsscsicommand check if the USB flash-drive is being recognized.root@srx4600-node:~# lsscsi [4:0:0:0] disk ATA TS960GV8MD1YTJM O122 /dev/sda [5:0:0:0] disk ATA TS960GV8MD1YTJM O122 /dev/sdb [6:0:0:0] disk UFD 3.0 Silicon-Power8G 1100 /dev/sdc
Mount the USB flash-drive.
root@srx4600-node:~# mkdir /var/tmp/usb
root@srx4600-node:~# mount /dev/sdc1 /var/tmp/usb
Go back to Junos prompt by using the
exitcommand.root@srx4600-node:~# exit root@srx4600:/var/tmp #
-
Copy the required file from USB flash drive to SRX4600 Firewall as shown in the example below.
In the example below File2.txt is copied to the SRX4600 Firewall /var/tmp/ folder:
root@srx4600:/var/tmp # scp -JU __juniper_private4__
root@192.168.1.1:/var/tmp/usb/File2.txt /var/tmp/
Go back to hypervisor.
root@srx4600:/var/tmp # vhclient -s
Last login: Wed Nov  1 16:56:32 UTC 2017 from srx4600 on pts/0
       You have new mail.

root@srx4600-node:~#
Unmount the USB flash-drive and exit hypervisor.
root@srx4600-node:~# umount /var/tmp/usb
root@srx4600-node:~# exit
root@srx4600-node:~#
Remove the USB flash-drive.