SRX4700 SSD Maintenance
This topic explains how to replace a solid state-drive (SSD) on your SRX4700 Firewall.
Replace an SRX4700 Firewall SSD
The two SSDs installed in the SRX4700 Firewall are field-replaceable units (FRUs). SSDs are not hot-swappable, so you need to power off the firewall to replace an SSD.
Ensure that you have the following equipment available:
-
Electrostatic discharge (ESD) grounding strap
-
An antistatic bag or an antistatic mat
-
SSD to replace
- Remove an SSD from the SRX4700 Firewall
- Install an SSD in the SRX4700 Firewall
- Replace the 1T SSD in the SRX4700 Firewall
- Replace the 2T SSD in the SRX4700 Firewall
- Replace the 1T and 2T SSDs from the SRX4700 Firewall
Remove an SSD from the SRX4700 Firewall
You need to power off the SRX4700 Firewall to remove an SSD.
-
Place your finger on the SSD front locker and press the front locker to
unlock the SSD front stopper.
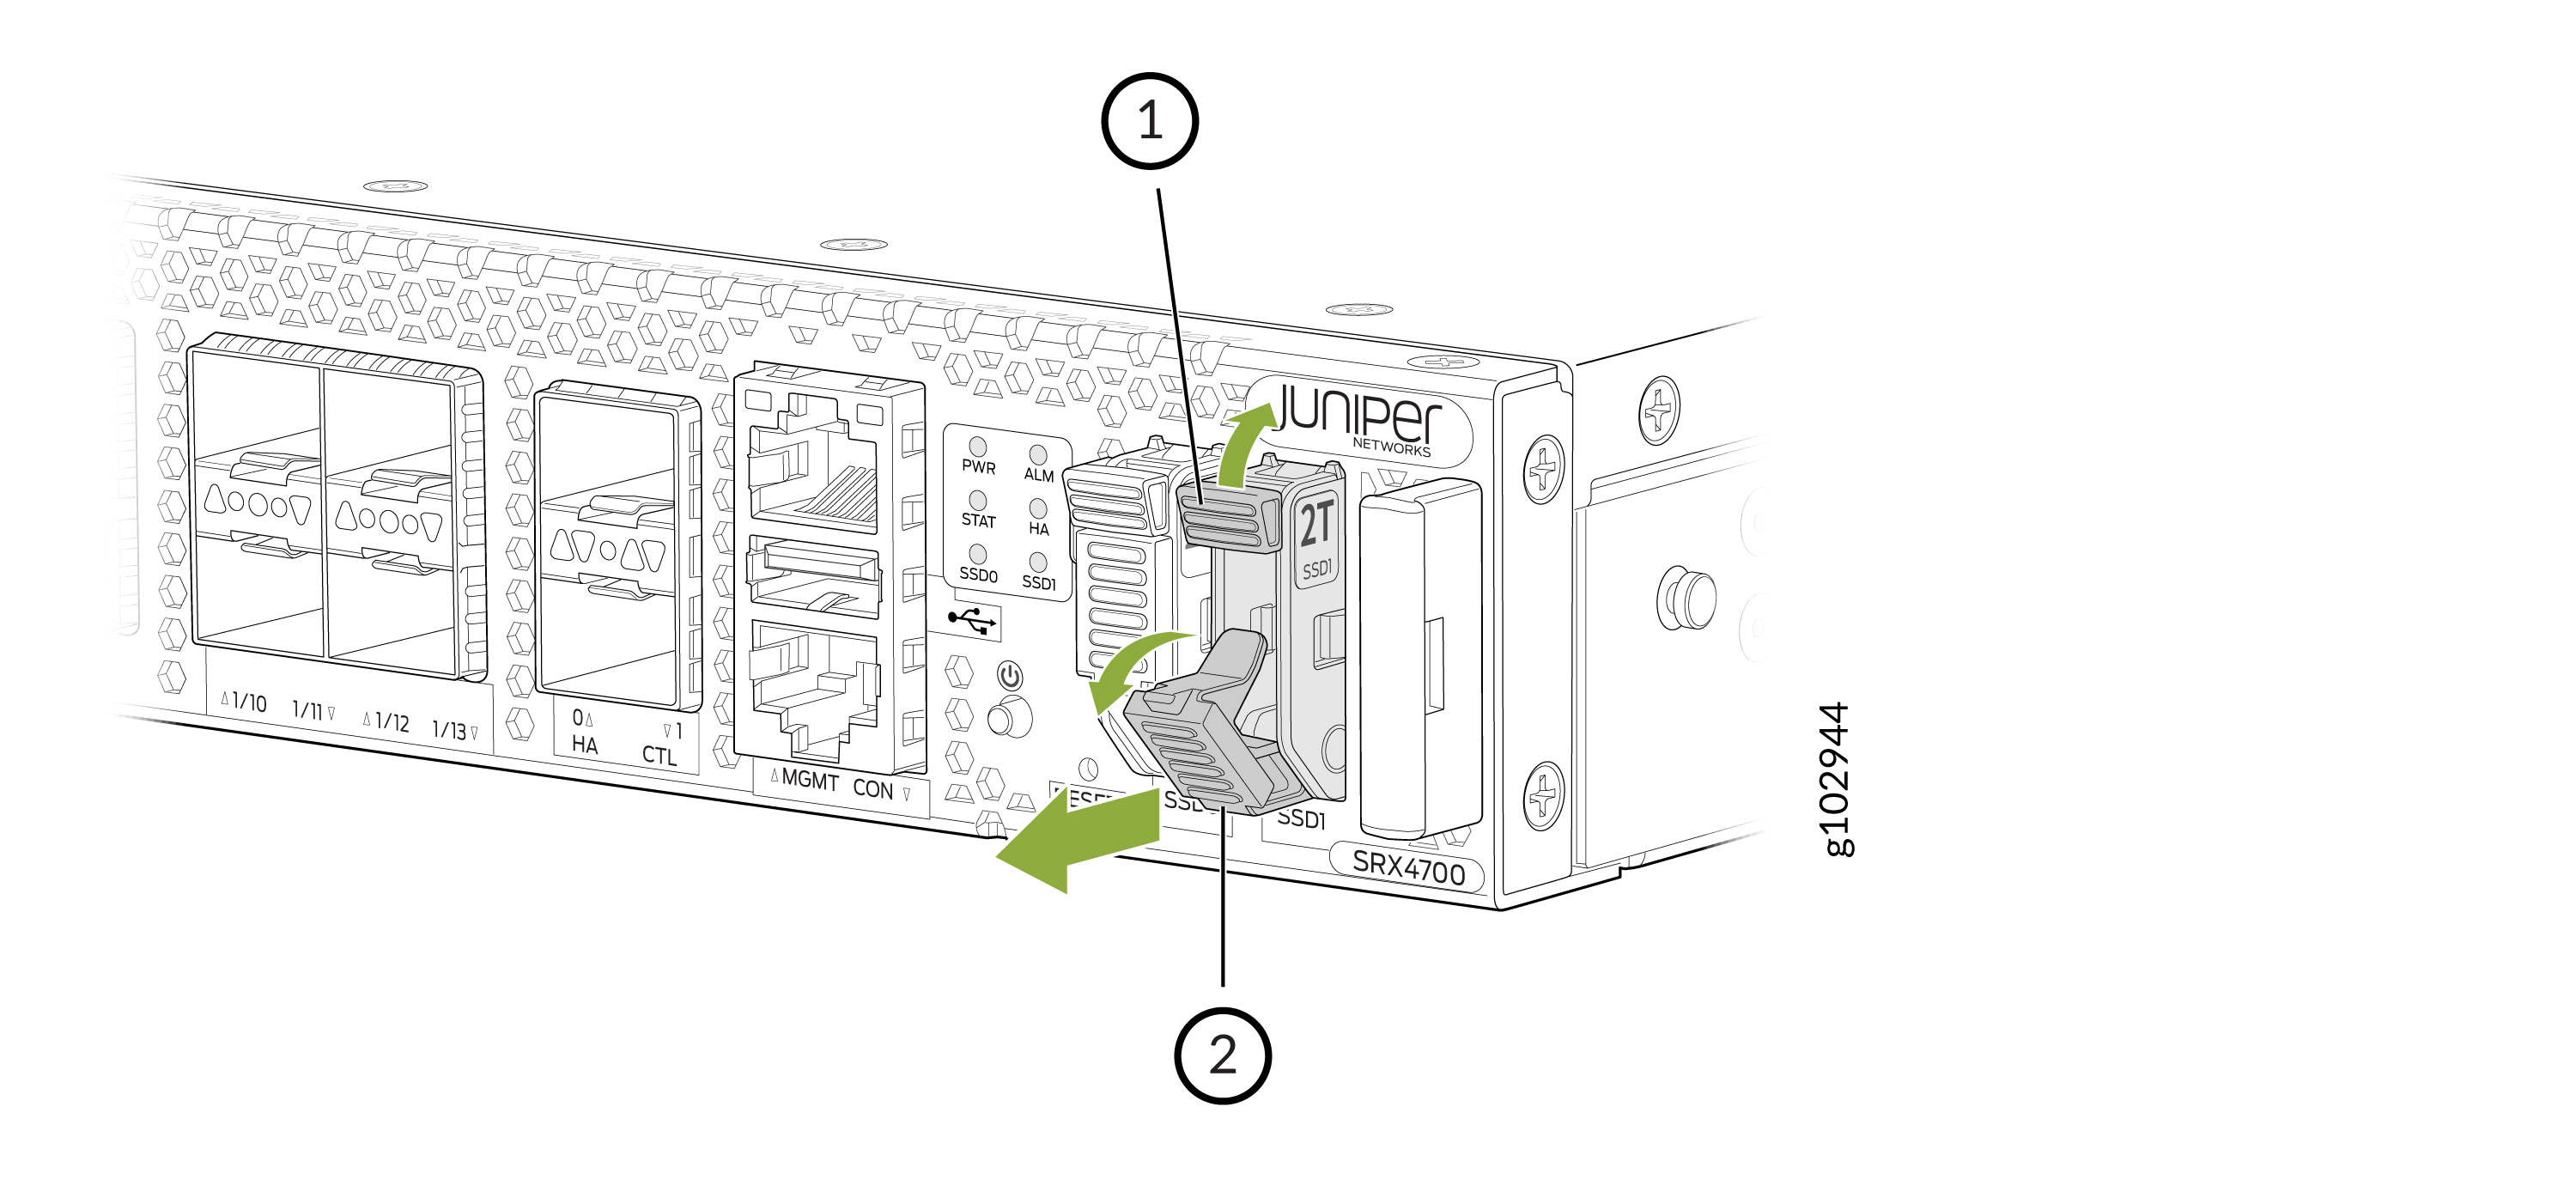
Callout Component 1
SSD front locker
2
SSD front stopper
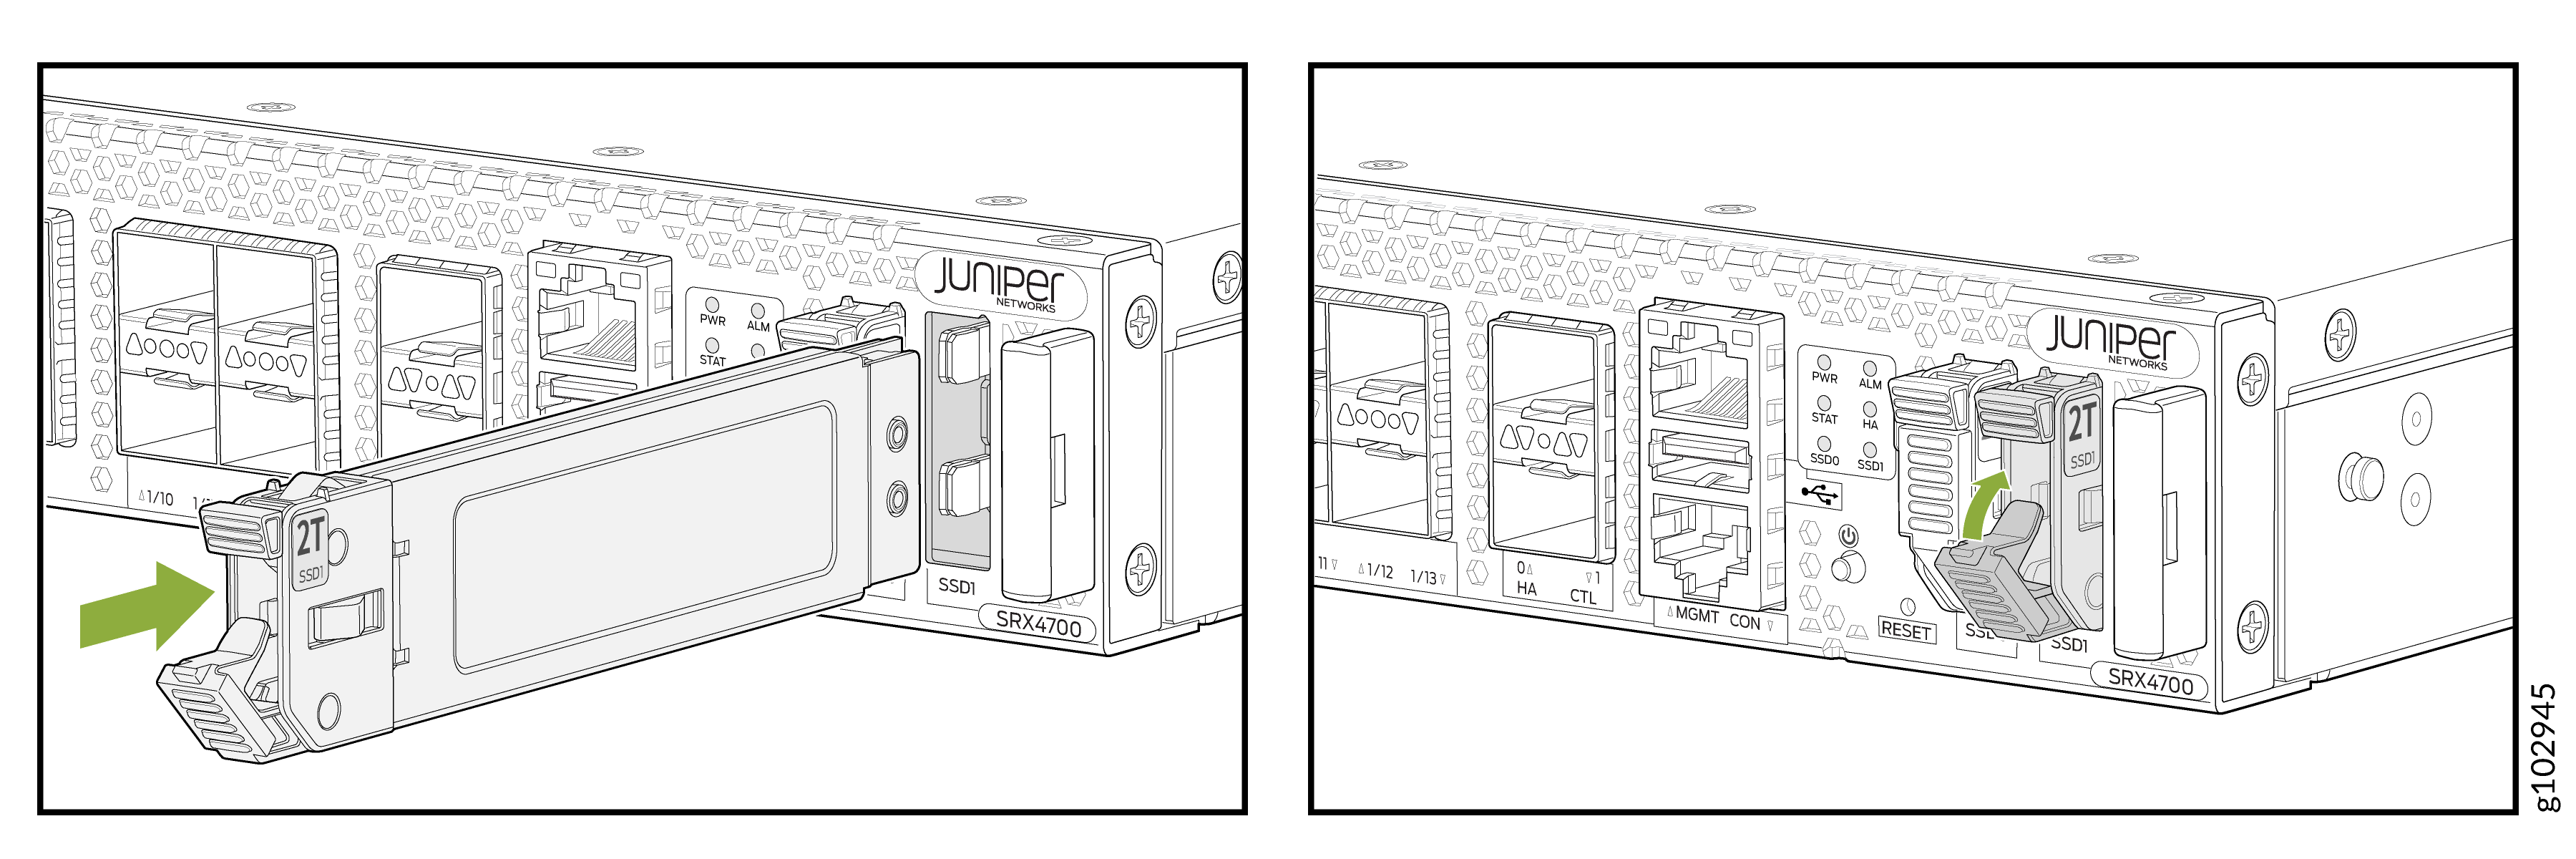
Install an SSD in the SRX4700 Firewall
You need to power off the SRX4700 Firewall to install a SSD.
-
Slide the SSD gently into its slot until it is fully seated. Press the
SSD front stopper to lock the SSD into its slot.
Replace the 1T SSD in the SRX4700 Firewall
You need to power off the SRX4700 Firewall to replace the 1T SSD (primary SSD).
If 1T SSD goes faulty or if the software image on it is corrupted, the firewall will boot from 2T SSD (secondary SSD).
-
Issue the
request vmhost power-offoperational mode CLI command. This command shuts down the firewall gracefully. You can manually power off the firewall using the power button located on the front panel of the firewall. - Remove the 1T SSD from slot SSD0. See, Remove an SSD from the SRX4700 Firewall.
- Install the replacement 1T SSD in slot SSD0. See, Install an SSD in the SRX4700 Firewall.
- Power on the firewall using the power button located on the front panel of the firewall. Firewall will boot from 1T SSD with the factory-default image and configuration installed on it.
-
(Optional): To synchronize the image and configuration from the
2T SSD to the 1T
SSD:
-
Issue the
request vmhost reboot disk2CLI command. This command reboots the firewall from the 2T SSD. -
Issue the
request vmhost snapshot recoveryCLI command. This command takes a snapshot from the 2T SSD to the 1T SSD. -
Issue the
request vmhost reboot disk1CLI command. This command reboots the firewall from the 1T SSD.
-
Issue the
-
Issue the
show vmhost hardwareCLI command to verify the details of the SSDs.
Replace the 2T SSD in the SRX4700 Firewall
You need to power off the SRX4700 Firewall to replace the 2T SSD (secondary SSD).
-
Issue the
request vmhost power-offoperational mode CLI command. This command shuts down the firewall gracefully. You can manually power off the firewall using the power button located on the front panel of the firewall. - Remove the 2T SSD from the slot SSD1. See, Remove an SSD from the SRX4700 Firewall.
- Install the replacement 2T SSD in slot the SSD1. See, Install an SSD in the SRX4700 Firewall.
- Power on the firewall using the power button located on the front panel of the firewall. Firewall boots from the 1T SSD.
-
To synchronize the image and configuration from the
1T SSD to the 2T SSD,
issue the
request vmhost snapshotCLI command. This command takes a snapshot from the 1T SSD to the 2T SSD. -
Issue the
show vmhost hardwareCLI command to verify the details of the SSDs.
Replace the 1T and 2T SSDs from the SRX4700 Firewall
You need to power off the SRX4700 Firewall to replace the SSDs.
-
Issue the
request vmhost power-offoperational mode CLI command. This command shuts down the firewall gracefully. You can manually power off the firewall using the power button located on the front panel of the firewall. - Remove the 1T SSD from the slot SSD0 and 2T SSD from the slot SSD1. See, Remove an SSD from the SRX4700 Firewall.
- Install the replacement 1T SSD in slot SSD0 and 2T SSD in slot SSD1. See, Install an SSD in the SRX4700 Firewall.
- Power on the firewall using the power button located on the front panel of the firewall. Firewall boots from 1T SSD with factory default settings and configurations.
-
Issue the
show vmhost hardwareCLI command to verify the details of the SSDs. -
If needed, upgrade your firewall with the desired Junos OS software.
After the upgrade is complete and the firewall is up and running with
the upgraded Junos OS software image and configurations, issue the
request vmhost snapshotCLI command to take a snapshot from the 1T SSD to the 2T SSD.