APPENDIX: Fabric Verification (Optional)
You may skip this optional chapter if you want. This information is presented to show more of the internal details on how the fabric is working.
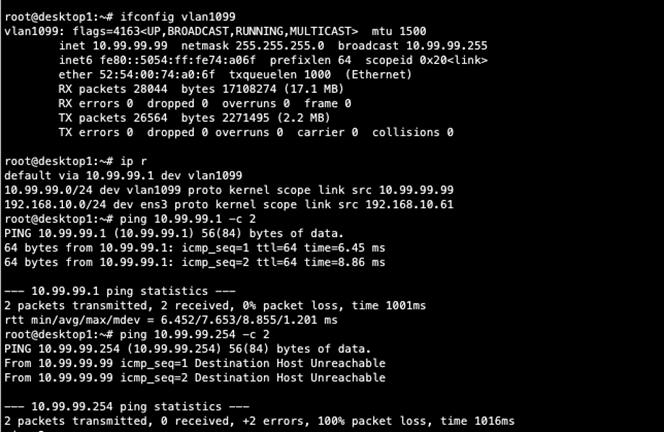
In the following steps, we cover the verification of the campus fabric EVPN multihoming deployment. See Figure 1 . Currently, there are two desktops to verify the fabric. Let’s take a quick look to see if Desktop1 can connect internally and externally.
Verification steps:
- Confirmed local IP address, VLAN, and default gateway were configured on Desktop1.
- Can ping default gateway – indicates that we can reach the distribution switch.
- Ping to WAN router failed (10.99.99.254) – we need to troubleshoot.
Start by verifying the campus fabric in the portal by selecting the Campus Fabric option under the Organization tab on the left side of the portal.
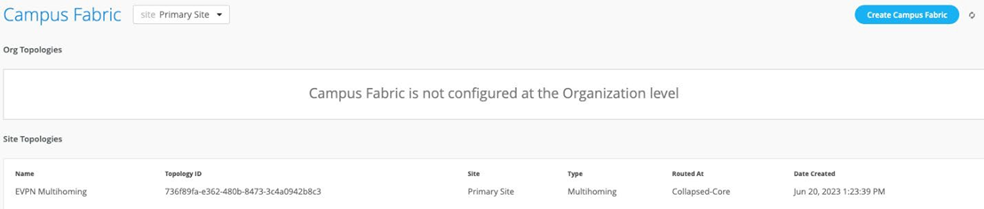
Accessing each device within the campus fabric through remote shell is supported here as well as a visual representation of the following capabilities:
- BGP peering establishment.
- Transmit and receive traffic on a link-by-link basis.
- Telemetry, such as LLDP, from each device that verifies the physical build.
BGP Underlay
Purpose
Verifying the state of eBGP between the collapsed core layers is essential for EVPN-VXLAN to operate as expected. This network of P2P links between each layer supports:
- Load balancing using ECMP for greater resiliency and bandwidth efficiencies.
- BFD to decrease convergence times during failures.
- Loopback reachability to support VXLAN tunnelling.
Due to the automated assignment of loopback IP addresses, for this fabric, we have the following configuration to remember:
| Switch Type | Switch Name | Auto assigned Loopback IP |
|---|---|---|
| Collapsed Core | Core1 | 172.16.254.2 |
| Collapsed Core | Core2 | 172.16.254.1 |
| Access | Access1 | N/A |
| Access | Access2 | N/A |
Action
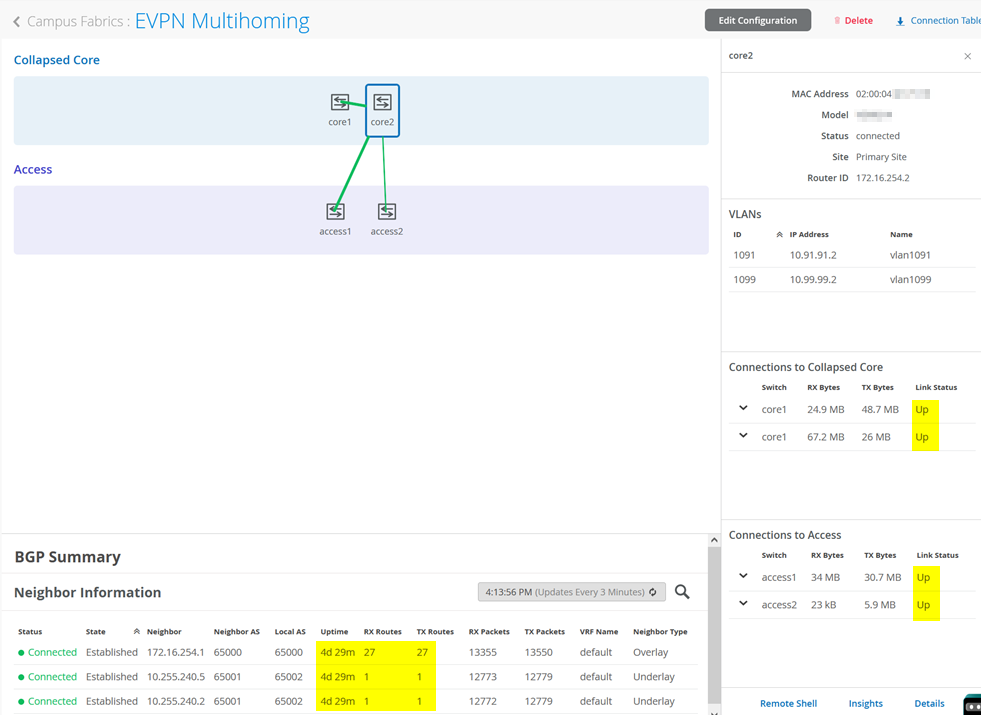
Verify that BGP sessions are established between core devices and distribution devices to ensure loopback reachability, BFD session status, and load-balancing using ECMP.
Operational data can be gathered through the campus fabric section of the portal using remote shell or using an external application such as SecureCRT or Putty.
Verification of BGP Peering
Core1:
Access the remote shell through the lower-right of the campus fabric, from the switch view, or through Secure Shell (SSH).
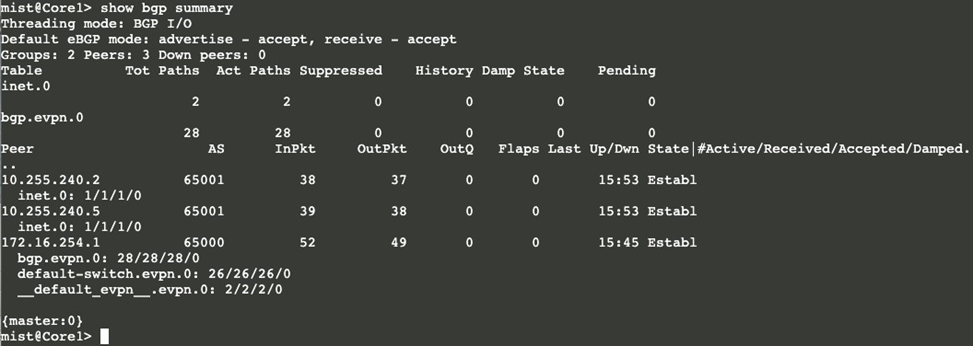
From the BGP summary we can see that the underlay (10.255.240.x) peer relationships are established. This means that the underlay links are attached to the correct devices and the links are up.
It also shows the overlay (172.16.254.x) relationship is established with Core2 and that it is peering at the correct loopback addresses. This demonstrates loopback reachability.
We can also see routes received and time shown when the sessions were established are roughly equal which looks good so far.
If BGP is not established, you can validate the underlay links and addressing, and that the loopback addresses are correct. Loopback addresses should be pingable from other loopback addresses.
The primary goal of eBGP in the underlay is to provide loopback reachability between core switches in an EVPN multihoming deployment. This loopback is used to terminate VXLAN tunnels between devices. The following shows loopback reachability from Core1 to Core2 in the fabric:
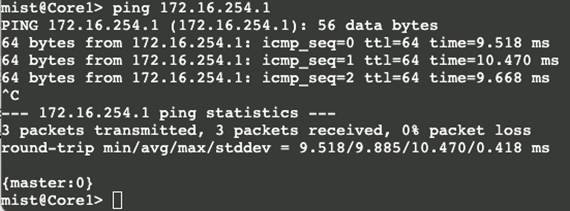
eBGP sessions are established between core-distribution layers in the campus fabric. Loopback reachability has also been verified between collapsed core devices.
Let’s verify that the routes are established to the collapsed core across multiple paths.
Core1: ECMP Loopback reachability with Core2

Core2: ECMP Loopback reachability with Core1

Finally, we validate BFD for fast convergence in the case of a link or device failure:

Conclusion: At this point, the BGP underlay and overlay are operational through the verification of eBGP between corresponding layers of the campus fabric and loopback routes are established between collapsed core devices.
EVPN-VXLAN Verification Between Collapsed Core Switches
Since the desktop can ping its default gateway, we can assume the Ethernet switching tables are correctly populated, and VLAN and interface modes are correct. If pinging the default gateway failed, then try troubleshooting the underlay connectivity.
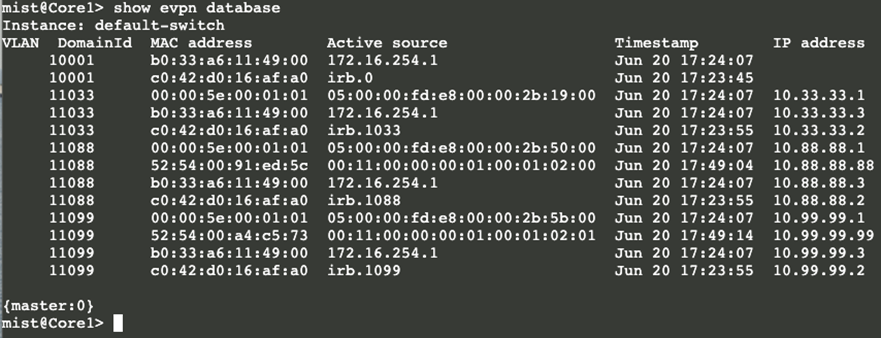
Verification of the EVPN Database on Both Core Switches
Core1:
Core2:
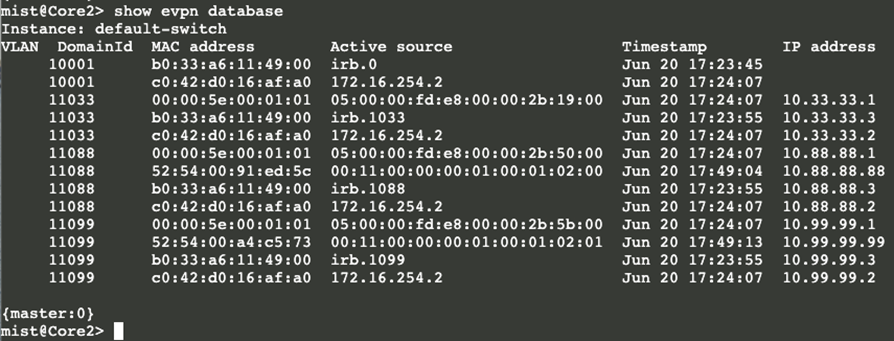
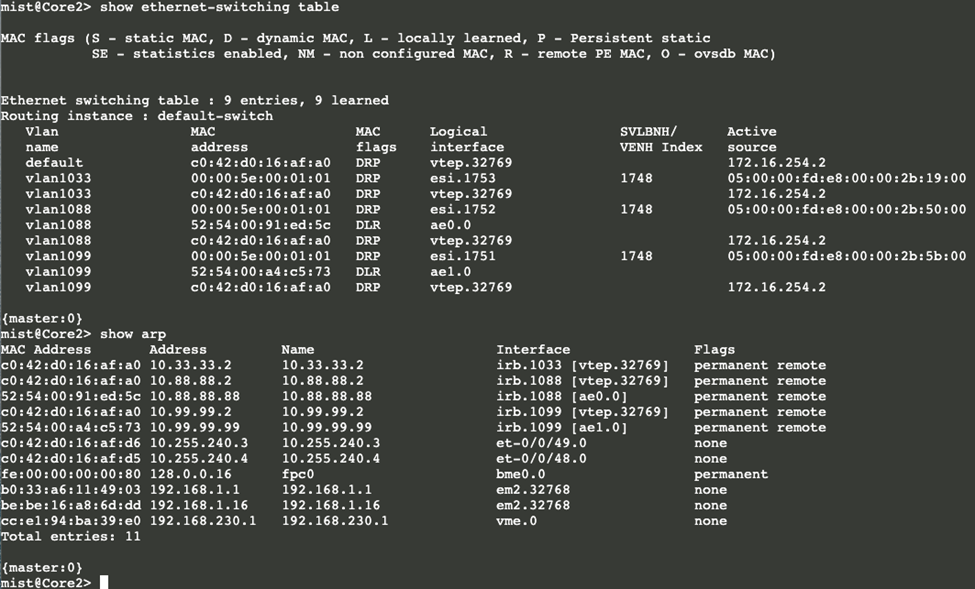
Both core switches have identical EVPN databases, which is expected. Note that the entries for desktop1 (10.99.99.99) and desktop2 (10.88.88.88) are present on each core switch. These entries are learned through the campus fabric from the ESI-LAGs to each access switch. For example, Desktop1 (10.99.99.99) is associated with shared ESI 10-digit segment between Core1 and 2 facing Access1 and is associated with a VNI of 11099. The fact that we see both Desktop ARP and associated ESI 10-digit segment entries leans towards an issue between the core and the Juniper Networks® SRX Series Firewall. Remember, the SRX Series Firewall is responsible for routing traffic between routing-instances; in this case, between corp-it, developers, and guest-wifi.
Verification of VXLAN Tunnelling Between Collapsed Core Switches
Core1:

Core2:

The EVPN database is confirmed on both core devices and VXLAN tunnels are established between core switches. We have also verified that Desktop1 and Desktop2 are present in both core switches’ EVPN databases.
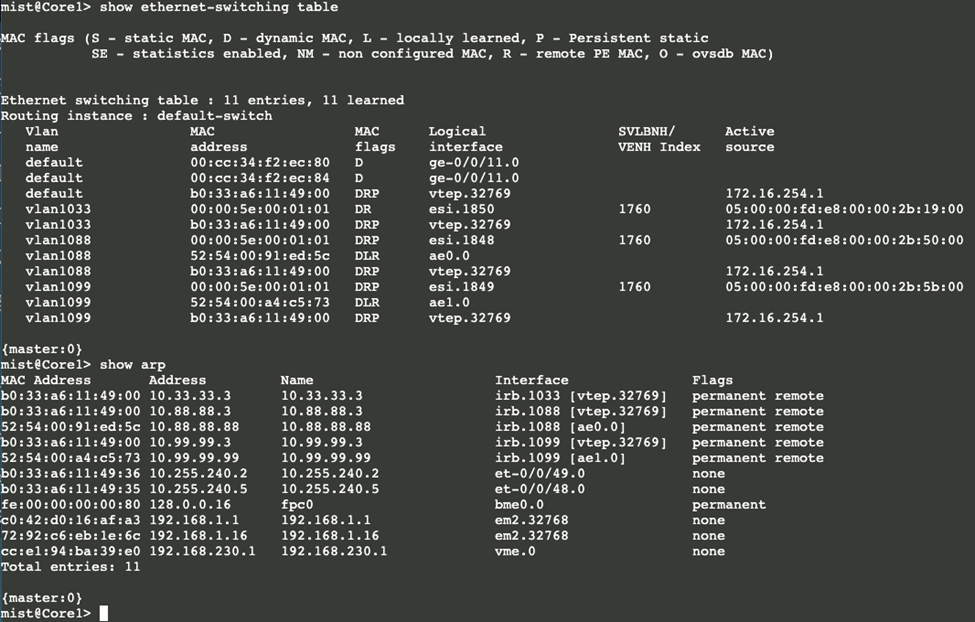
Core1: Ethernet Switching and ARP Tables
Core2: Ethernet Switching and ARP Tables
Result of Our Fabric Checks
Connectivity between the collapsed core switches looks correct since MAC and ARPs are being learned across the fabric on both cores. Let’s look at the connection between core and WAN router next.
We need to configure the attachment of the WAN router to complete the entire design. Without the WAN router configuration, the fabric only allows the following communications:
- The same VLAN/VNI on the same access switch but different ports.
- The same VLAN/VNI on different access switches.
- Different VLAN/VNI attached to the same VRF on the same access switch, but different ports.
- Different VLAN/VNI attached to the same VRF on different access switches.
All traffic between VRFs is always isolated inside the fabric. For security reasons, there is no possible configuration to perform route leaking between VRFs. This means that traffic between them is handled directly inside the fabric without the need to traverse through the WAN router as a possible enforcement point.