Testing Webhooks
Use public webhook receivers to test your webhooks and ensure that you're getting the data that you need.
By testing webhooks, you can verify the configuration process as well as inspect and parse
the event messages you receive from Mist. If you do not have a webhook receiver available to
you, you can use a public, free service. Many such services enable you to receive and inspect
the incoming webhook POST messages from Juniper Mist.
These public sites create a random URL that you can use on a temporary basis. The data that you receive is ephemeral and is deleted as soon as you close your browser. Using one of these sites from your browser, you can identify parameter data from the message payloads to help create your workflow.
After you configure your webhook, you can trigger it and view those messages as they are received on the public webhook receiver.
Two of these free testing webhook receivers are:
These sites are not Juniper maintained and are to be used at your own risk.
Webhook Tester
There is a webhook tester tool that you can use to easily test and monitor the webhooks for your Mist organization. The webhook tester is available here Mist Webhook Tester. This is an application that automatically creates and deletes the Webhook configuration in the Mist org to receive them, and displays the received webhook messages in a table.
-
Only local Mist accounts can use this application (SSO users are not supported).
-
Only administrators with a role of Super User are supported (Org level webhooks can be configured by Super Users).
Below is a diagram explaining how the application works.
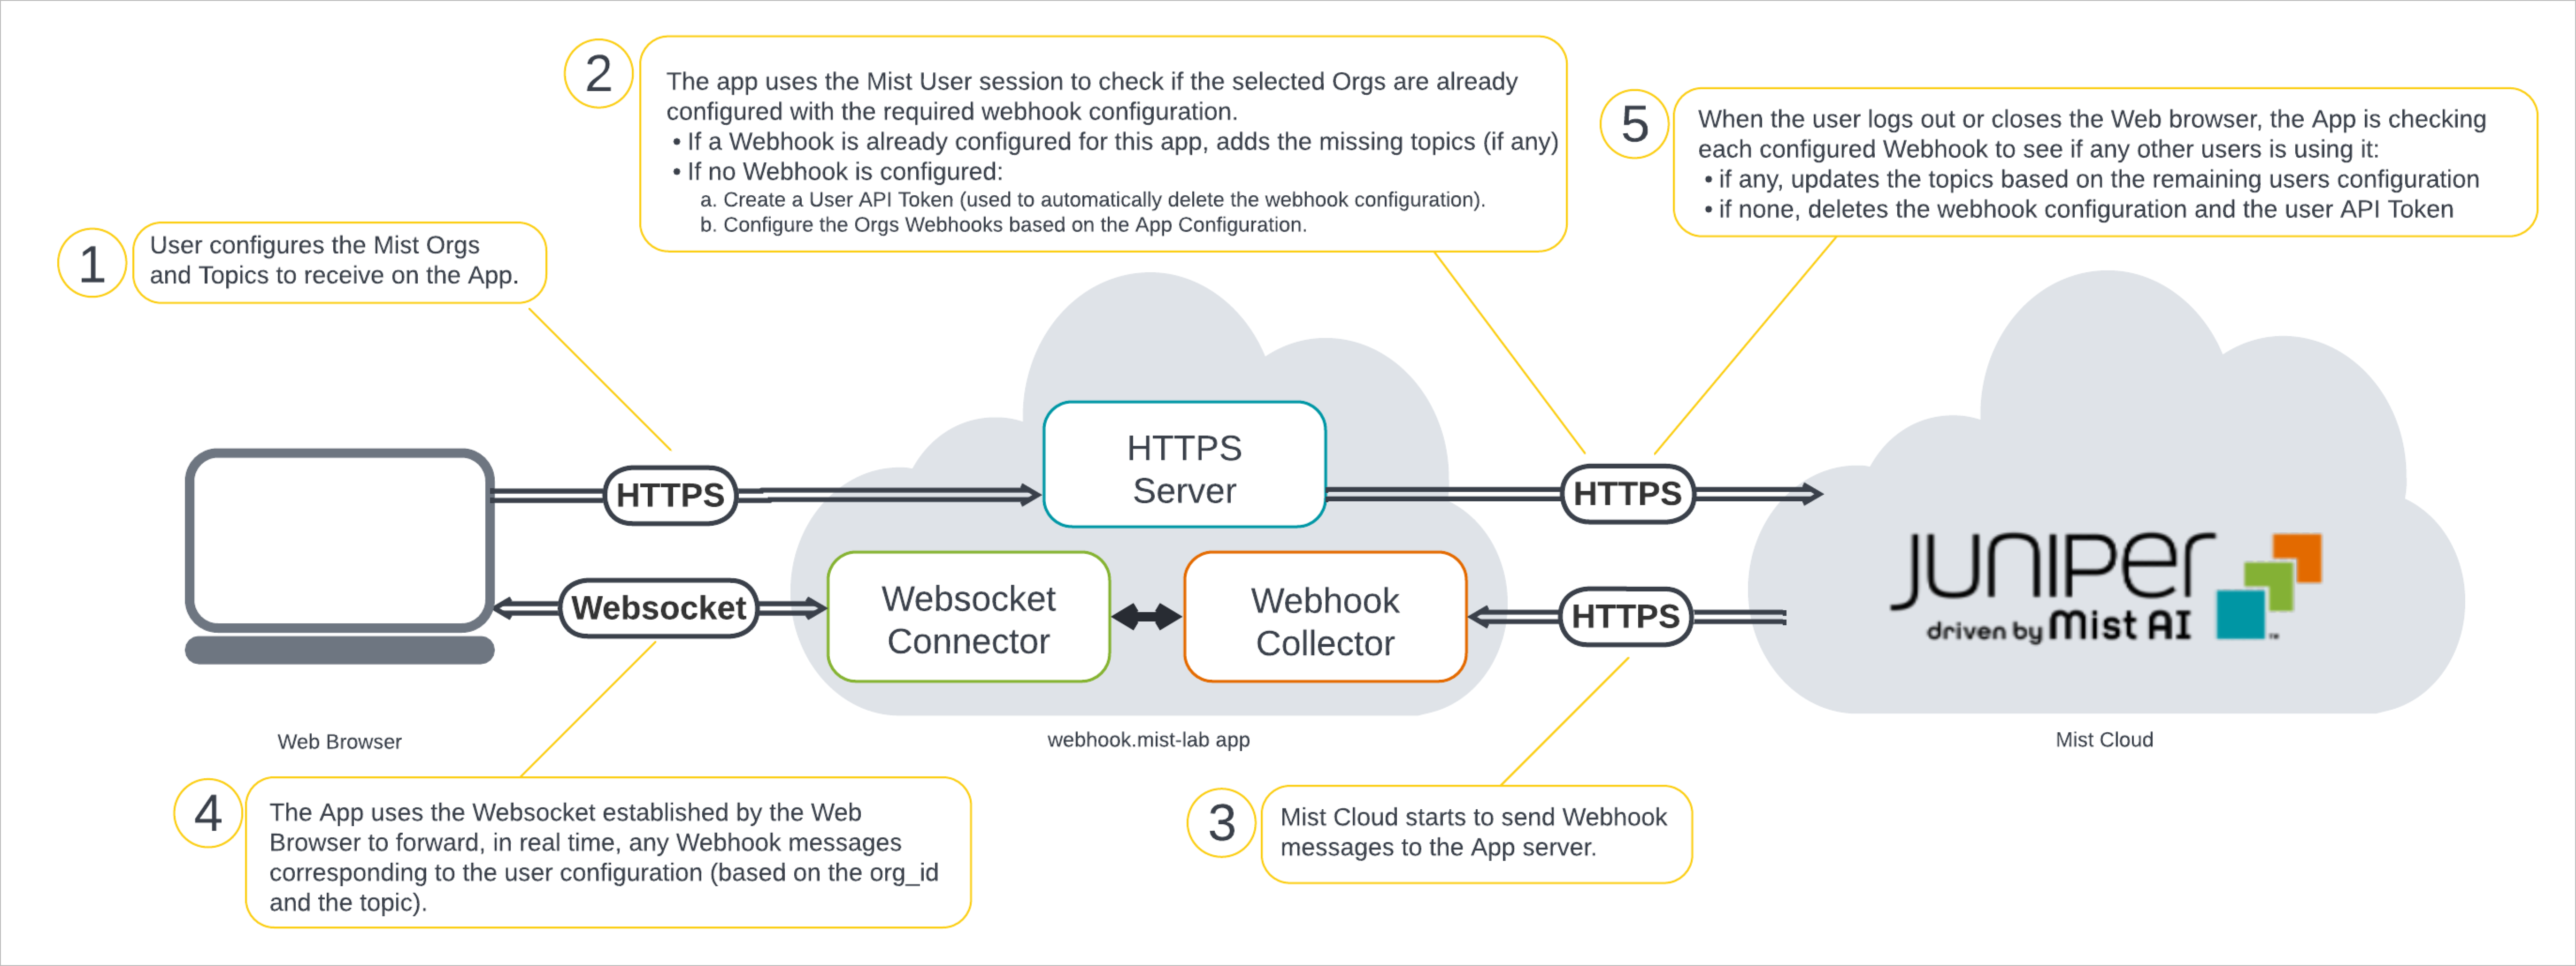
To use the webhook tester, simply:
Navigate to the Mist Webhook Tester.
On the configuration pop-up window, choose the:
Max Events in Memory—This is the maximum number of events to be stored in the application's memory.
Topics—These are the webhook topics to receive. Only a limited subset of Webhook Topics are supported, and all the other messages will be discarded.
Orgs—One or multiple Mist Orgs. The application will automatically create a new Webhook configuration on the selected orgs to send the enabled topics to the application.
Click Save.
As events occur, those webhooks are sent to the table for you to monitor and review. Information such as the date, topics, event type, org, site, device name, device MAC, and event details are displayed in the table for you.
For more details, see https://github.com/Mist-Automation-Programmability/mist_webhook_monitor?tab=readme-ov-file.
Test End-to-End Connectivity
With webhooks, you can test end-to-end connectivity from your Mist Cloud instance to your defined webhook receiver to confirm that you are receiving the webhook and are able to process it. This is a webhook for testing that webhooks are working. It serves the same function as a ping would for testing network connectivity, but you're testing your webhook functionality. This validates that no devices (a firewall or router) are blocking communications between the two endpoints.
This can be done from the API by issuing a POST (from your REST client) to, in this case,
your org, the configured webhook (id) as seen in this example:
POST
        /api/v1/orgs/203d3d02-dbc0-4c1b-xxxx-xxxxxxxxxxxx/webhooks/032b9cb1-80af-4edc-xxxx-xxxxxxxxxxxx/ping
A successful result looks like this:
{
    "topic": "ping",
    "events": [
        {
            "id": "032b9cb1-80af-4edc-xxxx-xxxxxxxxxxxx",
            "name": "my webhook",
            "org_id": "203d3d02-dbc0-4c1b-xxxx-xxxxxxxxxxxx",
            "timestamp": 1725375149.0829651
        }
    ]
}
This can also be done from the Juniper Mist Portal:
Navigate to Organization > Admin > Settings.
Find the Webhooks section and click the Add Webhook button.
Select the appropriate Webhook Type, give your test webhook a name, then paste the test URL you obtained from the free webhook test receiver website (see links provided above) into the URL field.
- Choose the webhook topics that you want to receive messages for and set any other necessary settings.
- Finally, select Add.

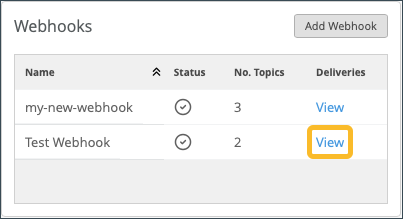
Find your test webhook listed in the Webhooks section of the Organization Settings page and click View to see the delivery events. You can check these events to see the delivery status of webhooks to confirm that you are receiving the webhook and are able to process it.
Additional Testing Information
To review additional webhook testing information, such as how test that your webserver is able to receive and process Mist Webhooks, see the information in Validate Deliveries.
To see how to send a ping event to a site webhook, see Ping Site Webhook.
To see how to send a ping event to an organization webhook, see Ping Org Webhook.