Automation Tools
This topic talks about a few automation tools that you can use with Juniper Mist™. We make no reccommendation regarding any of the tools discussed below. We provide the information and examples for informational purposes only.
Automation Tools Overview
The entire Juniper Mist GUI is built on top of the robust Mist API. This architecture makes Mist administration highly customizable, flexible, and scalable. Using automation tools, you can perform tasks or groups of tasks not available in the GUI.
Automation begins by identifying and understanding the tasks to be performed. Most automation tools are designed for machine-to-machine transactions. Because of this design, automation tools are not always intuitive for humans to understand and configure. Thankfully, many tools exist that help you interact with machine-based interfaces and even create your own automation scripts. The Juniper Mist API is just such a tool.
Postman
Postman is a tool to help you automate Juniper Mist management tasks. Postman can do many things, but you will use it as an API client. According to the Postman web site (www.postman.com), the Postman API client is the foundational tool of Postman. This client enables you to easily explore, debug, and test your APIs while also enabling you to define complex API requests for HTTP, REST, SOAP, GraphQL, and WebSockets.
Postman provides its own API GUI client to interact with a REST API interface, and many others. Postman allows users to set up reusable environments and use variables for consistency and efficiency when testing. You can visually organize each individual request into an order, inspect and store responses for reuse, and even have Postman help generate programmatic code such as Python.
Here is a short video on using variables in Postman to interact with the Juniper Mist API.
So, how do I do this? How do I make this happen with robots? So, this is not something that's supported, right? This is one of those things, like I said, this is kind of hacky, kind of unofficial. I just wanted to show you some, like a cool, fast way to get information in and out of the Mist dashboard. So, again, the professional, super, you know, legit way is to hit the question mark and then you look at API documentation, but we want to do just exactly what the dashboard did.
So, if I go in here, this is just Chrome, as you can use Firefox, Chrome, whatever. They have these developer tools, and I think they're for more like web developers, but we're going to use it in a kind of a different way. So, this thing records the traffic that's going to and from basically the API.
So, on this network tab, we click network tab, and then we're going to go into Postman so I can show you. I created an automation boot camp, like workflow, work site, and then I did just a couple of folders, right? So, we're going to change, we're going to add stuff to each one of these folders to do exactly what we did manually just a second ago. So, I'm going to, and I actually made an API test just so that I could see that my, I'm going to try real hard not to show you my API token, but I've got it in a global variable that I can't highlight, but it's like right there, and then it's basically a no body. I'm just doing get to API self. So, if you click on that, you can see that I get data. So, I know that my API token works, and then we're going to drive off of that because I know I'm going to accidentally show you that.
And then, so now we want to see like how, how did I make the template? How did I do the very beginning template? How did I do that? And how can I replicate that? So, what we're going to do is we'll do create template, and then I'm going to go back into this developer tools thing, and we're going to do NAC template again, and this is a little bit trial and error because it's not, you know, it's not something that's supported or documented or anything like that. It's just something that this is just the way that it works so that we can, we can take a, you know, we can just take a look in it and see how it works. So, I'm going to stop that, and when you click on these, you can see what's going on if my windows are out of the way. And so, really, we want this one. So, you can see it went to api.mist.com, blah, blah, blah. It was a post, and then all the way down at the bottom, you can see that that's the payload.
So, we're going to actually just remake this thing in Python or in Postman. So, I'm going to copy this. I'm going to go in here, and then we're going to do, because it's an org template thing, we're going to add a request, and we're going to say create org template, and we'll hit, I keep jockeying these windows around that you probably can't see, but we're going to hit make, and then get in here, paste this out, and again, we saw that it was a, that it's a post right here.
So, we go back in here, and we say we want this to be a post, and then my headers, I want authorization. Oops. And then, so, I also found out that if I copy and paste this variable, you don't actually see it. So, okay, you didn't actually see it pop up, because that's, you know, that's your super secret password to the keys of the castle. So, I'm going to save that, and then we also want a body, right? So, if I go back in here, you can see, I got to figure out how to move all this webinar stuff around. Scroll all the way down to this, and then we're going to hit view source. I like view source a little bit better, because then I can just copy and paste the whole thing. So, we're going to copy this, paste it in. We want just raw.
We'll hit paste, and so you can see that what's happening is it's going to my organization, and then it's going to network templates, and then it's going to post, it's going to make a new one, and we're going to name it NAC template. And then in here, in Postman, you can actually set this to conditional highlighting or whatever to JSON, and when you set that, it lets you, it allows you to hit this beautify button, and now you can kind of see it as a workflow rather than, you know, just all one block of payload. So, we're going to save that, and again, we'll go back over here, and we'll see that this has been created, but we don't, we want to do this with Postman, not manually, so we're just going to delete this one. And then we'll hit refresh to make sure it's actually gone. Okay, cool. So, it's gone.
Now, we'll just run what we have, and again, here's the response. We're going to end up needing this ID because this is what the rest of this stuff is based off of, and I only learned that through trial and error, right? I was just messing with this, seeing how it would work, and, you know, and just doing it this way. And again, this is, the only reason that this works is because this, the dashboard is asking the API on the back end how to interact with all the data. So, if this, if the API wasn't there, it didn't exist, then we wouldn't be able to mess with this. So, again, I think I hit the button, so I'll hit refresh on this. And like magic, it's there.
So, the one thing I didn't do, because I forgot, is added my host names. So, this is my, this is my NAC, and I need, we need that. Minus 1, 2, 3, 4, and then we'll hit okay on that, add this, get rid of that, 1.200, mist1234. Okay, so now, instead of hitting save right away, because we know this is going to save this information, we want to see how it's saving it, or what it's talking to.
So, back to developer tools, and then, now we hit save. So, now if we hit save, and then stop, we can see, this one's probably the right one, because this is our, this is our org stuff, so we see it's going to templates, blah, blah, blah. It's putting information in there, and then if we scroll down, we can see, okay, so, it's actually, this is my RADIUS config, so that's actually happening. So, let's just do that. That's, right? Like, so, we just made the thing, now let's do, we'll go in here, and then we'll do add a request. And we're going to say update org template.
And again, this could be something that you do all in one, like just in one thing. If you grabbed it when you created it, that could be something. But maybe not, who knows? So, now we got this, and then, same thing, I mean, this is like the cheaty, like, easy way to do it. I'm just copying and pasting now. Make sure that copied, and we're going to paste it in here. Looks good, maybe, I don't know, we're going to see in a second.
And then, I wish I could move this, and so, this one was a PUT, so we're going to go in here. I'm going to say PUT, and then, our header's going to be authorization, because we need that. We're going to copy this, so that you guys, again, that's so sketchy, like, I feel like you guys are going to get my API token at any moment.
But luckily, if something goes wrong, or this doesn't work, or whatever, I recorded this earlier, so we'll have a good version of it, so you can see exactly what's going on, and like, how I made it, just because this is kind of, it's a little bit all over the place, but I'm trying to show you how easy it is to just mock up whatever you might want to automate, so that that way you can say, okay, here in Postman, I'm doing, you know, the same thing that the dashboard's doing, and I don't necessarily need to super understand what the, you know, the API calls, or the JSON, or the, you know, this is kind of one of those things that, even though I'm, I guess I'm pretty advanced in the API stuff nowadays, it's nice to be able to just copy and paste, and just go from there, right?
So, again, I scroll down here, I'm going to hit view source, just so I can copy and paste this thing easier, and copy, and we're going to paste it into the body, raw, same thing, same as we did last time, paste that, turn it to JSON, and then that way we can beautify it, and again, this is exactly just what the dashboard was giving to the API, which gives to the back end, so we can see that it gave it the, you know, 192.168, and this is our password, again, same thing, blah, blah, blah, that's great, we're going to save it, and then we'll go back to it, and then close this.
So, if we delete this template, the whole thing, technically we should be able to run both of these things, and it should just work, so if I do this, and then this is the ID, we might need this, I'm not actually sure if we need this, so I'm going to copy it, and then in here, we can, oh, yep, so we'll need it, see how it says that, so this is our org, this is the org, and then it says network template, and it's going to modify this, so we just deleted that, so we're going to put in our new one that I just copied and pasted, and then we'll fire that one off, and then we'll hit refresh here, and so now it says that we made it, and then you guys can see it before I can, okay, so yeah, so that's everything that we wanted, right?
So that's pretty good for that piece, so now we want to do the same thing with the switch configuration, because we're just walking through the same thing that we just did, you know, manually, and again, manually, probably fine, it's probably something that you could just do within the constraints of, you know, out of the box operation of this, but I kind of just, same thing, right, it's just something that might be comfortable, I want to show you that it's a comfortable thing to do it in the dashboard, but then also if you just want a robot to do it, you can, so again, so we're in here now, and what we did last time was we inherited this thing, which is good, and then we did, what else did we change, so we changed this, we added a port profile.
So again, we'll do the same thing, we'll inherit this, and then we'll add one of these, .1X, and then we'll do our super secret, because I know Junos really well, hit that button, scroll through there, pretend like we know what we're doing, hit okay, and then before we hit save, we're going to do our little cheat again, and then go into developer tools, it's recording, and hit play, or go, and then, and you can see, and again, like you can see this stuff, right, so I see bundle, that's going to full story dot whatever, I don't really care about that, settings, okay, this could be interesting, this is going somewhere kind of neat, that might be something that we want, and then we'll look down here.
Yep, so we named it .1X, so that's a thing, and then right here, this is kind of interesting too, like all these numbers could be something, so that's a PUT, that's putting something in, network template ID, that could be interesting, let's just start with settings, just see what happens, so again, we're going to go into here, and now that we're kind of done with our org templates, I'm going to save it, and we don't need our API test either, and then we're going to go to site template, and we're going to say add request, I guess we want to update site template, go back in here, copy and paste, this is a little redundant, but at the end of this, hopefully we'll be able to see that I can just hit go on all these workflows, and then all these requests, and then it will make exactly what we did manually, automatically.
And same thing, where this is, this button right here, this code button is really cool, I'm not going to hit it, because you'll be able to see my API token, but this will let you export each one of these requests in Python, or I don't know, PowerShell, or whatever else is in there, so it's got a whole bunch of JavaScript, it's got a whole bunch of examples, and so again, you could copy and paste each one of these things, put them in Python, all in one thing, and then hit go on it, and it will just do everything that you want to do all in one go, rather than us building it as we go.
So we did that, and then we're going to view source, copy all this stuff, put it in the body, same thing, right, we're going to change this, I keep moving my, you can't see it, but I keep moving my webinar thing around, and again, so I hit beautify, so it's easier to see now, so I'm seeing that there's, here's my profile name, and, you know, whatever else that was changed in there, and again, this could be something that you want to change later or not, who cares, right, so save that, and then we will go back in here, and we'll see if it worked, so we're going to delete, take this off, and then we're going to take this thing off, hit save, and then we're going to do it in here, hit go, authentication credentials.
Okay, so that's probably important, right, so copy and paste this, authentication, authorization, and see, I'm just kind of, I'm just kind of building it as I go, like, I didn't really have a real, you know, super solid plan on how I'm doing this, and this is, again, it's like, it's definitely a different, like, approach to automation than, you know, Calvin and Brian were talking about, right, these guys are, like, you know, well into their journey in automation, and they're talking about, you know, connecting and integrating these applications together, and I'm just talking about seeing if I can make something talk to something else just immediately, right.
So I hit go on that, here's a whole bunch of stuff that it said, this is actually pretty important, like, you could go through here, and you could see whether or not it pass failed, what kind of thing you did, or, again, I could just go on here, hit boot camp, and then we'll see what happens, so what happened, we made .1x, but we didn't actually do this config template piece, so, like, why not, what happened, so now we're going to do, we're going to kind of sort of quasi troubleshoot it, so I'm just going to do NAC template, that's the only thing that I'm changing in this, again, we'll do developer tools, make sure it's on the network tab we're recording, hit go, and we'll stop it, I'll move my web thingy out of the way, and then we'll just look at it, so full story, don't care, that's options, don't care, it's probably this setting, maybe, we'll look in here, nope, we did that, so that's good, it's probably this guy, so let's see, no, that's a get, here's a put, let's do that, let's just see if that worked, so I'm going to say, we'll do a new one, actually, I'm going to go big brain on this one and just hit duplicate.
So, I don't have to copy and paste my password a bunch of times, okay, so instead of this, we're going to say apply org template to site template, again, you name it whatever you want, this is just kind of an easy way to sandbox this stuff, we're going to delete this, because we don't want that, we're going to delete this, because we don't want that either, kill all that stuff, and then again, back to the copy and paste game, like we're going to go in here, copy, and then go all the way to the bottom, change this to this, copy, paste here, it's already JSON beautified, so this is interesting, so you see that this thing is saying network template ID, and it's going to this site, and that means that it might be applying that to this site, so what was our, let's see, update site template, we didn't have it in here, our org template, that's probably our template ID.
So, if I hit save on that, this one might be a little easier to test, so we'll just go in here, boot camp, we'll take it off, save, go back in here, hit go, something happened, that's probably cool, we'll go back in here, hit okay, and you can already see, so that's what added that NAC template, so again, this isn't something that, like, this probably isn't in any kind of documentation anywhere, because it's just not, oh, so look this, this is actually overriding our templates here, so we don't want that to happen, so I wonder how we change that.
So again, I just, now I'm just doing the same thing all over again, it's a little bit of trial and error, it's a little bit of, you know, it's kind of scrappy and not really something that is, you know, in anywhere professionally or officially, but again, this is cool, because Calvin and I have actually done a lot of work together recently, and I like to put up a whole bunch of these things in there, and then just share this to him, so that that way, whatever he's using, whether he's putting it in Ansible or, you know, just using ServiceNow or whatever tool he's using, he can have the boiled down version of it right here, so he can see that this is, you know, this is actually what's the workflow, what's going on as far as talking to Mist, and then that way, at least, you know, there's a whole bunch of other complexities and all that stuff, so at least he's got my section down, and he doesn't have to really worry too much about it, because he knows that it works, this is really easy to share with other people, and then, you know, and then you're good to go.
So, we'll go back in here, we uncheck these, so we're going to see kind of why, like, I don't really know why those things were all overwritten, so we'll go back in here, and we'll hit save again, and it looks like it's just the same data, I mean, just kind of glancing at it, it looks the same, so I wonder if it has to do with the order in which we did that in, so let's just try that, so we're going to take this off, and then we're going to take this thing off, delete all this stuff, hit save, and then we'll go back to it to make sure that it's actually gone, yeah, so all this stuff's gone, so now let's just do it in a different order, let's do, let me put this up here, and we're going to do this one first, then we're going to do this one, and then we'll go back here, hit refresh.
See what happened, so now it applied the template, yep, it still overwrote them all, so we don't want that to happen, so let's take those off, we'll do it again, and then we'll go into here, actually, let's just make the whole thing, so that way we can just copy and paste easier, oh, we did, we did already, okay, cool, so I'm going to stop this, this is kind of how you'd like, see how it's doing some things that I don't really care about, if you stop this and then hit re-record, then you can get just what you want, so I'll hit save again, stop that, settings.
So we already know that we have that, but I'm just going to take all this and just redo it again, so copy this, put it in, this one was our, yeah, this is the body of this, delete all this stuff, you can do this with whatever workflow you want, you can do this with, I did, I've done this mostly with the wireless stuff, you know, if you want to look at the clients or whatever it is, you can just do the same thing, so now we're going to do network templates, we'll see if this changed, so that's a GET, so that's fine, this one was opposed to full story, we don't care about that, PUT, that's probably okay.
So, let's try that again, maybe that was different data, right, and again, you can actually dig into this stuff and really see what it's doing, but I'm just, you know, just firing away, delete that, hit okay, then we'll go and do it again, so we'll hit send on that, send on that, and it might actually be that I'm using the wrong work template, we can try the whole workflow again, we'll just get through it and then we'll see what happens, boot camp, so it applied that, okay, that was what it was, so we applied the template first and then it just, in that second payload that we copied and pasted, we said don't overwrite any of this stuff, and now we're good here, should be good, right, let's see, let's make sure, yeah, .1x, so now, all we want to do now is go to the switch, and again, this isn't best practice.
So, like what I would want to do is I probably would do the .1x stuff in the organizational level, because I want my whole org to be able to see where my NAC is, and then the rest of them, I would just PUT in this one here, and then I would just change, instead of going to the actual switch and applying this template to the port, I would just do it in here, and then that way I can, it'll just be in all one place, but I just wanted to show you that we can touch all of these facets of this thing, and then it's effectively the same thing, so we're going in here, and then all we have to do now, really, is apply this, apply our port configuration, right, so I'm going to say ge-0/0/2, and then I want my super expertly set up .1x.
I'll hit okay on that, and okay, that looks good, so we'll do, again, do the same thing, developer tools, hit save, stop this, it's usually at the front of this thing, usually it's, you know, something that's at the front, another cool thing is if you double click on any of these things, it'll drive you back out to the Django REST API framework, and you can see in human readable, like this is actually, this one was a get, yeah, so this one was a get, and it looks like it got a bunch of stuff, it got the devices and type switch, so this is all my switch configuration stuff, cool, not what we want, we want to actually put something, or like place something.
So, I'm thinking it's right here, yeah, so here's a PUT, and then if we scroll down, we can see, yeah, so it's changing things, this is where it's putting data, so we'll just make that, so we'll go into, we'll minimize these things, kill these things off, just for the sake of whatever, and then we'll make, add a new request, and we're going to say edit, switch config, we are going to make that a put, we're going to put our header in here of our token, hopefully this is the last time I have to show you the token part, so I don't screw that up, boom.
And then where are we going, we're going here, and what are we telling it to do, all this stuff, save that, put it over here, the body, raw, paste, again I kind of want to see what it looks like, because I'm interested, so now I can see that it's my switch, and here it is, this is the piece that we want, this is what it's changing, but again, I didn't code that, like I didn't do any part of that, I just copied and pasted, so we're going to save that, and then we'll go back over on our other side, close this out, and then we're going to take it away so that we can programmatically add it again, hopefully, save, so now we see that it is not in there anymore, and then when I hit the button, boom, stuff happened, and then scroll over here just to validate, and again this is something, like you can put this in a script all on its own, you can make it say hey, go out, validate, make sure you actually put this on, you put .1x on this section here, and you're good to go.
So now, let's put it all together, so let me delete, let me clean up the environment a little bit, so we want to delete that, that's good, we're going to go in here, because we're changing stuff all over the place, let's get rid of this, take this away, oops, take that away, take this .1x thing away, save, save, save, save, save, and then we're going to take the switch template, we're going to blow this thing away, good to go, all right, so let's just try, let's see what happens, let's go through the whole process, so let me open these things back up, so programmatically we want to create a template, that's the first thing, and then we're going to save this, because it's probably going to be useful, we figured out that that will be useful, update the org, remember we put this in here, save that, stuff happened, in here we got sites, let's see in the body real quick.
We'll see, oh, yep, so this is a network template ID, so it's probably this, again, shoot that out, make sure this doesn't have anything, yeah, this is our .1x, send that away, and then this one, same thing, we'll send this one away, and then in here, let's not even look at anything, let's just look at the end switch, see what happened, so now we see that we've got .1x assigned to this port, we've got our authentication servers have been inherited, our .1x has been inherited, and then, just to show that it did something, we will clear this screen, we'll enable this, and watch it not work, just because this is live, just kidding.
So there, that's it, so we basically just configured .1x, we learned how to walk through a manual workflow of how to mess with the dashboard, and then we put it in Postman, so that way, if we wanted to do this, if we wanted to scale this out to what Calvin and Brian and those guys are doing, that's super cool, that is the pipe dream, that's where I want to be, but I have to start somewhere, and this is how I start somewhere, this is if someone says, hey, can you get me the list of all the guest users on wireless and put it in a CSV file, I can probably ask Marvis to do that, honestly, but the cool thing about this system is that these APIs are all open on the backend, and I don't necessarily need to know the nuts and bolts of how it works to be able to use it, and use it the way that I want to use it, rather than the way that Mistis thought it would be useful for you to have it that way, so I think that's pretty much my demo.
Postman is an excellent development tool. You can use it to test individual configuration changes and then put them together into collections. This video is an excellent example of using Postman and a web browser to put together API requests to configure 802.1x in a switching template.
With the popularity of Postman, Juniper developers have published collections in the public Postman workspaces. Collections are a method of organizing API requests and documentation into groups. You can import, export, and share collections.
Here is a short video demonstrating the use of Postman collections and the Juniper Mist API.
The Postman collections incorporate many Juniper Mist capabilities. They also include collections for gathering client information, Mist Edge devices, switching, software-defined WAN (SD-WAN), and many other objects. You can find these collections, which include the Juniper Mist cloud APIs, Mist cloud WebSocket, and Mist Runner Collections, from this link: https://www.postman.com/juniper-mist/workspace/mist-systems-s-public-workspace.
For more information on how to get started with Postman, see Use Postman to Make Your First API Call.
Python
Python is an object-oriented programming language. It’s a popular language for many reasons. One reason is that Python is highly flexible and extensible. Compared to other programming languages, it is easy to learn and work with. Python is used for web development, data sciences, networking, and the Internet of Things (IoT), to name a few uses. It is open source and works on multiple platforms.
For more information about getting started with Python, check out the Python Software Foundation at: https://www.python.org/about/gettingstarted/
Juniper Networks supports Python use in many forms, such as direct script execution and toolkit scripts: https://www.juniper.net/documentation/us/en/software/junos/automation-scripting/topics/concept/junos-script-automation-python-scripts-overview.html
If you plan to share Python scripts with others, be sure to use an environment file (.mist_env) in place of the API token so that you do not share your token while sharing your script. For more information, see https://github.com/tmunzer/mist_library?tab=readme-ov-file#environment-file.
Python Script Examples
Leveraging the robust API library in Juniper Mist, you can automate tasks using Python. In this section, you will see some simple Python scripts that make a series of calls to the Mist API to gather information or make changes to Mist.
These scripts are meant to serve only as examples and may or may not work in your environment due to possible variances in your environment.
Display WLANs on a Specific Site
This is a simple example script that connects to the Mist API and displays all the wireless LANs (WLANs) for a specific site:
import requests
import json
url = 'https://api.mist.com/api/v1/sites/00000000-0000-0000-0000-000000000000/wlans'

##Set the API request headers
headers = {
    'Content-Type': 'application/json',
    'Authorization': 'Token a7c61a9ca25b4c27a14ea7c61a9ca7c61a9ca25b4c27a14e653b5af5db02a25ba7c61a9ca25b4c27a14e653b5af5db024c27a14e653b5af5db026xxxxxxxxxxx'
}

results = requests.get{url, headers=headers}
wlans = json.loads{results.text}

##Print each wlan and wlan_id
for wlan in wlans:
print{wlan["ssid"], ">", wlan ["id"]} user:$ python3 simple-script.py mist-prod > a7c61a9c-a25a-274c-a7c61a9c-a25b mist-test > a7c61a9c-a25b-4c27-a7c61a9c-a25b
Comparing RSSI (Windows)
You execute this Python script on a Windows laptop. The script gathers the
current signal quality percentage, not received signal strength indicator
(RSSI), from a Windows laptop. The script then gets the RSSI from the access
point (AP) to which the laptop is connected by parsing for the wireless
adapter’s MAC. The script makes these requests simultaneously and displays the
client’s signal quality on the same line as the AP’s RSSI. The script runs until
you send a Ctrl+c command from your keyboard to break
out of the script execution.
The script makes use of the netsh wlan show interface
Windows command. This is the command’s output:
C:\Users\user>netsh wlan show interface

There is 1 interface on the system:

    Name                   : Wi-Fi
    Description            : Intel(R) Wi-Fi 6E AX210 160MHz
    GUID                   : aa7a439e-fe66-494c-xxxx-xxxxxxxxxxxx
    Physical address       : 70:cd:xx:xx:xx:xx
    State                  : connected
    SSID                   : wi-fi
    BSSID                  : d4:20:xx:xx:xx:xx
    Network type           : Infrastructure
    Radio type             : 802.11ax
    Authentication         : WPA2-Personal
    Cipher                 : CCMP
    Connection mode        : Auto Connect
    Channel                : 149
    Receive rate (Mbps)    : 516
    Transmit rate (Mbps)   : 574
    Signal                 : 83%
    Profile                : hoth

    Hosted network status  : Not available
This is the script itself:
import requests
import json
import os
import time
import random
import string
import subprocess

##Set the API request headers
headers = {
        'Content-Type': 'application/json',
        'Authorization': 'Token <YOUR_API_TOKEN>'
}

##Function to get (strip) the "Signal" quality percentage from Windows from the "netsh wlan show interface" command
def get_clientsignal{}:

    results = subprocess.check_output(["netsh", "wlan", "show", "interface"]).decode()
    lines = results.split('\r\n')

    d = {}
    for line in lines:
        if ':' in line:
                vals = line.split(':')
                if vals[0].strip() != ''and vals[1].strip() != '':
                     d[vals[0].strip()] = vals[1].strip()

    for key in d.keys():
        if key == "Signal":

             return (d[key])

##Function to get (strip) the "Physical address" MAC from Windows from the "netsh wlan show interface" command
def get_windowsmac():

     results = subprocess.check_output(["netsh", "wlan", "show", "interface",]).decode()
     lines = results.split('\r\m')

     d = {}
     for line in lines:
          inf ': ' in line:
                vals = line.split(':')
                print(vals)
                if vals[0].strip() != '' and vals[1].strip() != '':
                    d[vals[0].strip()] = vals[1].strip()

    for key in d.keys():
        if key == "Physical address":
            client_mac = (d[key])

            return (client_mac)


##Main Section
###Define variables
client_mac = get_windowsmac()
client_mac = client_mac.replace(":", "")
###input your site_id in the API URL
url = ('https://api.mist.com/api/v1/sites/<YOUR_SITE_ID>/{}'.format(client_mac))

client_rssi = 0
my_rssi = 0

###Loop through every 3 seconds and print the results to the terminal
while True:
        results = requests.get(url, headers=headers)
        client = json.loads(results.text)
        client_rssi = get_clientsignal()
        my_rssi = client['rssi']
        print('Windows Signal', '=', client_rssi, '   ', my_rssi, '=', 'AP rssi')
        time.sleep(3)
When you run the python script, the resulting output should look like this:
C:\Users\user>python client-signal.py
Windows Signal = 83%	-59 = AP rssi
Windows Signal = 83%	-59 = AP rssi
Windows Signal = 83%	-62 = AP rssi
Windows Signal = 83%	-62 = AP rssi
Windows Signal = 83%	-62 = AP rssi
Windows Signal = 83%	-62 = AP rssi
Windows Signal = 83%	-62 = AP rssi
Windows Signal = 83%	-62 = AP rssi
Windows Signal = 83%	-62 = AP rssi
Windows Signal = 83%	-62 = AP rssi
Windows Signal = 83%	-62 = AP rssi
Windows Signal = 83%	-62 = AP rssi
Windows Signal = 83%	-62 = AP rssi
Windows Signal = 83%	-62 = AP rssi
Windows Signal = 83%	-62 = AP rssi
Windows Signal = 83%	-62 = AP rssi
Windows Signal = 83%	-62 = AP rssi
Windows Signal = 83%	-62 = AP rssi
Windows Signal = 83%	-62 = AP rssi
Windows Signal = 83%	-62 = AP rssi
Windows Signal = 83%	-62 = AP rssi
Windows Signal = 83%	-62 = AP rssi
Windows Signal = 83%	-58 = AP rssi
Traceback (most recent call last):
  File “client-signal.py, line 71, in <module> time.sleep(3)
KeyboardInterrupt
C:\Users\user>
The Juniper Mist AP reports its statistics approximately every 60 seconds. This is the reason the AP RSSI only changed twice during the time the script was running.
Comparing RSSI (MacOS)
This Python script is executed on a MacBook laptop. It is nearly identical to the
previous Windows script. The script simultaneously gathers the RSSI from the
MacBook and gets the RSSI from the AP to which the laptop is connected by
parsing for the wireless adapter’s MAC address. It makes these requests
simultaneously and displays the client’s signal quality on the same line as the
AP’s RSSI. The script runs until you send a Ctrl+c command to break out
of the script execution. To access the command on the Mac OS, you must include
the absolute path to the command:
/SystemLibrary/PrivateFrameworks/Apple802111.framework/Versions/A/Resources/airport
                            -I
.
This is what the airport -I command displays:
Mac:Desktop user$ /SystemLibrary/PrivateFrameworks/Apple802111.framework/Versions/A/Resources/airport -I
     agrCtlRSSI: -60
     agrExtRSSI: 0
    agrCtlNoise: -93
    agrExtNoise: 0
          state: running
        op mode: station
     lastTxRate: 486
        maxRate: 450
lastAssocStatus: 0
    802.11 auth: open
      link auth: wpa2-psk
          BSSID: 5c:5b:xx:xx:xx:xx
           SSID: SSID-1
            MCS: 8
        channel: 120, -1
This is the script itself:
import requests
import json
import os
import time
import random
import string


##Set the API request headers
headers = {
        'Content-Type': 'application/json',
        'Authorization': 'Token <YOUR_API_TOKEN>'


##Function to get (strip) the "RSSI" quality percentage from MacOS from the "airport -I" command
def get_clientsignal{}:

    input = os.popen(       	'/SystemLibrary/PrivateFrameworks/Apple802111.framework/Versions/A/Resources/airport -I)
    return int(**.join([x.split()[1] for x in input if 'agrCtlRSSI' in x]))


##Function to get (strip) the MAC from MacOS from the "ifconfig" command
def get_macbookmac():
     input = os.popen('ifconfig en0')
     return ''.join([xsplit()[1]for x in input if 'ether' in x])


##Main Section
###Define variables
client_mac = get_macbookmac()
client_mac = client_mac.replace(":", "")
###input your site_id in the API URL
url = ('https://api.mist.com/api/v1/sites/<YOUR_SITE_ID>/{}'.format(client_mac))

client_rssi = 0
my_rssi = 0

###Loop through every 3 seconds and print the results to the terminal
while True:
        results = requests.get(url, headers=headers)
        client = json.loads(results.text)
        client_rssi = get_clientsignal()
        my_rssi = client['rssi']
        print('Macbook rssi', '=', client_rssi, '   ', my_rssi, '=', 'AP rssi')
time.sleep(3) When the script runs, it gathers the RSSI information from the MacBook and the
connected AP (through a Mist API call) and prints its output on a single line.
The script runs until you cancel it by issuing the
Ctrl+c command.
Mac:Desktop user$ python3 client-signal.py
Macbook rssi = -61		-57 = AP rssi
Macbook rssi = -61		-57 = AP rssi
Macbook rssi = -61		-57 = AP rssi
Macbook rssi = -61		-57 = AP rssi
Macbook rssi = -61		-57 = AP rssi
Macbook rssi = -61		-59 = AP rssi
Macbook rssi = -61		-59 = AP rssi
Macbook rssi = -63		-59 = AP rssi
Macbook rssi = -64		-59 = AP rssi
Macbook rssi = -65		-59 = AP rssi
Macbook rssi = -63		-59 = AP rssi
The Juniper Mist AP reports its statistics approximately every 60 seconds. This is why the AP RSSI changes only once in the example output.
Random Password Creation for a Guest Portal
When you
configure a WLAN for a guest portal, use the Guest
Portalconfiguration to define the landing page. This is the page for
guests to log on to their wireless network. This configuration page enables you
to gather information about guests such as their full names, e-mail addresses,
and company details. You can add custom fields if you need users to gather
additional types of information.
You can configure the guest portal to use an alphanumeric passphrase for authorization. This is a manual process, but you can automate it to run regularly, such as daily, to create a new random password that you distribute to guests each day.
This image shows the current configured passphrase for the guest portal:
Below is a Python script to create a new,
random password for a guest portal. This script will send a
PUT command to the API to change the
passphrase.
import requests
import json
import random
import string
url = 'https://api.mist.com/api/v1/sites/<YOUR_SITE_ID>/wlans'
##Set the API request headers
headers = {
'Content-Type': 'application/json',
'Authorization': 'Token <YOUR_API_TOKEN>'
}
results = requests.get(url, headers=headers)
wlans = json.loads(results.text)
wlanid = None
portal = None
##Search for the guest SSID, mist_guest
for wlan in wlans:
print(wlan["ssid"], ">", wlan["id"])
if wlan ["ssid"] == "mist_guest":
wlanid = wlan["id"]
portal = wlan["portal"]
if wlanid:
##This function generates a 6 alphanumeric random string
thisisnew = ''.join(random.choice(string.ascii_letters) for _ in range(6))
print("New Password is:", thisisnew)
portal["password"] = thisisnew
##This takes the results and issues a PUT for the new password in the guest portal configuration
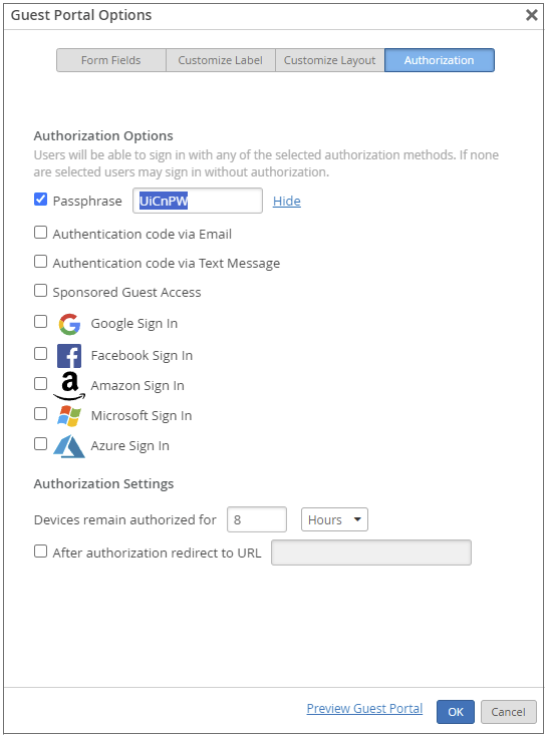
results = requests.put(url+"/{}".format(wlanid), headers=headers, data='{"portal": ' + json.dumps(portal) +'}') This
is the output from the script. It lists the wlan name
and the wlan_id until it finds the
mist_guest WLAN (defined in the script) and
resets the passphrase with the newly generated, random
passphrase:
Mac:Desktop user$ python3 client_guest_password.py
Mist-1 > 38fn03d0f9d-nfd3-xxxx-xxxx-xxxxxxxxxxxx
Mist-2 > p3j9n30lmsl-nfd3-xxxx-xxxx-xxxxxxxxxxxx
Mist-3 > 3knlso2k4ls-df9n-xxxx-xxxx-xxxxxxxxxxxx
mist_guest > 9djn3axc93nn-89sb-xxxx-xxxx-xxxxxxxxxxxx
New Password is: UiCnPW
Mac:Desktop user$
You can verify the passphrase change by going back to the WLAN configuration, or WLAN template page, and checking the guest portal configuration. When you click Reveal, you will see the new passphrase.
Additional Automation Resources
For detailed information and examples, use these resources:
| Resource | Description | Where to Find It |
|---|---|---|
|
Python scripts demonstrating possibilities of Mist APIs. |
Examples of Python scripts using the Mist APIs. These scripts are
using the mistapi Python package to simplify
the authentication process. |
To view script examples, go to: https://github.com/tmunzer/mist_library and browse the
scripts directory. |
| MISTAPI - Python Package to use Mist APIs | This package is built from the Mist OpenAPI specifications and is designed to simplify the use of the Mist APIs with Python scripts. |
To learn more about the package, go to: https://pypi.org/project/mistapi/
|
| Mist API Labs | Proof-of-Concept and prototype applications and scripts created to demonstrate the possibilities of Juniper-Mist APIs and some of the use cases. | Go to: Mist-Lab Demo Apps and in the Search box, enter webhooks. |
| Mist Postman Webhook Samples | Provides preconfigured examples of POST webhook syntax. | Browse: https://www.postman.com/juniper-mist/workspace/mist-systems-s-public-workspace |