- play_arrow Introduction
- play_arrow Router Data Extraction
- play_arrow Routing Protocols
- play_arrow Equal Cost Multiple Paths
- play_arrow Static Routes
- play_arrow Policy-Based Routes
- play_arrow Border Gateway Protocol
- NorthStar Planner Border Gateway Protocol Overview
- Border Gateway Protocol Recommended Instructions
- BGP Data Extraction
- BGP Reports
- BGP Options
- BGP Map
- BGP Live Status Check
- BGP Routing Table
- BGP Routes Analysis
- BGP Information at a Node
- BGP Neighbor
- Apply, Modify, or Add BGP Polices
- BGP Subnets
- Getipconf Usage Notes
- BGP Report
- play_arrow Virtual Private Networks
- NorthStar Planner Virtual Private Networks Overview
- Importing VPN Information from Router Configuration Files
- Viewing the Integrity Checks Reports
- Accessing VPN Summary Information
- Accessing Detailed Information for a Particular VPN
- VPN Topology View
- Route-Target Export/Import Relationships
- Additional Methods to Access VPN Information
- VPN Path Tracing
- VPN Design and Modeling Using the VPN Wizard
- L3 (Layer 3) VPN
- L3 Hub-and-Spoke VPN
- L2M (Layer2-Martini) VPN
- L2K (Layer2-Kompella) VPN
- VPLS-BGP VPN (for Juniper)
- VPLS-LDP VPN
- L2CCC (Circuit Cross-Connect) VPN
- Inter-AS VPN
- Forming VPN Customer Groups
- Deleting or Renaming VPNs
- VPN Configlet Generation
- Adding Traffic Demands in a VPN
- VPN Traffic Generation
- VPN-Related Reports
- VPN Monitoring and Diagnostics
- play_arrow GRE Tunnels
- play_arrow Multicast
- NorthStar Planner Multicast Overview
- NorthStar Planner Recommended Multicast Instructions
- Creating Multicast Groups
- Creating Multicast Demands
- Viewing Multicast Demands in the Network
- Comparing Multicast with Unicast
- Multicast SPT Threshold
- Multicast Reports
- Multicast Simulation
- Collecting Multicast Path Data from Live Network
- Importing Multicast Path Data
- Multicast Data Processing
- Viewing Multicast Trees
- play_arrow Class of Service
- NorthStar Planner Class of Service Overview
- NorthStar Planner Recommended CoS Instructions
- The QoS Manager
- Define Class Maps
- Create Policies for Classes
- Attach Policies to Interfaces
- Adding Traffic Inputs
- Using the Text Editor
- Reporting Module
- IP Flow Information
- Link information
- Traffic Load Analysis
- Traffic Load by Policy Class
- CoS Alias File
- Bblink File
- Policymap File
- Demand File
- Traffic Load File
- play_arrow Routing Instances
- play_arrow LSP Tunnels
- NorthStar Planner LSP Tunnels Overview
- Viewing Tunnel Info
- Viewing Primary and Backup Paths
- Viewing Tunnel Utilization Information from the Topology Map
- Viewing Tunnels Through a Link
- Viewing Demands Through a Tunnel
- Viewing Link Attributes/Admin-Group
- Viewing Tunnel-Related Reports
- Adding Primary Tunnels
- Adding Multiple Tunnels
- Mark MPLS-Enabled on Links Along Path
- Modifying Tunnels
- Path Configuration
- Specifying a Dynamic Path
- Specifying Alternate Routes, Secondary and Backup Tunnels
- Adding and Assigning Tunnel ID Groups
- Making Specifications for Fast Reroute
- Specifying Tunnel Constraints (Affinity/Mask or Include/Exclude)
- Adding One-Hop Tunnels
- Tunnel Layer and Layer 3 Routing Interaction
- play_arrow Optimizing Tunnel Paths
- play_arrow Tunnel Sizing and Demand Sizing
- play_arrow Tunnel Path Design
- Tunnel Path Design Overview
- Tunnel Path Design Instructions
- Designing Tunnel Paths Overview
- Backup Path Configuration Options
- Default Diversity Level
- Evaluate/Tune Options
- Advanced Options
- Viewing Design Results
- Tunnel Modifications
- Exporting and Importing Diverse Group Definitions
- Advanced Path Modification
- play_arrow Inter-Area MPLS-TE
- play_arrow Point-to-Multipoint (P2MP) Traffic Engineering
- NorthStar Planner P2MP Traffic Engineering Overview
- Point-to-Multipoint Traffic Engineering Instructions
- Import a Network That Already has Configured P2MP LSP Tunnels
- Examine the P2MP LSP Tunnels
- Create P2MP LSP Tunnels and Generate Corresponding LSP Configlets
- Examine P2MP LSP Tunnel Link Utilization
- Perform Failure Simulation and Assess the Impact
- play_arrow Diverse Multicast Tree Design
- Diverse Multicast Tree Design Overview
- Diverse Multicast Tree Instructions
- Open a Network That Already Has a Multicast Tree
- Set the Two P2MP Trees of Interest to be in the Same Diversity Group
- Using the Multicast Tree Design Feature to Design Diverse Multicast Trees
- Using the Multicast Tree Design Feature
- play_arrow DiffServ Traffic Engineering Tunnels
- DiffServ Traffic Engineering Tunnels Overview
- Using DS-TE LSP
- Hardware Support for DS-TE LSP
- NorthStar Planner Support for DS-TE LSP
- Configuring the Bandwidth Model and Default Bandwidth Partitions
- Forwarding Class to Class Type Mapping
- Link Bandwidth Reservation
- Creating a New Multi-Class or Single-Class LSP
- Configuring a DiffServ-Aware LSP
- Tunnel Routing
- Link Utilization Analysis
- play_arrow Fast Reroute
- NorthStar Planner Fast Reroute Overview
- Fast Reroute Supported Vendors
- Import Config and Tunnel Path
- Viewing the FRR Configuration
- Viewing FRR Backup Tunnels
- Viewing Primary Tunnels Protected by a Bypass Tunnel
- Modifying Tunnels to Request FRR Protection
- Modifying Links to Configure Multiple Bypasses (Juniper only)
- Modifying Links to Trigger FRR Backup Tunnel Creation (Cisco)
- FRR Design
- FRR Auto Design
- FRR Tuning
- Viewing Created Backup Tunnels
- Generating LSP Configlets for FRR Backup Tunnels
- Failure Simulation—Testing the FRR Backup Tunnels
- Exhaustive Failure
- Link, Site and Facility Diverse Paths
- play_arrow Cisco Auto-Tunnels
- play_arrow Integrity Check Report
- play_arrow Compliance Assessment Tool
- Compliance Assessment Tool Overview
- Using The Compliance Assessment Tool
- CAT Testcase Design
- Creating a New Project
- Loading the Configuration Files
- Creating Conformance Templates
- Reviewing and Saving the Template
- Saving and Loading Projects
- Run Compliance Assessment Check
- Compliance Assessment Results
- Publishing Templates
- Running External Compliance Assessment Scripts
- Scheduling Configuration Checking in Task Manager
- Building Templates
- Special Built-In Functions
- Paragon Planner Keywords For Use Within a Rule
- More on Regular Expressions
- IP Manipulation
- play_arrow Virtual Local Area Networks
- play_arrow Overhead Calculation
- play_arrow Router Reference
Input Interface Traffic
The interface traffic file can have one of the following two formats.
Interface Traffic File Format
#NodeID Interface Direction - Per1 Per2 Per3 ...
NODE3 ATM1/0.1 A2Z - 192320 204960 30263 ... NODE4 Ethernet0 A2Z - 381 382 539 ...
#LinkName Direction - Per1 Per2 Per3 ...
LINK1 A2Z - 192320 204960 30263 ...
The period data (Per1, Per2, ... Pern) indicates the traffic measured on the interface over several consecutive periods. By default, the units is in bits per second. Note that the number of periods is not limited to 24.
Before running the Traffic Matrix Solver, you will be asked to choose the desired period of traffic that the Traffic Matrix tool should try to match when generating its traffic matrix solution.
For your reference, the first two lines of the ingress or egress interface traffic files usually indicate the collection time for the first period of data and the interval (e.g. 5 minutes) between periods, as shown in the following example.
Example Interface Traffic File
#Starting Time : 6/28/07 9:50 PM #Interval : 5 minutes
NODE11 GigabitEthernet3/0/1 A2Z 0 243836792 239290424 240655400 245699408 253939296 249574480 250319920 247234760 249261400 248431176 246328192 246079952 241803032 245348992 244634288 245710200 242983256 241388720 239512760 238729992 239829624 238082232 234324288 231259912
After opening the network project, select Traffic > Import Traffic to open the Import Traffic Wizard to convert data from third-party measurements, such as MRTG, InfoVista, Concord eHealth, into NorthStar Planner’s format.
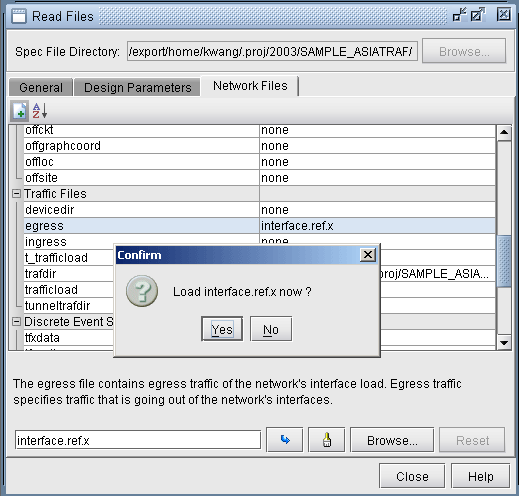
Specify the interface traffic file to use for the traffic matrix computation by switching to View or Design mode. Go to File>Read, click on the “Network Files” tab, scroll down to the “Traffic Files” section of the window, and click on either the “egress” (outgoing interface traffic) or “ingress” (incoming interface traffic) entry. If both files are specified, the egress file’s value will be checked first. If the value is unspecified in the egress file, the ingress file will then be checked. Browse for the desired file on the server, and click the blue arrow icon to load it into your network model.
Once you have loaded the file into your network model and saved your network environment (via File>Save Network...), the ingress and egress traffic files will be saved and available the next time you open that network project, or specification file.

Input TrafficLoad File
For a subset of the flows in the network, you may already have measured end-to-end flow bandwidth, e.g., from Netflow, JFlow, LDP statistics data, or other sources. In this case, you can specify the measured flow bandwidth through the trafficload file. The format is as follows:
#DemandID Direction AvgFrameSize Per1 Per2 Per3 etc...
Flow1 A2Z - 6852 2341 3456 3456 3568 3852
After opening the network model, select Traffic > Import Traffic to import data from third-party systems such as Netflow 9 xml, Arbor xml, TMS, and Juniper LDP Stat, into NorthStar Planner file format.
Make sure that the demand ID here matches that of the demand file.