Example: Control Management Access on Juniper Networking Devices
Our content testing team has validated and updated this example.
This example shows how to limit management access to Juniper Networking devices based on a specific set of allowed IP addresses. This type of functionality is often referred to as an access control list (ACL), and is implemented as a stateless firewall filter in the Junos OS.
Requirements
A Juniper networking device connected to a management network. To help validate the configuration there should be at least one other device with access to the management network that can initiate SSH or Telnet connections to the device under test (DUT). No special configuration beyond basic device initialization (management interface and related static route, system services, user login accounts, and so on), is required before you configure this example.
Overview
You can configure a firewall filter to limit the IP addresses that can manage a device. This firewall filter must include a term to deny all traffic except the IP addresses that are allowed to manage the device. You must apply the firewall filter to the loopback interface (lo0) to ensure that only management traffic, that is, traffic sent to the device itself, is filtered.
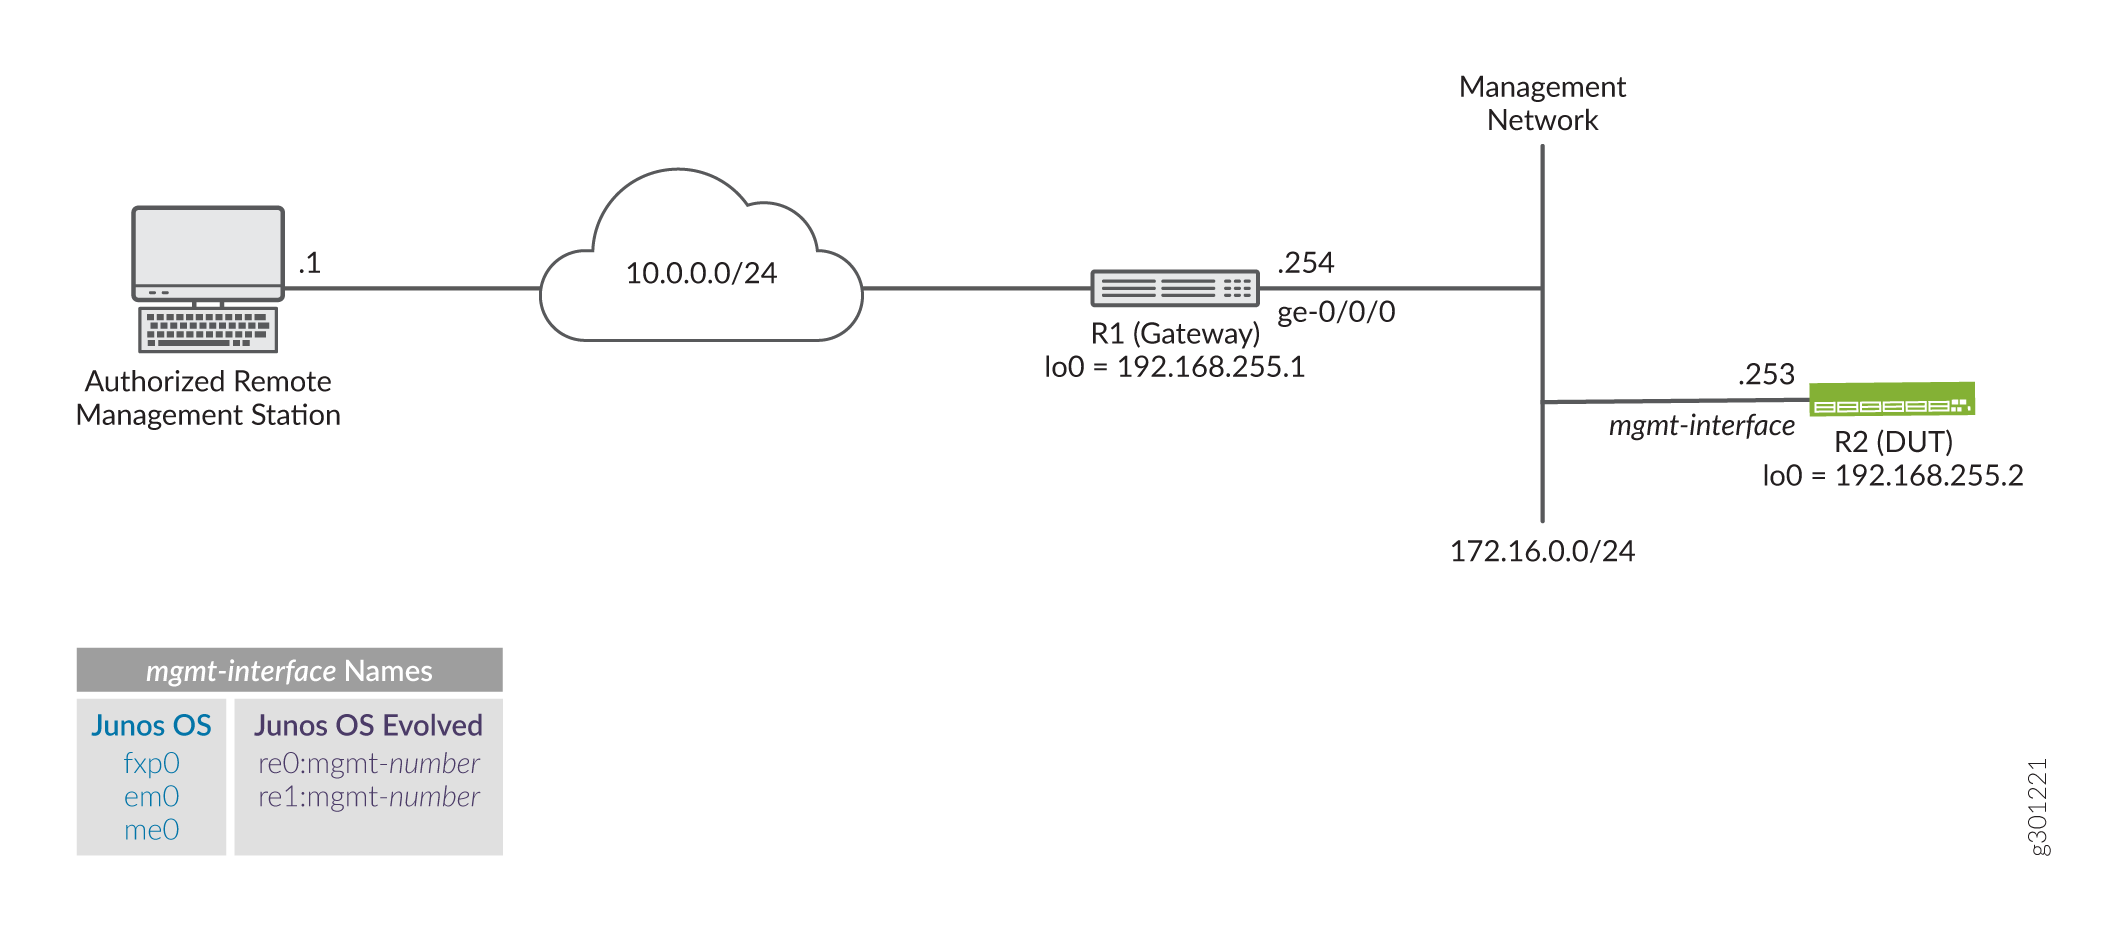
Example Topology
Figure 1 shows the topology for this example. The R1 device serves as the default gateway for the management network that is assigned the 172.16.0.0/24 subnet. You apply the filter that limits management access to the R2 device, making it the DUT in this example. The remote workstation is authorized to manage the DUT and has been assigned the 10.0.0.1/32 address.
In this example you:
Configure a prefix-list called manager-ip. This list defines the set of IP addresses that are allowed to manage the device. In this example the list includes the management subnet itself (172.16.0.0/24), and the IP address of an authorized remote user (10.0.0.1/32).
Configure a firewall filter limit-mgmt-access that rejects all source addresses except the specific set of addresses defined in the manager-ip prefix list. This ensures that only IP addresses listed in the prefix list can manage the device.
Apply the limit-mgmt-access filter to the loopback interface. Any time a packet addressed to the local device arrives on any interface, the loopback interface applies the filter limit-mgmt-access to limit management access to only allowed addresses.
Configure an IP Address List to Restrict Management Access to a Device
Procedure
CLI Quick Configuration
To quickly configure this example, edit the following commands as needed and paste them into the CLI of the R2 device at the [edit] hierarchy level. For completeness the configuration includes commands to configure SSH (for non- users) and the Telnet system services. It also provides the configuration of the management interface and related static route. These commands are not needed if your device already has this functionality configured.
Telnet does not support root login on Juniper Networks devices. SSH login for the root user is not configured in this example. Your device should have a non-root user configured to permit remote login. Alternatively, you can add the root-login allow argument to the system services ssh statement to permit root user login using SSH.
Be sure to issue a commit from configuration mode to activate the changes.
When applying a filter that restricts access to the device, consider using commit confirmed. This option automatically rolls back the configuration if you are unable to issue another commit in the specified time.
set system services ssh
set system services telnet
set interfaces fxp0 unit 0 family inet address 172.16.0.253/24
set interfaces lo0 unit 0 family inet address 192.168.255.2/32
set routing-options static route 0.0.0.0/0 next-hop 172.16.0.254 no-readvertise
set policy-options prefix-list manager-ip 172.16.0.0/24
set policy-options prefix-list manager-ip 10.0.0.1/32
set firewall filter limit-mgmt-access term block_non_manager from source-address 0.0.0.0/0
set firewall filter limit-mgmt-access term block_non_manager from source-prefix-list manager-ip except
set firewall filter limit-mgmt-access term block_non_manager from protocol tcp
set firewall filter limit-mgmt-access term block_non_manager from destination-port ssh
set firewall filter limit-mgmt-access term block_non_manager from destination-port telnet
set firewall filter limit-mgmt-access term block_non_manager then log
set firewall filter limit-mgmt-access term block_non_manager then discard
set firewall filter limit-mgmt-access term accept_everything_else then accept
set interfaces lo0 unit 0 family inet filter input limit-mgmt-access
Step-by-Step Procedure
The following steps require you to navigate various levels in the configuration hierarchy. For instructions on how to do that, see Using the CLI Editor in Configuration Mode in the CLI User Guide.
Configure the management and loopback interfaces and ensure that the Telnet and SSH system services are enabled.
[edit]
user@R2# set interfaces fxp0 unit 0 family inet address 172.16.0.253/24
user@R2# set interfaces lo0 unit 0 family inet address 192.168.255.2/32
user@R2# set routing-options static route 0.0.0.0/0 next-hop 172.16.0.254 no-readvertise
user@R2# set system services ssh
user@R2# set system services telnet
Define the set of allowed host addresses in the prefix list. This list includes prefixes for the management subnet and for a single authorized remote management station.
[edit policy-options]
user@R2# set prefix-list manager-ip 172.16.0.0/24
user@R2# set prefix-list manager-ip 10.0.0.1/32
The prefix list is referenced in the firewall filter. Using a prefix list makes it easy to update the addresses that are permitted to access the device. This is because only the prefix list needs to be updated. No edits are required to the firewall filter itself when adding or removing allowed prefixes.
Configure a firewall filter to deny Telnet and SSH traffic from all IP addresses except those defined in the prefix list.
[edit firewall filter limit-mgmt-access]
user@R2# set term block_non_manager from source-address 0.0.0.0/0
user@R2# set term block_non_manager from source-prefix-list manager-ip except
user@R2# set term block_non_manager from protocol tcp
user@R2# set term block_non_manager from destination-port ssh
user@R2# set term block_non_manager from destination-port telnet
user@R2# set term block_non_manager then discard
Note the use of the
exceptaction modifier. The first term matches on all possible source addresses. The next term inverts the match for those source addresses in the specified prefix list. The result is that management traffic destined to the specified protocol and ports is only accepted when the traffic comes from an address in the list. Traffic from all other source prefixes to the same combination of protocol and ports is discarded. In this example a logging action is added to assist in filter debugging and verification.Configure a default term to accept all other traffic. This ensures that other services and protocols, for example pings, BGP, or OSPF, are not affected by the filter.
Tip:The example filter is permissive by design. It can represent a security threat given it explicitly accepts all traffic that has not been rejected or discarded by previous filter terms. You can configure a stronger security filter by explicitly listing all protocols and services that should be accepted ending the filter with a deny all term, either implicitly or explicitly, to filter all other traffic. The drawback to a restrictive filter is it must be edited each time a supported service is added or removed.
[edit firewall filter imit-mgmt-access]
user@R2# set term accept_everything_else then accept
Apply the stateless firewall filter to the loopback interface as an input filter. Traffic sent from the local device is not filtered in this example.
[edit interfaces lo0 unit 0 ]
user@R2# set family inet filter input limit-mgmt-access
Results
Confirm your work by entering the following show configuration commands from configuration mode. If the output does not display the intended configuration, repeat the configuration instructions in this example to correct it.
user@R2# show policy-options
prefix-list manager-ip {
    172.16.0.0/24;
    10.0.0.1/32;
}
user@R2# show firewall
filter limit-mgmt-access {
    term block_non_manager {
        from {
            source-address {
                0.0.0.0/0;
            }
            source-prefix-list {
                manager-ip except;
            }
            protocol tcp;
            destination-port [ ssh telnet ];
        }
        then {
            log;
            discard;
        }
    }
    term accept_everything_else {
        then accept;
    }
}
user@R2# show interfaces
fxp0 {
    unit 0 {
        family inet {
            address 172.16.0.253/24;
        }
    }
}
lo0 {
    unit 0 {
        family inet {
            filter {
                input limit-mgmt-access;
            }
            address 192.168.255.2/32;
        }
    }
}
user@R2# show routing-options
static {
    route 0.0.0.0/0 {
        next-hop 172.16.0.254;
        no-readvertise;
    }
}
user@R2# show system services
ssh;
telnet;
When satisfied with your work enter commit from configuration mode.
When applying a filter that restricts access to the device, consider using commit confirmed. This option automatically rolls back the configuration if you are unable to issue another commit in the specified time.
Verify the Stateless Firewall Filter
Confirm that the firewall filter to limit management access is working properly.
Verify Accepted Packets
Purpose
Verify that the firewall filter correctly allows SSH and Telnet when the traffic is sourced from the 172.16.0.0/24 subnet or from the 10.0.0.1 host prefix associated with the remote management station.
Action
Clear the firewall log on your router or switch.
user@R2> clear firewall log
From a host attached to the 172.16.0.0/24 subnet, such as the R1 device, use the
ssh 172.16.0.253command to initiate a connection to the DUT. By default the R1 device sources it’s traffic from the egress interface used to reach the destination. As a result the test traffic is sourced from R1’s 172.16.0.254 address. This traffic does not match the block_non_manager filter term because of theexceptaction modifier for addresses that match the referenced prefix list. This traffic matches the accept_everything_else filter term causing it to be acceptedNote:You will be prompted to save the SSH host key if this is the first SSH login as user between these devices.
user@R1>ssh user@172.16.0.253
Password:
Last login: Tue Sep  8 09:46:58 2020 from 10.107.199.39
--- JUNOS 20.2R1.10 Kernel 64-bit XEN JNPR-11.0-20200608.0016468_buil
user@R2>
Logout out of the CLI at the R2 device to close the SSH session.
user@R2> exit
logout
Connection to 172.16.0.253 closed.
user@R1>
Note:Repeat this step using the
telnetcommand. The Telnet connection should succeed.Use the
show firewall logcommand at the R2 device to verify that the firewall log buffer on the R2 device does not contain entries with a source address in the 172.16.0.0/24 subnet. This means the packet header information for this traffic is not logged in the firewall filter log. Only traffic that matches the block_non_manager term is logged in this example.user@R2> show firewall log user@R2>
Meaning
The output confirms that SSH (and Telnet) connections are accepted when sourced from the management network. It also shows that packets which don’t match the block_non_manager term are not logged. The same results are expected if the SSH or Telnet traffic is generated by the remote management station that is assigned the 10.0.0.1 address.
Verify Logged and Rejected Packets
Purpose
Verify that the firewall filter correctly discards SSH and Telnet traffic that does not originate from one of the prefixes in the manager-ip prefix list.
Action
Generate SSH traffic sourced from an address that is not specified in the manager-ip prefix list. You can source the session from the R1 device’s loopback address to simulate a non-authorized IP. Alternatively, initiate the connection from any remote device that is not connected to the management subnet, and which has not been assigned an IP address of 10.0.0.1. The packets for this SSH session should be discarded, and the packet header information should be logged in the firewall filter log buffer.
Note:You should not expect any error message or reply. The connection attempt will time-out. This is because the sample filter uses a
discardrather than arejectaction.user@unauthorized-remote-host ssh user@172.16.0.253 ssh: connect to host 172.16.0.253 port 22: Connection timed out
The output shows the SSH connection does not succeed. This confirms the filter correctly blocks SSH traffic when sent from a disallowed source address. The same result is expected for Telnet sessions initiated by any non-authorized IP source address.
Use the
show firewall logcommand to verify that the firewall log buffer on the R2 device now contains entries for packets with a non-authorized source address.user@R2> show firewall log Log : Time Filter Action Interface Protocol Src Addr Dest Addr 11:35:46 limit-mgmt-access D fxp0.0 TCP 10.0.0.119 172.16.0.253 11:35:14 limit-mgmt-access D fxp0.0 TCP 10.0.0.119 172.16.0.253 11:34:58 limit-mgmt-access D fxp0.0 TCP 10.0.0.119 172.16.0.253
Meaning
The output confirms that traffic from the 10.0.0.119 source address has matched a logging term in the limit-mgmt-access filter. Recall that only the block_non_manager term has a log action in this example. The Action column displays a D to indicate the packets were discarded. The ingress interface for the filtered traffic is confirmed to be the management port fxp0.0 on the device. The transport protocol TCP and IP addresses of the filtered packets are also shown. Note that the source address 10.0.0.119 for this traffic is not listed in the manager-ip prefix list.
These results confirm the firewall filter is working properly for this example.