Maintaining MX480 Switch Control Boards
Replacing an MX480 Switch Control Board
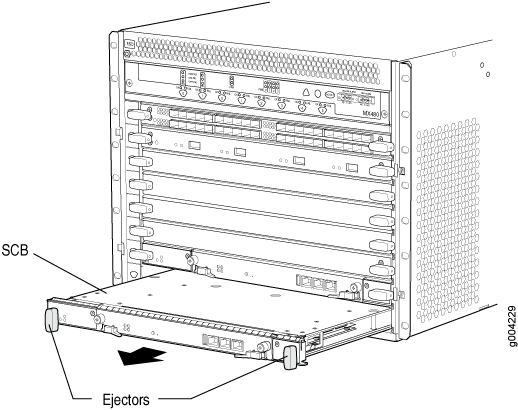
Before replacing a Switch Control Board (SCB), read the guidelines in Operating and Positioning the MX480 SCB Ejectors.
Removing an MX480 SCB-MX
- Take the host subsystem offline.
- Place an electrostatic bag or antistatic mat on a flat, stable surface.
- Attach an ESD grounding strap to your bare wrist and connect the strap to one of the ESD points on the chassis.
- Rotate the ejector handles simultaneously counterclockwise to unseat the Switch Control Board.
- Grasp the ejector handles, and slide the Switch Control Board about halfway out of the chassis.
- Place one hand underneath the Switch Control Board to support it, and slide it completely out of the chassis.
- Place the Switch Control Board on the antistatic mat.
- If you are not replacing the Switch Control Board now, install a blank panel over the empty slot.
Installing an MX480 Switch Control Board
- Place the ejector handles in the proper position, horizontally and
toward the center of the board.Figure 2: Installing a Switch Control Board in the MX480

Upgrading an MX480 to Use the SCBE-MX
This topic describes how to upgrade your MX960, MX480, or MX240 router to use the SCBE-MX without taking the router offline. This “in-service” upgrade only works for MX routers with DPC, MS-DPC, MPC1, MPC2, or MPC3 line cards. If your MX router has another type of line card, you’ll need to take the router offline before you do the upgrade.
Junos OS does not support in-service upgrades to the SCBE-MX on routers with an MX-MPC3E-3D or MX-MPC3-3D MPC. If your MX router has these MPCs, you’ll need to shutdown the system before you do the upgrade. An in-service upgrade can result in service disruption.
- Prepare for the Upgrade
- Upgrade the SCB-MX in the Backup Routing Engine
- Upgrade the MX480 SCB-MX in the Primary Routing Engine
- Complete the SCBE-MX Upgrade
Prepare for the Upgrade
Before you do the upgrade, open a telnet session to the primary
Routing Engine CLI operational mode and issue the configure exclusive command. This command locks the configuration to prevent accidental
changes during the upgrade process.
To prevent traffic loss during the upgrade process, we recommend that you operate the line cards at 50% line rate. This 50% limit must be maintained per PFE on each line card.
To prepare the MX480 router for the Enhanced MX Switch Control Board (SCBE-MX) upgrade:
Upgrade the SCB-MX in the Backup Routing Engine
The MX480 has two slots for the SCB-MX—that is, SCB 0 and SCB 1—and these correspond to RE0 and RE1 respectively, where SCB 1 is the first SCB-MX.
To upgrade the SCB-MX in the backup Routing Engine:
Upgrade the MX480 SCB-MX in the Primary Routing Engine
Complete the SCBE-MX Upgrade
See Also
Upgrading an MX480 to Use the SCBE2-MX
Consider the following scenarios when upgrading an MX480 SCB-MX or SCBE-MX to use the SCBE2-MX:
Scenario 1: SCBE2-MX; Routing Engine (RE) with Junos OS Release 13.3R1 or later installed.
Replace the SCB-MXs. Ensure that you replace the SCB-MXs at the same time.
Ensure that Enhanced IP or Enhanced Ethernet Network Services mode is configured before you power on the router.
Scenario 2: SCB-MX or SCBE-MX; existing Routing Engine with a Junos OS Release 13.3R1 or earlier installed.
Upgrade the Routing Engine (RE0 and RE1) software to Junos OS Release 13.3 or later.
Configure Enhanced IP or Enhanced Ethernet Network Services mode.
Replace the SCB-MXs. Ensure that you replace the SCB-MXs at the same time.
Scenario 3: Failed SCB-MX or SCBE-MX; Routing Engine with a Junos OS Release 13.3R1 or earlier installed.
Upgrade the software on the Routing Engine hosting the failed SCB-MX or SCBE-MX with Junos OS Release 13.3R1 or later.
Replace the SCB-MXs. Ensure that you replace the SCB-MXs at the same time.
Upgrade the software on the Routing Engine hosting the SCBE2-MX with Junos OS Release 13.3R1 or later.
Configure Enhanced IP or Enhanced Ethernet Network Services mode.
To upgrade the MX480 to use the SCBE2-MX, perform the following steps:
You cannot upgrade to SCBE2-MX without powering off the MX480 router.
- Prepare the MX480 Router for the SCBE2-MX Upgrade
- Power Off the MX480 Router
- Remove the MX480 Routing Engine
- Install the MX480 Routing Engine into the SCBE2-MX
- Power On the MX480 Router
- Complete the SCBE2-MX Upgrade
Prepare the MX480 Router for the SCBE2-MX Upgrade
user@host> show version
Model: mx480
Junos Base OS Software Suite [13.3-yyyymmdd];
...
The SCBE2-MX is supported only on:
Junos OS Release 13.3 or later
Network Services Mode: Enhanced-IP
The latest software ensures a healthy system—that is, a system that comprises Routing Engines, control boards, and FPCs—before the upgrade.
For information about how to verify and upgrade the Junos OS, see the Junos OS Installation and Upgrade Guide.
Power Off the MX480 Router
After turning off the power supply, wait at least 60 seconds before turning it back on.
Remove the MX480 Routing Engine
- Remove the cables connected to the Routing Engine.
- Place an electrostatic bag or antistatic mat on a flat, stable surface.
- Attach an electrostatic discharge (ESD) grounding strap to your bare wrist, and connect the strap to one of the ESD points on the chassis.
- Loosen the captive screws on the top and bottom of the Routing Engine.
- Flip the ejector handles outward to unseat the Routing Engine.
- Grasp the Routing Engine by the ejector handles, and slide it about halfway out of the chassis.
- Place one hand underneath the Routing Engine to support it, and slide it completely out of the chassis.
- Place the Routing Engine on the antistatic mat.
Install the MX480 Routing Engine into the SCBE2-MX
- Attach an electrostatic discharge (ESD) grounding strap to your bare wrist, and connect the strap to one of the ESD points on the chassis.
- Ensure that the ejector handles are not in the locked position. If necessary, flip the ejector handles outward.
- Place one hand underneath the Routing Engine to support it.
- Carefully align the sides of the Routing Engine with the guides inside the opening on the SCBE2-MX.
- Slide the Routing Engine into the SCBE2-MX until you feel resistance and then press the faceplate of the Routing Engine until it engages the connectors.
- Press both of the ejector handles inward to seat the Routing Engine.
- Tighten the captive screws on the top and bottom of the Routing Engine.
- Connect the management device cables to the Routing Engine.
Power On the MX480 Router
Complete the SCBE2-MX Upgrade
See Also
Upgrading an MX240, MX480, or MX960 Router to Use the SCBE3-MX
- Upgrade the Routing Engine
- Install the Routing Engine into the SCBE3-MX
- Install the SCBE3-MX into the Router Chassis
- Complete the SCBE3-MX Upgrade
Upgrade the Routing Engine
If you are upgrading to the SCBE3-MX from an SCBE2-MX or older SCB, the Routing Engine must be upgraded to the first supported Junos release for the SCBE3-MX (18.4R1) before you install it in the SCBE3-MX. Also, we recommend that you update the recovery snapshot with the 18.4R1 or later image before you begin the upgrade. If the Routing Engine fails to boot from the primary image, it will attempt to boot from the recovery image. Since the older recovery image does not support the SCBE3-MX, the Routing Engine will crash if it attempts to boot from the old recovery image.
If you plug the Routing Engine into the SCBE3-MX without first upgrading Junos to 18.4R1 or
later, Junos might crash and go to a db prompt. Should this occur, you’ll
need to recover the router by copying the Junos software image for the 18.4R1 or later release
and then booting from the USB drive to install 18.4R1 Junos on the SCBE3-MX. The USB install
will wipe out the router configuration and all user files on the Routing Engine.
To upgrade the Routing Engine while it’s plugged into an SCBE2-MX or older SCB:
Install the Routing Engine into the SCBE3-MX
Refer to the Routing Engine installation procedure for your MX model:
Installing an MX240 Routing Engine
Install the SCBE3-MX into the Router Chassis
Refer to the Switch Control Board installation procedure for your MX model:
Installing an MX240 Switch Control Board