How to Enroll Your SRX Series Firewalls in Juniper ATP Cloud Using Policy Enforcer
This section provides step-by-step instructions to enroll SRX Series Firewalls in Juniper ATP Cloud using the Guided Setup wizard in Policy Enforcer.
Solution Overview
Figure 1 shows a high-level workflow of how Policy Enforcer, Security Director, Juniper ATP Cloud, and Junos OS devices interact to provide a secure network deployment with Juniper Connected Security.
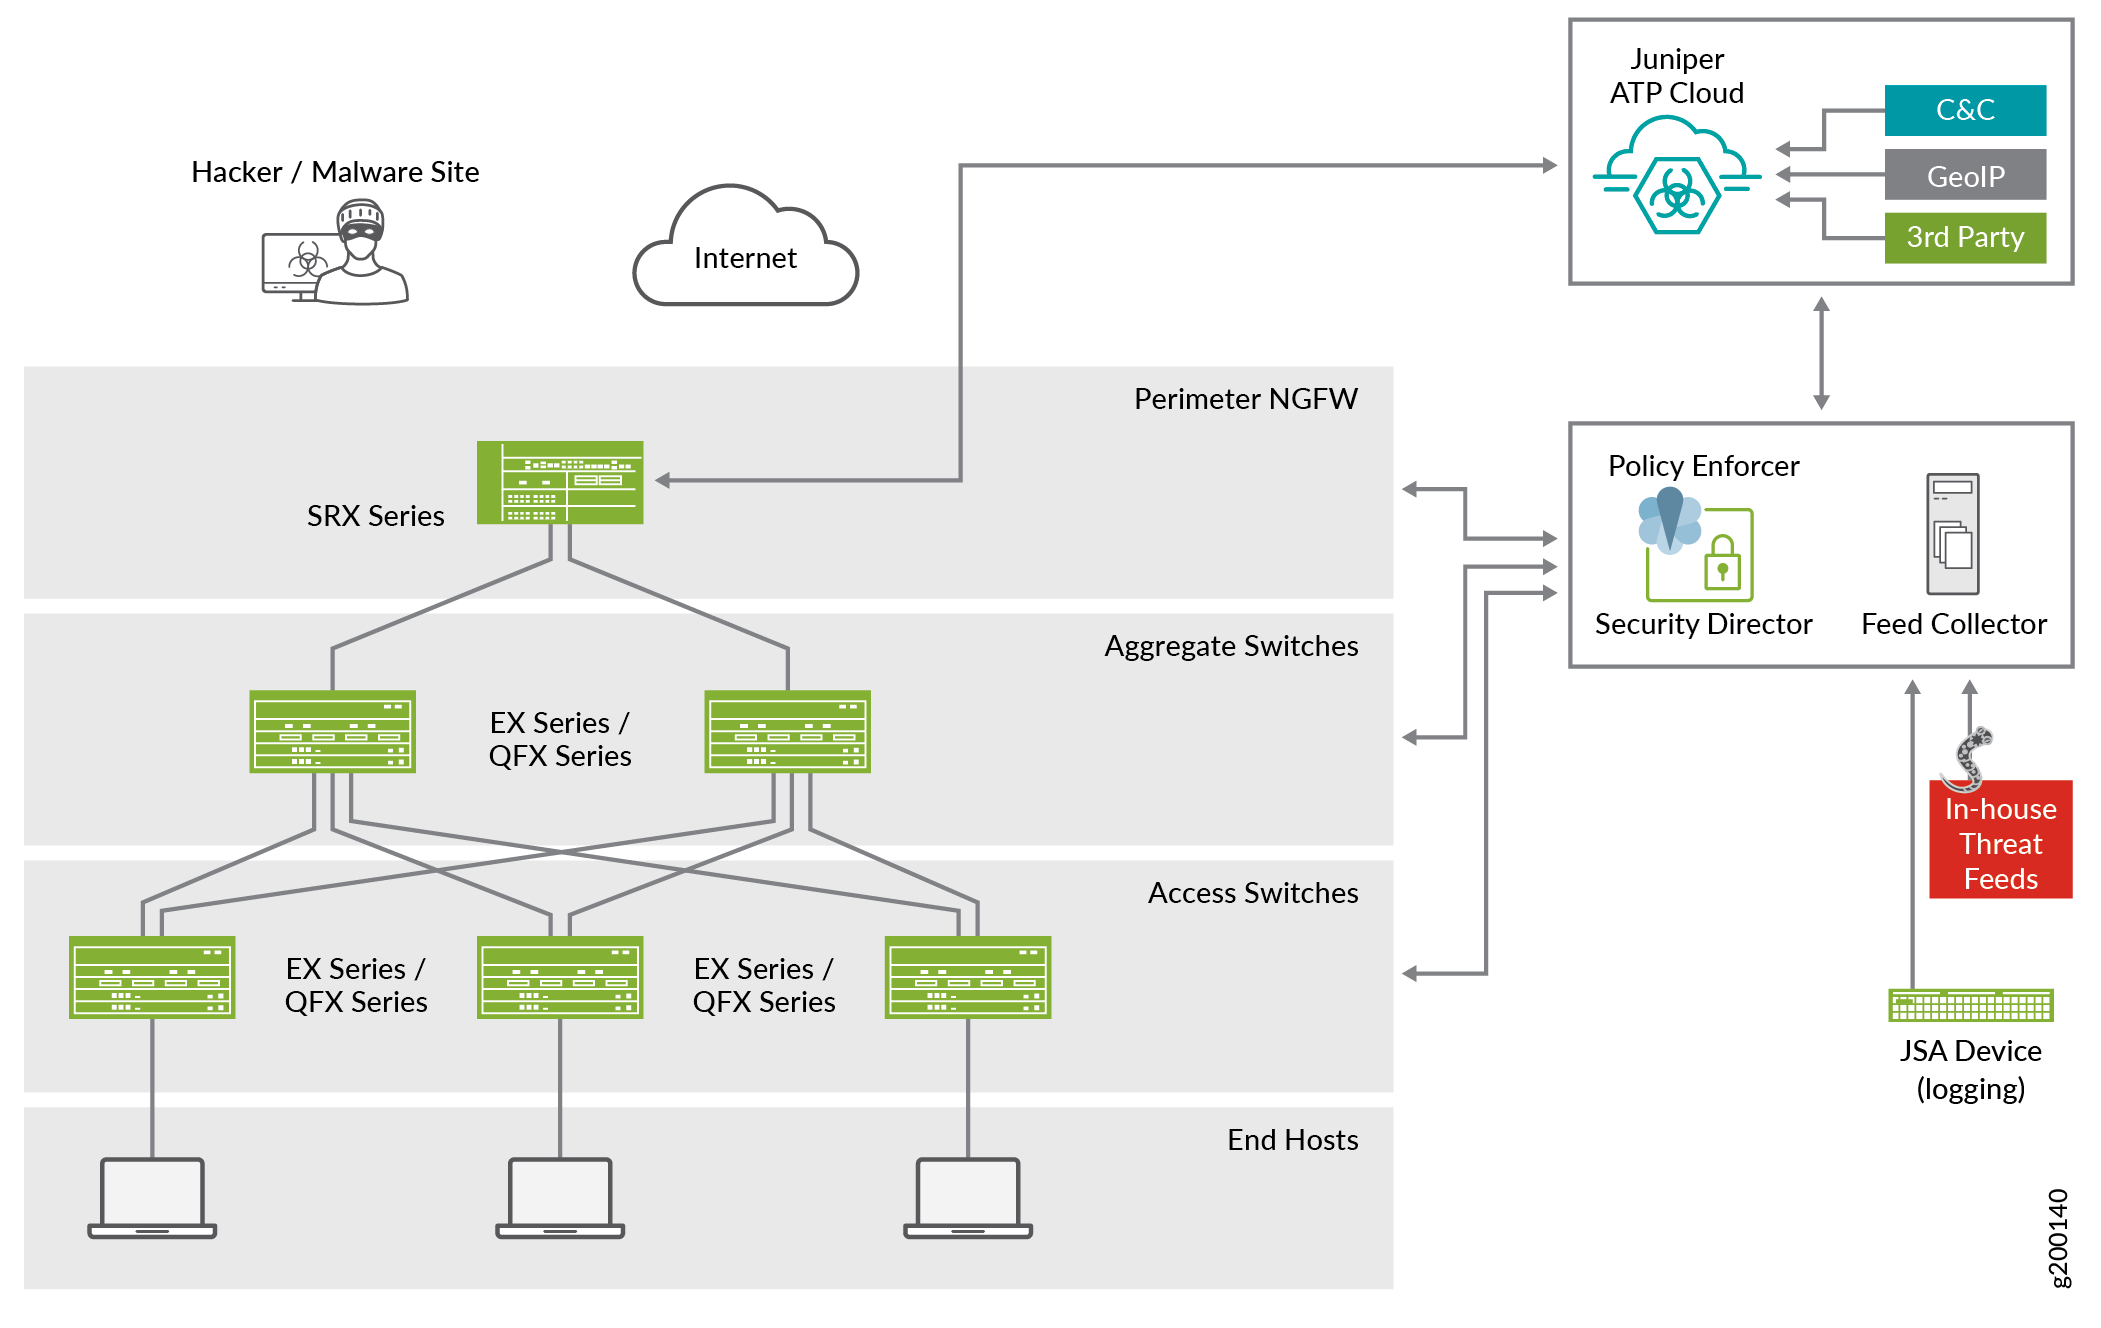
In the Juniper Connected Security solution, clients/endpoints are connected to EX Series Switches and QFX Series switches with endpoint protection software. These switches provide access security and control.
EX Series switches delivers switching services in branch, campus, and data center networks. QFX Series switches are high-performance, low-latency, edge devices optimized for data center environments.
SRX Series Firewalls provide security enforcement and deep inspection across all network layers and applications. In the context of the Juniper Connected Security solution, SRX Series Firewalls are deployed as perimeter firewalls connected to Juniper ATP Cloud for anti-malware services.
Juniper ATP Cloud identifies varying levels of risk and provides a higher degree of accuracy in threat protection. It integrates with SRX Series gateways to deliver deep inspection, inline malware blocking, and actionable reporting.
Policy Enforcer uses information gathered and reported by Juniper ATP Cloud to learn about the threats and rapidly respond to new threat conditions. With this information, Policy Enforcer automatically updates policies and deploys new enforcement to firewalls and switches, quarantining and tracking infected hosts to stop the progress of threats. Policy Enforcer identifies an infected host by its IP and MAC addresses, allowing tracking and continued blocking of the host even if it moves to another switch or access point (AP) on the network.
When these components works together, threats are detected more quickly by leveraging threat intelligence from multiple sources (including third-party feeds). Network security can adapt dynamically to real-time threat information so that security policies are enforced consistently.
Benefits
The Guided Setup wizard in Policy Enforcer is a one-stop shop to get your Juniper Connected Security solution up and running in one go. It is also the most efficient way to complete your Juniper ATP Cloud configurations with Juniper Connected Security because it simplifies security policy creation, threat detection, and security policy enforcement across your network.
Before You Begin
-
Install and configure Security Director. See Security Director Installation and Upgrade Guide.
-
Install and configure SRX Series Firewalls. See Software Installation and Upgrade Guide.
-
Download, deploy, and configure the Policy Enforcer virtual machine (VM). See Policy Enforcer Documentation.
-
Connect Policy Enforcer to Security Director. See Policy Enforcer Documentation.
-
Obtain a Juniper ATP Cloud license and create an ATP Cloud portal account. An ATP Cloud license and account are needed for all ATP Cloud Configuration Types (ATP Cloud with Juniper Connected Security, ATP Cloud, and Cloud Feeds only). If you don’t have an ATP Cloud license, contact your nearest Juniper Networks sales office or Juniper Networks partner. If you don’t have an ATP Cloud account, you are redirected to the ATP Cloud server to create one.
-
Ensure that the SRX Series Firewall that you want to set up threat prevention for is already discovered and available on Junos Space. See Overview of Device Discovery in Security Director.
Enroll SRX Series Firewalls in Juniper ATP Cloud Using Guided Setup in Policy Enforcer
- Step 1: Configure Policy Enforcer Settings
- Step 2: Access the Guided Setup Wizard
- Step 3: Create a Secure Fabric
- Step 4: Create a Policy Enforcement Group
- Step 5: Enroll Juniper ATP Cloud
- Step 6: Create a Threat Prevention Policy
- Step 7: (Optional) Configure GeoIP
Step 1: Configure Policy Enforcer Settings
The Juniper ATP Cloud Configuration Type you select on the Policy Enforcer Settings page determines the guided setup process. Guided Setup provides all the configuration items you need for your chosen configuration type. See ATP Cloud Configuration Type Overview for details of each configuration type.
We will be configuring only the mandatory parameters that are required for the use case. You can choose to change the default values as per your network requirement.
To configure Policy Enforcer settings:
-
Select .
The Settings page appears as shown in Figure 2.
Figure 2: Policy Enforcer Settings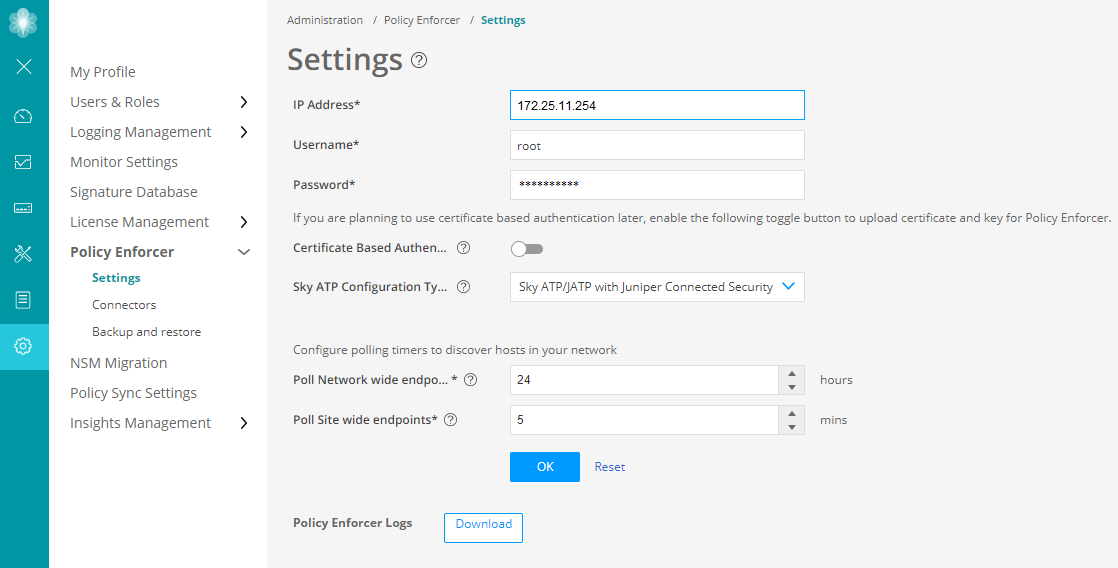
Step 2: Access the Guided Setup Wizard
Perform the steps in this section and the subsequent sections for configuring Juniper Connected Security with Juniper ATP Cloud.
- Select Configure > Guided Setup >
Threat Prevention.
The Threat Prevention Policy Setup page appears as shown in Figure 3.
Figure 3: Threat Prevention Policy Setup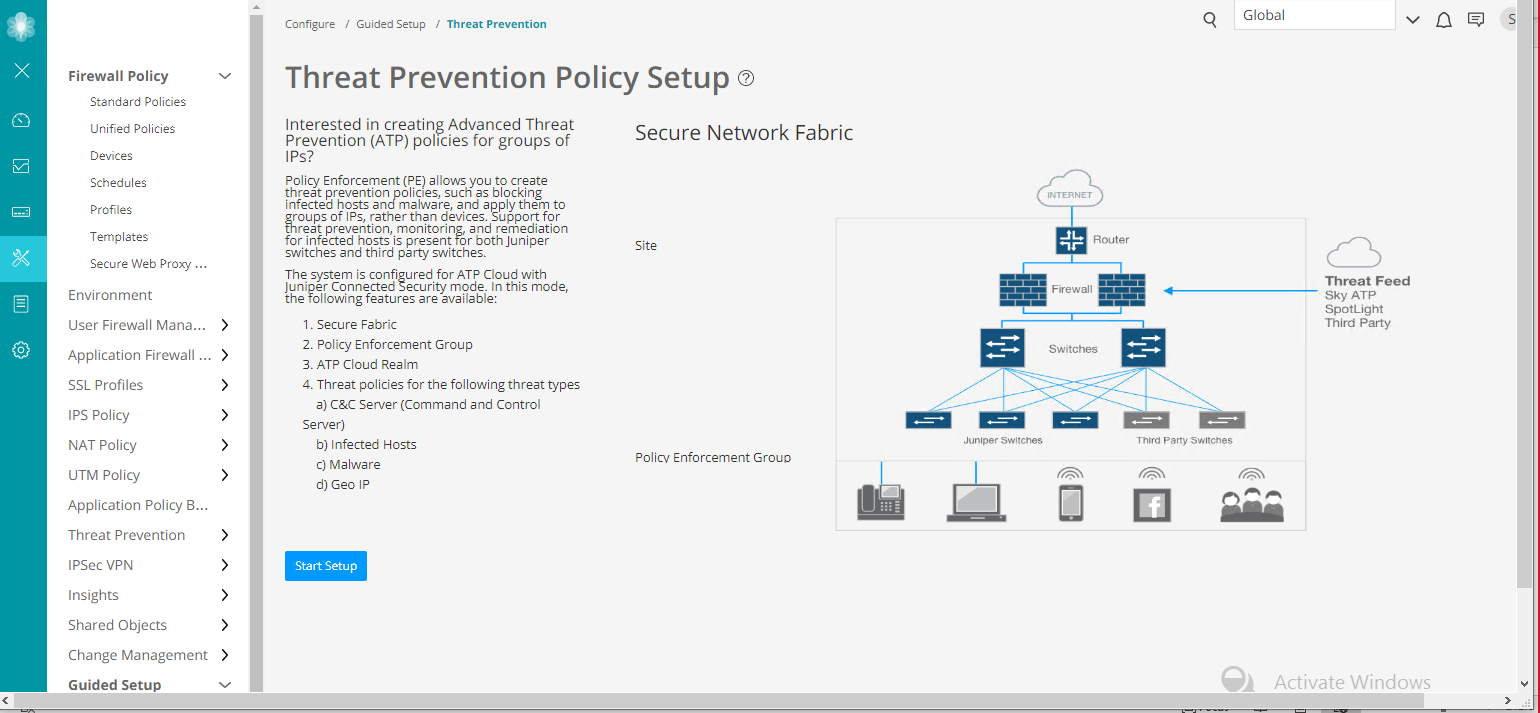
- Click Start Setup to begin the guided setup.
The Tenants page appears as shown in Figure 4.
Figure 4: Tenant Configuration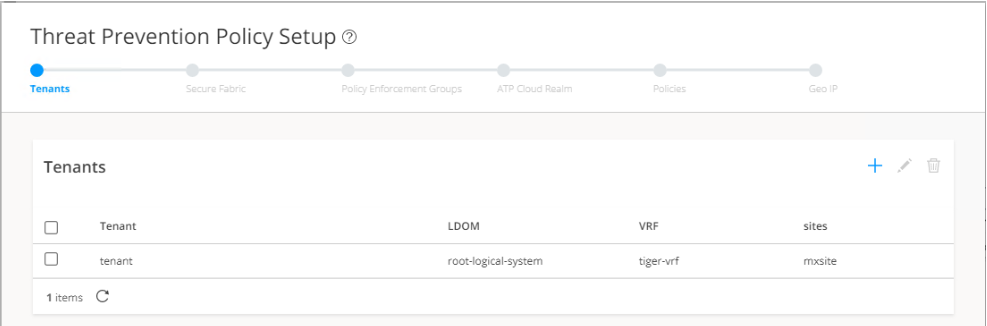
Tenant configuration is not applicable for SRX Series Firewalls. You must configure tenants only for MX Series Universal Routers. You can skip this step.
Step 3: Create a Secure Fabric
Secure fabric is a collection of sites that contain network devices (switches, routers, firewalls, and other security devices), to which users or user groups can apply aggregated threat prevention policies using the policy enforcement groups.
When threat prevention policies are applied to policy enforcement groups, the system automatically discovers to which sites those groups belong. This is how threat prevention is aggregated across your secure fabric. When you create a site, you must identify the perimeter firewalls so you can enroll them with Juniper ATP Cloud.
To create a secure fabric:
- Click the + on the top-right corner of the Sites page.
The Create Site page appears as shown in Figure 5.
Figure 5: Create Site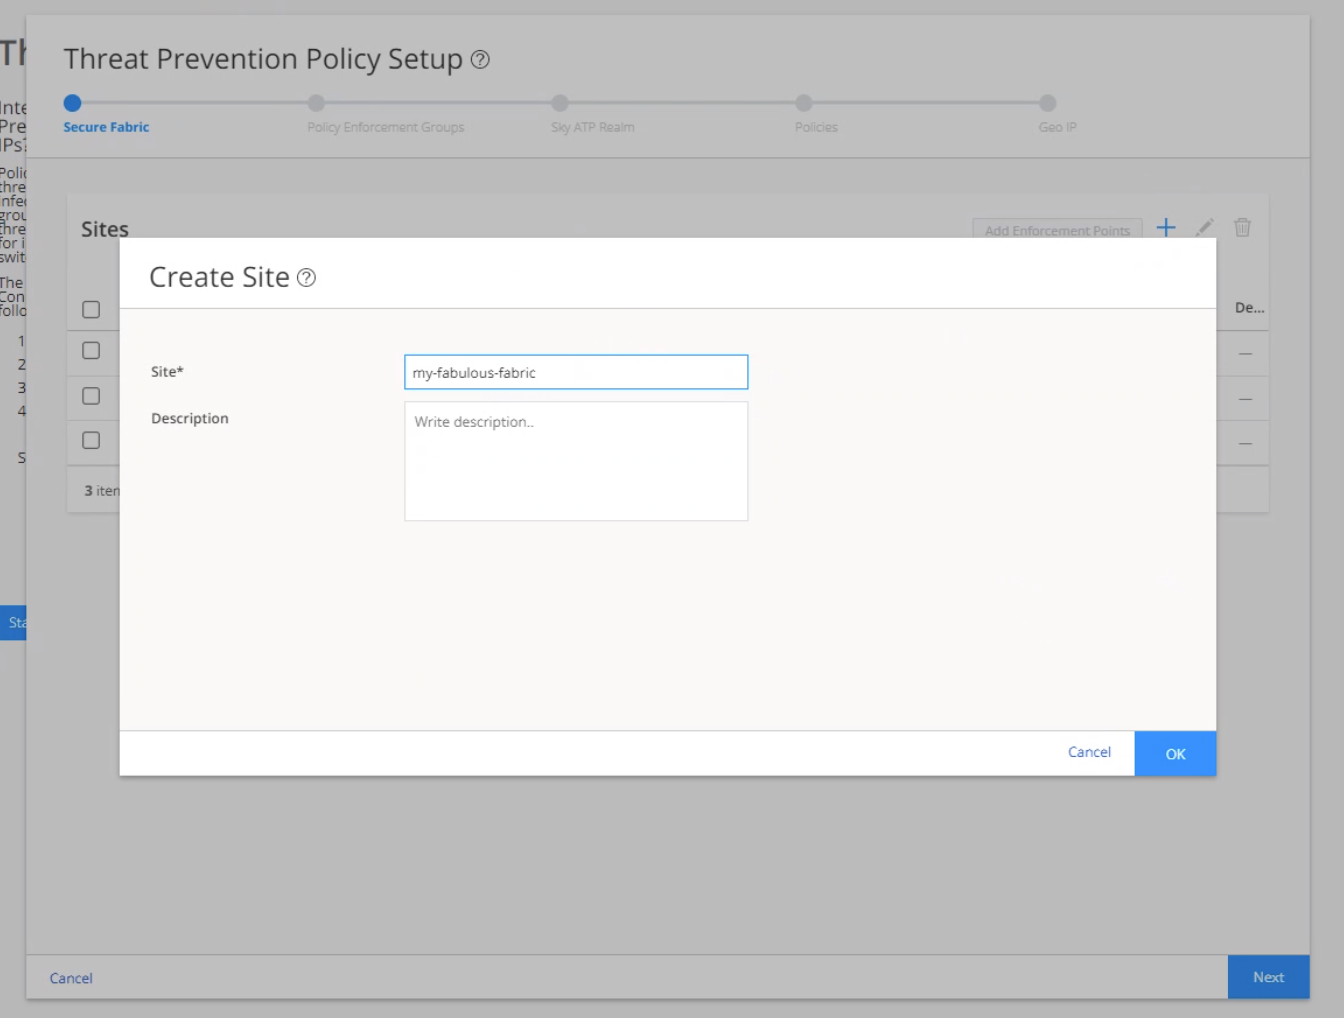
- Click OK.
The newly created site is displayed in the Sites page as shown in Figure 6.
Figure 6: Sites
You must now add the devices for which you want to apply a common security policy to the site.
- Click Add Enforcement Points in the Enforcement Points column of a
device or select a device and click Add Enforcement Points on the
top-right corner of the page.
The Add Enforcement Point page appears as shown in Figure 7.
Figure 7: Add Enforcement Point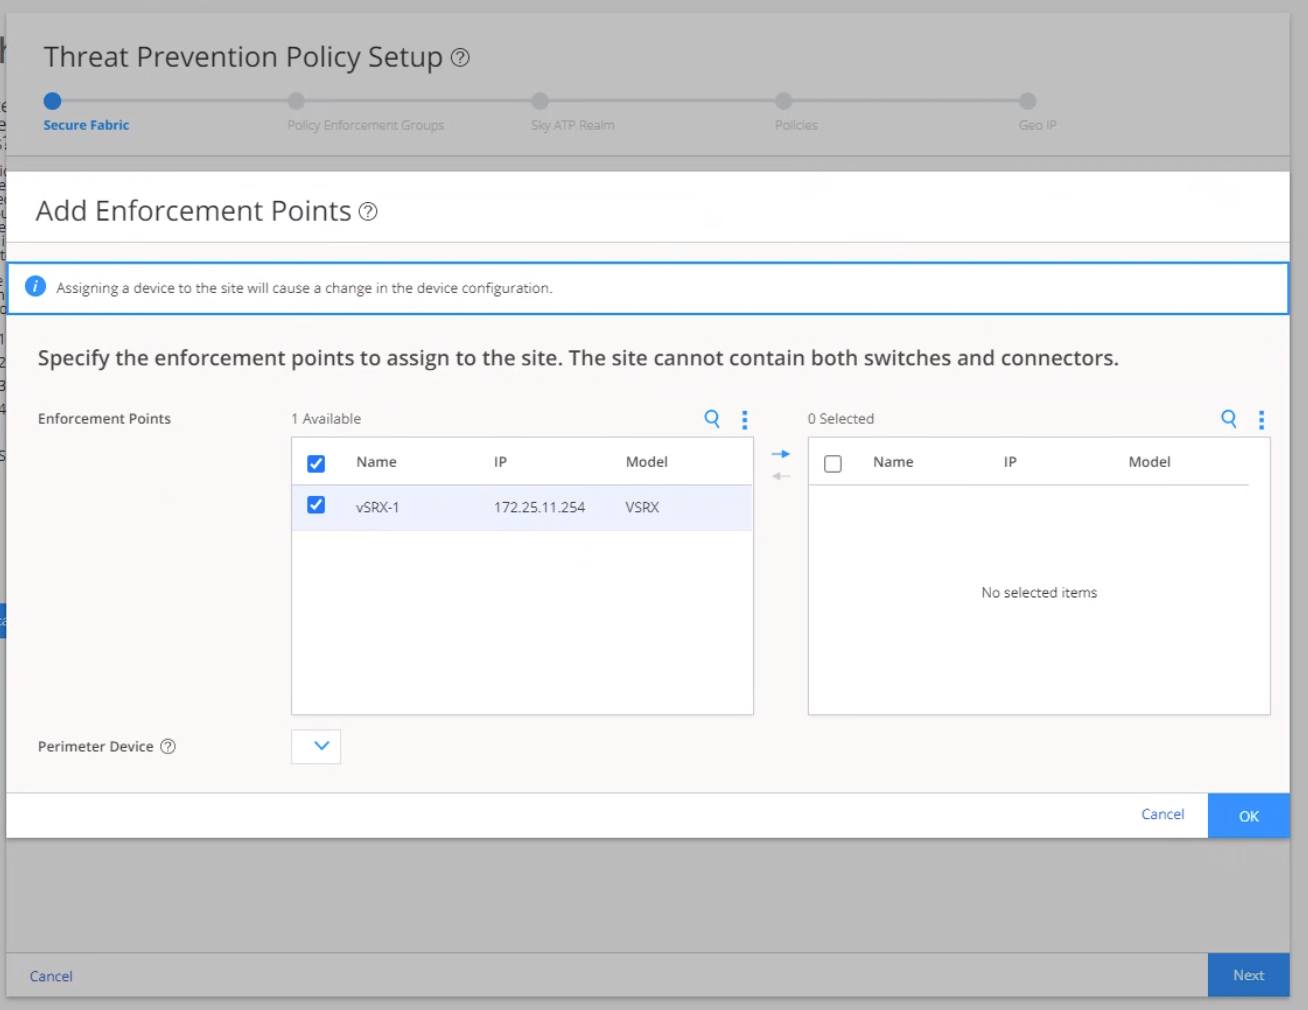 Note:
Note:-
A device can belong to only one site and you must remove it from any other site where it is used. To remove devices from a site, you must move the devices from the Selected column back to the Available column in the Enforcement Points section. For more information, see Adding Enforcement Points.
-
Firewall devices are automatically enrolled with ATP Cloud as part of this step. No manual enrollment is required.
-
Before adding an enforcement point for SRX Series Firewalls in Chassis Cluster mode, ensure that both the nodes are discovered in Security Director.
-
- To include a device, select the check box beside the device in the Available list and
click the > icon to move them to the Selected list. The devices in
the Selected list will be included in the site as shown in Figure 8.Figure 8: Assign Device to Site
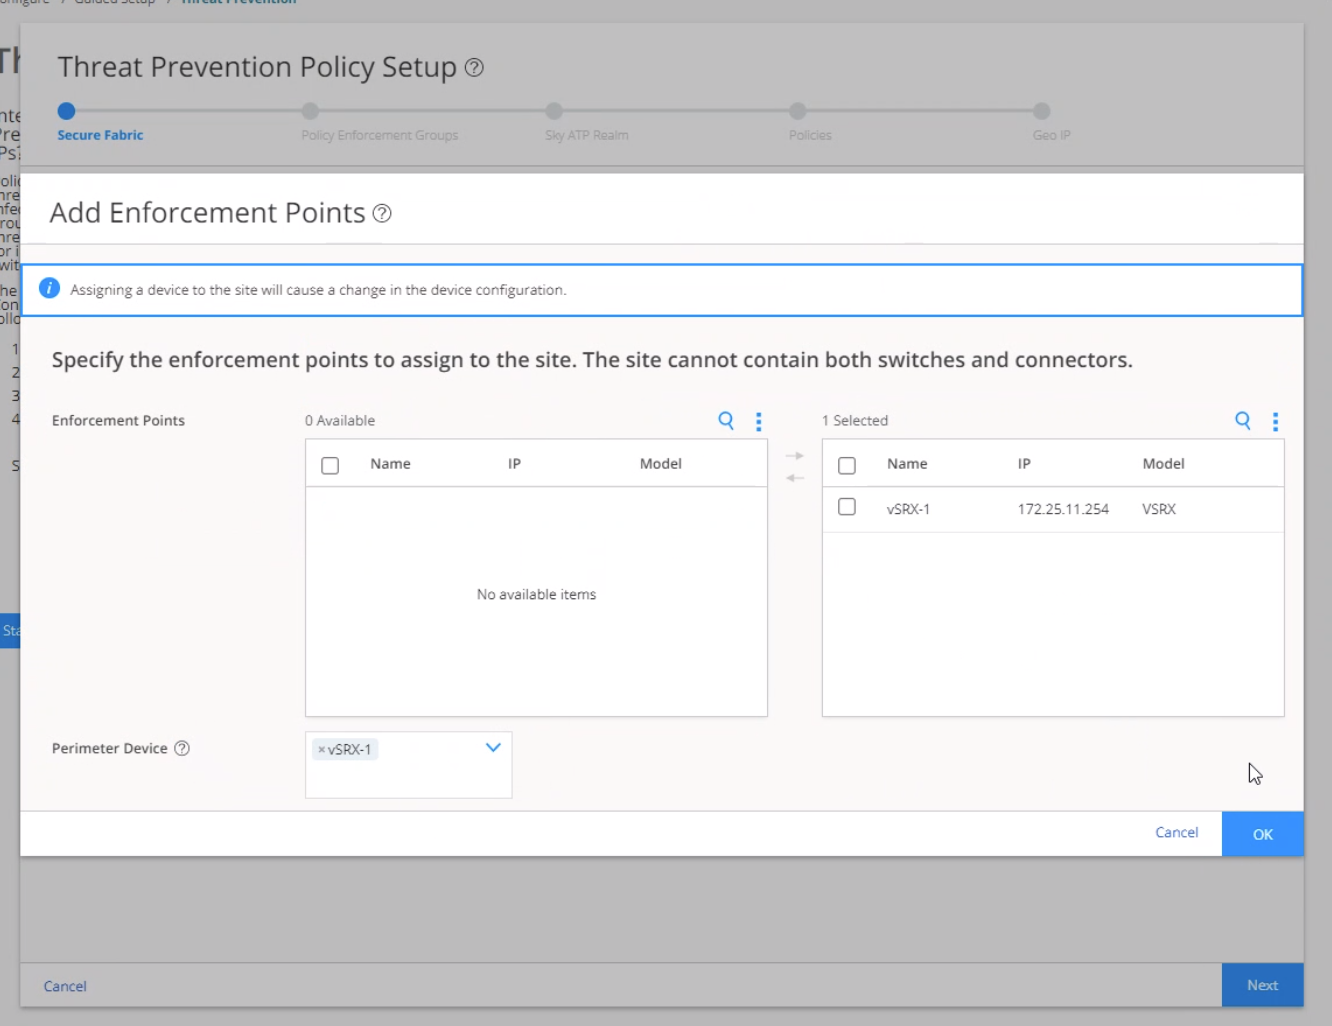
- Click OK.
You can view the Secure Fabric that you created on the Sites page as shown in Figure 9.
Figure 9: Site with Enforcement Point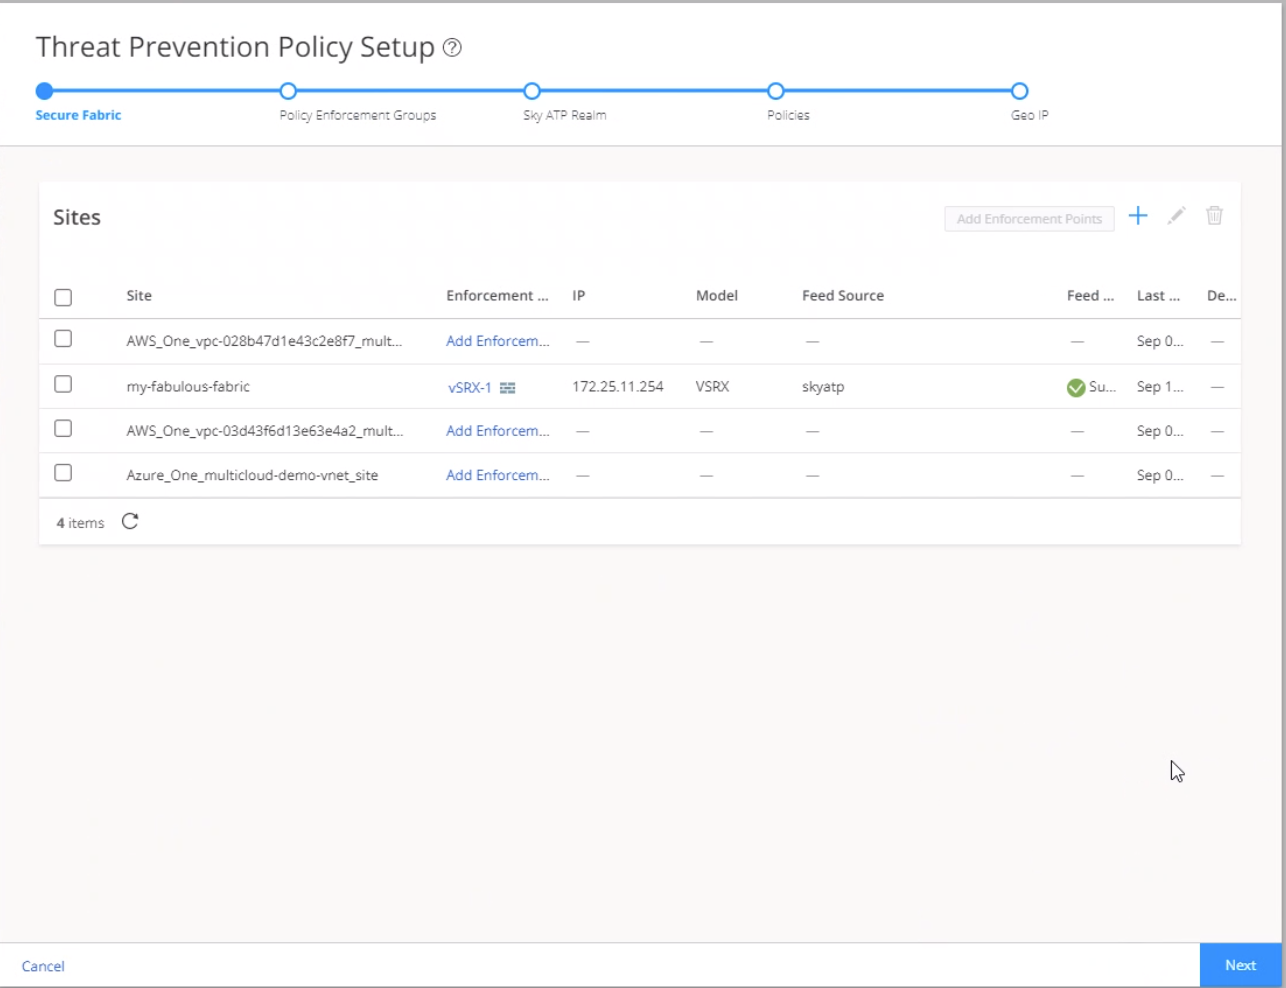
Step 4: Create a Policy Enforcement Group
A policy enforcement group is a grouping of endpoints to which you can apply advanced threat prevention policies. Create a policy enforcement group by adding endpoints (firewalls, switches, subnets, set of end users) under one common group name and later applying a threat prevention policy to that group. Determine what endpoints you will add to the group based on how you will configure threat prevention, either according to location, users and applications, or threat risk. Endpoints cannot belong to multiple policy enforcement groups.
To create a policy enforcement group:
- Click the + on the top-right corner of the Policy Enforcement
Groups page.
The Policy Enforcement Group page appears as shown in Figure 10.
Figure 10: Policy Enforcement Group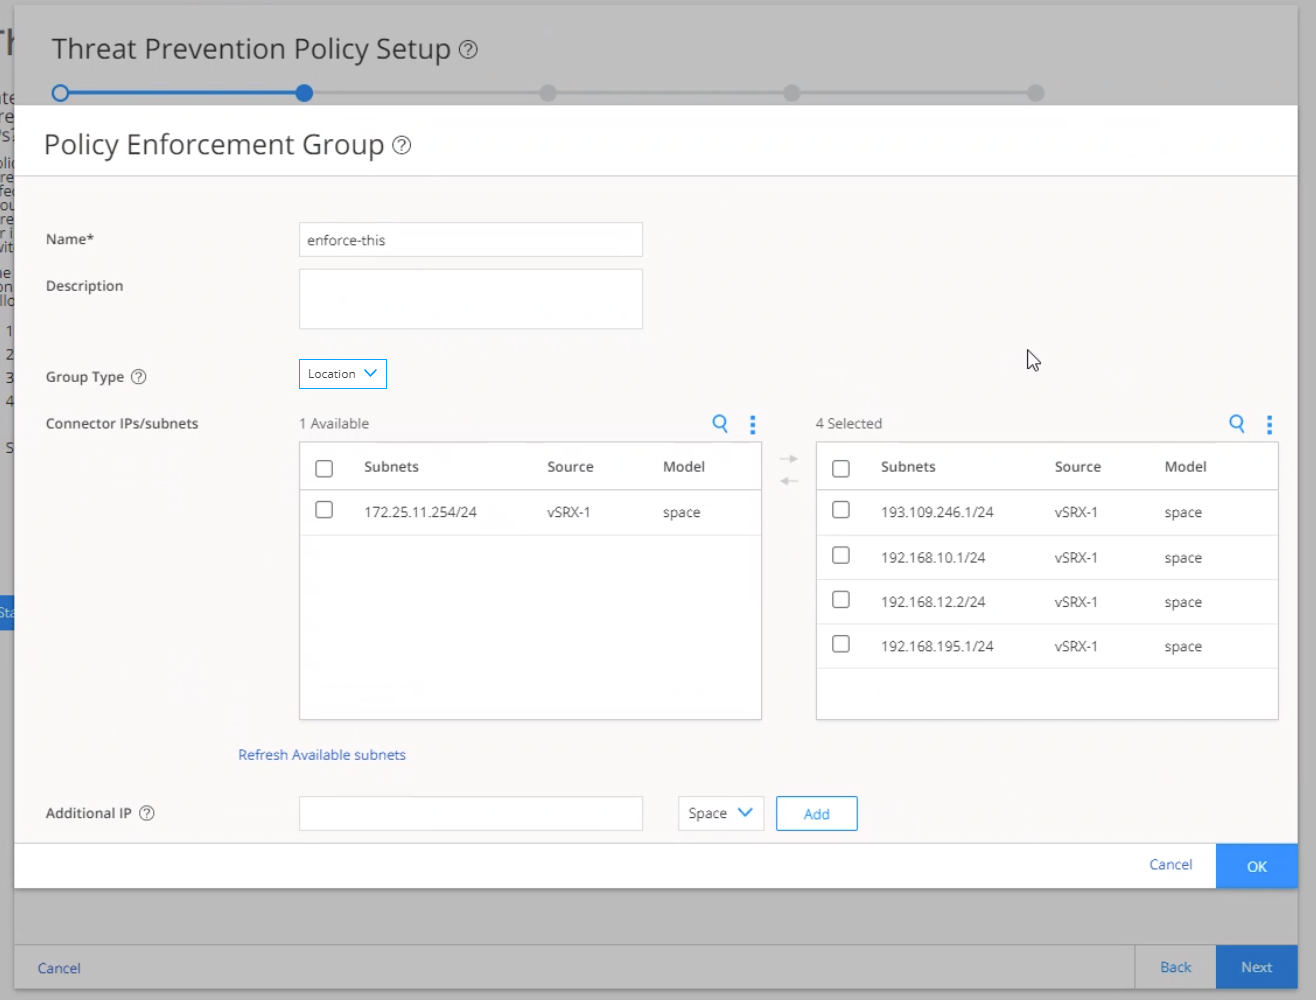
Step 5: Enroll Juniper ATP Cloud
An organization is a unique entity or identifier to manage and restrict access to Web applications. You must create at least one organization to log in to Juniper ATP Cloud. Once you create an organization, you can enroll SRX Series Firewalls into the organization. You can also give more users (administrators) permission to access the organization. If you have multiple organizations, note that each SRX Series Firewall can be bound to only one organization, and users cannot switch between organizations.
Before you begin:
-
Ensure that your ATP Cloud account is associated with a license. For more information, see Software Licenses for ATP Cloud.
-
Know which region will be covered by the organization that you create. You must a select a region when you configure an organization.
To create an organization from your ATP Cloud account:
-
Click the + sign on the top-right corner of the ATP Cloud
Organization page.
The ATP Cloud organization credentials page appears as shown in Figure 11.
Figure 11: ATP Cloud Organization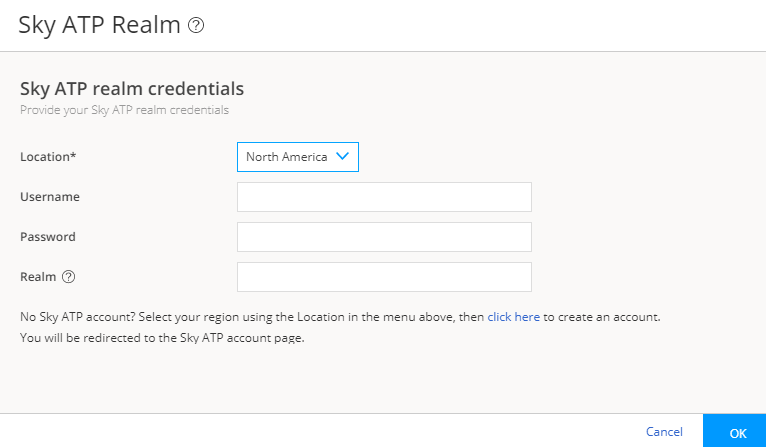
-
Select the location. Enter the username, password and organization details. See
Juniper ATP Cloud User Name to create and register an
organization, and then enroll your SRX Series Firewalls into the organization.
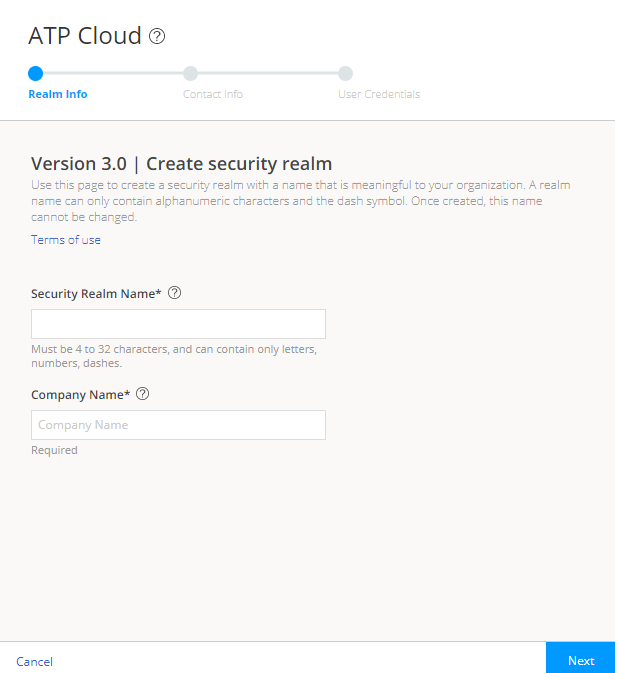
Figure 12: Create Security Organization
If an organization is already created with a site assigned, all devices in a site are listed under the Devices in Site(s) column that includes EX Series Switches, SRX Series, all enforcement points, and devices that are originally from an organization. Devices that are marked as perimeter firewall devices are listed under the Perimeter Firewall column.
Figure 13: New Organization Without Sites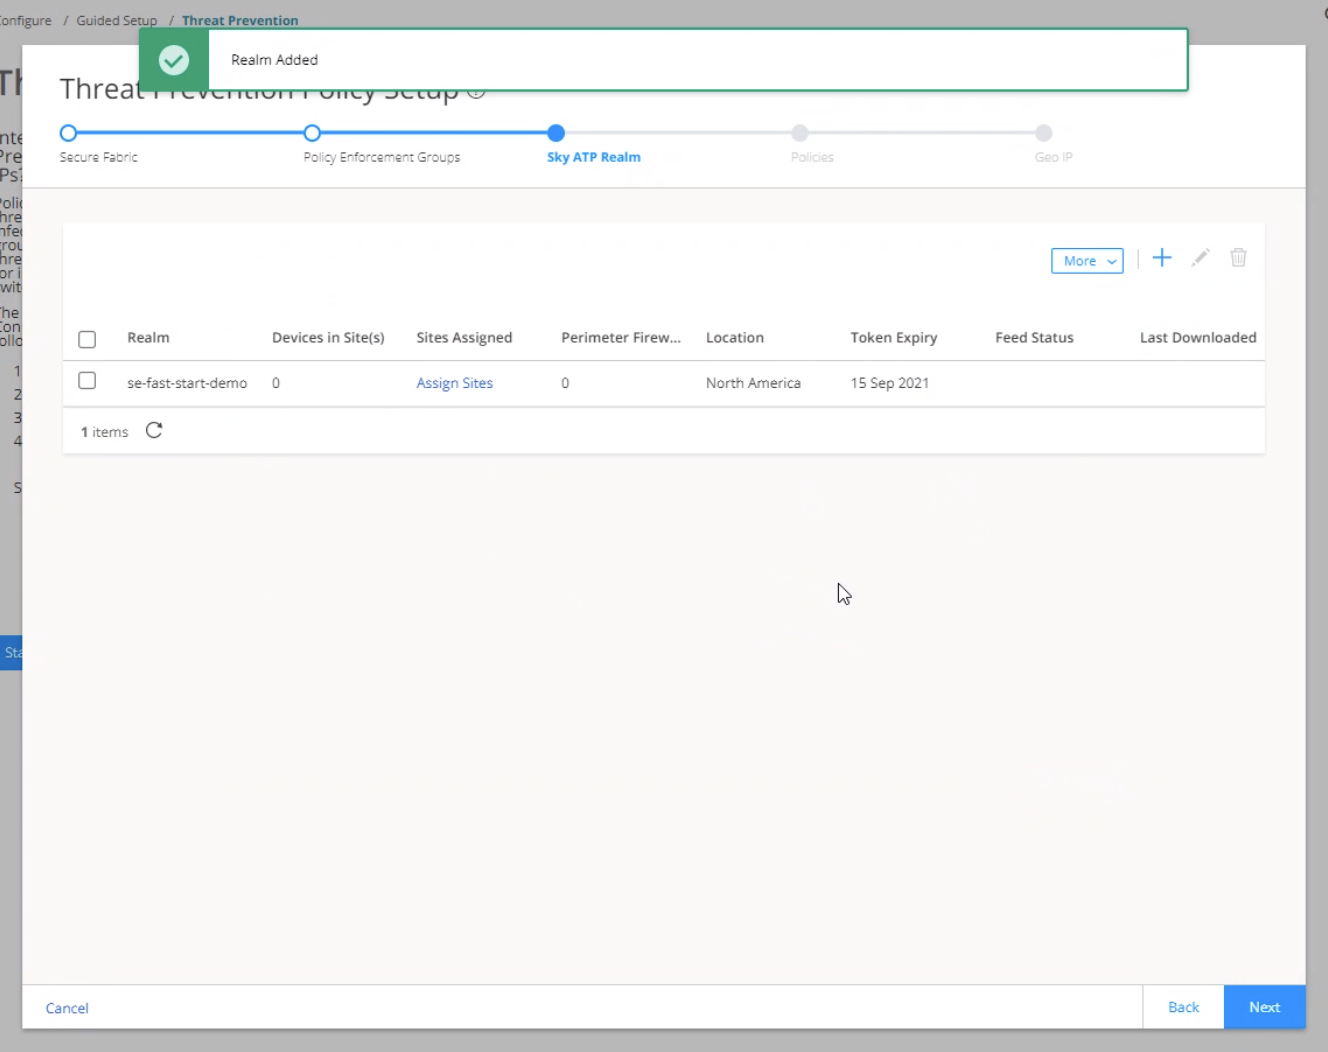 Note:
Note:If the organization addition is not successful, it means there is a network issue and Security Director is unable to reach Internet. Ensure that all devices and components can reach the Internet and each other.
If an organization does not have any site assigned, click Assign Sites.
The Sites page appears as shown in Figure 14.
Figure 14: Assign Site to a Organization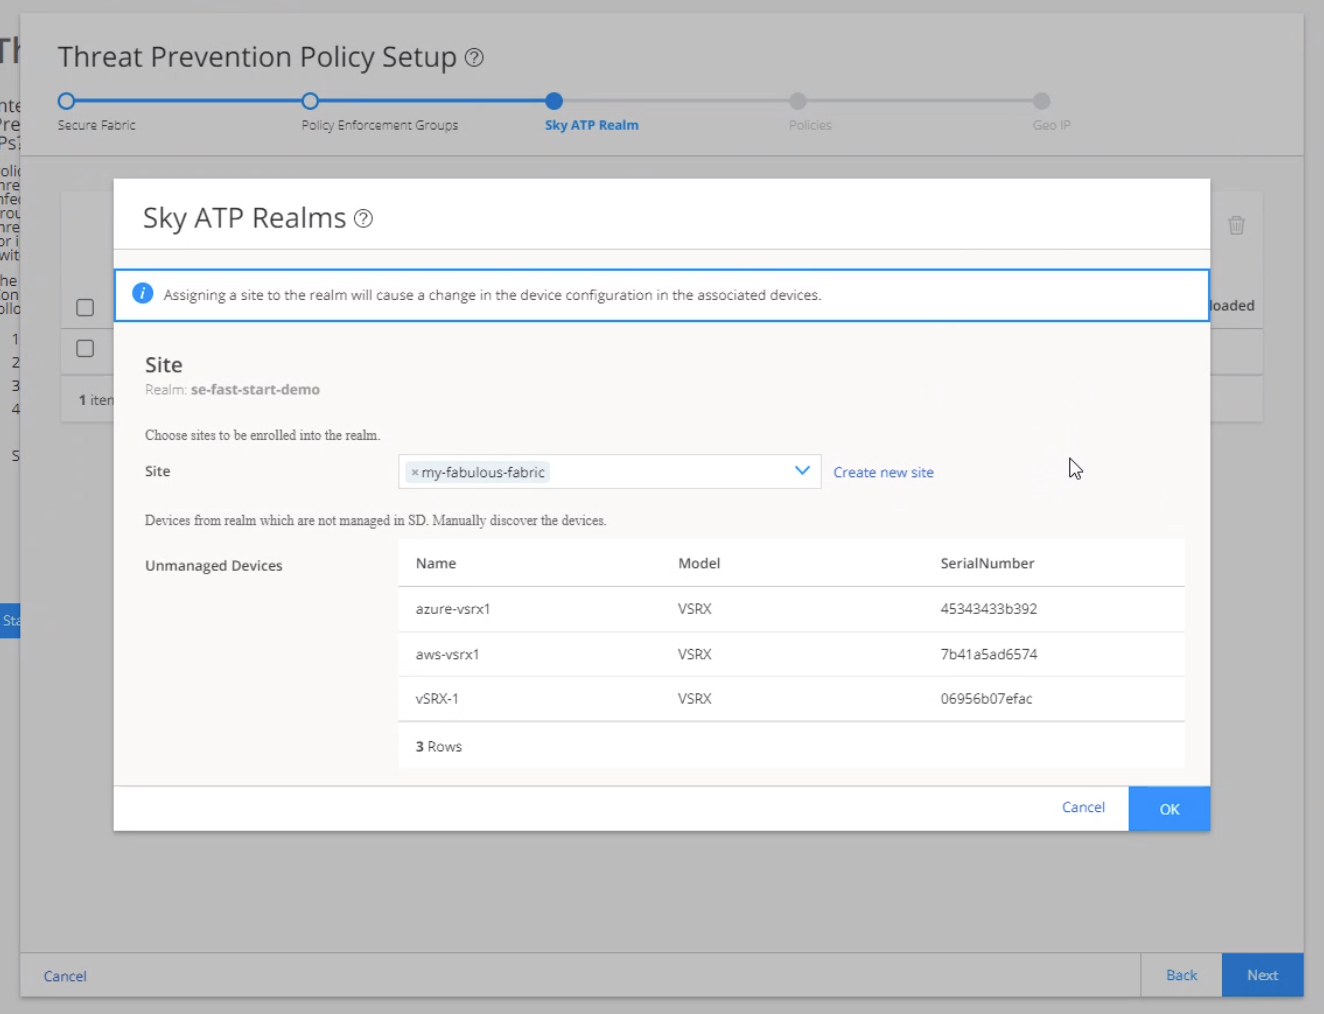
Select one or more sites to enroll into the organization. If there are no sites associated with the organization, click Create new site. To know more about creating a site, see Creating Secure Fabric and Sites.
Step 6: Create a Threat Prevention Policy
Threat prevention policies provide protection and monitoring for selected threat profiles, including command & control servers, infected hosts, and malware. Using feeds from Juniper ATP Cloud and custom feeds you configure, ingress and egress traffic is monitored for suspicious content and behavior. Based on a threat score, detected threats are evaluated and action might be taken once a verdict is reached. Once you have a Threat Prevention Policy, you assign one or more policy enforcement groups to it.
Before you begin:
-
Determine the type of profile you will use for the policy: command & control server, infected hosts, or malware. (You can select one or more threat profiles in a policy.)
-
Determine what action to take if a threat is found.
-
Know which policy enforcement group you will add to the policy.
To create a threat prevention policy:
- Click + on the top-right corner of the Policies page.
The Create Threat Prevention Policy page appears as shown in Figure 15.
Figure 15: Create Threat Prevention Policy 1
- Configure the profile parameters as shown in Figure 16
and Figure 17.
Use the instructions provided in Creating Threat Prevention Policies.Figure 16: Create Threat Prevention Policy 2
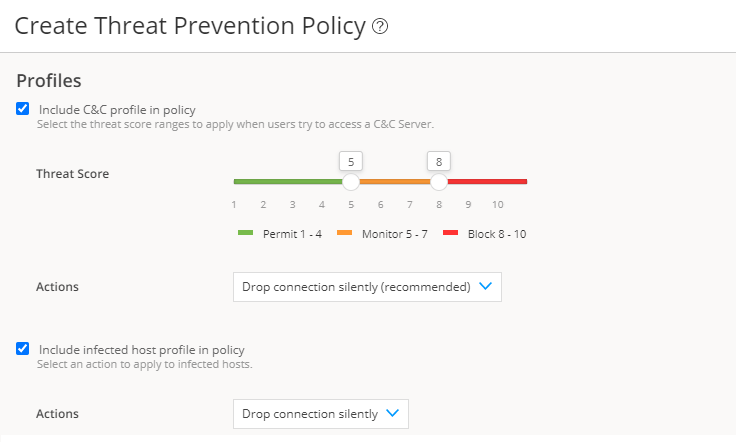 Figure 17: Create Threat Prevention Policy 3
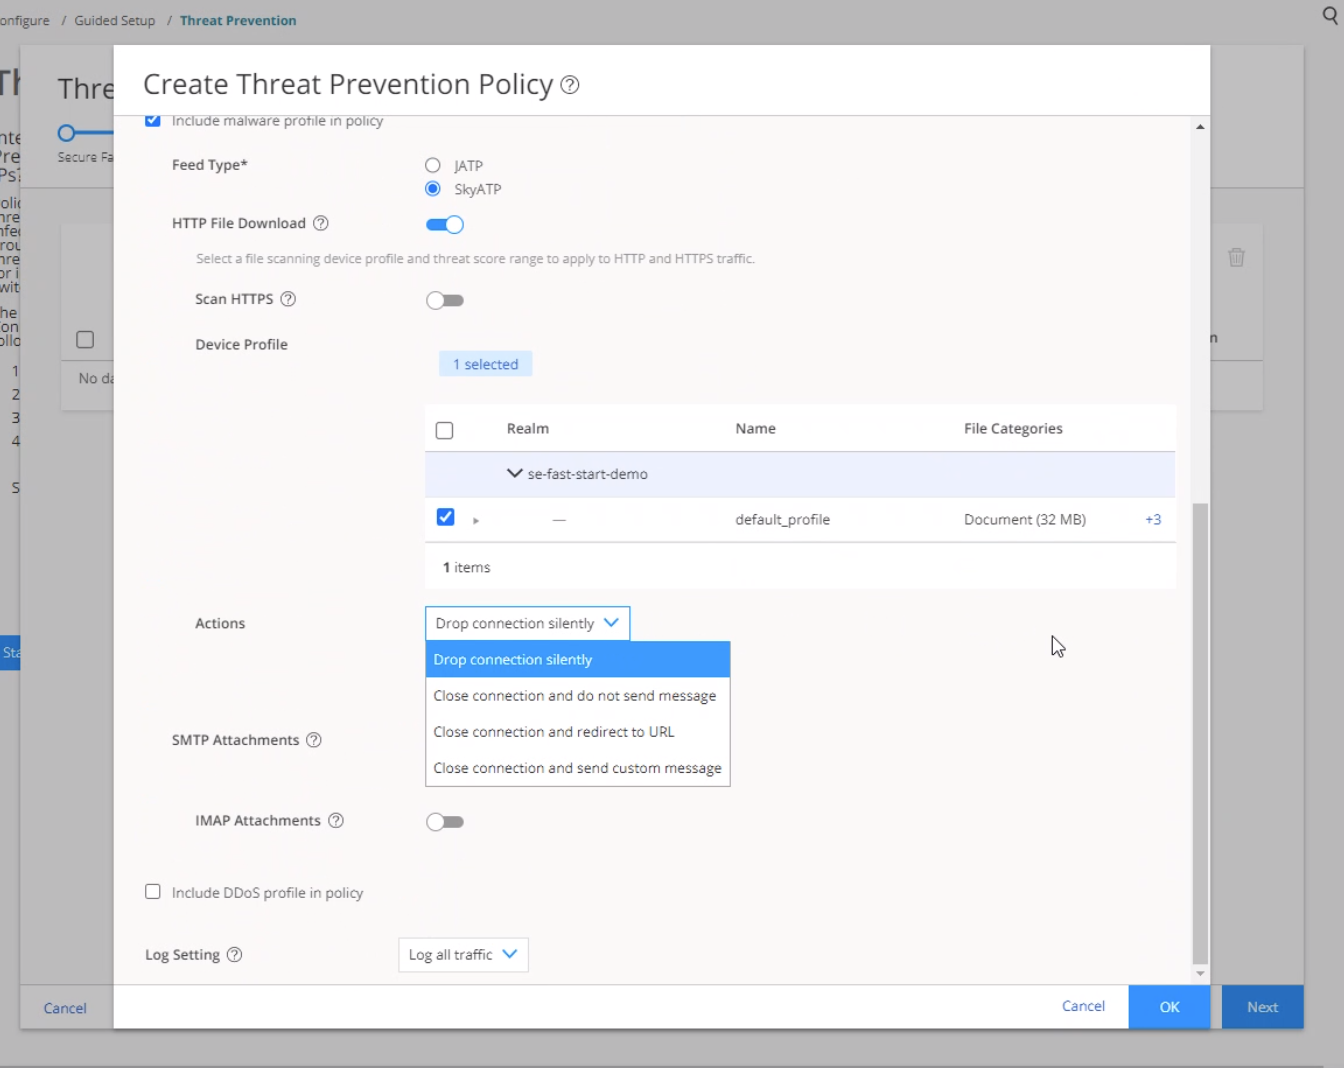
- Click OK.
The new policy appears in the Policies page as shown in Figure 18.
Figure 18: Policies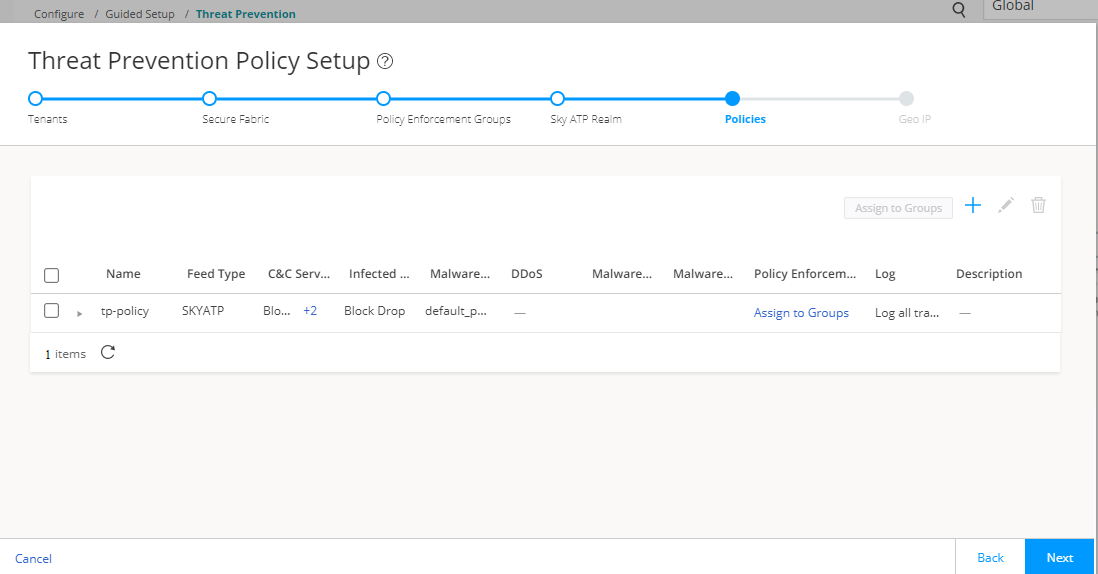
- Click Assign to Groups to assign the threat prevention policy to
the desired policy enforcement group.
The Assign to Policy Enforcement Groups page appears as shown in Figure 19.
Figure 19: Assign to Policy Enforcement Groups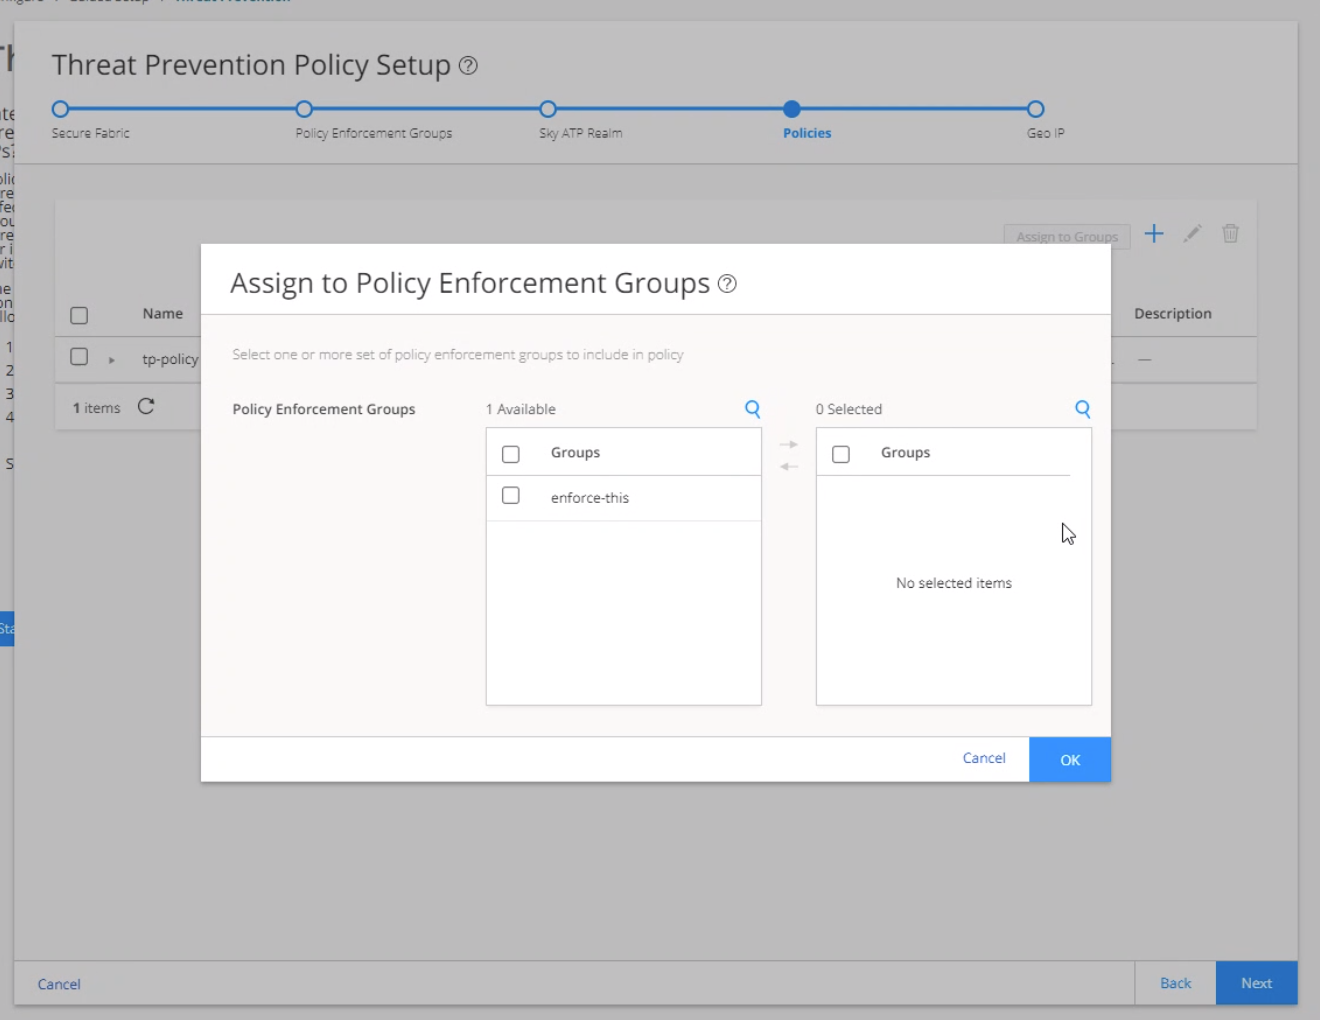
- Select one or more policy enforcement groups from the Available column and move it to the
Selected column to include in the policy. Click OK.
The system performs a rule analysis and prepares device configurations that include the threat prevention policies.
The View Change List page appears as shown in Figure 20.
Figure 20: View Change List
- Click Update to instruct the system to push the newly created
policy to the SRX Series Firewall.
The Job Status page appears as shown in Figure 21.
Figure 21: Job Status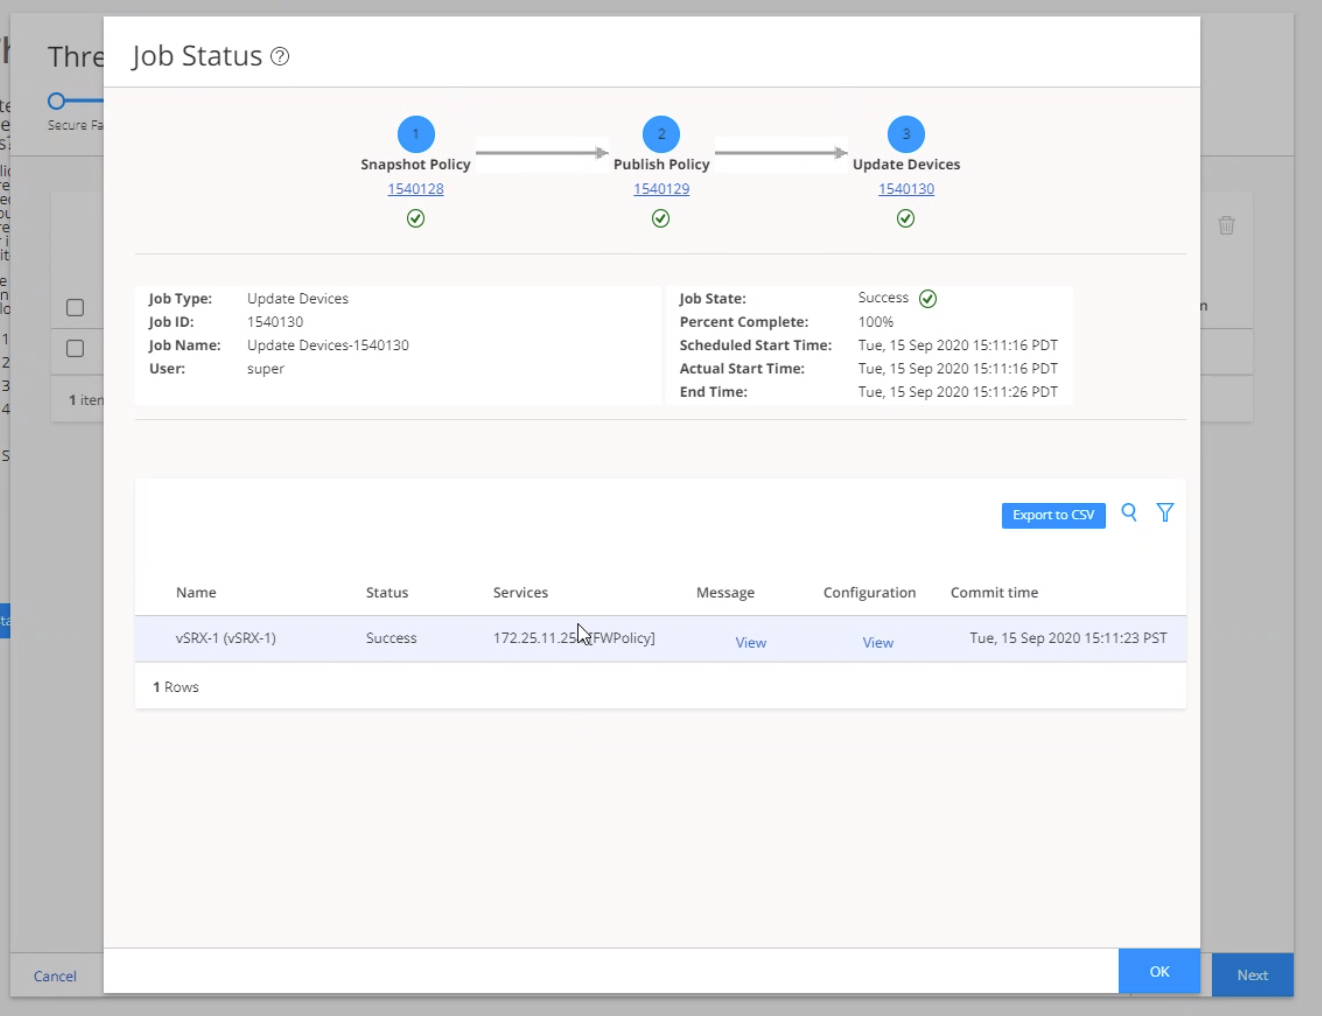
- Click the job status ID (Snapshot Policy, Publish Policy, and Update Devices) to view the
job details. To exit, click OK.
The new threat prevention policy appears in the Policies page.
Figure 22: Policy Assigned to Policy Enforcement Group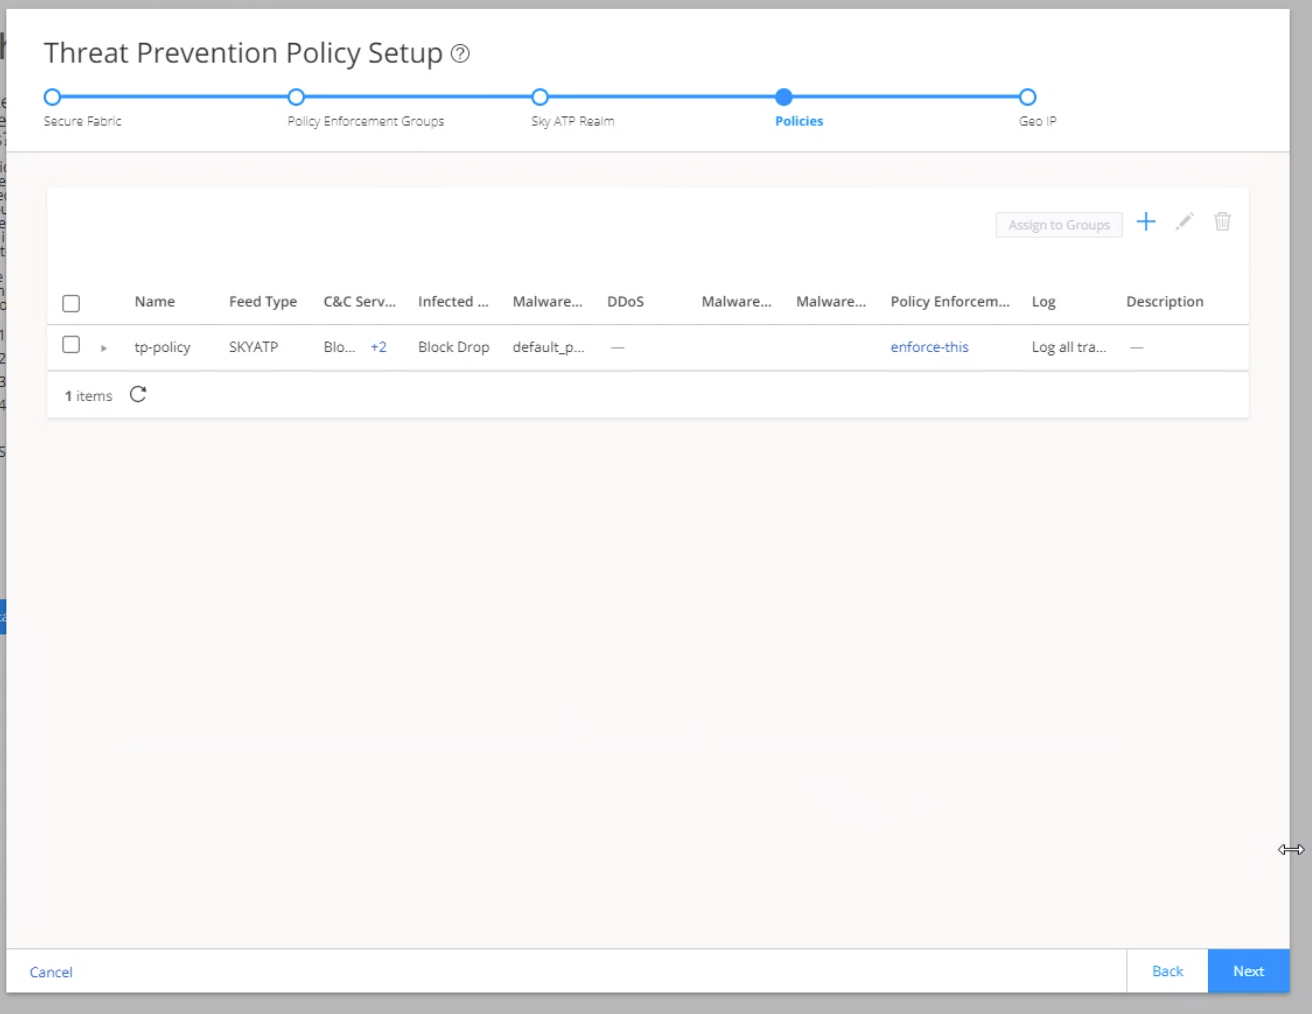
-
To configure GeoIP, see Step 7: (Optional) Configure GeoIP, else click
Finish to go to the Summary page.
The Summary page lists all the parameters that you have configured using the Guided Setup wizard.
Figure 23: Summary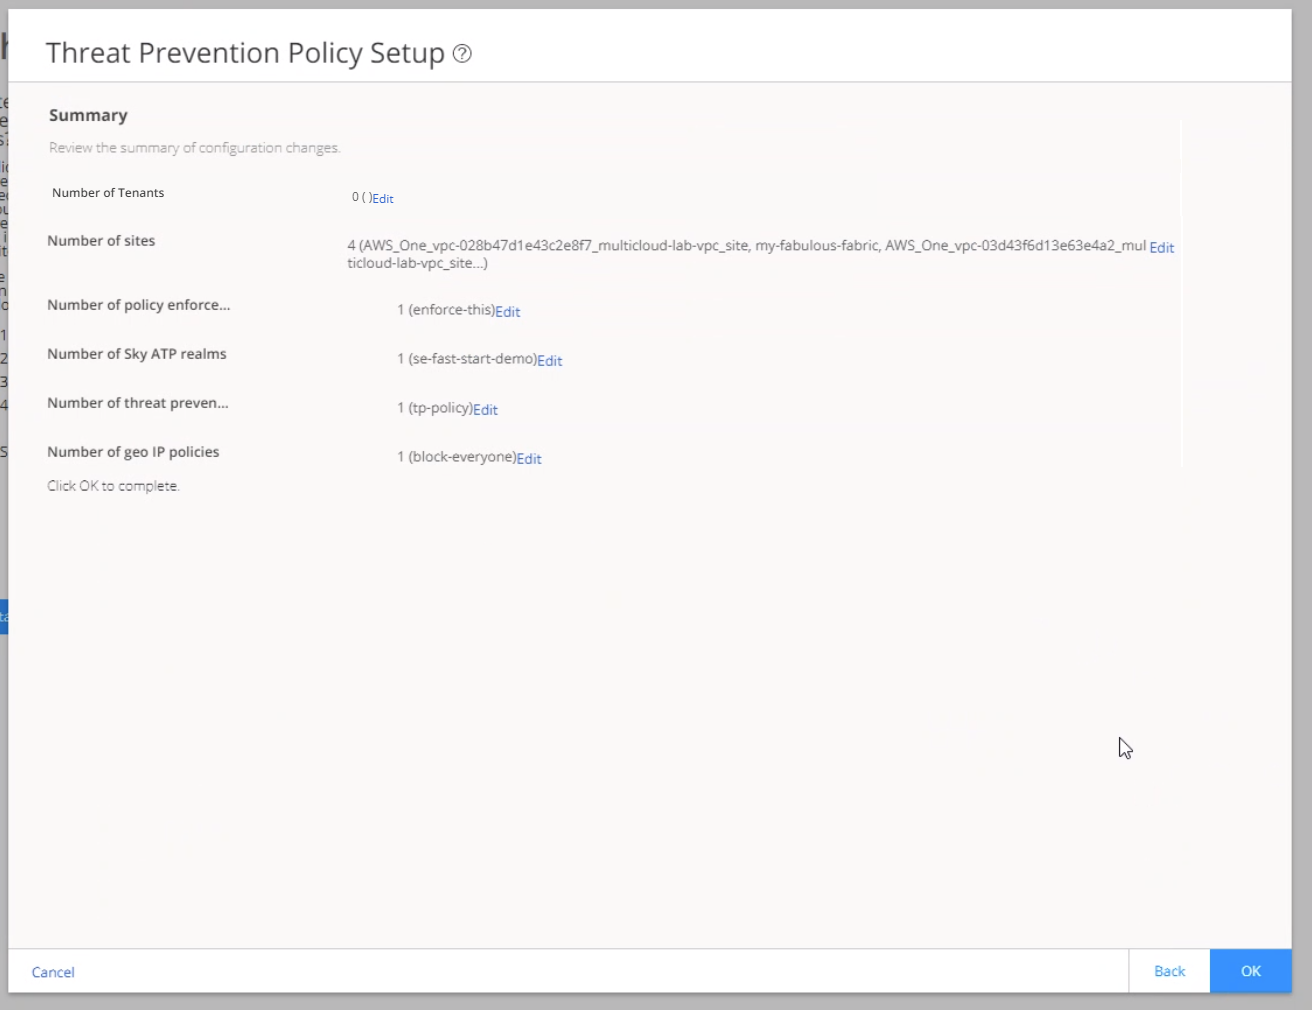
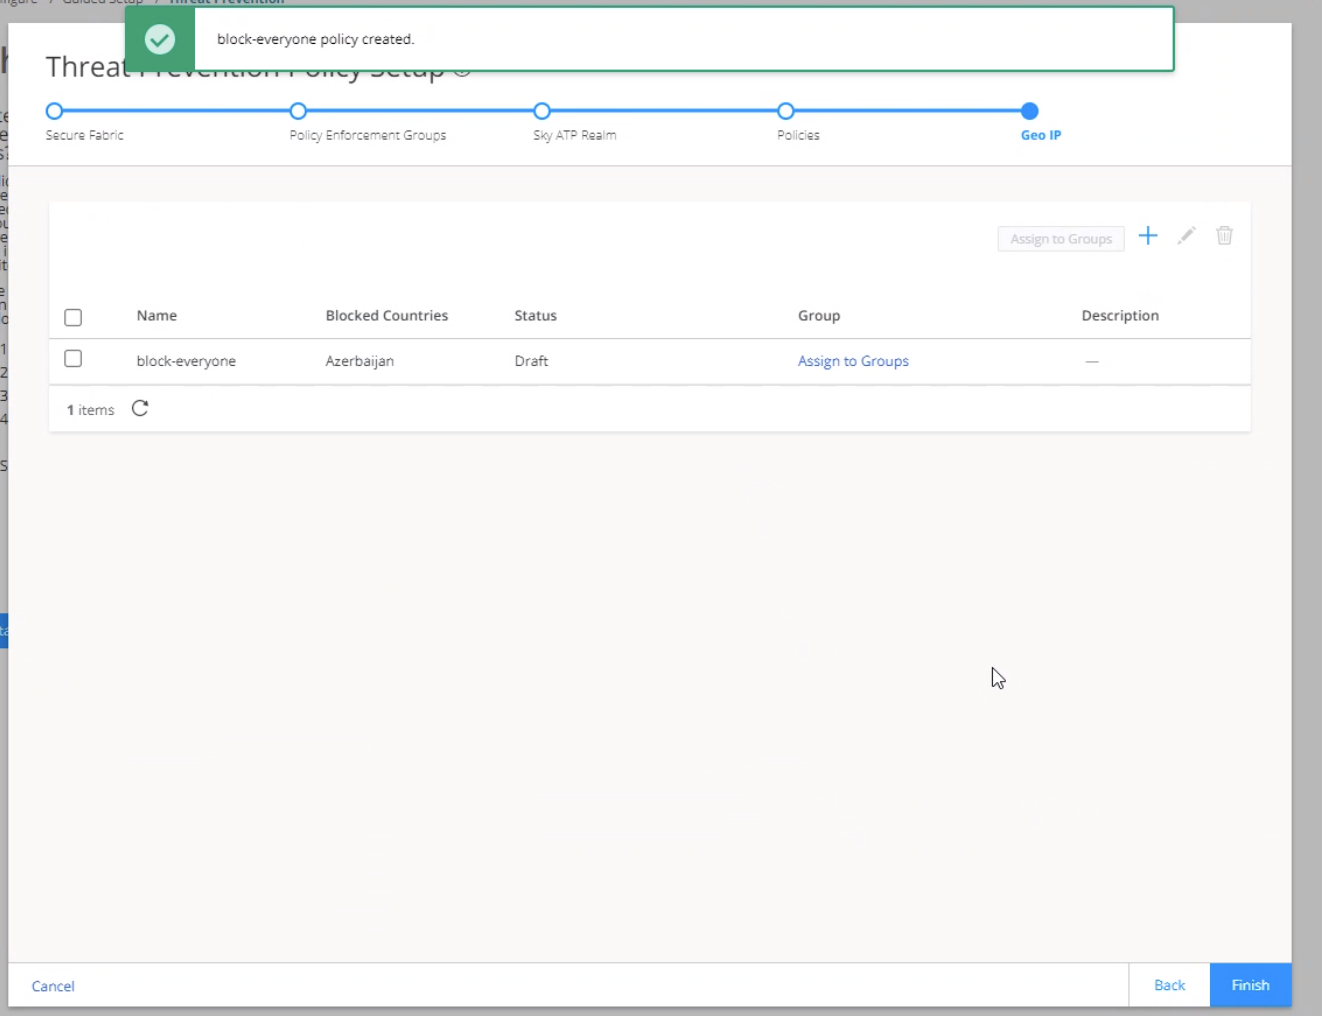
Step 7: (Optional) Configure GeoIP
GeoIP is the method of finding a computer terminal's geographic location by identifying that terminal's IP address. A GeoIP feed is an up-to-date mapping of IP addresses to geographical regions. By mapping IP addresses to the sources of attack traffic, you can determine the geographic regions of origin and filter traffic to and from specific locations in the world.
To create a GeoIP:
-
Click + on the top-right corner of the GeoIP page.
The Create Geo IP page appears as shown in Figure 24.
Figure 24: Create Geo IP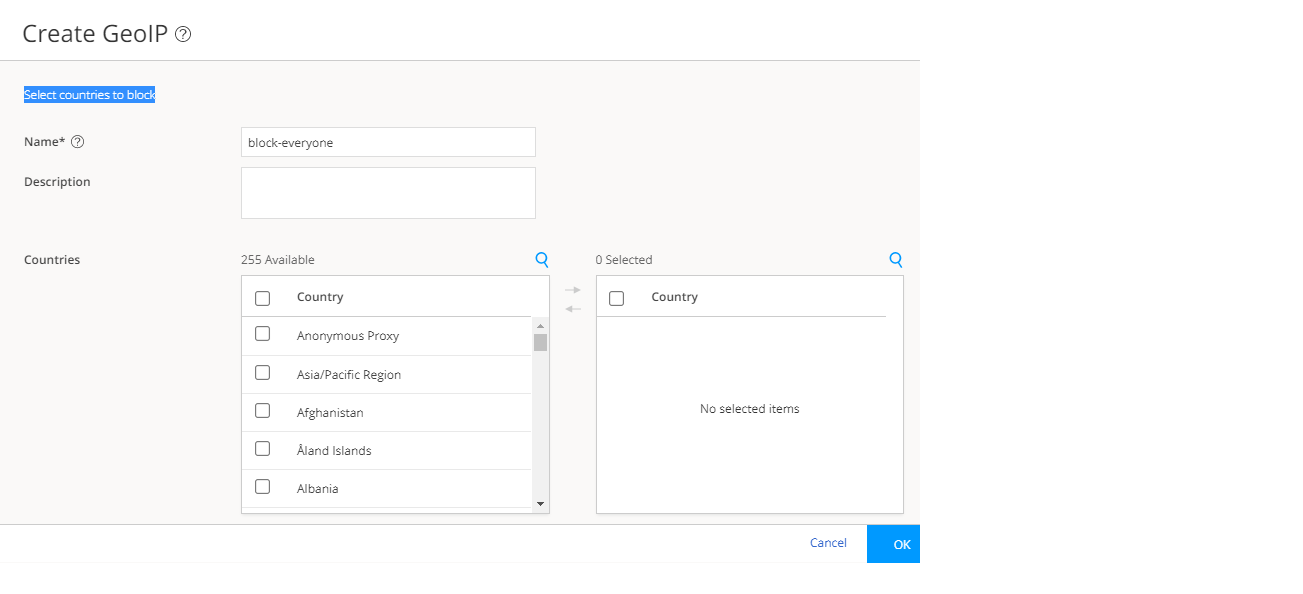
-
Use the instructions provided in Creating Geo IP Policies to create a GeoIP.
Figure 25: New GeoIP
What's Next?
Now that you have successfully created the threat prevention policy, you must assign the threat prevention policy to a security firewall policy before it can take affect. For more information, see Firewall Policies Overview and Creating Firewall Policy Rules.
Verify the Enrollment of the SRX Series Firewall in Juniper ATP Cloud
Purpose
Verify that the SRX Series Firewall is enrolled in ATP Cloud.
Action
Log in to Security Director Web portal and perform the following tasks:
|
Action |
Meaning |
|---|---|
|
Select . |
The Feed Source Status column displays the status (Success/Failed) of SRX Series Firewall enrollment in ATP Cloud. |
|
Select . |
The ATP Cloud organization name displayed under the Feed Source Status column confirms the enrollment of the device in ATP Cloud organization. |
|
Select . |
The Enrollment Status column displays the status (Success/Failed) of the Policy Enforcer in ATP Cloud organization. |