- play_arrow Installation
- play_arrow Installation Tasks Overview
- play_arrow Installation and Upgrade Tasks for the CTPView Server OS and CTPView Software
- Installing or Upgrading the CTPView Server OS
- Saving the CTPView Configuration Settings and Data (CTPView Server Menu)
- Creating More Disk Space on the CTPView Server (CTPView)
- Creating More Disk Space on the CTPView Server (CTPView Server Menu)
- Installing the CTPView Server OS (CTPView Server CLI)
- Restoring CTPView Software Configuration Settings and Data (CTPView)
- Restoring CTPView Software Configuration Settings and Data with the Restore Utility (CTPView Server Menu)
- Restoring CTPView Software Data by Manually Synchronizing the CTPView Server (CTPView)
- Reviewing the Installation Log for Errors (CTPView Server CLI)
- Verifying the CTPView Server OS Installation (CTPView)
- Validating the CTPView Server Configuration (CTPView)
- play_arrow Upgrade Tasks for Only the CTPView Software
- play_arrow Configuration Tasks for CTPView Administrative Settings
- Configuring the CTPView Administrative Settings
- Preparing a New Server
- Changing the BIOS Menu Password (CTPView Server CLI)
- Changing the Server's Default User Account Password (CTPView Server CLI)
- Changing the Server's Root Account Password (CTPView Server CLI)
- Changing the GRUB Boot Loader Password (CTPView Server Menu)
- Changing the PostgreSQL Apache Account Password (CTPView Server Menu)
- Changing the PostgreSQL Administrator Account Password (CTPView Server Menu)
- Configuring the Network Access (CTPView Server Menu)
- Creating a Self-Signed Web Certificate (CTPView Server Menu)
- Renewing a Self-Signed Web Certificate (CTPView Server Menu)
- Updating the CTPView Software
- Logging In with a Browser (CTPView)
- Changing the CTPView GUI Default User Account Password (CTPView)
- Creating a New Global_Admin Account (CTPView)
- Changing the User Password (CTP Menu)
- Enabling OpenSSL Authentication of Users by Creating a Self-Signed Web Certificate (CTPView Server Menu)
- Importing Certificates Issued by a Third-Party CA (CTPView Server Menu)
- Configuring Subdomains in Hostnames (CTPView Server Menu)
- play_arrow Configuring the CTPView Server on Virtual Machines
- Guidelines for Configuring Virtual CTPView Servers on VMware ESX Servers
- CTPView Servers on Virtual Machines Overview
- Creating a Virtualized Instance of CTPView Server on a Hyper-V Server
- Creating a Virtualized Instance of CTPView Server on an ESX Server
- Creating a Virtualized Instance of CTPView 9.3Rx Server on Proxmox Server
- play_arrow Upgrade Tasks for CTPOS
- play_arrow Default Accounts and Passwords
- play_arrow Understanding CTPView Upgrade Files
-
- play_arrow Administration
- play_arrow Managing and Displaying Users (CTPView)
- Managing CTPView Users with the CTPView Admin Center
- Accessing the CTPView Admin Center (CTPView)
- Monitoring CTPView Users (CTPView)
- Adding New CTPView Users (CTPView)
- Modifying CTPView User Properties (CTPView)
- Monitoring CTPView Groups (CTPView)
- Modifying CTPView User Group Affiliation (CTPView)
- Adding a New CTPView User Group (CTPView)
- Modifying CTPView User Group Default Properties (CTPView)
- Prohibiting and Reinstating CTPView Access by Users (CTPView)
- Deleting Users and Groups (CTPView)
- Managing User Passwords (CTPView)
- Configuring User Login Properties (CTPView)
- Understanding CTPView GUI User Levels
- CTPOS and CTPView Software Password Requirements
- Unlocking a User Account (CTP Menu)
- Unlocking User Accounts for Which Password Has Expired
- play_arrow Managing the CTPView Server (CTPView)
- Adding and Removing CTP Platforms Managed by CTPView Software (CTPView)
- Adding and Removing Host Groups (CTPView)
- Adding and Removing SNMP Communities (CTPView)
- Managing CTP Platforms in the Network (CTPView)
- Configuring Email Notifications (CTPView)
- Setting the CTPView Server Start-Up Banner (CTPView)
- Setting the CTP Platforms Login Banner (CTPView)
- Configuring an SSH Connection to a CTP Platform that Persists Through the Session (CTPView)
- Setting the CTPView Server Clock (CTPView)
- Managing NTP Servers for the CTPView Network (CTPView)
- NTP Authentication Overview on CTP Devices
- Configuring NTP Authentication Using the System Query Page (CTPView)
- Configuring NTP Authentication Using the System Configuration Page (CTPView)
- Configuring NTP and Syslog over IPv6 on CTP Node (CTPView)
- Configuring NTP over IPv6 on CTPView Server (CTPView)
- Configuring NetRef Settings (CTPView)
- Configuring Automatic Monitoring of CTP Platforms (CTPView)
- Setting a Limit on File Transfer Bandwidth Between the CTPView Server and CTP Platforms (CTPView)
- Restoring CTPView Software Configuration Settings and Data (CTPView)
- Restoring CTPView Software Data by Manually Synchronizing the CTPView Server (CTPView)
- Synchronizing Multiple CTPView Servers (CTPView)
- Establishing an SSH Connection (CTP Menu)
- Adding a VLAN Interface to a Node (CTP Menu)
- Separate Interfaces for Management and Circuit Traffic Overview
- Configuring Separate Interfaces for Management and Circuit Traffic (CTP Menu)
- play_arrow Monitoring CTP Platforms (CTPView)
- Monitoring the Network with the CTPView Software (CTPView)
- Changing the Display Settings for CTPView Network Monitoring (CTPView)
- Checking the CTPView Server Connection to CTP Platforms in the Network (CTPView)
- Displaying Runtime Query Results for a CTP Platform (CTPView)
- Overriding CTP Platform Network Status and Adding Comments (CTPView)
- Saving CTP Platform Configurations (CTPView)
- Setting an Audible Alert for CTP Platform Status (CTPView)
- Displaying CTPView Network Reports (CTPView)
- Field Descriptions in CTPView Network Reports (CTPView)
- Displaying Network Statistics (CTPView)
- Displaying the Management and Circuit Interface Settings (CTP Menu)
- play_arrow Changing CTPView GUI Settings
- play_arrow Managing and Displaying Users (CTPView Server Menu)
- Accessing the CTPView Server Configuration Menu (CTPView Server Menu)
- Managing CTPView Users (CTPView Server Menu)
- Classification of CTPView Shell Account Users
- Managing User Passwords (CTPView Server Menu)
- Accessing the Security Profile Configuration Menu (CTP Menu)
- Changing the User Password (CTP Menu)
- Configuring CTPView User Authentication with Steel-Belted RADIUS
- Configuring CTPOS and CTPView User Authentication with TACACS+
- Configuring the TACACS+ Server
- play_arrow Managing the CTPView Server (CTPView Server Menu)
- Managing CTPView Server Secure Logs (CTPView Server Menu)
- Setting the CTPView Server Start-Up Banner (CTPView Server Menu)
- Managing Access Security for the CTPView Server (CTPView Server Menu)
- Configuring an SSH Connection to a CTP Platform That Persists Through the Session (CTPView Server Menu)
- Saving the CTPView Configuration Settings and Data (CTPView Server Menu)
- Creating More Disk Space on the CTPView Server (CTPView Server Menu)
- Restoring CTPView Software Configuration Settings and Data with the Restore Utility (CTPView Server Menu)
- Restarting the PostgreSQL Server (CTPView Server Menu)
- Setting the Logging Level (CTPView Server Menu)
- play_arrow Restoring Default Values on the CTPView Server
- play_arrow Changing Administrative Passwords to Improve Access Security
- Changing Passwords to Improve Access Security
- Changing the BIOS Menu Password (CTPView Server CLI)
- Changing the Server's Root Account Password (CTPView Server CLI)
- Changing the GRUB Boot Loader Password (CTPView Server Menu)
- Changing the PostgreSQL Apache Account Password (CTPView Server Menu)
- Changing the PostgreSQL Administrator Account Password (CTPView Server Menu)
- play_arrow Configuring Access Control and Privileges
- play_arrow Using Third-Party Software on CTPView Servers
-
- play_arrow Troubleshooting
- play_arrow Validating the CTPView Server System Configuration
- play_arrow Restoring CLI Access to the CTPView Server
- Restoring Access to a CTPView Server
- Accessing a Shell on the CTPView Server (CTPView Server CLI)
- Setting a New Password for a Nonroot User Account (CTPView Server CLI)
- Setting a New Password for a Root User Account (CTPView Server CLI)
- Creating a Nonroot User Account and Password (CTPView Server CLI)
- play_arrow Restoring Browser Access to a CTPView Server
- play_arrow Changing a CTPOS User Password
- play_arrow Booting the CTPView Server from the CD-ROM Drive
- play_arrow Restarting the Apache Daemon In the Event of Browser Issues
- play_arrow Displaying Jitter Statistics in MIBs and Supporting Acorn MIB for Daemon Model
- play_arrow Knowledge Base
-
Circuit to Packet Network Overview
The CTP products are designed to create an IP packet flow from a serial data stream or analog voice connection, providing the necessary processing to re-create the serial bit stream or analog signal from an IP packet flow.
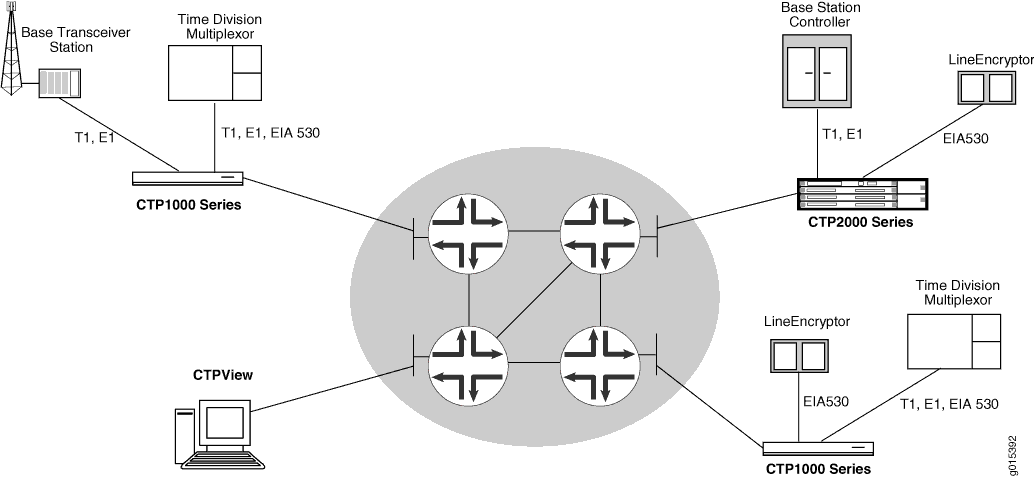
CTP products are designed to accommodate the delay, delay jitter, and packet reordering characteristics of an IP network. Figure 1 shows examples of applications that use CTP products.

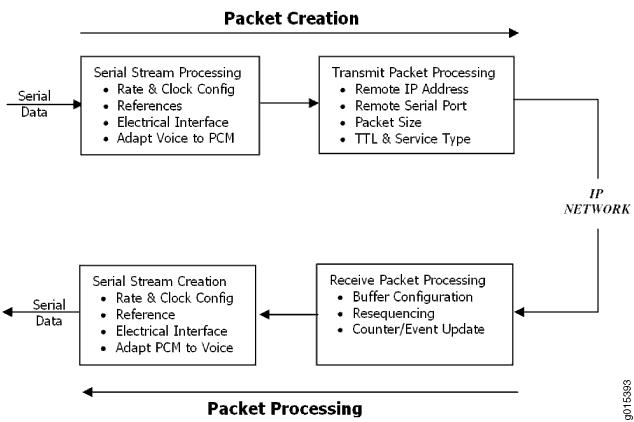
Numerous processes must occur to adapt serial data to and from IP packets. These processes are summarized in Figure 2. You configure the characteristics of the processes by using the CTP menu interface or the CTPView graphical user interface.

Using the menu interface, you can configure the CTP products to accept a serial data stream and create an IP flow that will be transferred across an IP network. The connection provided by the CTP platform is a physical layer circuit between the end user equipment.
Serial Stream Processing
Rate selection and clock configuration allow the serial interface rate to be configured through the software. Rates supported range from less than 300 bps to 12.288 Mbps (in subhertz increments).
You can configure the CTP systems by using the menu interface to provide multiple prioritized node clock references. An external reference input and any of the serial interfaces may be used for the node reference clock. Reference frequencies must be 32 KHz, n x 64 KHz, or 1,544 KHz up to a maximum of 4096 KHz (2048 KHz maximum on the CTP1002).
The electrical characteristics and encoding of the CTP ports are software configurable. The available options are EIA530, EIA530A, RS-232, V.35, analog 4WTO, conditioned diphase, isochronous, T1, and E1.
An analog voice signal terminated on the 4WTO interface is converted into a 64-Kbps pulse-code modulation (PCM) digital bit stream before adaptation to and from an IP flow. The analog interface allows transmit and receive levels to be adjusted.
Transmit Packet Processing
The CTP platform is configured with the remote IP address of the device where the packets created from the local serial port are to be routed.
The CTP remote port is specified by the IP address and physical port number of the remote unit and port.
The packet size created by the CTP platform may be set from 32 to 1456 bytes. Larger packet sizes are more bandwidth-efficient but introduce more serialization delay when the packet is created. The menu interface verifies that the combination of packet size and data rate does not result in a packet rate exceeding 1200 packets per second.
Time to live (TTL) may be set from 0 to 255. The TTL is the maximum number of hops in the IP network that the packet may travel before it is discarded by the network. You can configure the service type byte, which some IP networks use to determine the quality of service provided to the IP flow.
Receive Packet Processing
A receive buffer is required to smooth the timing jitter of received packets because of the delay variance that is inevitably encountered in the IP network. The configuration allows you to configure both the size of the buffer (in 1-ms increments) and the maximum amount of buffering delay allowed before the buffer will recenter. The size of the buffer configured should depend on the performance and characteristics of the IP network.
The CTP platform automatically resequences packets when they arrive out of order. If a packet is not received, the CTP platform inserts all data in lieu of the packet information so that bit count integrity is maintained.
You can prompt the menu interface to display detailed information about the port status, such as packet counts, late packets, missing packets, and buffer fill.
Serial Stream Creation
The packet receive process allows the serial data rate to be configured through the software. Rates supported range from less than 300 bps to 12.288 Mbps in subhertz increments. Conditioned diphase and isochronous interfaces operate at rates up to 1.024 Mbps.
Clock Options
The CTP platform provides numerous options for physical layer clocking:
Interface clocking options—The CTP platform allows complete configuration flexibility of interface clocking. This flexibility includes your ability to specify how clocks are generated (that is, from the node clock, which can be phase locked to an external clock input) and what clocks are used to process the data from the attached device. The CTP platform can synthesize over 1.5 billion rates between 1 bps and 12.288 Mbps.
Asymmetric clocking—You can configure CTP circuits to synthesize asymmetric rates.
Reference clock input—The CTP platform can phase lock its node clock to an interface clock or external reference input. Up to five prioritized references can be configured. The node provides a reference holdover if all references are lost.
Plesiochronous operation—Calibrated Clock is a patented CTP feature that allows the one-time calibration of the CTP oscillator to a known reference. Depending on environmental factors, two units calibrated to the same clock will have a clock difference as small as 100 parts per billion. This calibration enables CTP circuits to operate for long periods of time before a buffer recenter occurs.
Adaptive clocking—Although IP router networks do not transfer physical layer clocking, the CTP adaptive clocking feature, using patented Advanced Time Domain Processing (ATDP), allows the CTP platform to recover clocking information from the remote CTP port and adjust the local clock accordingly. ATDP provides rapid convergence to the correct clock, and does not vary due to changes in the average jitter buffer fill. As a result, a CTP circuit will continuously operate without a buffer recenter, even when clock references are not used.