- play_arrow Introduction
- play_arrow Router Data Extraction
- play_arrow Routing Protocols
- play_arrow Equal Cost Multiple Paths
- play_arrow Static Routes
- play_arrow Policy-Based Routes
- play_arrow Border Gateway Protocol
- Paragon Planner Border Gateway Protocol Overview
- Border Gateway Protocol Recommended Instructions
- BGP Data Extraction
- BGP Reports
- BGP Options
- BGP Map
- BGP Live Status Check
- BGP Routing Table
- BGP Routes Analysis
- BGP Information at a Node
- BGP Neighbor
- Apply, Modify, or Add BGP Polices
- BGP Subnets
- Getipconf Usage Notes
- BGP Report
- play_arrow Virtual Private Networks
- Paragon Planner Virtual Private Networks Overview
- Importing VPN Information from Router Configuration Files
- Viewing the Integrity Checks Reports
- Accessing VPN Summary Information
- Accessing Detailed Information for a Particular VPN
- VPN Topology View
- Route-Target Export/Import Relationships
- Additional Methods to Access VPN Information
- VPN Path Tracing
- VPN Design and Modeling Using the VPN Module
- L3 (Layer 3) VPN
- L3 Hub-and-Spoke VPN
- L2M (Layer2-Martini) VPN
- L2K (Layer2-Kompella) VPN
- VPLS-BGP VPN (for Juniper)
- VPLS-LDP VPN
- L2CCC (Circuit Cross-Connect) VPN
- Inter-AS VPN
- Forming VPN Customer Groups
- Deleting or Renaming VPNs
- VPN Configlet Generation
- Adding Traffic Demands in a VPN
- VPN Traffic Generation
- VPN-Related Reports
- VPN Monitoring and Diagnostics
- play_arrow GRE Tunnels
- play_arrow Multicast
- Paragon Planner Multicast Overview
- Paragon Planner Recommended Multicast Instructions
- Add Multicast Groups
- Creating Multicast Demands
- Viewing Multicast Demands in the Network
- Comparing Multicast with Unicast
- Multicast SPT Threshold
- Multicast Reports
- Multicast Simulation
- Collecting Multicast Path Data from Live Network
- Importing Multicast Path Data
- Multicast Data Processing
- Viewing Multicast Trees
- play_arrow Class of Service
- Paragon Planner Class of Service Overview
- Paragon Planner Recommended CoS Instructions
- The QoS Manager
- Define Class Maps
- Create Policies for Classes
- Attach Policies to Interfaces
- Adding Traffic Inputs
- Using the Text Editor
- Reporting Module
- IP Flow Information
- Link information
- Traffic Load Analysis
- Traffic Load by Policy Class
- CoS Alias File
- Bblink File
- Policymap File
- Demand File
- Traffic Load File
- play_arrow Traffic Matrix Solver
- play_arrow Optimizing Tunnel Paths
- play_arrow Tunnel Sizing and Demand Sizing
- play_arrow Tunnel Path Design
- Tunnel Path Design Overview
- Tunnel Path Design Instructions
- Designing Tunnel Paths Overview
- Backup Path Configuration Options
- Set Default Diversity Level
- Evaluate/Tune Options
- Advanced Options
- Viewing Design Results
- Tunnel Modifications
- Exporting and Importing Diverse Group Definitions
- Advanced Path Modification
- play_arrow Inter-Area MPLS-TE
- play_arrow Point-to-Multipoint (P2MP) Traffic Engineering
- Paragon Planner P2MP Traffic Engineering Overview
- Point-to-Multipoint Traffic Engineering Instructions
- Import a Network That Already has Configured P2MP LSP Tunnels
- Examine the P2MP LSP Tunnels
- Create P2MP LSP Tunnels and Generate Corresponding LSP Configlets
- Examine P2MP LSP Tunnel Link Utilization
- Perform Failure Simulation and Assess the Impact
- play_arrow Diverse Multicast Tree Design
- Diverse Multicast Tree Design Overview
- Diverse Multicast Tree Instructions
- Open a Network That Already Has a Multicast Tree
- Set the Two P2MP Trees of Interest to be in the Same Diversity Group
- Using the Multicast Tree Design Feature to Design Diverse Multicast Trees
- Using the Multicast Tree Design Feature
- play_arrow DiffServ Traffic Engineering Tunnels
- DiffServ Traffic Engineering Tunnels Overview
- Using DS-TE LSP
- Hardware Support for DS-TE LSP
- Paragon Planner Support for DS-TE LSP
- Configuring the Bandwidth Model and Default Bandwidth Partitions
- Forwarding Class to Class Type Mapping
- Link Bandwidth Reservation
- Creating a New Multi-Class or Single-Class LSP
- Configuring a DiffServ-Aware LSP
- Tunnel Routing
- Link Utilization Analysis
- play_arrow Fast Reroute
- Paragon Planner Fast Reroute Overview
- Fast Reroute Supported Vendors
- Import Config and Tunnel Path
- Viewing the FRR Configuration
- Viewing FRR Backup Tunnels
- Viewing Primary Tunnels Protected by a Bypass Tunnel
- Modifying Tunnels to Request FRR Protection
- Modifying Links to Configure Multiple Bypasses (Juniper only)
- Modifying Links to Trigger FRR Backup Tunnel Creation (Cisco)
- FRR Design
- FRR Auto Design
- FRR Tuning
- Viewing Created Backup Tunnels
- Generating LSP Configlets for FRR Backup Tunnels
- Failure Simulation—Testing the FRR Backup Tunnels
- Exhaustive Failure
- Link, Site and Facility Diverse Paths
- play_arrow Cisco Auto-Tunnels
- play_arrow Integrity Check Report
- play_arrow Virtual Local Area Networks
- play_arrow Overhead Calculation
- play_arrow Router Reference
Specifying a Dynamic Path
Configuring a Dynamic Route Between Source and Destination
To add a tunnel with a dynamic route between two nodes, after you have configured the source, destination, bandwidth, priority and preempt fields, simply click the “Add” button.
The word “Dynamic” should be displayed under the pathname column.
Configuring a Loose Route
To add in a loose route, double-click the cell under the Configured Route and type in a route. Where the route is “loose”, enter in two asterisks as the delimiter. For example, CHI-DAL**HOU**LAX**ATL would be an example of a loose route, where the only fixed portion is the path from Chicago (CHI) to Dallas (DAL). Since the exact route is not specified, it will be up to the hardware to choose a route going from DAL to HOU, HOU to LAX, and LAX to ATL.
Alternatively, you can specify a Loose Route through the Tunnel Path Selection window by right-clicking the row and selecting Edit Route. In the Tunnel Path Selection window, select the Loose Route radio button. You will then have a wider array of options to choose from when you are adding nodes or links to your route. Note that the nodes should still be in sequential order. When you have added the destination router, the OK button will be enabled to allow you to finish adding the loose route.
Configuring an Explicit Route Based On Current Route
To cause the Current Route to be set as the Configured Route, select “Add” “Config” in the Path Config. Options explained in Path Config Options on page 252.
Excluding Network Elements from a Path (for Cisco Routers)
You can specify dynamic routes that avoid particular nodes or links. However, for accurate modeling of your network, you should only choose this option if your hardware supports this feature. Cisco routers implement this with the “exclude-address” command.
To choose nodes or links to exclude from the map, select Click links/nodes on map, then right-click in table from the To choose paths: menu.
Next, click on the network elements you want to exclude from the route to highlight them. Note that you can hold down <CTRL> or <SHIFT> keys while clicking network elements to select more than one.
After you have selected the elements to exclude, right-click on the row of the table that you want to modify and select Use Map Sel’n as Excluded (Sel’n is an abbreviation for Selection). This will cause a statement to be entered into the Configured Route field like the following: EXCLUDE-NODEA-LINK1-LINK8-LINK14.
Alternatively, you can double-click the Configured Route field and type in a string starting with “EXCLUDE” and containing the IDs of the elements that are to be excluded separated by dashes ‘-’ (one dash separates each element). After you have entered in some text, click on a different table cell in order to turn the editing mode off.
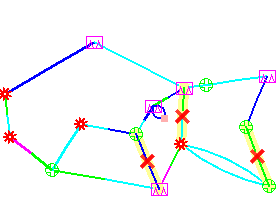
To visualize which elements you are excluding in a particular row, click on a table cell in that row that you are not editing. Select Show Route to view the excluded elements on the Map, which will be marked with an X as shown in Figure 1.
Figure 1: Marked Elements to Avoid in Route