Help us improve your experience.

Let us know what you think.

Do you have time for a two-minute survey?

Announcement: Try the Ask AI chatbot for answers to your technical questions about Juniper products and solutions.

close
header-navigation
keyboard_arrow_up
close
keyboard_arrow_left
Juniper Secure Connect User Guide
Table of Contents Expand all
list Table of Contents
file_download PDF
{ "lLangCode": "en", "lName": "English", "lCountryCode": "us", "transcode": "en_US" }
English
keyboard_arrow_right

Local User Authentication Using Pre-shared Key (CLI Procedure)

date_range 13-Dec-24

Overview

In this configuration, you use the username and password for local user authentication. This configuration option does not allow you to change or recover your credentials without interacting with the firewall administrator, hence we do not recommend this authentication method. Instead, we recommend you to use External User Authentication Using RADIUS method.

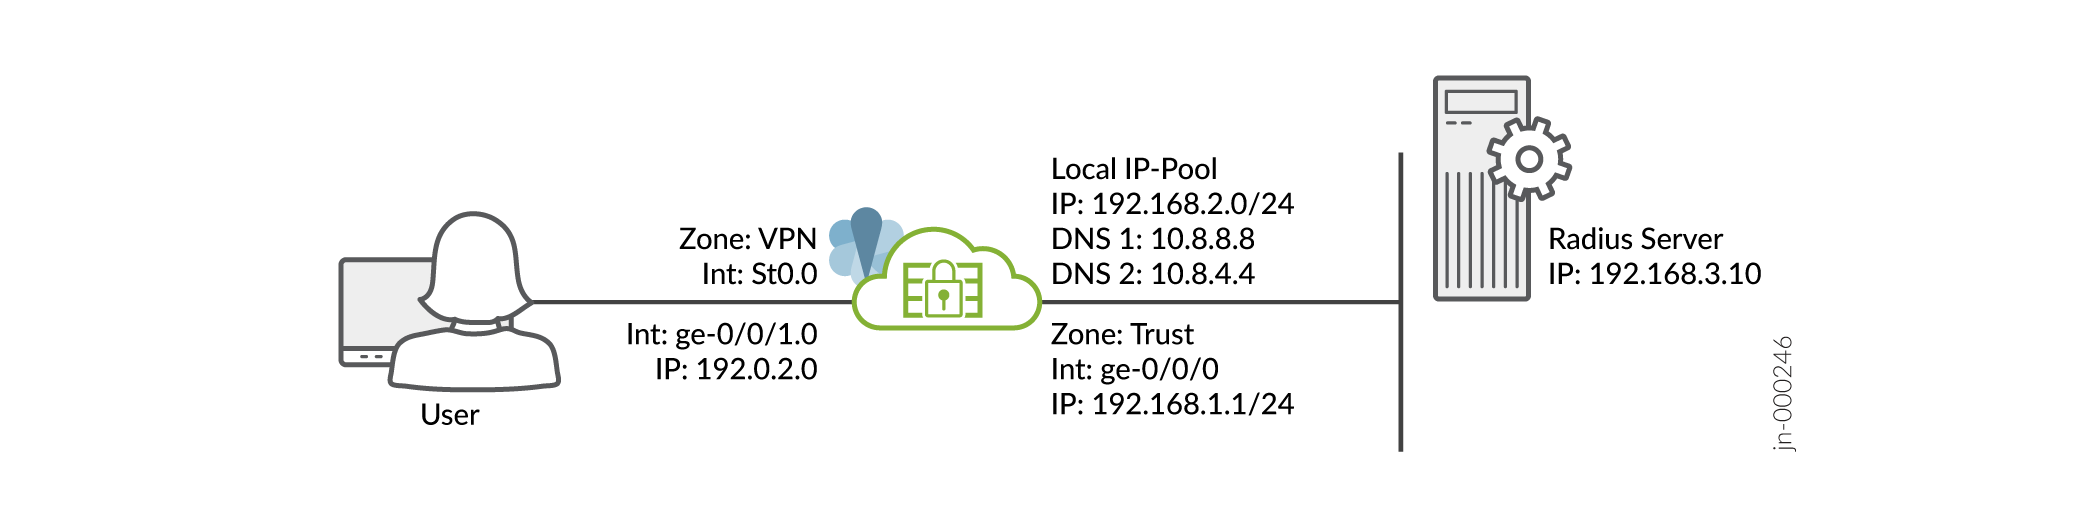
We assume that you have completed the basic setup of your SRX Series Firewalls, including interfaces, zones, and security policies as illustrated in the Figure 1.

Figure 1: Topology Topology

For information about prerequisites, see System Requirements for Juniper Secure Connect.

You must ensure that the SRX Series Firewall uses either a signed certificate or a self-signed certificate instead of the default system-generated certificate. Before you start configuring Juniper Secure Connect, you must bind the certificate to the SRX Series Firewall by executing the following command:

content_copy zoom_out_map
user@host# set system services web-management https pki-local-certificate <cert_name>

For example:

content_copy zoom_out_map
user@host# set system services web-management https pki-local-certificate SRX_Certificate

Where SRX_Certificate is the self-signed certificate.

CLI Quick Configuration

To quickly configure this example on your SRX Series Firewalls, copy the following commands, paste them into a text file, remove any line breaks, change any details necessary to match your network configuration, and then copy and paste the commands into the CLI at the [edit] hierarchy level.

content_copy zoom_out_map
[edit] 
user@host#

set security ike proposal JUNIPER_SECURE_CONNECT authentication-method pre-shared-keys
set security ike proposal JUNIPER_SECURE_CONNECT dh-group group19
set security ike proposal JUNIPER_SECURE_CONNECT encryption-algorithm aes-256-cbc
set security ike proposal JUNIPER_SECURE_CONNECT lifetime-seconds 28800
set security ike policy JUNIPER_SECURE_CONNECT mode aggressive

set security ike policy JUNIPER_SECURE_CONNECT proposals JUNIPER_SECURE_CONNECT
set security ike policy JUNIPER_SECURE_CONNECT pre-shared-key ascii-text "$9$yYJeMXVwgUjq7-jqmfn6rev"

set security ike gateway JUNIPER_SECURE_CONNECT dynamic hostname ra.example.com
set security ike gateway JUNIPER_SECURE_CONNECT dynamic ike-user-type shared-ike-id
set security ike gateway JUNIPER_SECURE_CONNECT ike-policy JUNIPER_SECURE_CONNECT
set security ike gateway JUNIPER_SECURE_CONNECT dead-peer-detection optimized
set security ike gateway JUNIPER_SECURE_CONNECT dead-peer-detection interval 10
set security ike gateway JUNIPER_SECURE_CONNECT dead-peer-detection threshold 5
set security ike gateway JUNIPER_SECURE_CONNECT version v1-only
set security ike gateway JUNIPER_SECURE_CONNECT aaa access-profile Juniper_Secure_Connect
set security ike gateway JUNIPER_SECURE_CONNECT tcp-encap-profile SSL-VPN
set security ike gateway JUNIPER_SECURE_CONNECT external-interface ge-0/0/1


set security ipsec proposal JUNIPER_SECURE_CONNECT encryption-algorithm aes-256-gcm
set security ipsec proposal JUNIPER_SECURE_CONNECT lifetime-seconds 3600
set security ipsec policy JUNIPER_SECURE_CONNECT perfect-forward-secrecy keys group19
set security ipsec policy JUNIPER_SECURE_CONNECT proposals JUNIPER_SECURE_CONNECT

set security ipsec vpn JUNIPER_SECURE_CONNECT bind-interface st0.0
set security ipsec vpn JUNIPER_SECURE_CONNECT ike gateway JUNIPER_SECURE_CONNECT
set security ipsec vpn JUNIPER_SECURE_CONNECT ike ipsec-policy JUNIPER_SECURE_CONNECT
set security ipsec vpn JUNIPER_SECURE_CONNECT traffic-selector ts-1 local-ip 0.0.0.0/0
set security ipsec vpn JUNIPER_SECURE_CONNECT traffic-selector ts-1 remote-ip 0.0.0.0/0
set security remote-access profile ra.example.com ipsec-vpn JUNIPER_SECURE_CONNECT
set security remote-access profile ra.example.com access-profile Juniper_Secure_Connect
set security remote-access profile ra.example.com client-config JUNIPER_SECURE_CONNECT
set security remote-access client-config JUNIPER_SECURE_CONNECT connection-mode manual
set security remote-access client-config JUNIPER_SECURE_CONNECT dead-peer-detection interval 60
set security remote-access client-config JUNIPER_SECURE_CONNECT dead-peer-detection threshold 5


set access address-assignment pool Juniper_Secure_Connect_Addr-Pool family inet network 192.168.2.0/24
set access address-assignment pool Juniper_Secure_Connect_Addr-Pool family inet range Range low 192.168.2.11
set access address-assignment pool Juniper_Secure_Connect_Addr-Pool family inet range Range high 192.168.2.100
set access address-assignment pool Juniper_Secure_Connect_Addr-Pool family inet xauth-attributes primary-dns 10.8.8.8/32
set access address-assignment pool Juniper_Secure_Connect_Addr-Pool family inet xauth-attributes primary-wins 192.168.4.10/32
set access profile Juniper_Secure_Connect address-assignment pool Juniper_Secure_Connect_Addr-Pool
set access firewall-authentication web-authentication default-profile Juniper_Secure_Connect
set access profile Juniper_Secure_Connect client Bob firewall-user password "$9$abGjqTz6uORmfORhSMWJGD"

set services ssl termination profile Juniper_SCC-SSL-Term-Profile server-certificate JUNIPER_SECURE_CONNECT(RSA)
set security tcp-encap profile SSL-VPN ssl-profile Juniper_SCC-SSL-Term-Profile
set security policies from-zone trust to-zone VPN policy JUNIPER_SECURE_CONNECT-1 match source-address any
set security policies from-zone trust to-zone VPN policy JUNIPER_SECURE_CONNECT-1 match destination-address any
set security policies from-zone trust to-zone VPN policy JUNIPER_SECURE_CONNECT-1 match application any
set security policies from-zone trust to-zone VPN policy JUNIPER_SECURE_CONNECT-1 then permit
set security policies from-zone trust to-zone VPN policy JUNIPER_SECURE_CONNECT-1 then log session-close
set security policies from-zone VPN to-zone trust policy JUNIPER_SECURE_CONNECT-2 match source-address any
set security policies from-zone VPN to-zone trust policy JUNIPER_SECURE_CONNECT-2 match destination-address any
set security policies from-zone VPN to-zone trust policy JUNIPER_SECURE_CONNECT-2 match application any
set security policies from-zone VPN to-zone trust policy JUNIPER_SECURE_CONNECT-2 then permit
set security policies from-zone VPN to-zone trust policy JUNIPER_SECURE_CONNECT-2 then log session-close

set interfaces ge-0/0/0 unit 0 family inet address 192.0.2.0/24
set interfaces ge-0/0/1 unit 0 family inet address 198.51.100.0/24
set interfaces st0 unit 0 family inet

set security zones security-zone trust host-inbound-traffic system-services all
set security zones security-zone trust host-inbound-traffic protocols all
set security zones security-zone trust interfaces ge-0/0/0.0
set security zones security-zone VPN host-inbound-traffic system-services all
set security zones security-zone VPN host-inbound-traffic protocols all
set security zones security-zone VPN interface st0.0
set security zones security-zone VPN interfaces ge-0/0/1.0

Step-by-Step-Procedure

To configure VPN settings using the command line interface:

  1. Log in to your SRX Series Firewall using the command line interface (CLI).
  2. Enter the configuration mode.
  3. Configure remote access VPN.
    Condition

    For deploying Juniper Secure Connect, you must create a self-signed certificate and bind the certificate to the SRX Series Firewall. For more information, see Preparing Juniper Secure Connect Configuration.

    IKE Configuration:

    1. Configure IKE proposal.
      • Define IKE proposal authentication method, Diffie-Hellman group, and authentication algorithm.
      • Configure pre-shared-keys as the authentication method.

        Enter the key in ASCII format. We do not support hexadecimal format for remote-access VPN.

      content_copy zoom_out_map
      user@host# set security ike proposal JUNIPER_SECURE_CONNECT authentication-method pre-shared-keys
      user@host# set security ike proposal JUNIPER_SECURE_CONNECT dh-group group19
      user@host# set security ike proposal JUNIPER_SECURE_CONNECT encryption-algorithm aes-256-cbc
      user@host# set security ike proposal JUNIPER_SECURE_CONNECT lifetime-seconds 28800
      
    2. Configure IKE policy.

      Set the IKE Phase 1 policy mode, reference to the IKE proposal, and IKE Phase 1 policy authentication method.

      content_copy zoom_out_map
      user@host# set security ike policy JUNIPER_SECURE_CONNECT mode aggressive
      user@host# set security ike policy JUNIPER_SECURE_CONNECT proposals JUNIPER_SECURE_CONNECT
      user@host# set security ike policy JUNIPER_SECURE_CONNECT pre-shared-key ascii-text "$9$yYJeMXVwgUjq7-jqmfn6rev"
      
    3. Configure IKE gateway options. See dynamic.
      content_copy zoom_out_map
      user@host# set security ike gateway JUNIPER_SECURE_CONNECT dynamic hostname ra.example.com
      user@host# set security ike gateway JUNIPER_SECURE_CONNECT dynamic ike-user-type shared-ike-id
      user@host# set security ike gateway JUNIPER_SECURE_CONNECT ike-policy JUNIPER_SECURE_CONNECT
      

      If you do not configure the DPD values and the version information, the Junos OS assigns the default value for these options. See dead-peer-detection.

      content_copy zoom_out_map
      user@host# set security ike gateway JUNIPER_SECURE_CONNECT dead-peer-detection optimized
      user@host# set security ike gateway JUNIPER_SECURE_CONNECT dead-peer-detection interval 10
      user@host# set security ike gateway JUNIPER_SECURE_CONNECT dead-peer-detection threshold 5
      user@host# set security ike gateway JUNIPER_SECURE_CONNECT version v1-only
      user@host# set security ike gateway JUNIPER_SECURE_CONNECT aaa access-profile Juniper_Secure_Connect
      user@host# set security ike gateway JUNIPER_SECURE_CONNECT tcp-encap-profile SSL-VPN
      

      Configure external interface IP address for the clients to connect. You must enter this same IP address (in this example: 192.0.2.0) for the Gateway Address field in the Juniper Secure Connect application. See gateway.

      content_copy zoom_out_map
      user@host# set security ike gateway JUNIPER_SECURE_CONNECT external-interface ge-0/0/1
      

    IPsec Configuration:

    1. Configure IPsec proposal.
      content_copy zoom_out_map
      user@host# set security ipsec proposal JUNIPER_SECURE_CONNECT encryption-algorithm aes-256-gcm
      user@host# set security ipsec proposal JUNIPER_SECURE_CONNECT lifetime-seconds 3600
      
    2. Configure IPsec policy.
      • Specify IPsec phase 2 PFS to use Diffie-Hellman group 19.
      • Specify IPsec Phase 2 proposal reference.
      content_copy zoom_out_map
      user@host# set security ipsec policy JUNIPER_SECURE_CONNECT perfect-forward-secrecy keys group19
      user@host# set security ipsec policy JUNIPER_SECURE_CONNECT proposals JUNIPER_SECURE_CONNECT
      

    IPsec VPN Configuration:

    1. Configure IPsec VPN parameters. See vpn (Security).
      content_copy zoom_out_map
      user@host# set security ipsec vpn JUNIPER_SECURE_CONNECT bind-interface st0.0
      user@host# set security ipsec vpn JUNIPER_SECURE_CONNECT ike gateway JUNIPER_SECURE_CONNECT
      user@host# set security ipsec vpn JUNIPER_SECURE_CONNECT ike ipsec-policy JUNIPER_SECURE_CONNECT
      
    2. Configure VPN traffic selectors. See traffic-selector.
      content_copy zoom_out_map
      user@host# set security ipsec vpn JUNIPER_SECURE_CONNECT traffic-selector ts-1 local-ip 0.0.0.0/0
      user@host# set security ipsec vpn JUNIPER_SECURE_CONNECT traffic-selector ts-1 remote-ip 0.0.0.0/0
      
  4. Configure the remote user client options.
    1. Configure remote access profile. See remote-access.
      content_copy zoom_out_map
      user@host# set security remote-access profile ra.example.com ipsec-vpn JUNIPER_SECURE_CONNECT
      user@host# set security remote-access profile ra.example.com access-profile Juniper_Secure_Connect
      user@host# set security remote-access profile ra.example.com client-config JUNIPER_SECURE_CONNECT
    2. Configure remote access client configuration. See client-config.
      content_copy zoom_out_map
      user@host# set security remote-access client-config JUNIPER_SECURE_CONNECT connection-mode manual
      user@host# set security remote-access client-config JUNIPER_SECURE_CONNECT dead-peer-detection interval 60
      user@host# set security remote-access client-config JUNIPER_SECURE_CONNECT dead-peer-detection threshold 5


    Table 1 summarizes the remote user settings options.

    Table 1: Remote User Settings Options

    Remote User Settings

    Description

    connection-mode

    To establish the client connection manually or automatically, configure the appropriate option.

    • If you configure manual option, then in the Juniper Secure Connect application, to establish a connection, you must either click the toggle button or select Connection > Connect from the menu.

    • If you configure Always option, then Juniper Secure Connect automatically establishes the connection.

    Known Limitation:

    Android device: If you use or select Always, then the configuration is downloaded from the first used SRX device. If the first SRX Series Firewall configuration changes or if you connect to a new SRX device, the configuration does not get downloaded to the Juniper Secure Connect application.

    This means that once you connect in the Always mode using the Android device, any configuration changes in the SRX Series Firewall do not take effect on Juniper Secure Connect.

    dead-peer-detection

    Dead Peer Detection (DPD) is enabled by default to allow the client to detect if the SRX Series Firewall is reachable and if the device is not reachable, disable the connection till reachability is restored.

    default -profile

    If you configure a VPN connection profile as a default-profile, then you must enter only the gateway address in the Juniper Secure Connect application. It is optional to enter the realm name in Juniper Secure Connect application, as the application automatically selects default profile as realm name. In this example, enter ra.example.com in the Gateway Address field of the Juniper Secure Connect application.

    Note:

    Starting in Junos OS Release 23.1R1, we’ve hidden the default-profile option at the [edit security remote-access] hierarchy level. In releases before Junos OS Release 23.1R1, you use this option to specify one of the remote-access profiles as the default profile in Juniper Secure Connect. But with changes to the format of remote-access profile names, we no longer require the default-profile option.

    We’ve deprecated default-profile option—rather than immediately removing it—to provide backward compatibility and a chance to make your existing configuration conform to the changed configuration. You’ll receive a warning message if you continue to use the default-profile option in your configuration. However existing deployments are not affected if you modify the current configuration. See default-profile (Juniper Secure Connect).

  5. Configure the local gateway.
    1. Create address pool for client dynamic-IP assignment. See address-assignment (Access).
      • Enter the network address that you use for the address assignment.

      • Enter your DNS server address. Enter WINS server details, if required. Create the address range to assign IP addresses to the clients.

      • Enter the name, and the lower and higher limits.

      content_copy zoom_out_map
      user@host# set access address-assignment pool Juniper_Secure_Connect_Addr-Pool family inet network 192.168.2.0/24
      user@host# set access address-assignment pool Juniper_Secure_Connect_Addr-Pool family inet range Range low 192.168.2.11
      user@host# set access address-assignment pool Juniper_Secure_Connect_Addr-Pool family inet range Range high 192.168.2.100
      user@host# set access address-assignment pool Juniper_Secure_Connect_Addr-Pool family inet xauth-attributes primary-dns 10.8.8.8/32
      user@host# set access address-assignment pool Juniper_Secure_Connect_Addr-Pool family inet xauth-attributes primary-wins 192.168.4.10/32
      
    2. Create access profile. Enter the details for the local IP pool that is in the VPN policy for the clients. Enter a name for the IP address pool.
      content_copy zoom_out_map
      user@host# set access profile Juniper_Secure_Connect address-assignment pool Juniper_Secure_Connect_Addr-Pool
      user@host# set access firewall-authentication web-authentication default-profile Juniper_Secure_Connect
      

      Enter a username and password for SRX local authentication of client credentials.

      content_copy zoom_out_map
      user@host# set access profile Juniper_Secure_Connect client Bob firewall-user password "$9$abGjqTz6uORmfORhSMWJGD"
      
    3. Create SSL termination profile. SSL termination is a process where the SRX Series Firewalls acts as an SSL proxy server, and terminates the SSL session from the client. Enter the name for the SSL termination profile and select the server certificate that you use for the SSL termination on the SRX Series Firewalls. The server certificate is a local certificate identifier. Server certificates are used to authenticate the identity of a server.
      content_copy zoom_out_map
      user@host# set services ssl termination profile Juniper_SCC-SSL-Term-Profile server-certificate JUNIPER_SECURE_CONNECT(RSA)
    4. Create SSL VPN profile. See tcp-encap.
      content_copy zoom_out_map
      user@host# set security tcp-encap profile SSL-VPN ssl-profile Juniper_SCC-SSL-Term-Profile
    5. Create firewall policies.
      Create the security policy to permit traffic from the trust zone to the VPN zone.
      content_copy zoom_out_map
      user@host# set security policies from-zone trust to-zone VPN policy JUNIPER_SECURE_CONNECT-1 match source-address any
      user@host# set security policies from-zone trust to-zone VPN policy JUNIPER_SECURE_CONNECT-1 match destination-address any
      user@host# set security policies from-zone trust to-zone VPN policy JUNIPER_SECURE_CONNECT-1 match application any
      user@host# set security policies from-zone trust to-zone VPN policy JUNIPER_SECURE_CONNECT-1 then permit
      user@host# set security policies from-zone trust to-zone VPN policy JUNIPER_SECURE_CONNECT-1 then log session-close
      
      Create the security policy to permit traffic from the VPN zone to the trust zone.
      content_copy zoom_out_map
      user@host# set security policies from-zone VPN to-zone trust policy JUNIPER_SECURE_CONNECT-2 match source-address any
      user@host# set security policies from-zone VPN to-zone trust policy JUNIPER_SECURE_CONNECT-2 match destination-address any
      user@host# set security policies from-zone VPN to-zone trust policy JUNIPER_SECURE_CONNECT-2 match application any
      user@host# set security policies from-zone VPN to-zone trust policy JUNIPER_SECURE_CONNECT-2 then permit
      user@host# set security policies from-zone VPN to-zone trust policy JUNIPER_SECURE_CONNECT-2 then log session-close
  6. Configure Ethernet interface information.
    content_copy zoom_out_map
    user@host# set interfaces ge-0/0/0 unit 0 family inet address 192.0.2.0/24
    user@host# set interfaces ge-0/0/1 unit 0 family inet address 198.51.100.0/24

    Configure st0 interface with the family set as inet.

    content_copy zoom_out_map
    user@host# set interfaces st0 unit 0 family inet
  7. Configure security zones.

    For host-inbound-traffic the required minimum configuration:

    1. system-services - On the VPN zone, select ike to allow VPN service and https to allow HTTPS connection to push the initial configuration to Juniper Secure Connect Application. On the trust zone, select https.

    2. protocols - None for the basic configuration.

      See system-services and protocols.

    In the configuration example we mention all system-services and protocols. But, we recommend you to allow only necessary services and protocols.

    content_copy zoom_out_map
    user@host# set security zones security-zone trust host-inbound-traffic system-services all
    user@host# set security zones security-zone trust host-inbound-traffic protocols all
    user@host# set security zones security-zone trust interfaces ge-0/0/0.0
    user@host# set security zones security-zone VPN host-inbound-traffic system-services all
    user@host# set security zones security-zone VPN host-inbound-traffic protocols all
    user@host# set security zones security-zone VPN interface st0.0
    user@host# set security zones security-zone VPN interfaces ge-0/0/1.0
  8. Remote access configuration with remote user and local gateway is configured successfully.
  9. Launch the Juniper Secure Connect application and provide the same IP address that you configured for external IP address in the Gateway Address field in the Juniper Secure Connect application.

    In this example, you’ve configured 192.0.2.0 as the external interface IP address for the clients to connect. You must enter this same IP address (192.0.2.0) for the Gateway Address field in the Juniper Secure Connect application.

Result

From operational mode, confirm your configuration by entering the show security, show access, and show services commands. If the output does not display the intended configuration, repeat the configuration instructions in this example to correct it.

content_copy zoom_out_map
[edit]
user@host> show security
   ike {
       proposal JUNIPER_SECURE_CONNECT {

           authentication-method pre-shared-keys;
           dh-group group19;
           encryption-algorithm aes-256-cbc;
           lifetime-seconds 28800;
       }
       policy JUNIPER_SECURE_CONNECT {
           mode aggressive;
;
           proposals JUNIPER_SECURE_CONNECT;
           pre-shared-key ascii-text "$9$lifv87wYojHm-VHmfT/9evW"; ## SECRET-DATA
       }
       gateway JUNIPER_SECURE_CONNECT {
           ike-policy JUNIPER_SECURE_CONNECT;
           dynamic {
               hostname ra.example.com;
               ike-user-type shared-ike-id;
           }
           dead-peer-detection {
               optimized;
               interval 10;
               threshold 5;
           }
           external-interface ge-0/0/1;

           aaa {
               access-profile Juniper_Secure_Connect;
           }
           version v1-only;
           tcp-encap-profile SSL-VPN;
       }
   }
   ipsec {
       proposal JUNIPER_SECURE_CONNECT {

           encryption-algorithm aes-256-gcm;
           lifetime-seconds 3600;
       }
       policy JUNIPER_SECURE_CONNECT {

           perfect-forward-secrecy {
               keys group19;
           }
           proposals JUNIPER_SECURE_CONNECT;
       }
       vpn JUNIPER_SECURE_CONNECT {
           bind-interface st0.0;

           ike {
               gateway JUNIPER_SECURE_CONNECT;
               ipsec-policy JUNIPER_SECURE_CONNECT;
           }
           traffic-selector ts-1 {
               local-ip 0.0.0.0/0;
               remote-ip 0.0.0.0/0;
           }
       }
   }
   remote-access {
       profile ra.example.com {
           ipsec-vpn JUNIPER_SECURE_CONNECT;
           access-profile Juniper_Secure_Connect;
           client-config JUNIPER_SECURE_CONNECT;
       }
       client-config JUNIPER_SECURE_CONNECT {
           connection-mode manual;
           dead-peer-detection {
               interval 60;
               threshold 5;
           }
       }
      
   }
   policies {
       from-zone trust to-zone VPN {
           policy JUNIPER_SECURE_CONNECT-1 {
               match {
                   source-address any;
                   destination-address any;
                   application any;
               }
               then {
                   permit;
                   log {
                       session-close;
                   }
               }
           }
       }
       from-zone VPN to-zone trust {
           policy JUNIPER_SECURE_CONNECT-2 {
               match {
                   source-address any;
                   destination-address any;
                   application any;
               }
               then {
                   permit;
                   log {
                       session-close;
                   }
               }
           }
       }
   }
   tcp-encap {
       profile SSL-VPN {
           ssl-profile Juniper_SCC-SSL-Term-Profile;
       }
   }
content_copy zoom_out_map
[edit]
user@host> show access
  access {
      profile Juniper_Secure_Connect {
          client Bob {
              firewall-user {
                  password "$9$m5z6p0IreW9AeWLxwsP5Q"; ## SECRET-DATA
              }
          }
          address-assignment {
              pool Juniper_Secure_Connect_Addr-Pool;
          }
      }
      address-assignment {
          pool Juniper_Secure_Connect_Addr-Pool {
              family inet {
                  network 192.168.2.0/24;
                  range Range {
                      low 192.168.2.11;
                      high 192.168.2.100;
                  }
                  xauth-attributes {
                      primary-dns 10.8.8.8/32;
                      primary-wins 192.168.4.10/32;
                  }
              }
          }
      }
      firewall-authentication {
          web-authentication {
              default-profile Juniper_Secure_Connect;
          }
      }
  }
content_copy zoom_out_map
[edit]
user@host> show services
   ssl {
       termination {
           profile Juniper_SCC-SSL-Term-Profile {
               server-certificate JUNIPER_SECURE_CONNECT(RSA);
           }
       }
   }

Make sure that you already have a server certificate to attach with the SSL termination profile.

content_copy zoom_out_map
[edit]
user@host> show interfaces
ge-0/0/0 {
    unit 0 {
        family inet {
            address 192.0.2.0/24;
        }
    }
}
ge-0/0/1 {
    unit 0 {
        family inet {
            address 198.51.100.0/24;
        }
    }
}
st0 {
    unit 1 {
        family inet;
    }
}
content_copy zoom_out_map
[edit]
user@host> show security zones
security-zone trust {
    host-inbound-traffic {
        system-services {
            all;
        }
        protocols {
            all;
        }
    }
    interfaces {
        ge-0/0/0.0;
    }
}
security-zone VPN {
    host-inbound-traffic {
        system-services {
            all;
        }
        protocols {
            all;
        }
    }
    interfaces {
        st0.1;
        ge-0/0/1.0;
    }
}

When you are done configuring the feature on your device, enter commit from configuration mode.

footer-navigation