- play_arrow Overview
- play_arrow Introduction
-
- play_arrow Devices
- play_arrow Device Management
- play_arrow Systems of Record
- play_arrow Device Discovery Profiles
- play_arrow Modeling Devices
- Rapid Deployment Overview
- Zero Touch Deployment Using Autoinstallation and Junos Space Network Management Platform on ACX Series and SRX Series Devices
- Model Devices Overview
- Creating a Connection Profile
- Creating a Modeled Instance
- Activating a Modeled or Cloned Device in Junos Space Network Management Platform
- Downloading a Configlet
- Viewing and Copying Configlet Data
- Activating Devices by Using Configlets
- Viewing a Modeled Instance
- Adding More Devices to an Existing Modeled Instance
- Viewing the Status of Modeled Devices
- Deleting Modeled Instances
- Viewing a Connection Profile
- Cloning a Connection Profile
- Modifying a Connection Profile
- Deleting Connection Profiles
- play_arrow Device Authentication in Junos Space
- play_arrow Viewing Device Inventory
- play_arrow Exporting Device Inventory
- play_arrow Configuring Juniper Networks Devices
- Modifying the Configuration on the Device
- Reviewing and Deploying the Device Configuration
- Junos OS Releases Supported in Junos Space Network Management Platform
- Configuration Guides Overview
- Saving the Configuration Created using the Configuration Guides
- Previewing the Configuration Created using the Configuration Guides
- Deploying the Configuration Created using the Configuration Guides
- Viewing and Assigning Shared Objects
- Applying a CLI Configlet to Devices
- Applying a CLI Configlet to a Physical Inventory Element
- Applying a CLI Configlet to a Physical Interface
- Applying a CLI Configlet to a Logical Interface
- Executing a Script on the Devices
- Executing a Script on a Physical Inventory Component
- Executing a Script on a Logical Interface
- Executing a Script on the Physical Interfaces
- play_arrow Device Adapter
- play_arrow Device Configuration Management
- play_arrow Adding and Managing Non Juniper Networks Devices
- play_arrow Accessing Devices
- Launching a Device’s Web User Interface
- Looking Glass Overview
- Executing Commands by Using Looking Glass
- Exporting Looking Glass Results in Junos Space Network Management Platform
- Secure Console Overview
- Connecting to a Device by Using Secure Console
- Configuring SRX Series Firewall Clusters in Junos Space using Secure Console
- play_arrow Logical Systems (LSYS)
- play_arrow Tenant System (TSYS)
- play_arrow Device Partitions
- play_arrow Custom Labels
- play_arrow Verifying Template, Image Deployment, Script Execution, and Staged Images on Devices
- play_arrow Device Maintenance
- Viewing Device Statistics
- Viewing Devices and Logical Systems with QuickView
- Resynchronizing Managed Devices with the Network
- Putting a Device in RMA State and Reactivating Its Replacement
- Modifying the Target IP Address of a Device
- Modifying the Serial Number of a Device
- Rebooting Devices
- Deleting Staged Images on a Device
- Cloning a Device in Junos Space Network Management Platform
- Deleting Devices
-
- play_arrow Device Templates
- play_arrow Overview
- play_arrow Template Definitions
- Creating a Template Definition
- Finding Configuration Options in a Template Definition
- Working with Rules in a Template Definition
- Specifying Device-Specific Values in Template Definitions
- Managing CSV Files for a Template Definition
- Publishing a Template Definition
- Viewing a Template Definition
- Modifying a Template Definition
- Cloning a Template Definition
- Importing a Template Definition
- Exporting a Template Definition
- Unpublishing a Template Definition
- Deleting a Template Definition
- play_arrow Configuring Devices using Device Templates
- play_arrow Configuring Devices using Quick Templates
- play_arrow Device Template Administration
- Viewing Template Details
- Viewing the Device-Template Association (Device Templates)
- Viewing Template Definition Statistics
- Viewing Device Template Statistics
- Comparing Templates or Template Versions
- Comparing a Device Template Configuration with a Device Configuration
- Cloning a Template in Junos Space Network Management Platform
- Exporting and Importing a Quick Template in Junos Space Network Management Platform
- Deleting Device Templates from Junos Space Network Management Platform
-
- play_arrow CLI Configlets
- play_arrow Overview
- play_arrow CLI Configlets
- Creating a CLI Configlet
- Modifying a CLI Configlet
- Viewing CLI Configlet Statistics
- Viewing a CLI Configlet
- Exporting CLI Configlets
- CLI Configlet Examples
- Deleting CLI configlets
- Cloning a CLI Configlet
- Importing CLI Configlets
- Applying a CLI Configlet to Devices
- Comparing CLI Configet Versions
- Marking and Unmarking CLI Configlets as Favorite
- play_arrow Configuration Views
- Configuration Views Overview
- Configuration View Variables
- Configuration View Workflow
- XML Extensions
- Creating a Configuration View
- Viewing a Configuration View
- Modifying a Configuration View
- Deleting Configuration Views
- Exporting and Importing Configuration Views
- Viewing Configuration Views Statistics
- Default Configuration Views Examples
- play_arrow XPath and Regular Expressions
- play_arrow Configuration Filters
-
- play_arrow Images and Scripts
- play_arrow Overview
- play_arrow Managing Device Images
- Device Images Overview
- Importing Device Images to Junos Space
- Viewing Device Images
- Modifying Device Image Details
- Staging Device Images
- Staging Satellite Software Packages on Aggregation Devices
- Verifying the Checksum
- Viewing and Deleting MD5 Validation Results
- Deploying Device Images
- Deploying Satellite Software Packages on Aggregation and Satellite Devices
- Viewing Device Image Deployment Results
- Viewing Device Association of Images
- Undeploying JAM Packages from Devices
- Removing Device Images from Devices
- Deleting Device Images
- play_arrow Managing Scripts
- Scripts Overview
- Promoting Scripts Overview
- Importing Scripts to Junos Space
- Viewing Script Details
- Modifying Scripts
- Modifying Script Types
- Comparing Script Versions
- Staging Scripts on Devices
- Verifying the Checksum of Scripts on Devices
- Viewing Verification Results
- Enabling Scripts on Devices
- Executing Scripts on Devices
- Executing Scripts on Devices Locally with JUISE
- Viewing Execution Results
- Exporting Scripts in .tar Format
- Viewing Device Association of Scripts
- Marking and Unmarking Scripts as Favorite
- Disabling Scripts on Devices
- Removing Scripts from Devices
- Deleting Scripts
- Script Annotations
- Script Example
- play_arrow Managing Operations
- play_arrow Managing Script Bundles
- Script Bundles Overview
- Creating a Script Bundle
- Viewing Script Bundles
- Modifying a Script Bundle
- Staging Script Bundles on Devices
- Enabling Scripts in Script Bundles on Devices
- Executing Script Bundles on Devices
- Disabling Scripts in Script Bundles on Devices
- Viewing Device Associations of Scripts in Script Bundles
- Deleting Script Bundles
-
- play_arrow Reports
- play_arrow Reports Overview
- play_arrow Report Definitions
- play_arrow Reports
-
- play_arrow Network Monitoring
- play_arrow Overview
- play_arrow Integration of OpenNMS with Junos Space Network Management Platform
- play_arrow Managing Nodes
- play_arrow Network Monitoring Administration
-
- play_arrow Configuration Files
- play_arrow Overview
- play_arrow Managing Configuration Files
-
- play_arrow Jobs
- play_arrow Overview
- play_arrow Managing Jobs
- Viewing Statistics for Jobs
- Viewing Your Jobs
- Viewing Jobs
- Viewing Objects on Which a Job is Executed
- Viewing Job Recurrence
- Rescheduling and Modifying the Recurrence Settings of Jobs
- Retrying a Job on Failed Devices
- Reassigning Jobs
- Canceling Jobs
- Clearing Your Jobs
- Archiving and Purging Jobs
- Common Error Messages in Device-Related Operations
-
- play_arrow Role-Based Access Control
- play_arrow Overview
- play_arrow Roles
- Roles Overview
- Predefined Roles Overview
- Creating a User-Defined Role
- Managing Roles
- Modifying User-Defined Roles
- Deleting User-Defined Roles
- Cloning Predefined and User-Defined Roles
- Exporting User-Defined Roles from Junos Space Network Management Platform
- Importing Roles to Junos Space Network Management Platform
- play_arrow User Accounts
- Configuring Users to Manage Objects in Junos Space Overview
- Creating Users in Junos Space Network Management Platform
- Modifying a User
- Deleting Users
- Disabling and Enabling Users
- Unlocking Users
- Viewing Users
- Exporting User Accounts from Junos Space Network Management Platform
- Changing Your Password on Junos Space
- Clearing User Local Passwords
- Viewing User Statistics
- play_arrow User Groups
- play_arrow Domains
- play_arrow Remote Profiles
- play_arrow API Access Profiles
- play_arrow User Sessions
-
- play_arrow Audit Logs
- play_arrow Troubleshooting
- play_arrow Knowledge Base
-
Junos Space Nodes in the Junos Space Fabric Overview
When you install and configure the Junos Space Appliance or Junos Space Virtual Appliance as a Junos Space node, Junos Space Network Management Platform automatically creates a fabric with one node. To create a fabric with multiple nodes providing the scalability and availability that your network requires, you must first configure a Junos Space Virtual Appliance as a Junos Space node using the Junos Space CLI. You can then use the Junos Space Platform GUI to add the node to the fabric.
This topic contains the following sections:
Understanding the Junos Space Node Functions in a Fabric
A fabric that consists of a single node provides complete Junos Space Platform management functionality, with the following node functions enabled for the node:
Load balancer—For processing HTTP requests from remote browsers and northbound interface (NBI) clients
Database—For processing database requests (for create, read, update, and delete operations)
Application logic (JBoss server)—For processing back-end business logic (Junos Space Network Management Platform service requests) and Device Mediation Layer (DML) workload (that is, any interaction between Junos Space and any device, such as device connectivity, device events, and logging events)
Figure 1 shows all functions enabled on a fabric comprising one node.

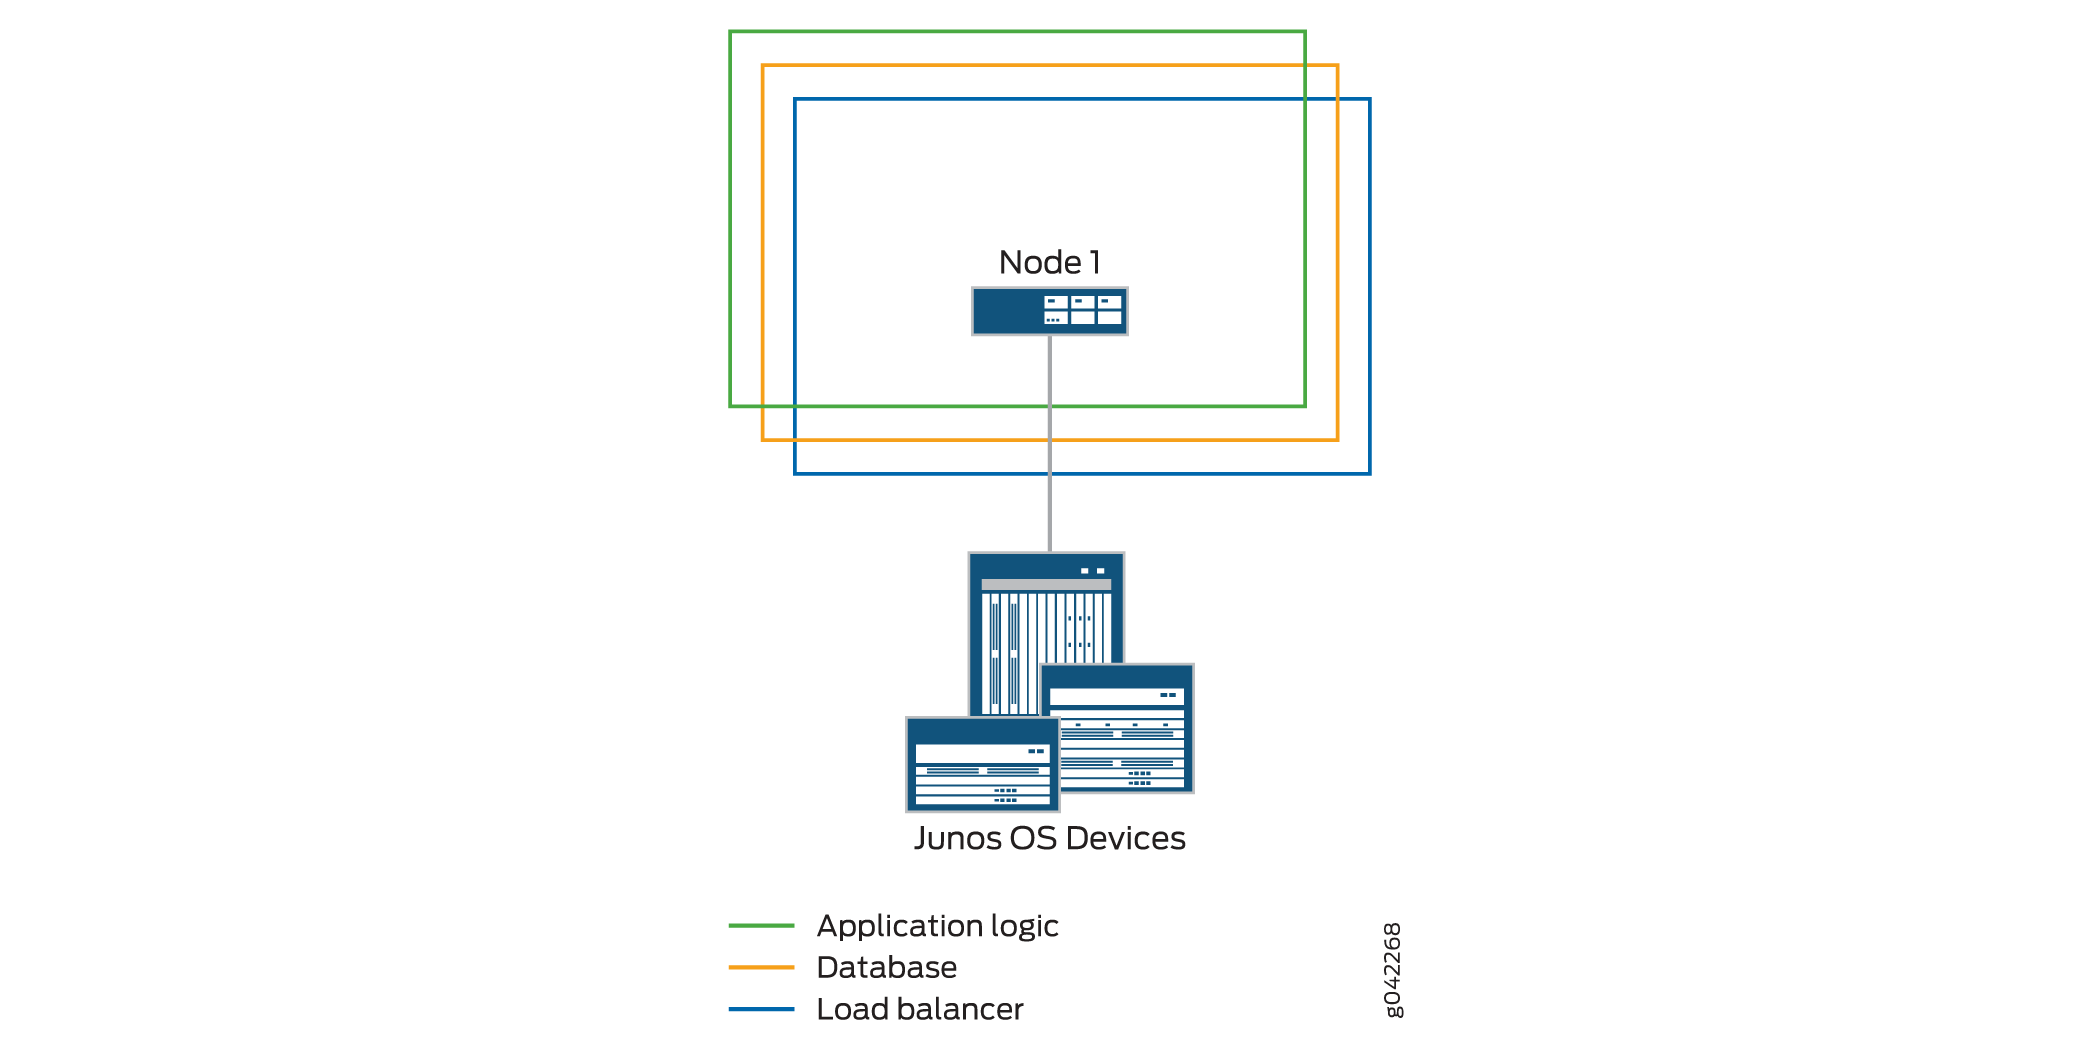
A fabric that comprises a single node provides no workload balancing and no backup if the Junos Space node goes down.
As your network expands with new devices, services, and users, you can add Junos Space nodes to handle the increased workload. For each additional Junos Space node that you configure, you must add the node to the fabric using the Junos Space Platform GUI. Each node that you add to the fabric increases the resource pool for the node functions to meet the scalability and high availability requirements of your network.
The Junos Space Platform node functions distribute the workload across operating nodes according to the following load-distribution rules:
Load balancer—When a node that functions as the active load-balancer server is down, all HTTP requests are automatically routed to the standby load-balancer server that is running on a separate node.
Database—When a node that functions as the active database server is down, all database requests (for create, read, update, and delete operations) are routed to the node that functions as the standby database server.
Application logic (DML and business logic)—Device connections and user requests are distributed among the nodes, and device-related operations are routed to the node to which the device is connected.
Junos Space Platform uses the following algorithm to ensure that the number of devices connected to a node does not exceed the threshold limit for each node:
Threshold Limit = [(Number of Devices in Database) / (Number of Nodes Running)] + 2
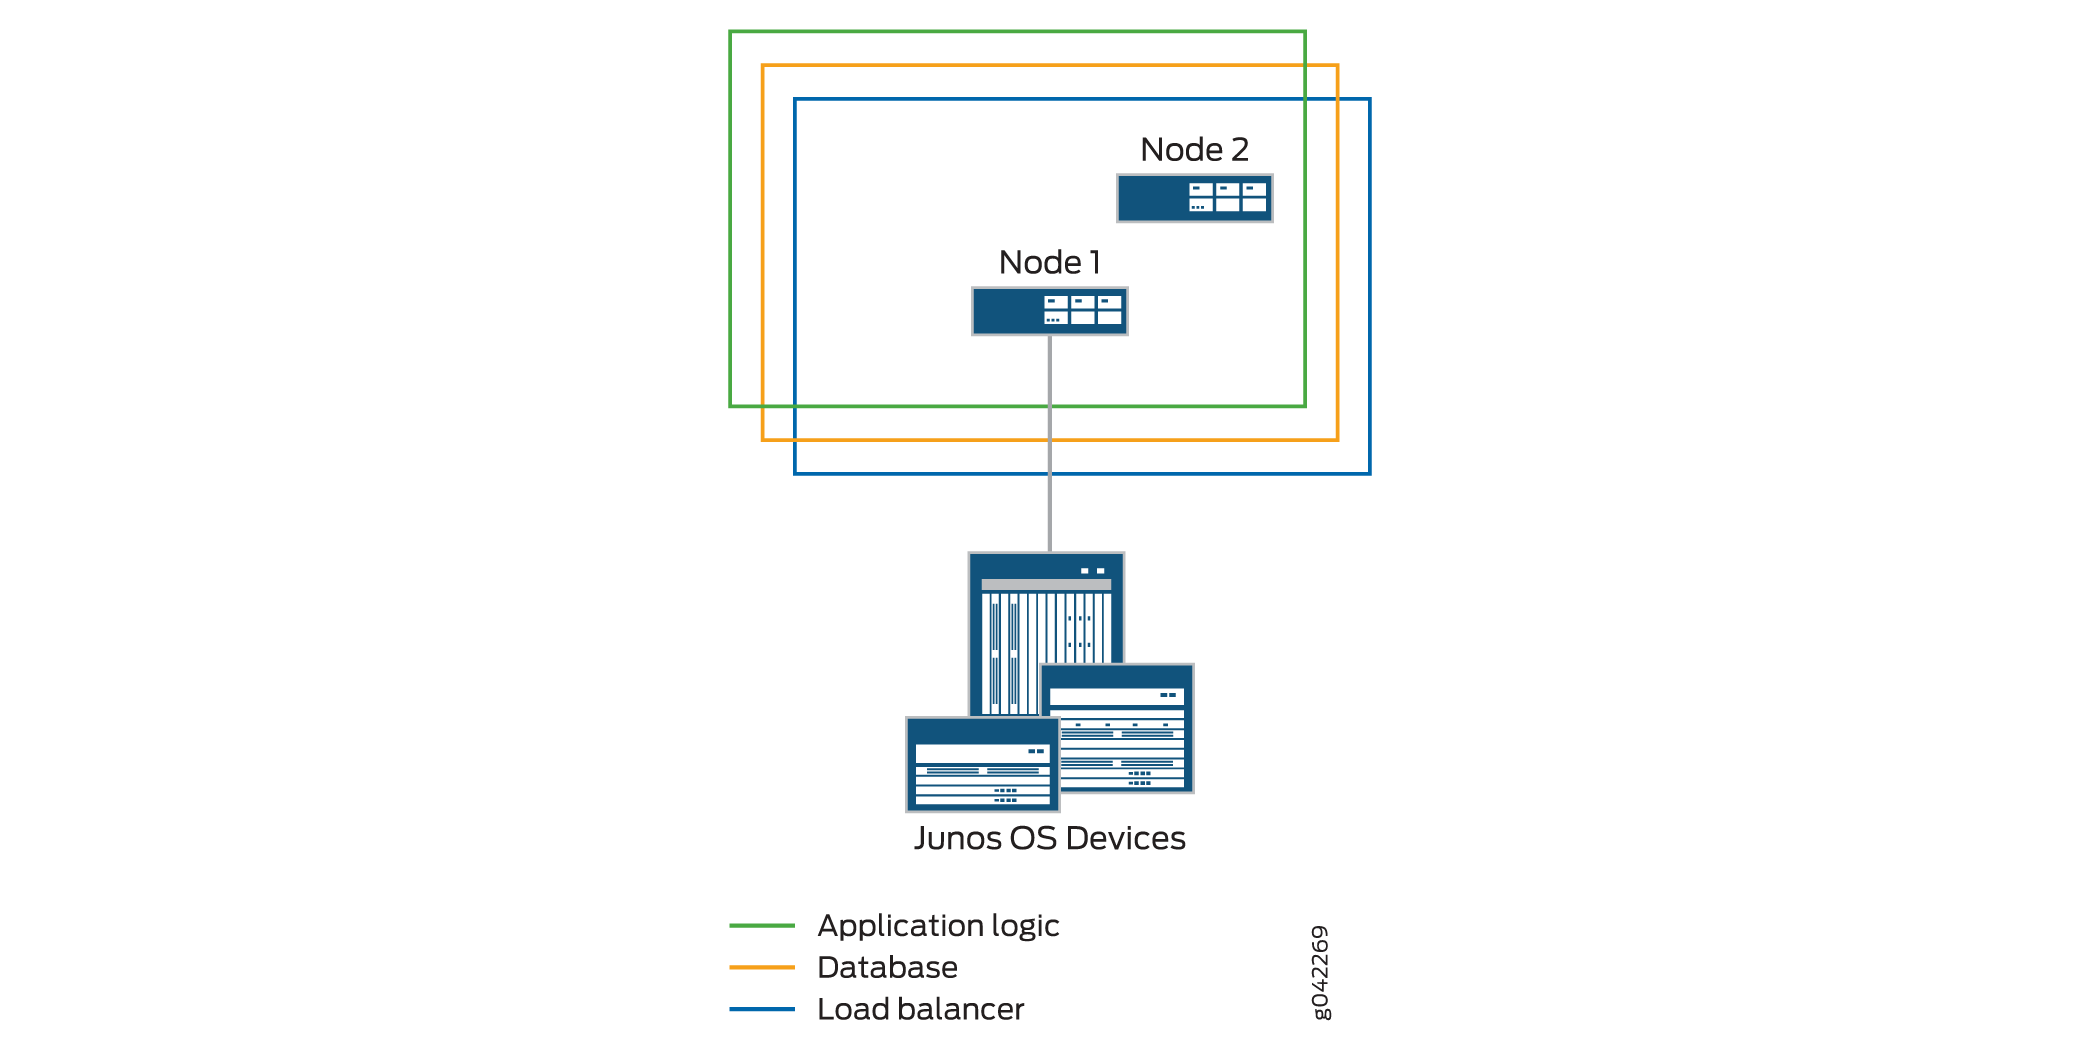
When a second Junos Space node is added to the fabric, the first node functions as the active load-balancer server and active database server, and the second node functions as the standby load-balancer server and standby database server. The load-balancer and application logic node functions provide scalability and high availability. The database node function on the second node provides high availability only.
Figure 2 shows the functions enabled on a fabric comprising two nodes.

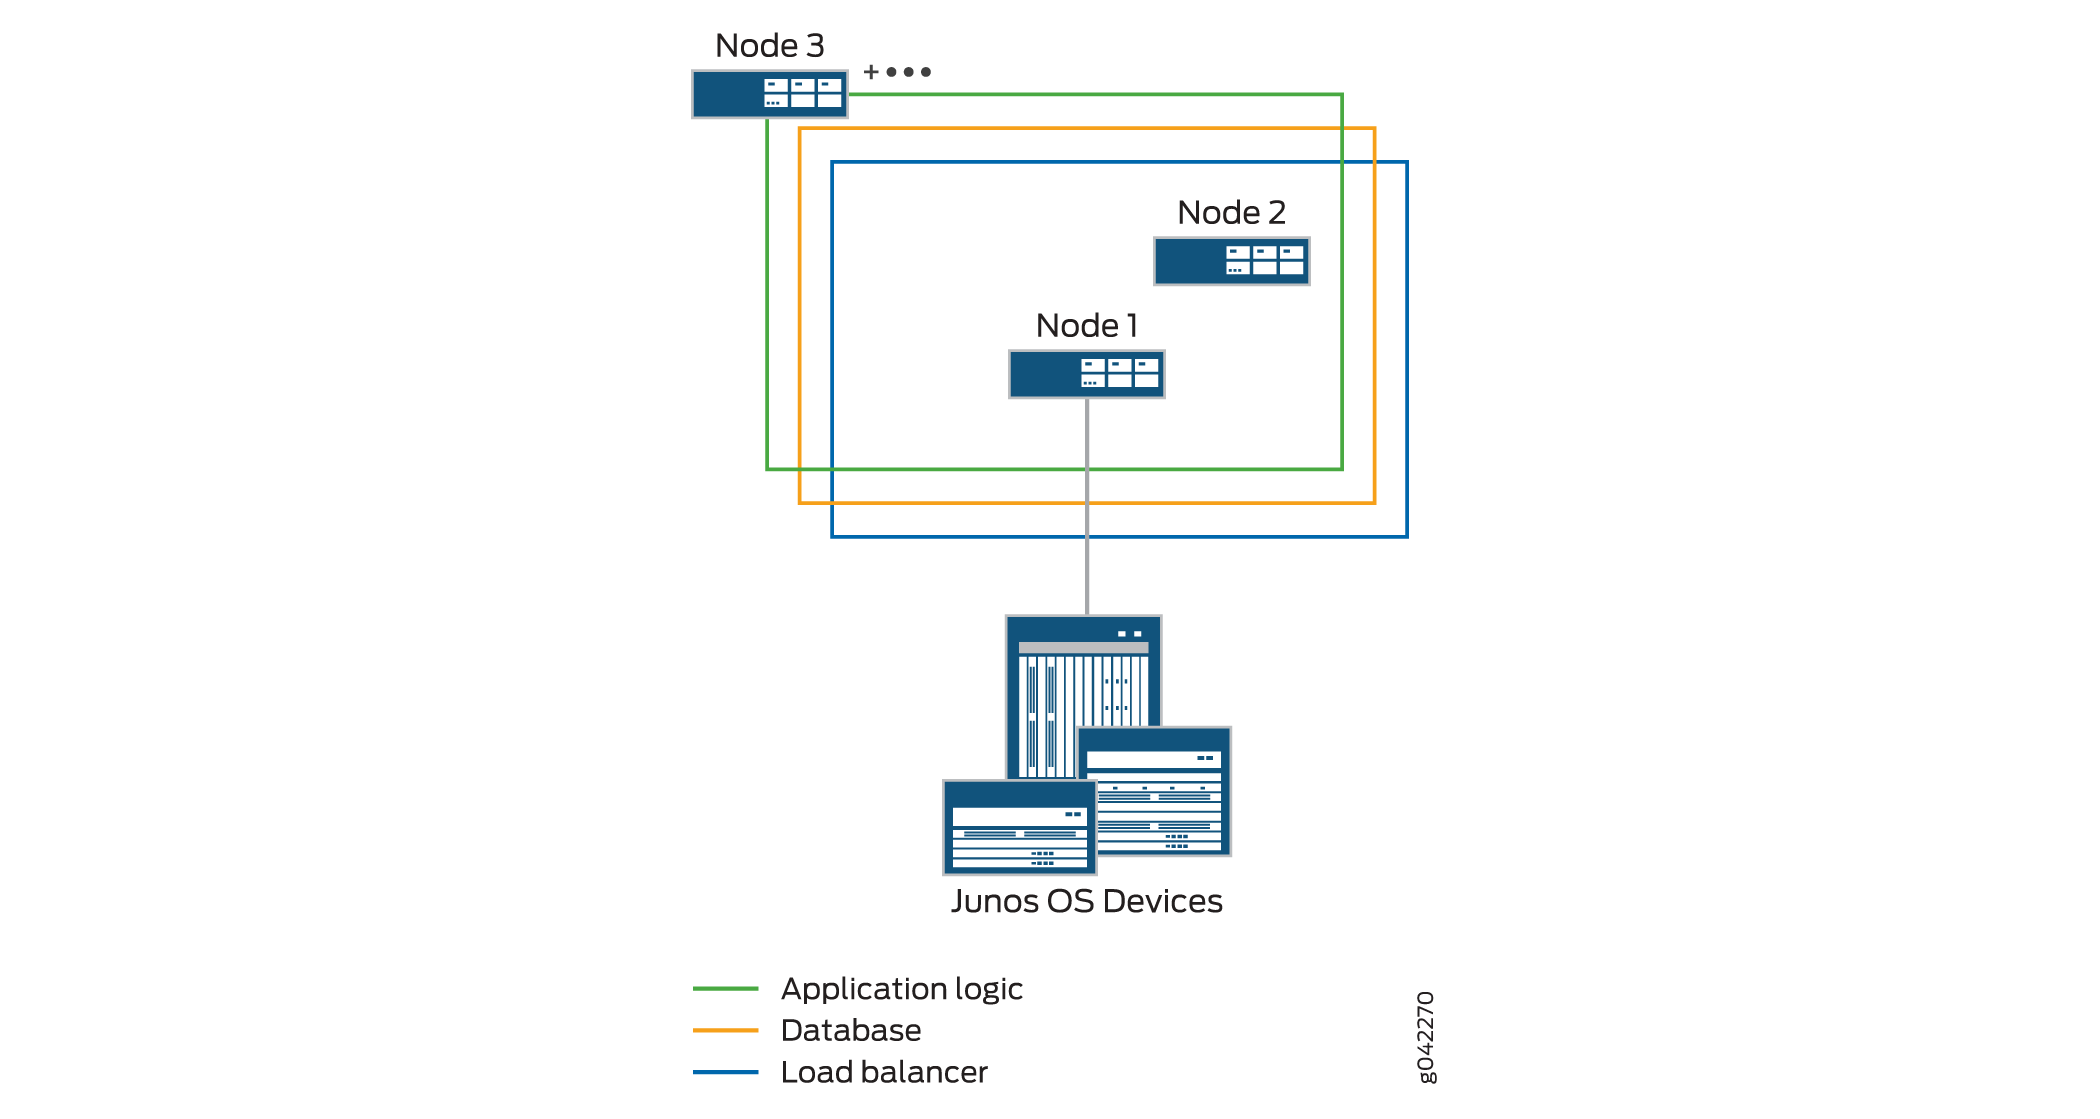
Typically, if the fabric has three or more Junos Space Nodes, only the application logic functionality is enabled from the third node onward. The application logic functionality provides both scalability and high availability. However, high availability for application logic is not available if both the first and second nodes are down. For high availability of application logic, at least one among the first and second nodes should be up.
Figure 3 shows the functions enabled on a fabric comprising three nodes.

In addition to the load balancer and JBoss nodes, you can also include dedicated database nodes in the Junos Space fabric. For more information about dedicated database nodes, see Dedicated Database Nodes in the Junos Space Fabric Overview and Distributed File System in the Junos Space Fabric Overview respectively.
You can add a Junos Space node to an existing fabric as one of the following types of nodes on the basis of the functions you want the node to perform.
JBoss, database and load-balancer node:
When you add a node to an existing fabric that has one JBoss, database and load-balancer node, you can choose to add the new node as another JBoss, database and load-balancer node. This node functions as the standby load-balancer server and ensures high availability for the Junos Space fabric. The node also provides database and application logic functionality to the fabric.
JBoss and load-balancer node:
When you add a node to an existing fabric that has two dedicated database nodes in addition to a JBoss and load-balancer node, the fourth node can be added only as another JBoss and load-balancer node. This node functions as the standby load-balancer server and ensures high availability for the Junos Space fabric. In this case, both the active and standby load-balancer nodes provide load balancing and application logic functionality only and the dedicated database nodes provide the database functionality.
JBoss node:
When you add a node to an existing fabric that already has two load-balancer nodes, you can choose to add the new node as a JBoss-only node. This node provides only the application logic functionality.
Dedicated database node:
When you add a node to an existing fabric, you can choose to add the node as a dedicated database node. If no dedicated database nodes exist in the fabric, you must add two nodes together, one as the primary database node and the other as the secondary database node. If a dedicated database node is already part of the fabric, you can add one node as the secondary database node. You cannot have more than two dedicated database nodes in a fabric. The dedicated database nodes function as the primary and secondary MySQL servers.