ClearPass Configuration for Third-Party Plug-in
On ClearPass you will configure the following:
-
API Client
-
Custom Attribute
-
Enforcement Profiles
-
Enforcement Policy
Policy Enforcer's ClearPass Connector communicates with the Clearpass Radius server using the Clearpass API. As part of threat remediation, Policy Enforcer's Clearpass Connector uses enforcement profiles. This section provides information for configuring Clearpass so that Policy Enforcer can invoke the appropriate enforcement profiles.
As part of the configuration, on ClearPass you will create two enforcement profiles, one for quarantine and one for terminate. Then you will use them in the ClearPass enforcement policy. Once ClearPass is configured, you will configure a ClearPass Connector on Policy Enforcer.
-
Always use a third-party switch that supports 802.1x, Radius CoA, Radius Accounting, and DHCP snooping features. Enabling DHCP snooping is important which configures the Radius attribute, Framed-IP-Address. Only after configuring Framed-IP-Address, Policy Enforcer can detect the session related to the infected-host IP addresses and terminate the session.
-
The stale sessions in ClearPass cannot be terminated and therefore, the actual East-West traffic block will not be active until you reauthenticate the session. You must ensure to clear the stale sessions in ClearPass frequently.
To configure the API Client:
-
In ClearPass, navigate to Administration > API Services > API Clients and create a client with
the following attributes:
Note:
You must login as ClearPass Guest to see the API services menu.
-
Client ID: sdsnclient
-
Enabled: Select the check box for Enable API client
-
Operator Profile: Create a profile from Administrator > Operator Logins > Profiles for the API client with minimum access privileges as shown in Figure 1.
Figure 1: ClearPass API Client Operator Profile Minimum Privileges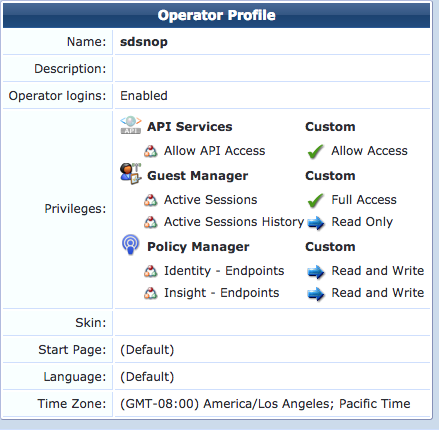
-
Grant Type: Select Client credentials (grant_type = client_credentials)
-
Client Secret: Copy and save this. It will not be shown again.
-
Access Token Lifetime: Enter 5 minutes as a time-frame.
Figure 2: ClearPass Edit API Client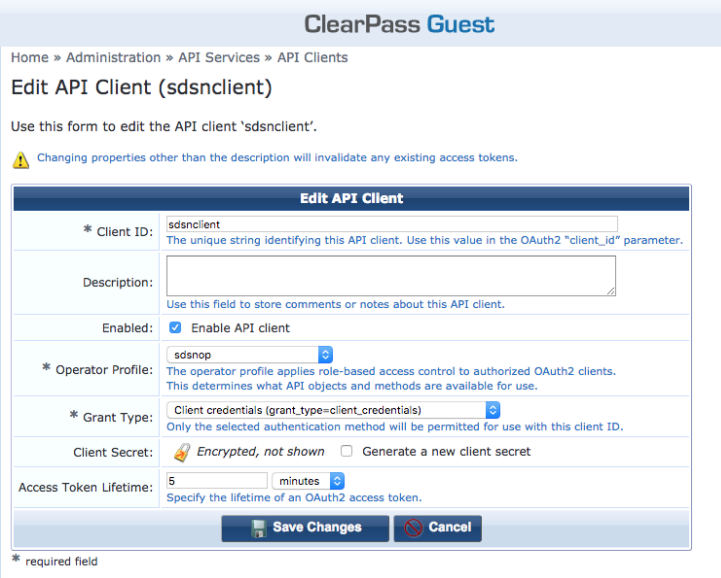
-
To configure a Custom Attribute:
-
Select ClearPass Policy Manager and navigate to Administration > Dictionaries > Attributes to create a custom attribute. Then add it into the Dictionary: sdsnEpStatus. Enter the following:
-
Entity Type: Endpoint
-
Name: sdsnEpStatus (Note that you must use this name - sdsnEpStatus)
-
Data Type: List
-
Is Mandatory: Yes
-
Allowed Values: healthy, blocked, quarantine
-
Default Value: healthy
Figure 3: ClearPass Edit Attribute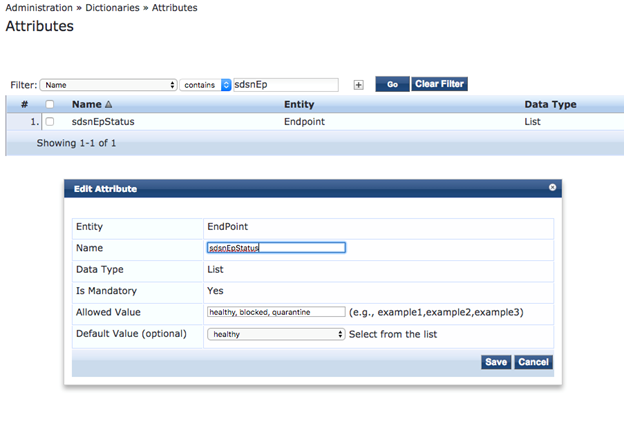
-
-
Click Save.
To configure Enforcement Profiles:
-
In ClearPass, navigate to Configuration > Enforcement > Profiles and create two enforcement profiles.
-
Profile 1: Create the following profile to quarantine infected endpoints:
-
Name: Name of the enforcement profile
-
Description: Quarantine profile for Juniper Connected Security
-
Type: RADIUS
-
Action: Accept
Figure 4: ClearPass Enforcement Profile: Quarantine Note:
Note:The data displayed at the bottom of the screen is for example and not for configuration purposes. Note that the 4th attribute can be set for the accounting packets to be sent by the NAS device to the Clearpass Radius server.
-
-
Profile 2: Create the following profile to block infected endpoints:
Note:To configure this profile, copy the default system profile Juniper Terminate Session and edit the profile name and attributes.
-
Name: JNPR SDSN Terminate Session
-
Description: Block profile for SDSN
-
Type: RADIUS_CoA
-
Action: Disconnect
Note:If there are any vendor-specific additional attributes required for the Terminate COA, those needs to be added here. For example, in the case of Juniper Networks Trapeze Wireless Clients, the JNPR SDSN Terminate Session profile requires two additional attributes: NAS-IP-Address and User-Name.
Figure 5: ClearPass Enforcement Profile: Terminate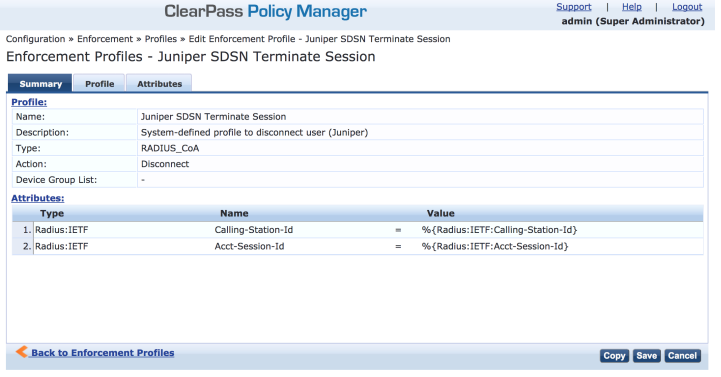
-
Configure an Enforcement Policy:
In ClearPass, navigate to Configuration > Enforcement > Policies. Both profiles you created must be added to all the enforcement policies for endpoints addressed by Policy Enforcer.
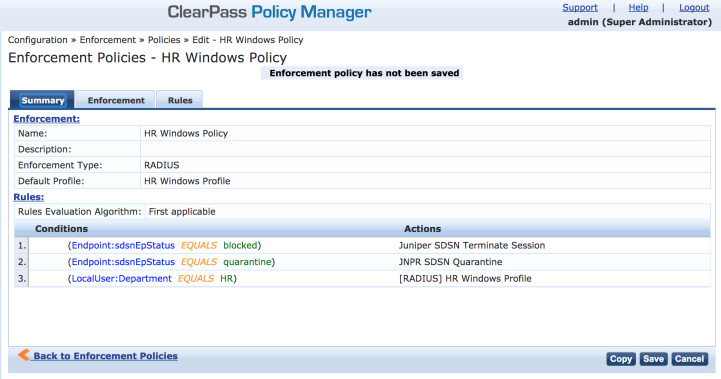
Rules Evaluation should be set to "First applicable."
Make sure the default termination enforcement profile for each of the supported vendors is not superseded by any of its enforcement profile copies. Also make sure that all the attributes required for termination are set in the profile. (As in the previous Juniper Networks Trapeze Wireless Clients example.)
Enable Insight:
-
In ClearPass, navigate to Administration > Server Manager > Server Configuration for the server in use.
-
Enable Insight in the System tab.
Set the Log accounting Interim-update Packets as TRUE:
-
In ClearPass, navigate to Administration > Server Manager > Server Configuration for the server in use.
-
Select the Service Parameters tab.
-
In the Select Service drop down list, select Radius Server and set the Log accounting Interim-update Packets as TRUE.
-
Proceed to Creating a Policy Enforcer Connector for Third-Party Switches to finish the configuration with Policy Enforcer.