Deploy vSRX Virtual Firewall in Google Cloud Platform
The following procedures describe how to deploy vSRX Virtual Firewall in the Google Virtual Private Cloud (VPC):
Deploy the vSRX Virtual Firewall Firewall from Google Cloud Platform Marketplace.
Use custom private image to deploy the vSRX Virtual Firewall Firewall from the GCP portal.
Use cloud-init to deploy the vSRX Virtual Firewall Firewall through gcloud using CLI.
Deploy the vSRX Virtual Firewall Firewall from Marketplace Launcher
You can use the Google Cloud Platform Marketplace to deploy your vSRX3.0 with licenses as avirtual machine(VM) running on a Google Compute Engine instance.
Before you deploy the vSRX Virtual Firewall, you must create or choose a project in your organization and create any networks and subnets that will connect to the firewall. You cannot attach multiple network interfaces to the same VPC network. Every interface you create must have a dedicated network with at least one subnet.
This topic provide your step to deploy a vSRX Virtual Firewall Firewall from the Google Cloud Platform Marketplace Launcher.
- Locate the vSRX Virtual Firewall listing in the Marketplace.
In the Search box, type ’Juniper’ or ’vSRX Virtual Firewall’ and click one of the following options based on your licensing requirements as shown in Figure 1.
The images are available from cloud:
vSRX Virtual Firewall Next Generation Firewall
vSRX Virtual Firewall Next Generation Firewall-BYOL
vSRX Virtual Firewall Next Generation Firewall with Anti-Virus Protection
Figure 1: Locate vSRX Virtual Firewall Listing in the GCP Marketplace
- Click Launch on Compute Engine. The deployment
page appears as shown in Figure 2.Figure 2: Launch vSRX Virtual Firewall Instance in GCP from Marketplace

- Name the instance and choose resources.
Provide the details for the vSRX Virtual Firewall VM:
Deployment Name—Enter a unique name for your vSRX Virtual Firewall VM.
Machine type—Select a machine type based on the system requirements for your license.
SSH key—Paste your public SSH key that you created earlier.
Paste the key after the text gcp-user:
Note:It is mandatory to use “gcp-user” as username when you login to the vSRX Virtual Firewall for the first time vSRX Virtual Firewall.
Select the Block project-wide SSH keys option.
Network interfaces—Select the VPC network and the subnets. Note that you can add only those subnets that you’ve created for the selected zone for this vSRX Virtual Firewall VM.
IP Forwarding—Retain the default value On. This is a mandatory requirement for the vSRX Virtual Firewall VM.
Enable External IP—Select the ephemeral option. This setting allows the GCP to provide an ephemeral IP address to act as the external IP address.
Allow HTTP traffic from the Internet—Retain the default value as selected. We recommend not providing HTTP access unless absolutely necessary.
Allow TCP port 22 traffic from the Internet—Retain the default value as selected. F or security reasons, we recommend that you limit the SSH access only to the specific IP address to access the vSRX Virtual Firewall
Name the instance and choose resources as shown in Figure 3.
Figure 3: Name vSRX Virtual Firewall Instance and Choose Resources in GCP Marketplace
Choose a Deployment Name. The name must be unique and cannot conflict with any other deployment in the project.
Select a zone.
Select a machine type.
Set the SSH Key as shown in Figure 4.
Figure 4: SSH Key
Configure the network and subnet.
Leave IP forwarding ‘on’ (mandatory for vSRX Virtual Firewall deployments) as shown in Figure 5.
Figure 5: IP Forwarding Configuration
Deploy the vSRX Virtual Firewall Instance from GCP Portal Using Custom Private Image
You can also use your custom private image to deploy the vSRX Virtual Firewall instead of deploying an image from GCP marketplace. Firstly you need upload the private image to Google Cloud storage, then create compute image in GCP, and then deploy vSRX Virtual Firewall on Google Compute Engine.
Watch the video Deploying vSRX Virtual Firewalls on Google Cloud Platform to understand how you can deploy vSRX Virtual Firewall instances from GCP.
- Upload vSRX Virtual Firewall Image to Google Cloud Storage
- Create vSRX Virtual Firewall Image
- Deploy the vSRX Virtual Firewall Firewall from GCP Portal
Upload vSRX Virtual Firewall Image to Google Cloud Storage
To upload vSRX Virtual Firewall image to Google Cloud Storage:
Upload image through SDK shell:
Install Google Cloud SDK on Ubuntu.
You must install Google Cloud SDK on your operation system. below is the sample to install it on Ubuntu.
For more information on Google Cloud SDK installation on Ubuntu, see https://cloud.google.com/sdk/docs/quickstart-debian-ubuntu and for Gcloud command-line tool overview, see https://cloud.google.com/sdk/gcloud/.
To upload image through SDK shell:
Create google cloud storage.
gs://vsrx-imageCopy disk.raw to cloud storage.
gsutil cp vsrx-0115.tar.gz gs://vsrx-image
To upload image from Google Cloud Platform portal.
Click Storage->Create Bucket->Upload files as shown in Figure 6.
Figure 6: vSRX Virtual Firewall Image Upload from GCP Portal
Check the private image is available in Google Cloud Storage by selecting Storage -> Bucket detail in Google Cloud Platform web as shown in Figure 7.
Figure 7: View Private Images in GCP Portal
Create vSRX Virtual Firewall Image
After you upload the vSRX Virtual Firewall image file to GCP storage you need to create GCP compute image for vSRX Virtual Firewall deployment.
Using Google Console
You can rename the image file using the Google console as well.
Log in to your Google account and open the Google Cloud Platform home page.
Click theimages option on the Google Cloud Platform page. The Create an image page opens as shown in Figure 8
Figure 8: Google Cloud Platform Image Creation Page
Fill in the required details in the Create an image page and click Create.
Note:It is mandatory to use “gcp-user” as username when you login to the vSRX Virtual Firewall for the first time vSRX Virtual Firewall.
Check the private image that available in Google Cloud Compute Engine. On Google Cloud Platform web, click Compute Engine->Images as shown in Figure 9.
Figure 9: Check Private Image in Google Cloud Compute Engine
Deploy the vSRX Virtual Firewall Firewall from GCP Portal
You can follow below steps to deploy a vSRX Virtual Firewall instance:
- Configure a vSRX Virtual Firewall instance.
Name—Specify a unique name to the instance.
Region—Select proper region you want to deploy the vSRX Virtual Firewall on, you must already create subnet in same region in proper VPC networks.
Machine configuration —Choose correct machine type.
Container —Uncheck
Boot Disk—Choose the private image in Custom Images tab as shown in Figure 10. You must already upload the private image to Google Cloud Storage.
Figure 10: Boot Disk from Custom Images
Identity and API access—Set default
Firewall / Management —Set default
Firewall / Security—Paste your SSH Key pair here. Details please reference “Prepare to setup vSRX Virtual Firewall on GCP – SSH Key”.
Firewall / Disks—Set default
Firewall / Networking:
Table 1: Firewall Networking Firewall / Networking
Details
Hostname
Optional, you can specify tags for the instance used for route configuration.
Network Interfaces
Default
You can set interfaces to existing VPC networks and subnet in same region. Interface number, Interface order and manage interface setting.
Deploy the vSRX Virtual Firewall Firewall Using Cloud-init
vSRX Virtual Firewall supports cloud-init. Cloud-init is an open-source multi-distribution package that handles early initialization of a cloud instance. It allows user to customize VM instance with attributes like hostname and default IP on the first boot. Cloud-init is particularly useful when user wants to deploy large number of VM instances in the data center using automation tools.
Some of the initial provisioning parameters for first boot are:
Hostname
Root password
SSH public key
Note:for the ssh key file, it needs to be in the format "<username>:<key value>" as required by google cloud. Something like this:
Management interface (fxp0) IP
Default gateway IP
You can deploy vSRX Virtual Firewall Firewall using cloud-init in two ways:
From Google SDK
To deploy vSRX Virtual Firewall with cloud-init from Google portal, see Deploy the vSRX Virtual Firewall Firewall from GCP Portal. To add user-data to have cloud init enabled specify the metadata.
GCE supports cloud-init type instance configuration. To launch instance with user data, use the command below as an example.
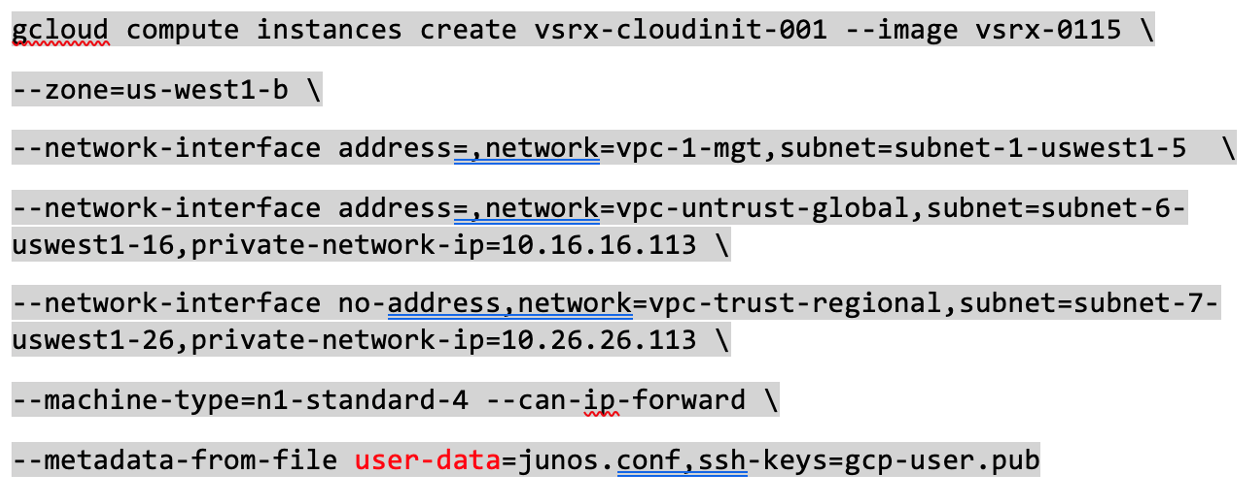
Please note the following points:
junos.conf is configuration file with ‘#junos-config’ in content
gcp-user.pub is ssh public key
vSRX Virtual Firewall 3.0 supports RSA key pair only
For the SSH key file, it needs to be in the format <username>:<key value> as required by Google cloud. Refer the sample SSH key file below.
root@cnrd-kvmsrv37:~# cat gcp-user.pub
ssh-rsa AAAAB3NzaC1yc2EAAAADAQABAAABAQDeR2jhMLzSfgee/5cnduTa+13yVLKbTa/
OFnZSHQsZoA5LKHIXs/TbyooZTX5PnfNr6hx2Iyxjaodu01kT0UJ87wps8n9BH74DP6x0YK07OaZZl5T/
5Iso9fXRCzl9+go9vKzNKhqXmqKUc3Fl6hTX2QzQbtrwN2twLzCxz+OSliCoobJr+/
8wPcvI6fUbL6FRTgE1zC1HBlDKspK7x47YDYPJlUcyMhRtGvxd319jrx5i96mZq850+
dCfZkHSipT09hFRtk8C4MsOaKsw3RWUCY5LCPekrutrLLfhMKh88onv4ud7gXOklSwgVVod49aY2FfiaACMAVoaomfYXweP
gcp-user


ssh -i <private-key> gcp-user@<vSRX management public ip>
In junos.conf, please remove the “gcp-default” block in your user data. They will shadow the one created by vSRX Virtual Firewall init script. Refer the sample junos config
#junos-config security { policies { default-policy { permit-all; } } zones { security-zone trust { interfaces { ge-0/0/0.0; } } security-zone untrust { interfaces { ge-0/0/1.0; } } } } interfaces { ge-0/0/0 { unit 0 { family inet { 10.0.0.10/24; } } } ge-0/0/1 { unit 0 { family inet { 10.0.1.10/24; } } } }Note:gcloud connect to vSRX Virtual Firewall is not supported. Always use ssh with user provided key to connect to vSRX Virtual Firewall after instance is up.