ON THIS PAGE
Example: Enabling Wide IS-IS Metrics for Traffic Engineering
This example shows how to allow a wide range of metric values on IS-IS interfaces.
Requirements
Before you begin, configure IS-IS on both routers. See Example: Configuring IS-IS for information about the sample IS-IS configuration.
Overview
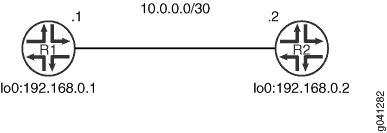
Figure 1 shows the topology used in this example.

This example describes the steps on Device R1.
Configuration
Procedure
CLI Quick Configuration
To quickly configure
this example, copy the following commands, paste them into a text
file, remove any line breaks, change any details necessary to match
your network configuration, and then copy and paste the commands into
the CLI at the [edit] hierarchy level.
Device R1
set protocols isis level 2 wide-metrics-only
set protocols isis level 1 wide-metrics-only
set protocols isis interface lt-1/2/0.1 level 2 metric 100
set protocols isis interface lt-1/2/0.1 level 1 metric 100
Step-by-Step Procedure
The following example requires you to navigate various levels in the configuration hierarchy. For information about navigating the CLI, see Using the CLI Editor in Configuration Mode in the CLI User Guide.
To configure IS-IS checksums:
Configure a metric of 100 on the interface at both IS-IS levels.
[edit protocols isis interface lt-1/2/0.1]
user@R1# set level 2 metric 100
user@R1# set level 1 metric 100
Enable wide metrics.
[edit protocols isis]
user@R1# set level 2 wide-metrics-only
user@R1# set level 1 wide-metrics-only
Results
From configuration mode, confirm your configuration
by entering the show protocols command. If the output does
not display the intended configuration, repeat the instructions in
this example to correct the configuration.
user@R1# show protocols
isis {
    level 2 wide-metrics-only;
    level 1 wide-metrics-only;
    interface lt-1/2/0.1 {
        level 2 metric 100;
        level 1 metric 100;
    }
}
If you are done configuring the device, enter commit from configuration mode.
Verification
Confirm that the configuration is working properly.
Verifying That Wide Metrics Are Enabled
Purpose
Make sure that the interface has the expected metric.
Action
From operational mode, enter the show isis interface
extensive command.
user@R1> show isis interface lt-1/2/0.1 extensive
IS-IS interface database:
lt-1/2/0.1
  Index: 68, State: 0x6, Circuit id: 0x1, Circuit type: 3
  LSP interval: 100 ms, CSNP interval: 10 s, Loose Hello padding
  Adjacency advertisement: Advertise
  Level 1
    Adjacencies: 1, Priority: 64, Metric: 100
    Hello Interval: 9.000 s, Hold Time: 27 s
    Designated Router: tp5-R2.02 (not us)
  Level 2
    Adjacencies: 1, Priority: 64, Metric: 100
    Hello Interval: 9.000 s, Hold Time: 27 s
    Designated Router: tp5-R2.02 (not us)
Meaning
The output shows that the metric is set to 100, as expected, at both Level 1 and Level 2.
