ON THIS PAGE
Configure Syslog over TLS
Learn how to configure your device to transport system log messages (also known as syslog messages) securely over the Transport Layer Security (TLS) protocol.
Control Plane Logs
syslog statement at the [system]
hierarchy level.Example: Configure Syslog over TLS
This example shows how to configure a Juniper Networks device to transport syslog messages (control plane logs) securely over TLS.
Requirements
This example uses the following hardware and software components:
-
Junos OS Release 21.2R1 or later
-
Junos OS Evolved Release 23.4R1 or later
-
Device running Junos OS or Junos OS Evolved (syslog client)
-
Syslog server
Overview
You use the TLS protocol to enable secure transportation of system log messages (control plane logs) from the syslog client to the syslog server. TLS uses certificates to authenticate and encrypt the communication.
Syslog over TLS supports the end-entity certificate-based authorization policy defined in RFC 5425, but does not support subject name authorization policy.
- Server authentication (or one-way TLS)—Client verifies the identify of the server and trusts the server.
- Mutual authentication—Both the server and client trust each other.
You can choose either server authentication or mutual authentication depending on your network. To quickly access the information you need, click the links in Table 1.
|
Authentication Mode |
Procedure |
Section Where the Information Is Located |
|---|---|---|
|
Server authentication |
Configure PKI Configure the device |
Configuration
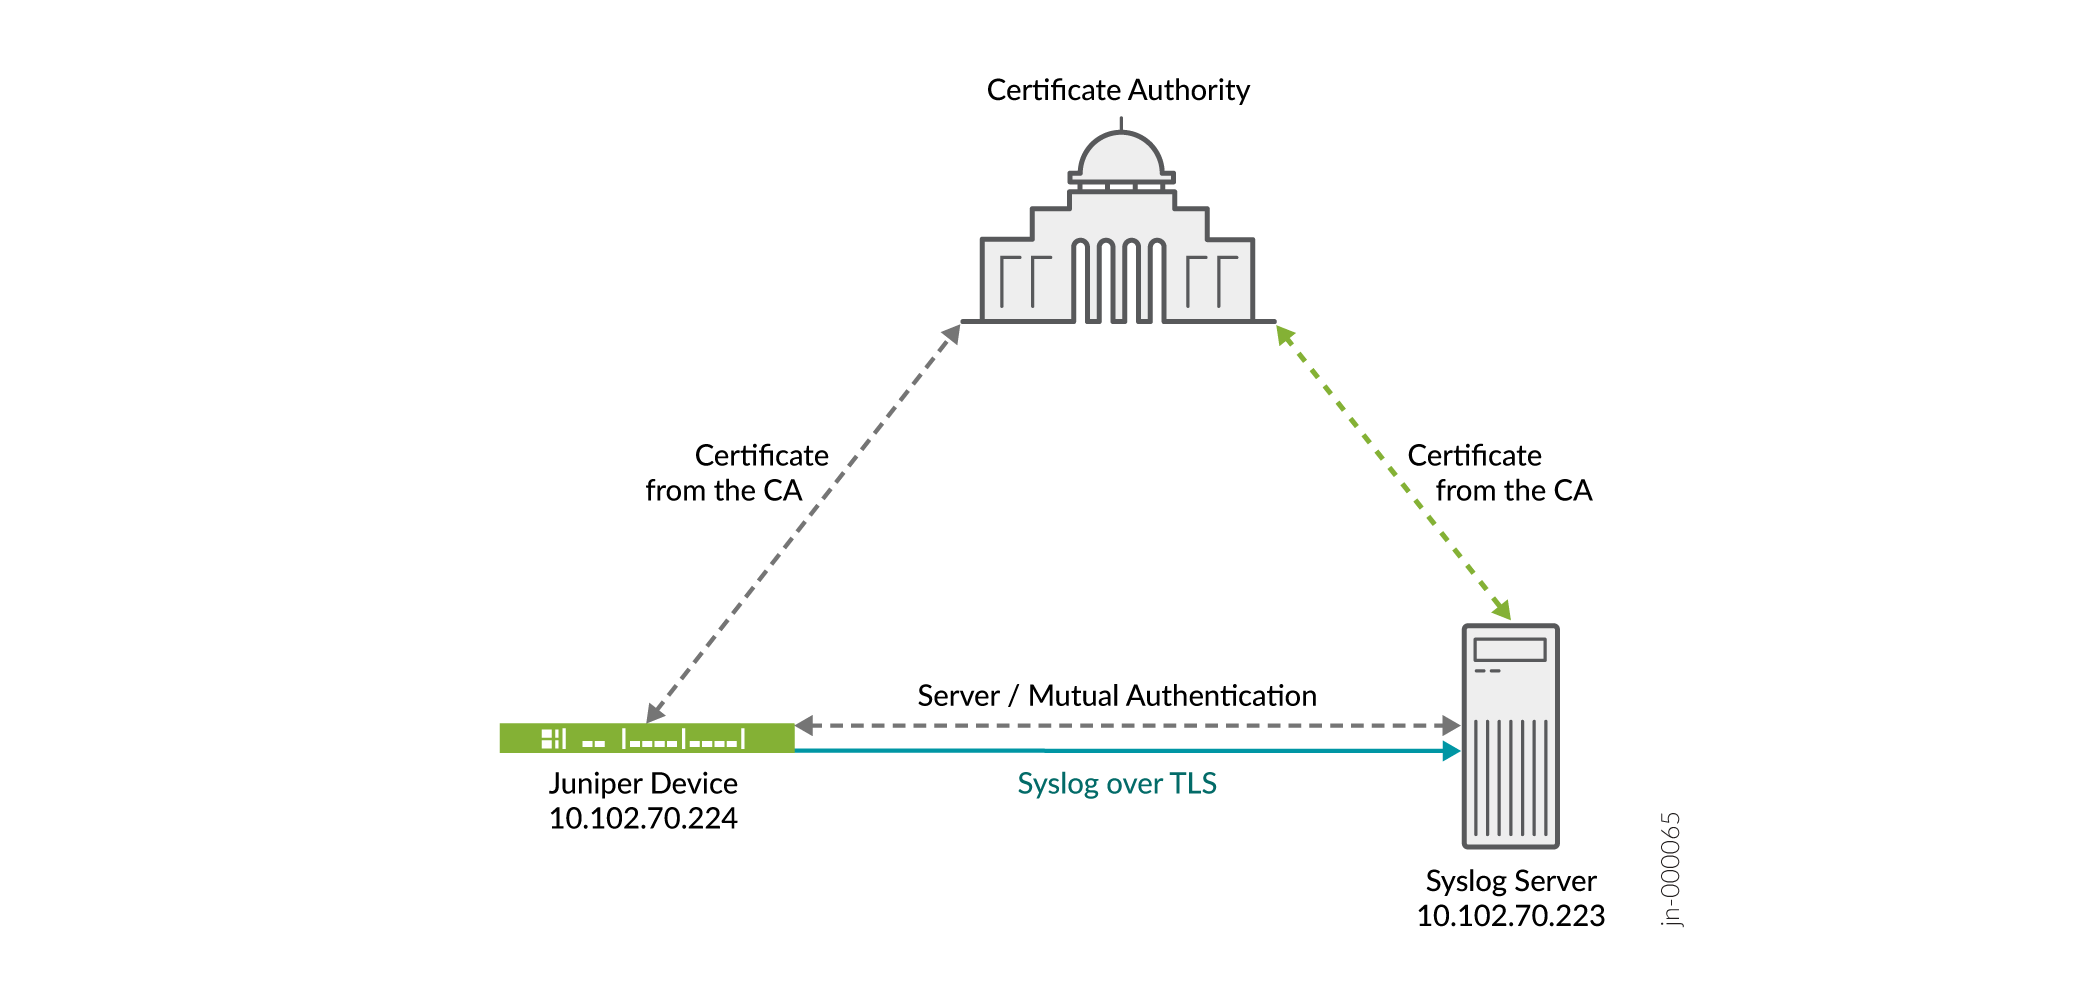
In the following example, we use the TLS protocol to securely transport syslog messages (control plane logs) from the Juniper device to the remote syslog server. Figure 1 shows the basic topology used in this example.
Configure PKI on the device, see Configure PKI in Junos OS.
Configure Server Authentication on Your Device
Step-by-Step Procedure
The following procedure requires you to navigate various levels in the configuration hierarchy. For information about navigating the CLI, see Using the CLI Editor in Configuration Mode.
To configure the device:
-
Specify the syslog server that receives the system log messages. You can specify the IP address of the syslog server or a fully qualified hostname. In this example, use 10.102.70.233 as the IP address of the syslog server.
[edit]
user@host# set system syslog host 10.102.70.223 any any
-
Specify the port number of the syslog server.
[edit]
user@host# set system syslog host 10.102.70.223 port 10514
-
Specify the syslog transport protocol for the device. In this example, use TLS as the transport protocol.
[edit]
user@host# set system syslog host 10.102.70.223 transport tls
-
Specify the name of the trusted certificate authority (CA) group or specify the name of the CA profile to be used. In this example, use example-ca as the CA profile.
[edit]
user@host# set system syslog host 10.102.70.223 tlsdetails trusted-ca-group trusted-ca-group-name ca-profiles example-ca
-
Configure the device to send all log messages.
[edit]
user@host# set system syslog file messages any any
-
Commit the configuration.
[edit]
user@host# commit
Results
In configuration mode, confirm your configuration by using the
show system syslog command.
[edit]
user@host# show system syslog
host 10.102.70.223 {
    any any;
    port 10514;
    transport tls;
    tlsdetails {
        trusted-ca-group trusted-ca-group-name {
            ca-profiles example-ca;
        }
    }
}
Verification
To verify that the configuration is working properly, enter the
show log command on the syslog server.
See Also
Data Plane Logs
Example: Configure the TLS Syslog Protocol on SRX Series Firewalls
This example shows how to configure the Transport Layer Security (TLS) syslog protocol on SRX Series Firewalls to receive encrypted syslog events from network devices that support TLS syslog event forwarding.
Requirements
Before you begin, enable server certificate verification and encryption or decryption capabilities.
Overview
The TLS syslog protocol enables a log source to receive encrypted syslog events from network devices that support TLS syslog event forwarding. The log source creates a listen port for incoming TLS syslog events and generates a certificate file for the network devices.
In this example, you configure a syslog collector associated with one SSL-I profile. Each SSL-I profile enables the user to specify things such as preferred ciphers suite and trusted CA certificates. You can configure multiple SSL-I profiles and associate the profiles with different collector servers.
Configuration
Procedure
CLI Quick Configuration
To quickly configure
this section of the example, copy the following commands, paste them
into a text file, remove any line breaks, change any details
necessary to match your network configuration, copy and paste the
commands into the CLI at the [edit] hierarchy
level, and then enter commit from configuration
mode.
set security log mode stream
set security log format sd-syslog
set security log source-interface ge-0/0/1.0
set security log transport protocol tls
set security log transport tls-profile ssl-i-tls
set security log stream server1 format sd-syslog
set security log stream server1 category all
set security log stream server1 host 192.0.2.100
set services ssl initiation profile ssl-i-tls protocol-version all
set services ssl initiation profile ssl-i-tls trusted-ca all
set services ssl initiation profile ssl-i-tls actions ignore-server-auth-failure
Step-by-Step Procedure
The following example requires you to navigate various levels in the configuration hierarchy. For instructions on how to do that, see Using the CLI Editor in Configuration Mode in the CLI User Guide.
To configure the TLS syslog protocol:
-
Set the log mode to stream.
[edit security]
user@host# set log mode stream
-
Specify the structured system log (sd-syslog) format for remote security message logging .
[edit security]
user@host# set log format sd-syslog
-
Set the host source interface number.
[edit security]
user@host# set log source-interface ge-0/0/1.0
-
Specify TLS as the security log transport protocol to be used to log the data.
[edit security]
user@host# set log transport protocol tls
-
Specify the TLS profile name.
[edit security]
user@host# set log transport tls-profile ssl-i-tls
-
Set the log stream to use the structured syslog format for sending logs to server 1.
[edit security]
user@host# set log stream server1 format sd-syslog
-
Set the category of server 1 logging to all.
[edit security]
user@host# set log stream server1 category all
-
Specify server host parameters by entering the server name or IP address.
[edit security]
user@host# set log stream server1 host 192.0.2.100
-
Define the protocol version all for the SSL initiation access profile.
[edit services]
user@host# set ssl initiation profile ssl-i-tls protocol-version all
-
Attach all CA profile groups to the SSL initiation profile to use when requesting a certificate from the peer.
[edit services]
user@host# set ssl initiation profile ssl-i-tls trusted-ca all
-
Configure the SSL initiation access profile to ignore the server authentication failure.
[edit services]
user@host# set ssl initiation profile ssl-i-tls actions ignore-server-auth-failure
Results
In configuration mode, verify your configuration by using the
show security log command. If the output does
not display the intended configuration, then repeat the
configuration instructions in this example to correct it.
[edit]
user@host# show security log
    mode stream;
        format sd-syslog;
        source-interface ge-0/0/1.0;
        transport {
            protocol tls;
            tls-profile ssl-i-tls;
        }
        stream server1 {
            format sd-syslog;
            category all;
            host {
            192.0.2.100;
            }
        }
    }
[edit]
user@host# run show configuration services ssl initiation
    profile ssl-i-tls {
        protocol-version all;
        trusted-ca all;
        actions {
            ignore-server-auth-failure;
        }
    }
If you are done configuring the device, enter commit
from configuration mode.
Verification
To verify that the configuration is working properly, enter the show
log command on the syslog server.