- play_arrow Port Security
- play_arrow Port Security Overview
-
- play_arrow IPSec
- play_arrow Understanding IPsec and Security Associations
- play_arrow IPsec Configurations and Examples
- play_arrow Configuring IPsec Security Associations
- play_arrow Using Digital Certificates for IPsec
- play_arrow Additional IPsec Options
- play_arrow Configuring IPsec Dynamic Endpoints
- play_arrow Additional ES and AS PIC Configuration Examples
- Example: ES PIC Manual SA Configuration
- Example: AS PIC Manual SA Configuration
- Example: ES PIC IKE Dynamic SA Configuration
- Example: AS PIC IKE Dynamic SA Configuration
- Example: IKE Dynamic SA Between an AS PIC and an ES PIC Configuration
- Example: AS PIC IKE Dynamic SA with Digital Certificates Configuration
- Example: Dynamic Endpoint Tunneling Configuration
-
- play_arrow Digital Certificates
- play_arrow Configuring Digital Certificates
- Public Key Cryptography
- Configuring Digital Certificates
- Configuring Digital Certificates for an ES PIC
- IKE Policy for Digital Certificates on an ES PIC
- Configuring Digital Certificates for Adaptive Services Interfaces
- Configuring Auto-Reenrollment of a Router Certificate
- IPsec Tunnel Traffic Configuration
- Tracing Operations for Security Services
- play_arrow Configuring SSH and SSL Router Access
-
- play_arrow Trusted Platform Module
- play_arrow MACsec
- play_arrow Understanding MACsec
- play_arrow MACsec Examples
-
- play_arrow MAC Limiting and Move Limiting
- play_arrow MAC Limiting and Move Limiting Configurations and Examples
- Understanding MAC Limiting and MAC Move Limiting
- Understanding MAC Limiting on Layer 3 Routing Interfaces
- Understanding and Using Persistent MAC Learning
- Configuring MAC Limiting
- Example: Configuring MAC Limiting
- Verifying That MAC Limiting Is Working Correctly
- Override a MAC Limit Applied to All Interfaces
- Configuring MAC Move Limiting (ELS)
- Verifying That MAC Move Limiting Is Working Correctly
- Verifying That the Port Error Disable Setting Is Working Correctly
-
- play_arrow IP Source Guard
- play_arrow Understanding IP Source Guard
- play_arrow IP Source Guard Examples
- Example: Configuring IP Source Guard on a Data VLAN That Shares an Interface with a Voice VLAN
- Example: Configuring IP Source Guard with Other EX Series Switch Features to Mitigate Address-Spoofing Attacks on Untrusted Access Interfaces
- Example: Configuring IP Source Guard and Dynamic ARP Inspection to Protect the Switch from IP Spoofing and ARP Spoofing
- Example: Configuring IPv6 Source Guard and Neighbor Discovery Inspection to Protect a Switch from IPv6 Address Spoofing
- Configuring IP Source Guard to Mitigate the Effects of Source IP Address Spoofing and Source MAC Address Spoofing
- Example: Configuring IP Source Guard and Dynamic ARP Inspection on a Specified Bridge Domain to Protect the Devices Against Attacks
- Example: Configuring IPv6 Source Guard and Neighbor Discovery Inspection to Protect a Switch from IPv6 Address Spoofing
-
- play_arrow IPv6 Access Security
- play_arrow Neighbor Discovery Protocol
- play_arrow SLAAC Snooping
- play_arrow Router Advertisement Guard
-
- play_arrow Control Plane Distributed Denial-of-Service (DDoS) Protection and Flow Detection
- play_arrow Control Plane DDoS Protection
- play_arrow Flow Detection and Culprit Flows
-
- play_arrow Unicast Forwarding
- play_arrow Unicast Reverse Path Forwarding
- play_arrow Unknown Unicast Forwarding
-
- play_arrow Storm Control
- play_arrow Malware Protection
- play_arrow Juniper Malware Removal Tool
-
- play_arrow Configuration Statements and Operational Commands
Example: Protecting against Rogue DHCP Server Attacks
In a rogue DHCP server attack, an attacker has introduced a rogue server into the network, allowing it to give IP address leases to the network's DHCP clients and to assign itself as the gateway device.
This example describes how to configure a DHCP server interface as untrusted to protect the switch from a rogue DHCP server:
Requirements
This example uses the following hardware and software components:
One EX Series switch or one QFX3500 switch
Junos OS Release 9.0 or later for EX Series switches or Junos OS Release 12.1 or later for the QFX Series
A DHCP server to provide IP addresses to network devices on the switch
Before you configure an untrusted DHCP server interface to mitigate rogue DHCP server attacks, be sure you have:
Connected the DHCP server to the switch.
Enabled DHCP snooping on the VLAN.
Configured a VLAN on the switch. See the task for your platform:
Overview and Topology
Ethernet LANs are vulnerable to address spoofing and DoS attacks on network devices. This example describes how to protect the switch from rogue DHCP server attacks.
This example shows how to explicitly configure an untrusted interface on an EX3200-24P switch and a QFX3500 switch. Figure 1 illustrates the topology for this example.
Topology

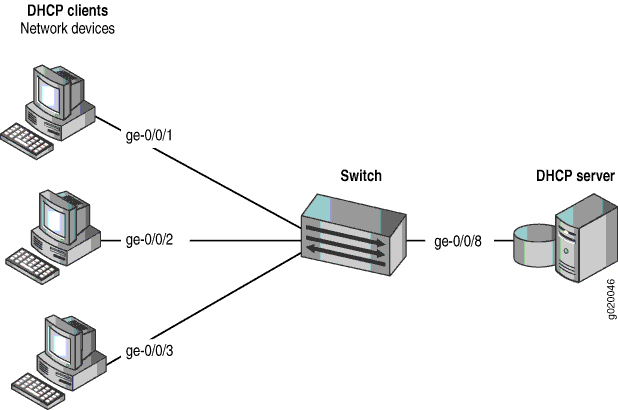
The components of the topology for this example are shown in Table 1.
Properties | Settings |
---|---|
Switch hardware | One EX3200-24P, 24 ports (8 PoE ports) or one QFX3500 switch |
VLAN name and ID | employee-vlan, tag 20 |
VLAN subnets | 192.0.2.16/28 192.0.2.17 through 192.0.2.30192.0.2.31 is the subnet's broadcast address |
Interfaces in employee-vlan | ge-0/0/1, ge-0/0/2, ge-0/0/3, ge-0/0/8 |
Interface for DHCP server | ge-0/0/8 |
In this example, the switch has already been configured as follows:
Secure port access is activated on the switch.
DHCP snooping is enabled on the VLAN employee-vlan.
The interface (port) where the rogue DHCP server has connected to the switch is currently trusted.
Configuration
To configure the DHCP server interface as untrusted because the interface is being used by a rogue DHCP server:
Procedure
CLI Quick Configuration
To quickly set the rogue DHCP server interface as untrusted, copy the following command and paste it into the switch terminal window:
[edit ethernet-switching-options secure-access-port] set interface ge-0/0/8 no-dhcp-trusted
Step-by-Step Procedure
To set the DHCP server interface as untrusted:
Specify the interface (port) from which DHCP responses are not allowed:
[edit ethernet-switching-options secure-access-port] user@switch# set interface ge-0/0/8 no-dhcp-trusted
Results
Check the results of the configuration:
[edit ethernet-switching-options secure-access-port] user@switch# show interface ge-0/0/8.0 { no-dhcp-trusted; }
Verification
Confirm that the configuration is working properly.
Verifying That the DHCP Server Interface Is Untrusted
Purpose
Verify that the DHCP server is untrusted.
Action
Send some DHCP requests from network devices (here they are DHCP clients) connected to the switch.
Display the DHCP snooping information when the port on which the DHCP server connects to the switch is not trusted.
Meaning
There is no output from the command because no entries are added to the DHCP snooping database.