Example: Configuring MACsec over an MPLS CCC on EX Series Switches
This example shows how to enable MACsec to secure sensitive traffic traveling from a user at one site to a user at another site over a basic MPLS CCC.
Requirements
This example uses the following hardware and software components:
-
Three EX4550 switches used as the PE and provider switches in the MPLS network
-
One EX4550 switch used as the CE switch connecting site A to the MPLS network
-
One EX4200 switch that has installed an SFP+ MACsec uplink module used as the CE switch connecting site B to the MPLS network
-
Junos OS Release 12.2R1 or later running on all EX4550 switches in the MPLS network (PE1, PE2, or the provider switch)
-
Junos OS Release 13.2X50-D15 (controlled version) or later running on the CE switch at site A and the CE switch at site B
Note:The controlled version of Juniper Networks Junos operating system (Junos OS) software must be downloaded to enable MACsec. MACsec software support is not available in the domestic version of Junos OS software, which is installed on the switch by default. The controlled version of Junos OS software includes all features and functionality available in the domestic version of Junos OS, while also supporting MACsec. See Understanding Media Access Control Security (MACsec) for additional information about MACsec software requirements.
-
A MACsec feature license installed on the CE switch at site A and the CE switch at site B
Note:To purchase a software license for MACsec, contact your Juniper Networks sales representative (https://www.juniper.net/us/en/contact-us/sales-offices). The Juniper Networks sales representative will provide you with a feature license file and a license key. You will be asked to supply the chassis serial number of your switch; you can obtain the serial number by running the
show virtual-chassisorshow chassis hardwarecommand.
Overview and Topology
In this example, financially-sensitive company data is often sent between a user at site A and a user at site B. The company wants to ensure that all network traffic traveling from the user at site A to the user at site B is highly secure and cannot be viewed or corrupted by an attacker. The company is using the industry-standard Layer 2 security provided by MACsec, which provides encryption to ensure data cannot be viewed by attackers and integrity checks to ensure transmitted data is not corrupted, to secure all traffic traveling on the CCC through the MPLS cloud connecting the sites. VLANs are configured at both sites to ensure traffic traveling between the two users traverses the sites over the MACsec-secured CCC.
The MPLS network in this example includes two provider edge (PE) switches—PE1 and PE2—and one provider (transit) switch. PE1 connects the customer edge (CE) switch at site A to the MPLS network and PE2 connects the CE switch at site B to the MPLS network. MACsec is enabled on the CCC connecting the CE switches at site A and site B to secure traffic traveling between the sites over the CCC. A VLAN that includes the interfaces that connect the users to the CE switches, interface ge-0/0/0 on the CE switch at site A and interface ge-0/0/2 on the CE switch at site B, and the interfaces that connect the CE switches to the MPLS cloud (ge-0/0/0 on the site A CE switch and xe-0/1/0 on the site B CE switch), is used to direct all traffic between the users onto the MACsec-secured CCC.
Figure 1 shows the topology used in this example. The
MACsec-secured CCC traffic is labeled MACsec CCC in the figure.
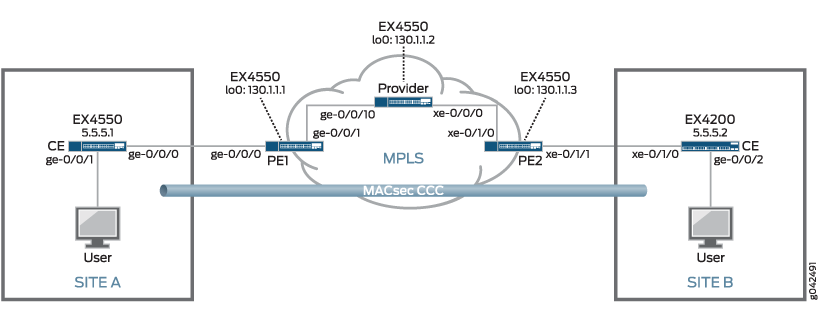
Table 1 provides a summary of the MPLS network components in this topology.
Table 2 provides a summary of the MACsec connectivity association used in this topology. MACsec is enabled by creating a connectivity association on the interfaces at each end of a link. MACsec is enabled when the interfaces at each end of the link exchange pre-shared keys—the pre-shared keys are defined in the connectivity association—to secure the link for MACsec.
Table 3 provides a summary of the VLAN used in this topology. The VLAN is used in this topology to direct all communication from the user at site A to the user at site B onto the MACsec-secured CCC.
| Component | Description |
|---|---|
|
PE1 |
PE switch. lo0:
ge-0/0/0:
ge-0/0/1:
|
|
Provider |
Provider switch. lo0:
ge-0/0/10:
xe-0/0/0:
|
|
PE2 |
PE switch. lo0:
xe-0/1/0
xe-0/1/1
|
|
lsp_to_pe2_xe1 label-switched path |
Label-switched path from PE1 to PE2. |
|
lsp_to_pe1_ge0 label-switched path |
Label-switched path from PE2 to PE1. |
| Connectivity Association | Description |
|---|---|
|
ccc-macsec |
Connectivity association enabling MACsec on CCC connecting site A to site B. The connectivity association is enabled on the following interfaces:
|
| VLAN | Description |
|---|---|
|
macsec |
VLAN directing traffic between the user at site A and the user at site B onto the MACsec-secured CCC. The VLAN includes the following interfaces:
|
Configuring MPLS
This section explains how to configure MPLS on each switch in the MPLS network.
It includes the following sections:
- Configuring MPLS on Switch PE1
- Configuring MPLS on the Provider Switch
- Configuring MPLS on Switch PE2
- Results
Configuring MPLS on Switch PE1
CLI Quick Configuration
To quickly configure the MPLS configuration on the PE1 switch, use the following commands:
[edit]
set protocols ospf traffic-engineering


                  set protocols ospf area 0.0.0.0 interface lo0.0


                  set protocols ospf area 0.0.0.0 interface ge-0/0/1.0


                  set protocols mpls label-switched-path lsp_to_pe2_xe1 to 130.1.1.3


                  set protocols mpls interface ge-0/0/1.0


                  set protocols rsvp interface lo0.0


                  set protocols rsvp interface ge-0/0/1.0


                  set interfaces lo0 unit 0 family inet address 130.1.1.1/32


                  set interfaces ge-0/0/1 unit 0 family inet address 10.1.5.2/24


                  set interfaces ge-0/0/1 unit 0 family mpls


                  set interfaces ge-0/0/0 unit 0 family ccc


                  set protocols connections remote-interface-switch ge-1-to-pe2 interface ge-0/0/0.0


                  set protocols connections remote-interface-switch ge-1-to-pe2 transmit-lsp lsp_to_pe2_xe1


                  set protocols connections remote-interface-switch ge-1-to-pe2 receive-lsp lsp_to_pe1_ge0
Step-by-Step Procedure
To configure MPLS on Switch PE1:
-
Configure OSPF with traffic engineering enabled:
[edit protocols] user@switch-PE1# set ospf traffic-engineering -
Configure OSPF on the loopback address and the core interfaces:
[edit protocols] user@switch-PE1# set ospf area 0.0.0.0 interface lo0.0 user@switch-PE1# set ospf area 0.0.0.0 interface ge-0/0/1.0 -
Configure MPLS on this switch, PE1, with an LSP to the PE2 switch:
[edit protocols] user@switch-PE1# set mpls label-switched-path lsp_to_pe2_xe1 to 130.1.1.3 -
Configure MPLS on the core interfaces:
[edit protocols] user@switch-PE1# set mpls interface ge-0/0/1.0 -
Configure RSVP on the loopback interface and the core interfaces:
[edit protocols] user@switch-PE1# set rsvp interface lo0.0 user@switch-PE1# set rsvp interface ge-0/0/1.0 -
Configure IP addresses for the loopback interface and the core interfaces:
[edit] user@switch-PE1# set interfaces lo0 unit 0 family inet address 130.1.1.1/32 user@switch-PE1# set interfaces ge-0/0/1 unit 0 family inet address 10.1.5.2/24 -
Configure
family mplson the logical unit of the core interface addresses:[edit] user@switch-PE1# set interfaces ge-0/0/1 unit 0 family mpls -
Configure the logical unit of the customer edge interface as a CCC:
[edit interfaces ge-0/0/0 unit 0] user@PE-1# set family ccc -
Configure the interface-based CCC from PE1 to PE2:
[edit protocols]
user@PE-1# set connections remote-interface-switch ge-1-to-pe2 interface ge-0/0/0.0
user@PE-1# set connections remote-interface-switch ge-1-to-pe2 transmit-lsp lsp_to_pe2_xe1
user@PE-1# set connections remote-interface-switch ge-1-to-pe2 receive-lsp lsp_to_pe1_ge0
Results
Display the results of the configuration:
user@PE-1> show configuration
interfaces {
    ge-0/0/0 {
        unit 0 {
            family ccc;
        }
    }
    ge-0/0/1{
        unit 0 {
            family inet {
                address 130.1.5.2/24;
            }
            family mpls;
        }
    }
    lo0 {
        unit 0 {
            family inet {
                address 130.1.1.1/32;
            }
        }
    }
}
protocols {
    rsvp {
        interface lo0.0;
        interface ge-0/0/1.0;
    }
    mpls {
        label-switched-path lsp_to_pe2_xe1 {
            to 130.1.1.3;
        }
        interface ge-0/0/1.0;
    }
    ospf {
        traffic-engineering;
        area 0.0.0.0 {
            interface lo0.0;
            interface ge-0/0/1.0;
        }
    }
    connections {
        remote-interface-switch ge-1-to-pe2 {
            interface ge-0/0/0.0;
            transmit-lsp lsp_to_pe2_xe1;
            receive-lsp lsp_to_pe1_ge0;
        }
    }
}
Configuring MPLS on the Provider Switch
CLI Quick Configuration
To quickly configure the MPLS configuration on the provider switch, use the following commands:
[edit]
set protocols ospf traffic-engineering


                  set protocols ospf area 0.0.0.0 interface lo0.0


                  set protocols ospf area 0.0.0.0 interface ge-0/0/10.0


                  set protocols ospf area 0.0.0.0 interface xe-0/0/0.0


                  set protocols mpls interface ge-0/0/10.0


                  set protocols mpls interface xe-0/0/0.0


                  set protocols mpls label-switched-path lsp_to_pe2_xe1 to 130.1.1.3


                  set protocols rsvp interface lo0.0


                  set protocols rsvp interface ge-0/0/10.0


                  set protocols rsvp interface xe-0/0/0.0


                  set interfaces lo0 unit 0 family inet address 130.1.1.2/32


                  set interfaces ge-0/0/10 unit 0 family inet address 10.1.5.1/24


                  set interfaces ge-0/0/10 unit 0 family mpls


                  set interfaces xe-0/0/0 unit 0 family inet address 10.1.9.1/24


                  set interfaces xe-0/0/0 unit 0 family mpls
Step-by-Step Procedure
To configure the provider switch:
-
Configure OSPF with traffic engineering enabled:
[edit protocols] user@switch-P# set ospf traffic-engineering -
Configure OSPF on the loopback interface and the core interfaces:
[edit protocols] user@switch-P# set ospf area 0.0.0.0 interface lo0.0 user@switch-P# set ospf area 0.0.0.0 interface ge-0/0/10.0 user@switch-P# set ospf area 0.0.0.0 interface xe-0/0/0.0 -
Configure MPLS on the core interfaces on the switch:
[edit protocols] user@switch-P# set mpls interface ge-0/0/10.0 user@switch-P# set mpls interface xe-0/0/0.0 -
Configure RSVP on the loopback interface and the core interfaces:
[edit protocols] user@switch-P# set rsvp interface lo0.0 user@switch-P# set rsvp interface ge-0/0/10.0 user@switch-P# set rsvp interface xe-0/0/0.0 -
Configure IP addresses for the loopback interface and the core interfaces:
[edit] user@switch-P# set interfaces lo0 unit 0 family inet address 130.1.1.2/32 user@switch-P# set interfaces ge-0/0/10 unit 0 family inet address 10.1.5.1/24 user@switch-P# set interfaces xe-0/0/0 unit 0 family inet address 10.1.9.1/24 -
Configure
family mplson the logical unit of the core interface addresses:[edit] user@switch-P# set interfaces ge-0/0/10 unit 0 family mpls user@switch-P# set interfaces xe-0/0/0 unit 0 family mpls -
Configure the LSP to the PE2 switch:
[edit]
user@switch-P# set protocols mpls label-switched-path lsp_to_pe2_xe1 to 130.1.1.3
Results
Display the results of the configuration:
user@switch-P> show configuration
interfaces {
    ge-0/0/10 {
        unit 0 {
            family inet {
                address 10.1.5.1/24;
            }
            family mpls;
        }
    }
    xe-0/0/0 {
        unit 0 {
            family inet {
                address 10.1.9.1/24;
            }
            family mpls;
        }
    }
    lo0 {
        unit 0 {
            family inet {
                address 130.1.1.2/32;
            }
        }
    }
}
protocols {
    rsvp {
        interface lo0.0;
        interface ge-0/0/10.0;
        interface xe-0/0/0.0;
    }
    mpls {
        label-switched-path lsp_to_pe2_xe1 {
            to 130.1.1.3;
        }
        interface ge-0/0/10.0;
        interface xe-0/0/0.0;
    }
    ospf {
        traffic-engineering;
        area 0.0.0.0 {
            interface lo0.0;
            interface ge-0/0/10.0;
            interface xe-0/0/0.0;
        }
    }
}
Configuring MPLS on Switch PE2
CLI Quick Configuration
To quickly cconfigure the MPLS configuration on Switch PE2, use the following commands:
[edit]
set protocols ospf traffic-engineering


                  set protocols ospf area 0.0.0.0 interface lo0.0


                  set protocols ospf area 0.0.0.0 interface xe-0/1/0.0


                  set protocols mpls label-switched-path lsp_to_pe1_ge0 to 130.1.1.1


                  set protocols mpls interface xe-0/1/0.0


                  set protocols rsvp interface lo0.0


                  set protocols rsvp interface xe-0/1/0.0


                  set interfaces lo0 unit 0 family inet address 130.1.1.3/32


                  set interfaces xe-0/1/0 unit 0 family inet address 10.1.9.2/24


                  set interfaces xe-0/1/0 unit 0 family mpls


                  set interfaces xe-0/1/1 unit 0 family ccc


                  set protocols connections remote-interface-switch xe-1-to-pe1 interface xe-0/1/1.0


                  set protocols connections remote-interface-switch xe-1-to-pe1 transmit-lsp lsp_to_pe1_ge0


                  set protocols connections remote-interface-switch xe-1-to-pe1 receive-lsp lsp_to_pe2_xe1
Step-by-Step Procedure
To configure Switch PE2:
-
Configure OSPF with traffic engineering enabled:
[edit protocols] user@switch-PE2# set ospf traffic-engineering -
Configure OSPF on the loopback interface and the core interface:
[edit protocols] user@switch-PE2# set ospf area 0.0.0.0 interface lo0.0 user@switch-PE2# set ospf area 0.0.0.0 interface xe-0/1/0.0 -
Configure MPLS on this switch (PE2) with a label-switched path (LSP) to the other PE switch (PE1):
[edit protocols] user@switch-PE2# set mpls label-switched-path lsp_to_pe1_ge0 to 130.1.1.1 -
Configure MPLS on the core interface:
[edit protocols] user@switch-PE2# set mpls interface xe-0/1/0.0 -
Configure RSVP on the loopback interface and the core interface:
[edit protocols] user@switch-PE2# set rsvp interface lo0.0 user@switch-PE2# set rsvp interface xe-0/1/0.0 -
Configure IP addresses for the loopback interface and the core interface:
[edit] user@switch-PE2# set interfaces lo0 unit 0 family inet address 130.1.1.3/32 user@switch-PE2# set interfaces xe-0/1/0 unit 0 family inet address 10.1.9.2/24 -
Configure
family mplson the logical unit of the core interface:[edit] user@switch-PE2# set interfaces xe-0/1/0 unit 0 family mpls -
Configure the logical unit of the customer edge interface as a CCC:
[edit interfaces xe-0/1/1 unit 0] user@switch-PE2# set family ccc -
Configure the interface-based CCC between the primary edge switches:
[edit protocols]
user@switch-PE2# set connections remote-interface-switch xe-1-to-pe1 interface xe-0/1/1.0
user@switch-PE2# set connections remote-interface-switch xe-1-to-pe1 transmit-lsp lsp_to_pe1_ge0
user@switch-PE2# set connections remote-interface-switch xe-1-to-pe1 receive-lsp lsp_to_pe2_xe1
Results
Display the results of the configuration:
user@switch-PE2> show configuration
interfaces {
    xe-0/1/0 {
        unit 0 {
            family inet {
                address 10.1.9.2/24;
            }
            family mpls;
        }
    }
    xe-0/1/1 {
        unit 0 {
            family ccc;
        }
    }
    lo0 {
        unit 0 {
            family inet {
                address 130.1.1.3/32;
            }
        }
    }
}
protocols {
    rsvp {
        interface lo0.0;
        interface xe-0/1/0.0;
    }
    mpls {
        label-switched-path lsp_to_pe1_ge0 {
            to 130.1.1.1;
        }
        interface xe-0/1/0.0;
    }
    ospf {
        traffic-engineering;
        area 0.0.0.0 {
            interface lo0.0;
            interface xe-0/1/0.0;
        }
    }
    connections {
        remote-interface-switch xe-1-to-pe1 {
            interface xe-0/1/1.0;
            transmit-lsp lsp_to_pe1_ge0;
            receive-lsp lsp_to_pe2_xe1;
        }
    }
}
Configuring MACsec
This section explains how to configure MACsec on each switch in the topology.
It includes the following sections:
- Configuring MACsec on the Site A CE Switch to Secure Traffic to Site B
- Configuring MACsec on the Site B CE Switch to Secure Traffic to Site A
Configuring MACsec on the Site A CE Switch to Secure Traffic to Site B
CLI Quick Configuration
[edit]
set security macsec connectivity-association ccc-macsec security-mode static-cak


                  set security macsec connectivity-association ccc-macsec pre-shared-key ckn 37c9c2c45ddd012aa5bc8ef284aa23ff6729ee2e4acb66e91fe34ba2cd9fe311


                  set security macsec connectivity-association ccc-macsec pre-shared-key cak 228ef255aa23ff6729ee664acb66e91f


                  set security macsec interfaces ge-0/0/0 connectivity-association ccc-macsec
Step-by-Step Procedure
In this example, the traffic between the users that often exchange financially-sensitive data is sent between the sites on a CCC through the MPLS cloud. MACsec is enabled on the CCC by configuring a MACsec connectivity association on the interfaces on the site A and site B CE switches that connect to the MPLS PE switches. The connectivity associations must have matching connectivity-association names (in this example, ccc-macsec), matching CKNs (in this example, 37c9c2c45ddd012aa5bc8ef284aa23ff6729ee2e4acb66e91fe34ba2cd9fe311), and CAKs (in this example, 228ef255aa23ff6729ee664acb66e91f) in order to establish a MACsec-secure connection.
To enable MACsec on the CCC connecting site A to site B, perform the following procedure on the site A CE switch:
-
Create the connectivity association named ccc-macsec, and configure the MACsec security mode as
static-cak:[edit security macsec] user@switch-CE-A# set connectivity-association ccc-macsec security-mode static-cak -
Create the pre-shared key by configuring the CKN and CAK:
[edit security macsec] user@switch-CE-A# set connectivity-association ccc-macsec pre-shared-key ckn 37c9c2c45ddd012aa5bc8ef284aa23ff6729ee2e4acb66e91fe34ba2cd9fe311 user@switch-CE-A# set connectivity-association ccc-macsec pre-shared-key cak 228ef255aa23ff6729ee664acb66e91f -
Assign the connectivity association to the interface connecting to the PE1 switch:
[edit security macsec]
user@switch-CE-A# set interfaces ge-0/0/0 connectivity-association ccc-macsec
This completes the steps for configuring the connectivity association on one end of the CCC. MACsec is not enabled until a connectivity association with matching pre-shared keys is enabled on the opposite end of a link, which in this case is the interface on the site B CE switch, of the CCC. The process for configuring the connectivity association on the site B CE switch is described in the following section.
Results
Display the results of the configuration:
user@switch-CE-A> show configuration
security {
    macsec {
        connectivity-association {
            ccc-macsec {
                pre-shared-key {
                    cak "$9$rJ-lWLxNdw24Xxik.PQzreK"; ## SECRET-DATA
                    ckn 37c9c2c45ddd012aa5bc8ef284aa23ff6729ee2e4acb66e91fe34ba2cd9fe311;
                }
                security-mode {
                    static-cak;
                }
            }
        }
        interfaces {
            ge-0/0/0 {
                connectivity-association {
                    ccc-macsec;
                }
            }
        }
    }
}
Configuring MACsec on the Site B CE Switch to Secure Traffic to Site A
CLI Quick Configuration
[edit]
set security macsec connectivity-association ccc-macsec security-mode static-cak


                  set security macsec connectivity-association ccc-macsec pre-shared-key ckn 37c9c2c45ddd012aa5bc8ef284aa23ff6729ee2e4acb66e91fe34ba2cd9fe311


                  set security macsec connectivity-association ccc-macsec pre-shared-key cak 228ef255aa23ff6729ee664acb66e91f


                  set security macsec interfaces xe-0/1/0 connectivity-association ccc-macsec
Step-by-Step Procedure
Traffic travels from site B to site A over the MPLS network using a CCC. MACsec is enabled on the CCC by configuring a MACsec connectivity association on the interfaces on the site A and site B CE switches that connect to the MPLS PE switches. The connectivity associations must have matching connectivity-association names (in this example, ccc-macsec), matching CKNs (37c9c2c45ddd012aa5bc8ef284aa23ff6729ee2e4acb66e91fe34ba2cd9fe311), and matching CAKs (228ef255aa23ff6729ee664acb66e91f) in order to establish a MACsec-secure connection.
To enable MACsec on the CCC connecting site B to site A, perform the following procedure on the site B CE switch:
-
Create the connectivity association named ccc-macsec, and configure the MACsec security mode as
static-cak:[edit security macsec] user@switch-CE-B# set connectivity-association ccc-macsec security-mode static-cak -
Create the pre-shared key by configuring the CKN and CAK:
[edit security macsec] user@switch-CE-B# set connectivity-association ccc-macsec pre-shared-key ckn 37c9c2c45ddd012aa5bc8ef284aa23ff6729ee2e4acb66e91fe34ba2cd9fe311 user@switch-CE-B# set connectivity-association ccc-macsec pre-shared-key cak 228ef255aa23ff6729ee664acb66e91f -
Assign the connectivity association to the interface connecting to Switch PE2:
[edit security macsec]
user@switch-CE-B# set interfaces xe-0/1/0 connectivity-association ccc-macsec
MACsec is enabled for the CCC after the pre-shared keys are exchanged, which is shortly after this procedure is completed.
Results
Display the results of the configuration:
user@switch-CE-B> show configuration
security {
    macsec {
        connectivity-association {
            ccc-macsec {
                security-mode {
                    static-cak;
                }
                pre-shared-key {
                    cak "$9$rJ-lWLxNdw24Xxik.PQzreK"; ## SECRET-DATA
                    ckn 37c9c2c45ddd012aa5bc8ef284aa23ff6729ee2e4acb66e91fe34ba2cd9fe311;
                }
            }
        }
        interfaces {
            xe-0/1/0 {
                connectivity-association {
                    ccc-macsec;
                }
            }
        }
    }
}
Configuring VLANs to Direct Traffic onto the MACsec-Secured CCC
This section explains how to configure VLANs on the site A and site B CE switches. The purpose of the VLANs is to direct traffic that you want to be MACsec-secured onto the MACsec-secured CCC.
- Configuring the VLAN to Direct Traffic to the MACsec CCC on the Site A CE Switch
- Configuring the VLAN to Direct Traffic to the MACsec CCC on the Site B CE Switch
Configuring the VLAN to Direct Traffic to the MACsec CCC on the Site A CE Switch
CLI Quick Configuration
[edit]
set interfaces ge-0/0/0 unit 0 family ethernet-switching vlan members macsec


                  set interfaces ge-0/0/2 unit 0 family ethernet-switching vlan members macsec


                  set interfaces vlan unit 50 family inet address 5.5.5.1/24


                  set vlans macsec vlan-id 50


                  set vlans macsec l3-interface vlan.50
Step-by-Step Procedure
To create a VLAN (VLAN ID 50) that directs traffic from the user at site A onto the MACsec-secured CCC:
-
Configure the ge-0/0/0 interface into the macsec VLAN:
[edit interfaces ge-0/0/0 unit 0] user@switch-CE-A# set family ethernet-switching vlan members macsec -
Configure the ge-0/0/2 interface into the macsec VLAN:
[edit interfaces ge-0/0/2 unit 0] user@switch-CE-A# set family ethernet-switching vlan members macsec -
Create the IP address for the macsec VLAN broadcast domain:
[edit interfaces] user@switch-CE-A# set vlan unit 50 family inet address 5.5.5.1/24 -
Configure the VLAN tag ID to 50 for the macsec VLAN:
[edit vlans] user@switch-CE-A# set macsec vlan-id 50 -
Associate a Layer 3 interface with the macsec VLAN:
[edit vlans]
user@switch-CE-A# set macsec l3-interface vlan.50
Results
Display the results of the configuration:
user@switch-CE-A> show configuration
interfaces {
    ge-0/0/0 {
        unit 0 {
            family ethernet-switching {
                vlan members macsec;
            }
        }
    }
    ge-0/0/2 {
        unit 0 {
            family ethernet-switching {
                vlan members macsec;
            }
        }
    }
    vlan {
        unit 50 {
            family inet address 5.5.5.1/24;
        }
    }
}
vlans {
    macsec {
        l3-interface vlan.50;
        vlan-id 50;
    }
}
Configuring the VLAN to Direct Traffic to the MACsec CCC on the Site B CE Switch
CLI Quick Configuration
[edit]
set interfaces ge-0/0/2 unit 0 family ethernet-switching vlan members macsec


                  set interfaces xe-0/1/0 unit 0 family ethernet-switching vlan members macsec


                  set interfaces vlan unit 50 family inet address 5.5.5.2/24


                  set vlans macsec vlan-id 50


                  set vlans macsec l3-interface vlan.50
Step-by-Step Procedure
To create a VLAN (VLAN ID 50) to direct traffic for the user at site B onto the MACsec-secured CCC:
-
Configure the ge-0/0/2 interface into the macsec VLAN:
[edit interfaces ge-0/0/2 unit 0] user@switch-CE-B# set family ethernet-switching vlan members macsec -
Configure the xe-0/1/0 interface into the macsec VLAN:
[edit interfaces xe-0/1/0 unit 0] user@switch-CE-B# set family ethernet-switching vlan members macsec -
Create the IP address for the macsec VLAN broadcast domain:
[edit interfaces] user@switch-CE-B# set vlan unit 50 family inet address 5.5.5.2/24 -
Configure the VLAN tag ID to 50 for the macsec VLAN:
[edit vlans] user@switch-CE-B# set macsec vlan-id 50 -
Associate a Layer 3 interface with the macsec VLAN:
[edit vlans]
user@switch-CE-B# set macsec l3-interface vlan.50
Results
Display the results of the configuration:
user@switch-CE-B> show configuration
interfaces {
    ge-0/0/2 {
        unit 0 {
            family ethernet-switching {
                vlan members macsec;
            }
        }
    }
    xe-0/1/0 {
        unit 0 {
            family ethernet-switching {
                vlan members macsec;
            }
        }
    }
    vlan {
        unit 50 {
            family inet address 5.5.5.2/24;
        }
    }
}
vlans {
    macsec {
        l3-interface vlan.50;
        vlan-id 50;
    }
}
Verification
To confirm that the configuration is working properly, perform these tasks:
- Verifying the MACsec Connection
- Verifying That MACsec-Secured Traffic Is Traversing the CCCs
- Verifying That the MPLS and CCC Protocols Are Enabled on the Provider Edge and Provider Switch Interfaces
- Verifying MPLS Label Operations
- Verifying the Status of the MPLS CCCs
- Verifying OSPF Operation
- Verifying the Status of the RSVP Sessions
Verifying the MACsec Connection
Purpose
Verify that MACsec is operational on the CCC.
Action
Enter the
show security macsec connections
command on one or both of the customer edge (CE) switches.
user@switch-CE-A> show security macsec connections
Interface name: ge-0/0/0
        CA name: ccc-macsec
        Cipher suite: GCM-AES-128   Encryption: on
        Key server offset: 0        Include SCI: no
        Replay protect: off         Replay window: 0
          Outbound secure channels
            SC Id: 00:19:E2:53:CD:F3/1
            Outgoing packet number: 9785
            Secure associations
            AN: 0 Status: inuse Create time: 2d 20:47:54
          Inbound secure channels
            SC Id: 00:23:9C:0A:53:33/1
            Secure associations
            AN: 0 Status: inuse Create time: 2d 20:47:54
Meaning
The Interface name: and CA name: outputs shows that the
ccc-macsec connectivity association is operational on interface ge-0/0/0. The output does
not appear when the connectivity association is not operational on the interface.
For additional verification that MACsec is operational on the CCC, you can also enter
the show security macsec connections command on the other CE switch.
Verifying That MACsec-Secured Traffic Is Traversing the CCCs
Purpose
Verify that traffic traversing the CCC is MACsec-secured.
Action
Enter the
show security macsec statistics
command on one or both of the CE switches.
user@switch-CE-A> show security macsec statistics
Interface name: ge-0/0/0
    Secure Channel transmitted
        Encrypted packets: 9784
        Encrypted bytes:   2821527
        Protected packets: 0
        Protected bytes:   0
    Secure Association transmitted
        Encrypted packets: 9784
        Protected packets: 0
    Secure Channel received
        Accepted packets:  9791
        Validated bytes:   0
        Decrypted bytes:   2823555
    Secure Association received
        Accepted packets:  9791
        Validated bytes:   0
        Decrypted bytes:   2823555
Meaning
The Encrypted packets line under the Secure Channel transmitted output is incremented each time a packet is sent from the interface that is secured and
encrypted by MACsec. The Encrypted packets output shows that 9784 encrypted and
secured packets have been transmitted from interface ge-0/0/0. MACsec-secured traffic is,
therefore, being sent on interface ge-0/0/0.
The Accepted packets line under the Secure Association received output is incremented each time a packet that has passed the MACsec integrity check is received
on the interface. The Decrypted bytes line under the Secure Association received output is incremented each time an encrypted packet is received and decrypted. The output
shows that 9791 MACsec-secured packets have been received on interface ge-0/0/0, and that
2823555 bytes from those packets have been successfully decrypted. MACsec-secured traffic
is, therefore, being received on interface ge-0/0/0.
For additional verification, you can also enter the show security macsec statistics command on the other CE switch.
Verifying That the MPLS and CCC Protocols Are Enabled on the Provider Edge and Provider Switch Interfaces
Purpose
Verify that MPLS is enabled on the correct interfaces for the PE and provider switches.
Action
Enter the show interfaces terse command on both of the PE switches
and the provider switch:
user@switch-PE1> show interfaces terse

Interface               Admin Link Proto    Local                 Remote
ge-0/0/0                up    up
ge-0/0/0.0              up    up   ccc
ge-0/0/1                up    up
ge-0/0/1.0              up    up   inet     10.1.5.2/24
                                   mpls
<some output removed for brevity>user@switch-P> show interfaces terse
Interface Admin Link Proto Local Remote
xe-0/0/0 up up
xe-0/0/0.0 up up inet 10.1.9.1/24
mpls
ge-0/0/10 up up
ge-0/0/10.0 up up inet 10.1.5.1/24
mpls
<some output removed for brevity>user@switch-PE2> show interfaces terse
Interface Admin Link Proto Local Remote
xe-0/1/0 up up
xe-0/1/0.0 up up inet 10.1.9.2/24
mpls
xe-0/1/1 up up
xe-0/1/1.0 up up ccc
<some output removed for brevity>Meaning
The output confirms that the MPLS protocol is up for the provider switch interfaces passing MPLS traffic—xe-0/0/0 and ge-0/0/10—and on the PE switch interfaces passing MPLS traffic, which is interface ge-0/0/1 on the PE1 switch and interface xe-0/1/0 on the PE2 switch.
The output also confirms that CCC is enabled on the PE switch interfaces facing the CE switches, which are interface ge-0/0/0 on the PE1 switch and interface xe-0/1/1 on the PE2 switch.
Verifying MPLS Label Operations
Purpose
Verify which interface is being used as the beginning of the CCC and which interface is being used to push the MPLS packet to the next hop.
Action
Enter the show route forwarding-table family mpls on one or both
of the PE switches.
user@switch-PE1> show route forwarding-table family mpls

Routing table: default.mpls
MPLS:
Destination        Type RtRef Next hop           Type Index NhRef Netif
default            perm     0                    dscd    50     1
0                  user     0                    recv    49     4
1                  user     0                    recv    49     4
2                  user     0                    recv    49     4
13                 user     0                    recv    49     4
299856             user     0                   Pop    1327     2 ge-0/0/0.0
ge-0/0/0.0  (CCC)  user     0 10.1.5.1          Push 299952  1328     2 ge-0/0/1.0
Meaning
This output confirms that the CCC is configured on interface ge-0/0/0.0. The switch receives ingress traffic on ge-0/0/1.0 and pushes label 299952 onto the packet, which exits the switch through interface ge-0/0/1.0. The output also shows that when the switch receives an MPLS packet with label 299856, it pops the label and sends the packet out through interface ge-0/0/0.0
For further verification of MPLS label operations, enter the show route forwarding-table
family mpls on the other PE switch.
Verifying the Status of the MPLS CCCs
Purpose
Verify that the MPLS CCCs are operating.
Action
Enter the show connections command on the PE switches.
user@switch-PE1> show connections
CCC and TCC connections [Link Monitoring On]
Legend for status (St):             Legend for connection types:
 UN -- uninitialized                 if-sw:  interface switching
 NP -- not present                   rmt-if: remote interface switching
 WE -- wrong encapsulation           lsp-sw: LSP switching
 DS -- disabled                      tx-p2mp-sw: transmit P2MP switching
 Dn -- down                          rx-p2mp-sw: receive P2MP switching
 -> -- only outbound conn is up     Legend for circuit types:
 <- -- only inbound  conn is up      intf -- interface
 Up -- operational                   oif  -- outgoing interface
 RmtDn -- remote CCC down            tlsp -- transmit LSP
 Restart -- restarting               rlsp -- receive LSP


Connection/Circuit                Type        St      Time last up     # Up trans
ge-1-to-pe2                       rmt-if      Up      May 30 19:01:45         1
  ge-0/0/0.0                        intf      Up
  lsp_to_pe2_xe1                    tlsp      Up
lsp_to_pe1_ge0 rlsp Upuser@switch-PE2> show connections
CCC and TCC connections [Link Monitoring On]
Legend for status (St): Legend for connection types:
UN -- uninitialized if-sw: interface switching
NP -- not present rmt-if: remote interface switching
WE -- wrong encapsulation lsp-sw: LSP switching
DS -- disabled tx-p2mp-sw: transmit P2MP switching
Dn -- down rx-p2mp-sw: receive P2MP switching
-> -- only outbound conn is up Legend for circuit types:
<- -- only inbound conn is up intf -- interface
Up -- operational oif -- outgoing interface
RmtDn -- remote CCC down tlsp -- transmit LSP
Restart -- restarting rlsp -- receive LSP
Connection/Circuit Type St Time last up # Up trans
xe-1-to-pe1 rmt-if Up May 30 09:39:15 1
xe-0/1/1.0 intf Up
lsp_to_pe1_ge0 tlsp Up
lsp_to_pe2_xe1 rlsp Up
The show connections command displays the status of the CCC connections.
This output verifies that the CCC interfaces and their associated transmit and receive LSPs
are Up on both PE switches.
Verifying OSPF Operation
Purpose
Verify that OSPF is running.
Action
Enter the show ospf neighbor command the provider or the PE switches,
and check the State output.
user@switch-P> show ospf neighbor

Address          Interface              State     ID               Pri  Dead
10.1.5.2         ge-0/0/10.0            Full      130.1.1.1        128    33
10.1.9.2         xe-0/0/0.0             Full      130.1.1.3        128    38
Meaning
The State output is Full on all interfaces using OSPF,
so OSPF is operating.
For further verification on OSPF, enter the show ospf neighbor command on
the PE switches in addition to the provider switch.
Verifying the Status of the RSVP Sessions
Purpose
Verify the status of the RSVP sessions.
Action
Enter the show rsvp session command, and verify that the state is
up for each RSVP session.
user@switch-P> show rsvp session

Ingress RSVP: 0 sessions
Total 0 displayed, Up 0, Down 0

Egress RSVP: 0 sessions
Total 0 displayed, Up 0, Down 0

Transit RSVP: 2 sessions
To              From            State   Rt Style Labelin Labelout LSPname
130.1.1.1       130.1.1.3       Up       0  1 FF  299936   299856 lsp_to_pe1_ge0
130.1.1.3       130.1.1.1       Up       0  1 FF  299952   299840 lsp_to_pe2_xe1
Total 2 displayed, Up 2, Down 0
Meaning
The State is Up for all connections, so RSVP is operating
normally.
For further verification, enter the show rsvp session on the PE switches
in addition to the provider switch.