Example: Setting Up DHCP Option 82 (No Relay)
You can use DHCP option 82, also known as the DHCP relay agent information option, to help protect the switch against attacks such as spoofing (forging) of IP addresses and MAC addresses, and DHCP IP address starvation. Option 82 provides information about the network location of a DHCP client, and the DHCP server uses this information to implement IP addresses or other parameters for the client.
DHCP option 82 is not supported on the QFX10000 switches.
You can configure the DHCP option 82 feature in several topologies:
The switch, DHCP clients, and DHCP server are all on the same VLAN. The switch forwards the clients' requests to the server and forwards the server's replies to the clients. This topic describes this configuration.
The switch functions as a relay agent when the DHCP clients or the DHCP server is connected to the switch through a Layer 3 interface. This means that the relay agent and server can be on different networks–that is, the relay agent can be external. On the switch, these interfaces are configured as routed VLAN interfaces (RVIs) or, the interfaces are configured as integrated routing and bridging (IRB) interfaces. In either case, the switch relays the clients' requests to the server and then forwards the server's replies to the clients. These configurations are described in Example: Setting Up DHCP Option 82.
Before you configure DHCP option 82 on the switch, perform these tasks:
Connect and configure the DHCP server.
Note:Your DHCP server must be configured to accept DHCP option 82. If the server is not configured for DHCP option 82, the server does not use the DHCP option 82 information in the requests sent to it when it formulates its reply messages.
Configure a VLAN on the switch and associate the interfaces on which the clients and the server connect to the switch with that VLAN. See Configuring VLANs for EX Series Switches with ELS Support (CLI Procedure)
Setting Up DHCP Option 82 on the Switch with No Relay (ELS)
This task uses Junos OS for EX Series switches with support for the Enhanced Layer 2 Software (ELS) configuration style. If your switch runs software that does not support ELS, see Setting Up DHCP Option 82 on the Switch with No Relay (non-ELS). For ELS details, see Using the Enhanced Layer 2 Software CLI.
To configure DHCP option 82:
See Also
Setting Up DHCP Option 82 on the Switch with No Relay (non-ELS)
This task uses Junos OS for EX Series switches that do not include support for the Enhanced Layer 2 Software (ELS) configuration style. If your switch runs software that does support ELS, see Setting Up DHCP Option 82 on the Switch with No Relay (ELS). For ELS details, see Using the Enhanced Layer 2 Software CLI.
To configure DHCP option 82:
Replace values displayed in italics with values for your configuration.
To view results of the configuration steps before committing the configuration, type
the show command at the user prompt.
To commit these changes to the active configuration, type the commit command
at the user prompt.
See Also
Example: Setting Up DHCP Option 82 Using the Same VLAN
This example describes how to configure DHCP option 82 on a switch with DHCP clients, DHCP server, and switch all on the same VLAN:
Requirements
This example uses the following hardware and software components:
One EX Series or QFX Series switch
Junos OS Release 9.3 or later for EX Series switches or Junos OS Release 12.1 or later for the QFX Series
A DHCP server to provide IP addresses to network devices on the switch
Overview and Topology
If DHCP option 82 is enabled on the switch, then when a network device—a DHCP client—that is connected to the switch on an untrusted interface sends a DHCP request, the switch inserts information about the client's network location into the packet header of that request. The switch then sends the request to the DHCP server. The DHCP server reads the option 82 information in the packet header and uses it to implement the IP address or other parameter for the client.
DHCP option 82 is enabled on an individual VLAN or on all VLANs on the switch.
When option 82 is enabled on the switch, then this sequence of events occurs when a DHCP client sends a DHCP request:
The switch receives the request and inserts the option 82 information in the packet header.
The switch forwards the request to the DHCP server.
The server uses the DHCP option 82 information to formulate its reply and sends a response back to the switch. It does not alter the option 82 information.
The switch strips the option 82 information from the response packet.
The switch forwards the response packet to the client.
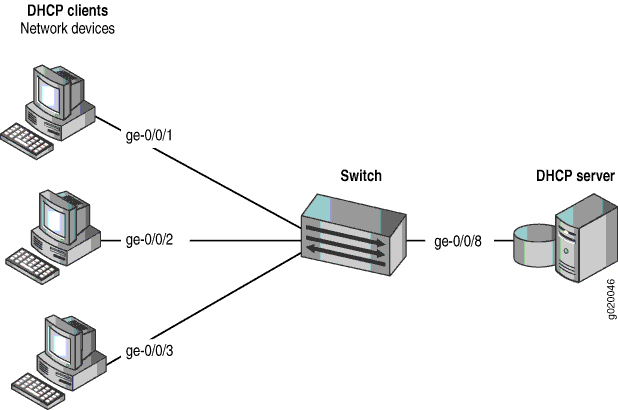
Figure 1 illustrates the topology for this example.
Topology
In this example, you configure DHCP option 82 on the switch. The switch connects to the DHCP server on interface ge-0/0/8. The DHCP clients connect to the switch on interfaces ge-0/0/1, ge-0/0/2, and ge-0/0/3.
The switch, server, and clients are all members of the employee VLAN – be sure to configure the employee VLAN on the switch and associated the interfaces on which the clients and the server connect to the switch with the employee VLAN.
Configuration
Procedure
CLI Quick Configuration
To quickly configure DHCP option 82, copy the following commands and paste them into the switch terminal window:
set ethernet-switching-options secure-access-port vlan employee dhcp-option82 set ethernet-switching-options secure-access-port vlan employee dhcp-option82 circuit-id prefix hostname set ethernet-switching-options secure-access-port vlan employee dhcp-option82 circuit-id use-vlan-id set ethernet-switching-options secure-access-port vlan employee dhcp-option82 remote-id set ethernet-switching-options secure-access-port vlan employee dhcp-option82 remote-id prefix mac set ethernet-switching-options secure-access-port vlan employee dhcp-option82 remote-id use-string employee-switch1 set ethernet-switching-options secure-access-port vlan employee dhcp-option82 vendor-id
Step-by-Step Procedure
To configure DHCP option 82:
Specify DHCP option 82 for the employee VLAN:
[edit ethernet-switching-options secure-access-port]
user@switch# set vlan employee dhcp-option82
Configure a prefix for the circuit ID suboption (the prefix is always the hostname of the switch):
[edit ethernet-switching-options secure-access-port]
user@switch# set vlan employee dhcp-option82 circuit-id prefix hostname
Specify that the circuit ID suboption value contains the VLAN ID rather than the VLAN name (the default):
[edit ethernet-switching-options secure-access-port]
user@switch# set vlan employee dhcp-option82 circuit-id use-vlan-id
Specify that the remote ID suboption be included in the DHCP option 82 information:
[edit ethernet-switching-options secure-accesswitch# set vlan employee dhcp-option82 remote-id
Configure a prefix for the remote ID suboption (here, the prefix is the MAC address of the switch):
[edit ethernet-switching-options secure-access-port] user@switch# set vlan employee dhcp-option82 remote-id prefix mac
Specify that the remote ID suboption value contain a character string (here, the string is employee-switch1):
[edit ethernet-switching-options secure-access-port] user@switch# set vlan employee dhcp-option82 remote-id use-string employee-switch1
Configure a vendor ID suboption value, and use the default value. To use the default value, do not type a character string after the vendor-id option keyword:
[edit ethernet-switching-options secure-access-port]
user@switch# set vlan employee dhcp-option82 vendor-id
Results
Check the results of the configuration:
[edit ethernet-switching-options secure-access-port]
user@switch# show
vlan employee {
    dhcp-option82 {
        circuit-id {
            prefix hostname;
            use-vlan-id;
        }
        remote-id {
            prefix mac;
            use-string employee-switch1;
        }
        vendor-id;
    }
}
Change History Table
Feature support is determined by the platform and release you are using. Use Feature Explorer to determine if a feature is supported on your platform.