- play_arrow Overview
- play_arrow Appliance Overview
- play_arrow Chassis
-
- play_arrow Site Planning and Specifications
- play_arrow Site Preparation
- play_arrow Rack Requirements
- play_arrow Power Requirements
- play_arrow Compliance
-
- play_arrow Safety and Regulatory Compliance Information
- play_arrow General Safety Information
- play_arrow Radiation and Laser Warnings
- play_arrow Installation and Maintenance Safety Information
- play_arrow Power and Electrical Safety Information
- General Electrical Safety Guidelines and Warnings
- Preventing Electrostatic Discharge Damage
- AC Power Electrical Safety Guidelines
- AC Power Disconnection Warning
- DC Power Electrical Safety Guidelines
- DC Power Disconnection Warning
- DC Power Grounding Requirements and Warning
- DC Power Wiring Sequence Warning
- DC Power Wiring Terminations Warning
- Multiple Power Supplies Disconnection Warning
- TN Power Warning
- Action to Take After an Electrical Accident
-
- play_arrow Installation and Configuration
- play_arrow Installing the Appliance
- Tools and Parts Required to Install the Junos Space Appliance
- Unpacking the JA2500 Junos Space Appliance
- Mounting the JA2500 Junos Space Appliance
- Front-and-Rear Mounting the JA2500 Junos Space Appliance Flush to a Rack
- Front-and-Rear Mounting the JA2500 Junos Space Appliance Recessed in a Rack
- Midmounting the Junos Space Appliance in a Two-Post Rack
- play_arrow Connecting the Appliance
- play_arrow Performing Initial Configuration
- Booting the Junos Space Appliance
- Configuring a Junos Space Appliance as a Junos Space Node
- Configuring a Junos Space Appliance as a Standalone or Primary FMPM Node
- Configuring a Junos Space Appliance as a Backup or Secondary FMPM Node for High Availability
- Installing a Junos Space Image on a Junos Space Appliance by Using a USB Drive
- Powering Off the Junos Space Appliance
- play_arrow Changing Network and System Settings
-
- play_arrow Troubleshooting
- play_arrow Troubleshooting Procedures
- play_arrow Monitoring the Appliance
- play_arrow Returning Hardware
- Returning a JA2500 Junos Space Appliance or Component for Repair or Replacement
- Locating the Serial Number on a JA2500 Junos Space Appliance or Component
- Contacting Customer Support to Obtain Return Materials Authorization for Junos Space Appliances
- Packing a JA2500 Junos Space Appliance or Component for Shipping
-
ON THIS PAGE
Replacing the Fan on a Junos Space Appliance
The Junos Space appliance ships with two field-replaceable fans that are hot-swappable. You can remove and replace a fan without powering off the appliance or disrupting any functions.
When a fan fails, the full cooling load switches to the remaining fan and the red Hardware Fault LED on the front panel of the appliance blinks and an alarm sounds.
The LEDs on the front panel of the JA2500 are arranged vertically, as shown in Figure 1.

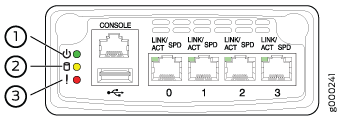
1 — Power LED | 3 — Hardware Fault LED |
2 — Hard Disk Activity LED |
The Junos Space appliance should not run on one fan for an extended period of time. Failed fans should be replaced as soon as possible.
Ensure that you have the following parts and tools available to remove the fan from the appliance chassis:
(Optional) Electrostatic discharge (ESD) grounding strap
(Optional) An antistatic bag or an antistatic mat