The Juniper ATP Cloud uses a Junos OS op script to help you configure your SRX Series Firewall to
connect to the Juniper ATP Cloud cloud service. This script performs the following
tasks:
-
Downloads and installs certificate authority (CAs) licenses onto your SRX Series
Firewall.
Note:
-
You must allow traffic to the junipersecurity.net domain on ports
8444 and 7444 since the Trusted Platform Module (TPM)-based
certificates are used for connections between the SRX Series
Firewall and Juniper ATP Cloud. To determine if a feature is
supported by a specific platform or Junos OS release, see Feature Explorer. For more
information about using TPM on SRX Series Firewalls, see
Trusted Platform Module
Overview.
-
For newly enrolled TPM and non-TPM-based devices, traffic must be
allowed to the junipersecurity.net domain only on port 443.
-
Creates local certificates and enrolls these certificates with the cloud server
-
Performs basic Juniper ATP Cloud configuration on the SRX Series Firewall
-
Establishes a secure connection to the cloud server
Note:
-
Juniper ATP Cloud requires that both your Routing Engine (control plane)
and Packet Forwarding Engine (data plane) can connect to the
Internet.
-
The data plane connection should not be sourced from the management or
loopback interface, such as fxp0 or lo0. You do not need to open any
ports on the SRX Series Firewall to communicate with the cloud server.
However, if you have a device in the middle, such as a firewall, then
that device must have port 443 open.
-
The SRX Series Firewall uses the default inet.0 routing table and an
interface part of inet.0 as source-interface for control-plane
connection from SRX Series Firewall to Juniper ATP Cloud. If the only
Internet-facing interface on SRX Series Firewall is part of a routing
instance, then we recommend that you add a static route pointing to the
routing instance. Else, the control connection will fail to
establish.
-
Juniper ATP Cloud requires that your SRX Series Firewall hostname
contains only alphanumeric ASCII characters (a-z, A-Z, 0-9), the
underscore symbol (_) and the dash symbol (-).
For SRX300, SRX320, SRX340, SRX345, SRX380 and SRX550 Series firewalls, you must run the
set security forwarding-process enhanced-services-mode command and reboot
the device before running the op script or before running the request services
advanced-anti-malware enroll command.
To download and run the Juniper ATP Cloud scripts:
Note:
Starting in Junos OS Release 19.3R1, you can use the request services
advanced-anti-malware enroll command on the SRX Series Firewall to enroll a
device to the Juniper ATP Cloud Web Portal. With this command, you do not have to perform
any enrollment tasks on the Web Portal. All enrollment is done from the CLI on the SRX
Series Firewall. See Enroll an SRX Series Firewall Using the CLI.
-
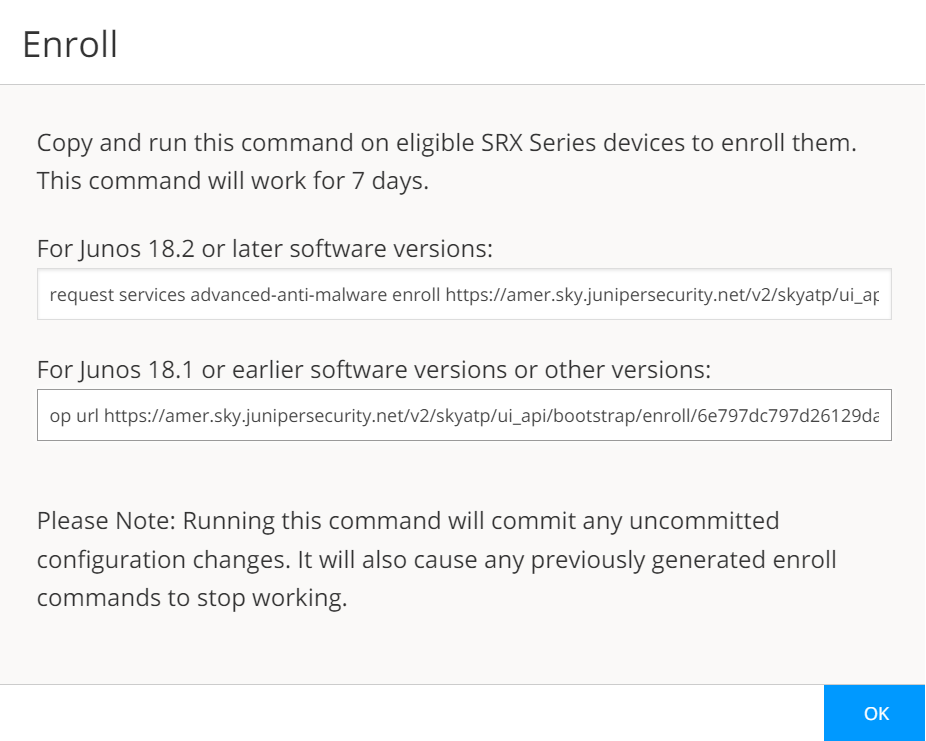
In the Web UI, click Devices and then click Enroll.
The Enroll window appears. See Figure 1.
Figure 1: Enrolling Your SRX Series Firewall
-
Copy the highlighted contents to your clipboard and click OK.
Note:
When enrolling devices, Juniper ATP Cloud generates a unique op script for each request. Each
time you click Enroll, you’ll get slightly different parameters
in the op script. The screenshot above is just an example. Do not copy the above
example onto your SRX Series Firewall. Instead, copy and paste the output you receive
from your Web UI and use that to enroll your SRX Series Firewalls.
-
Paste this command into the Junos OS CLI of the SRX Series Firewall you want to
enroll with Juniper ATP Cloud. Press Enter. Your screen will
look similar to the
following for
TPM-based and non-TPM-based
devices:
-
Script for TPM-based devices:
request services advanced-anti-malware enroll https://amer.sky.junipersecurity.net/v2/skyatp/ui_api/bootstrap/enroll/mt8zlb8xwl0vmg5x/8tajwglnz54sdhkn.slax
Platform is supported by ATP Cloud: SRX2300.
Version 25.4I-20250731.0.1357 is valid for bootstrapping.
Junos version 25.4I-20250731.0.1357 supports https endpoints.
Image Version: 25.4I-20250731.0.1357...
TPM supported device detected.
Junos version 25.4I-20250731.0.1357 supports TPM.
Going to enroll single device for SRX2300: <device_SSRN> with hostname <device_name>.
Application Signature DB version on this device is: 3825 (Minor). Using latest version of Application Signature DB is recommended.
Remove related security-intelligence service configurations...
Remove related advanced-anti-malware service configurations...
Remove related SSL service configurations...
Remove related PKI configurations...
Clear local certificate aamw-srx-cert...
Clear key pair: aamw-srx-cert...
Clear CA profile aamw-cloud-ca...
Clear CA profile aamw-secintel-ca...
Building aws certificates...
Configure aws CA...
Load aws CA...
Communicate with cloud...
License type for this device: premium.
License of your device will expire in 310 days.
Configuration added successfully for SSL crypto hardware.
Configure CA aamw-ca...
Request aamw-secintel-ca CA...
Wait aamw-secintel-ca CA download status...
Load aamw-secintel-ca CA...
Request aamw-cloud-ca CA...
Wait aamw-cloud-ca CA download status...
Load aamw-cloud-ca CA...
CA certificate ready: aamw-cloud-ca...
CA certificate ready: aamw-secintel-ca...
Configure SSL service...
Configuration added successfully for SSL service.
Configure advanced-anti-malware service...
Configuration added successfully for advanced-anti-malware service.
Configure security-intelligence service...
Configuration added successfully for security-intelligence service.
Check configuration on device...
SSL profile: [OK]
SecIntel CA: [OK]
Cloud CA: [OK]
TPM: [OK]
Client cert found: [OK]
SSL profile action: [OK]
URL for advanced-anti-malware: [OK]
Profile for advanced-anti-malware: [OK]
URL for security-intelligence: [OK]
Profile for security-intelligence: [OK]
All configurations are correct for enrollment.
Communicate with cloud...
Wait for aamw connection status...
Device enrolled successfully!
Please see following links for more information:
ATP Cloud sample config:
https://www.juniper.net/documentation/en_US/release-independent/sky-atp/topics/example/configuration/sky-atp-policy-creating-cli.html
ATP Cloud quick start guide:
http://www.juniper.net/documentation/en_US/release-independent/sky-atp/information-products/topic-collections/sky-atp-qsg.pdf
ATP Cloud technical documents:
http://www.juniper.net/documentation/en_US/release-independent/sky-atp/information-products/pathway-pages/index.html
It is recommended to run diagnostic process with the following cli command to make sure all configurations are valid:
request services advanced-anti-malware diagnostics srxapi.preprod.sky.junipersecurity.net detail
This script performs the following series of checks and configurations to
ensure connectivity with Juniper ATP Cloud:
Detect if the SRX Series Firewall is a TPM-supported
platform
Verify whether the Junos OS version supports HTTPS endpoints
Identify the device type (standalone or chassis cluster)
Remove any existing configuration related to Juniper ATP Cloud
enrollment on SecIntel, AAMW, SSL, and PKI
Delete local certificates and CA profiles
Configure and load certificates using an HTTPS connection from
AWS
Connect to the cloud to retrieve certificates
Check license details
Add configuration for SSL crypto hardware
Download CA and device certificates
Load SecIntel and AAMW-cloud certificates
Restore previously removed configurations (SecIntel, AAMW, SSL, and
PKI)
Commit the changes and verify the configuration (SSL Profile, TPM,
AAMW profile)
Once all configurations are verified, the SRX Series Firewall establishes a
connection with the cloud. A message indicates that the device has been
successfully enrolled.
-
Script for non-TPM-based devices:
request services advanced-anti-malware enroll https://amer.sky.junipersecurity.net/v2/skyatp/ui_api/bootstrap/enroll/mt8zlb8xwl0vmg5x/8tajwglnz54sdhkn.slax
Platform is supported by ATP Cloud: VSRX.
Version 25.4I-20251117.0.1931 is valid for bootstrapping.
Junos version 25.4I-20251117.0.1931 supports https endpoints.
Enrolling with ATP Cloud license serial number: 060620220302-n41jy.
Going to enroll single device for VSRX: 106616265e0d@060620220302-n41jy with hostname argon-vsrx-01.
Application Signature DB version on this device is: 3814 (Major). Using latest version of Application Signature DB is recommended.
Remove related security-intelligence service configurations...
Remove related advanced-anti-malware service configurations...
Remove related SSL service configurations...
Remove related PKI configurations...
Clear local certificate aamw-srx-cert...
Clear key pair: aamw-srx-cert...
Clear CA profile aamw-cloud-ca...
Clear CA profile aamw-secintel-ca...
Building aws certificates...
Configure aws CA...
Load aws CA...
Communicate with cloud...
License type for this device: premium.
License of your device will expire in 215 days.
Configure CA aamw-ca...
Request aamw-secintel-ca CA...
Wait aamw-secintel-ca CA download status...
Load aamw-secintel-ca CA...
Request aamw-cloud-ca CA...
Wait aamw-cloud-ca CA download status...
Load aamw-cloud-ca CA...
Retrieve CA profile aamw-ca...
CA certificate ready: aamw-ca...
CA certificate ready: aamw-cloud-ca...
CA certificate ready: aamw-secintel-ca...
Generate key pair: aamw-srx-cert...
Enroll local certificate aamw-srx-cert with CA server...
Configure SSL service...
Configuration added successfully for SSL service.
Configure advanced-anti-malware service...
Configuration added successfully for advanced-anti-malware service.
Configure security-intelligence service...
Configuration added successfully for security-intelligence service.
Check configuration on device...
SSL profile: [OK]
SecIntel CA: [OK]
Cloud CA: [OK]
Client cert found: [OK]
SSL profile action: [OK]
URL for advanced-anti-malware: [OK]
Profile for advanced-anti-malware: [OK]
URL for security-intelligence: [OK]
Profile for security-intelligence: [OK]
All configurations are correct for enrollment.
Communicate with cloud...
Wait for aamw connection status...
Device enrolled successfully!
Please see following links for more information:
ATP Cloud sample config:
https://www.juniper.net/documentation/en_US/release-independent/sky-atp/topics/example/configuration/sky-atp-policy-creating-cli.html
ATP Cloud quick start guide:
http://www.juniper.net/documentation/en_US/release-independent/sky-atp/information-products/topic-collections/sky-atp-qsg.pdf
ATP Cloud technical documents:
http://www.juniper.net/documentation/en_US/release-independent/sky-atp/information-products/pathway-pages/index.html
It is recommended to run diagnostic process with the following cli command to make sure all configurations are valid:
request services advanced-anti-malware diagnostics srxapi.preprod.sky.junipersecurity.net detail
This script performs the following series of checks and configurations to
ensure connectivity with Juniper ATP Cloud:
Detect if the SRX Series Firewall is a TPM-supported
platform
Verify whether the Junos OS version supports HTTPS endpoints
Identify the device type (standalone or chassis cluster)
Remove any existing configuration related to Juniper ATP Cloud
enrollment on SecIntel, AAMW, SSL, and PKI
Delete local certificates and CA profiles
Configure and load certificates using an HTTPS connection from
AWS
Connect to the cloud to retrieve certificates
Check license details
Download CA and device certificates
Load SecIntel and AAMW-cloud certificates
Restore previously removed configurations (SecIntel, AAMW, SSL, and
PKI)
Commit the changes and verify the configuration (SSL Profile, TPM,
AAMW profile)
Once all configurations are verified, the SRX Series Firewall establishes a
connection with the cloud. A message indicates that the device has been
successfully enrolled.
-
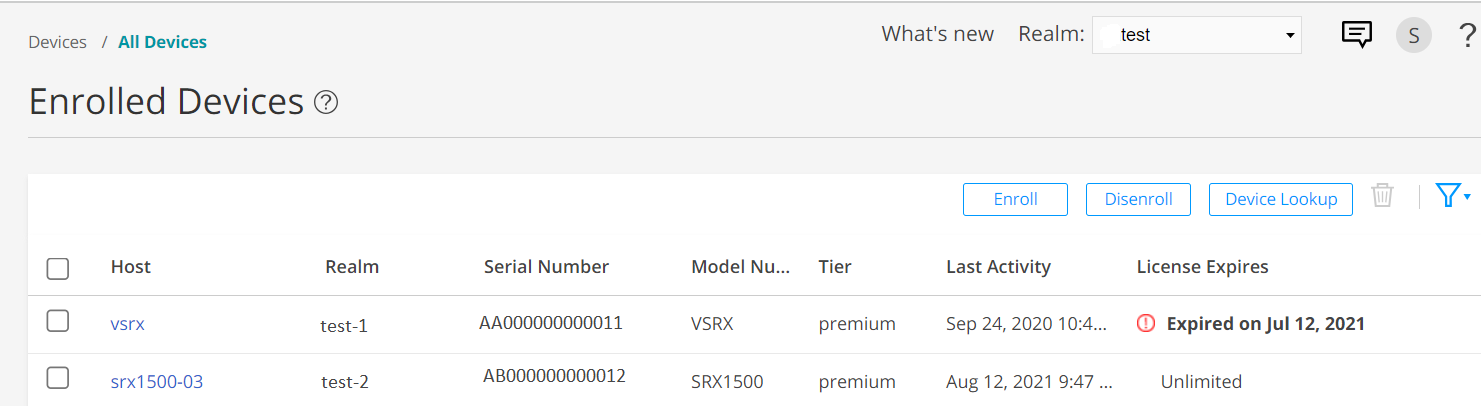
In the Juniper ATP Cloud Web portal, click Devices.
The SRX Series Firewall you enrolled now appears in the table. See Figure 2.
Figure 2: Example Enrolled SRX Series Firewall
-
(optional) Use the
show services advanced-anti-malware status CLI
command to verify that connection is made to the cloud server from the SRX Series
Firewall. Your output will look similar to the following.
show services advanced-anti-malware status
Server connection status:
  Server hostname:  https://amer.sky.junipersecurity.net/   Server port:     443
    Control Plane:
      Connection Time: 2015-11-23 12:09:55 PST
      Connection Status: Connected
    Service Plane:
      fpc0
        Connection Active Number: 0
        Connection Failures: 0
Once configured, the SRX Series Firewall communicates to the cloud through multiple
persistent connections that are established over a secure channel (TLS 1.2). The SRX Series
Firewall is authenticated using SSL client certificates.
As stated earlier, the script performs basic Juniper ATP Cloud configuration on the SRX
Series Firewall. These configurations include:
Note:
You should not copy and run the following examples on your SRX Series Firewall. The list
here is simply to show you what is being configured by the op script. If you run into any
issues, such as certificates, rerun the op script again.
-
Creating a default profile.
-
Establishing a secured connection to the cloud server. The following is an example.
Your exact URL is determined by your geographical region. See table.
Table 1: Customer Portal URLs
|
Location
|
Customer Portal URL
|
|
United States
|
Customer Portal:
https://amer.sky.junipersecurity.net
|
|
European Union
|
Customer Portal:
https://euapac.sky.junipersecurity.net
|
|
APAC
|
Customer Portal:
https://apac.sky.junipersecurity.net
|
|
Canada
|
Customer Portal:
https://canada.sky.junipersecurity.net
|
set services advanced-anti-malware connection url
 https://amer.sky.junipersecurity.net (this URL is only an example and will not work for all locations).
 set services advanced-anti-malware connection authentication tls-profile aamw-ssl
-
Configuring the SSL proxy.
set services ssl initiation profile aamw-ssl trusted-ca aamw-secintel-ca
set services ssl initiation profile aamw-ssl client-certificate aamw-srx-cert
set services security-intelligence authentication tls-profile aamw-ssl
set services advanced-anti-malware connection authentication tls-profile aamw-ssl
set services ssl initiation profile aamw-ssl trusted-ca aamw-cloud-ca
-
Configuring the cloud feeds (allowlists, blocklists and so on.)
set services security-intelligence url https://cloudfeeds.sky.junipersecurity.net/
api/manifest.xml
set services security-intelligence authentication tls-profile aamw-ssl
Juniper ATP Cloud uses SSL forward proxy as the client and server authentication. Instead
of importing the signing certificate and its issuer’s certificates into the trusted-ca list
of client browsers, SSL forward proxy now generates a certificate chain and sends this
certificate chain to clients. Certificate chaining helps to eliminate the need to distribute
the signing certificates of SSL forward proxy to the clients because clients can now
implicitly trust the SSL forward proxy certificate.
The following CLI commands load the local certificate into the PKID cache and load the
certificate-chain into the CA certificate cache in PKID, respectively.
request security pki local-certificate load filename ssl_proxy_ca.crt key sslserver.key certificate-id ssl-inspect-ca
request security pki ca-certificate ca-profile-group load ca-group-name ca-group-name filename certificate-chain
Where:
| ssl_proxy_ca.crt (Signing certificate) |
Is the SSL forward proxy certificate signed by the administrator or by the
intermediate CA.
|
| sslserver.key |
Is the keypair.
|
| ssl-inspect-ca |
Is the certificate ID that SSL forward proxy uses in configuring the root-ca in the
SSL forward proxy profile.
|
| certificate-chain |
Is the file containing the chain of certificates.
|
The following is an example of SSL forward proxy certificate chaining used by the op
script.
request security pki local-certificate enroll certificate-id aamw-srx-cert ca-profile aamw-ca challenge-password *** subject CN=4rrgffbtew4puztj:model:sn email email-address
request security pki ca-certificate enroll ca-profile aamw-ca
Note that you cannot enroll the SRX Series Firewall to Juniper ATP Cloud if the SRX Series
Firewall is in FIPS mode due to a PKI limitation.
To check your certificates, see Troubleshooting Juniper Advanced Threat Prevention Cloud:
Checking Certificates. We recommend that you re-run the op script if you are having
certificate issues.