Sizing Tunnels
Although the steps below are for tunnel sizing, demand sizing works the same way.
Open a network project spec that contains tunnels, by double-clicking on the specification file in the File Manager.
Since the tunnel sizing feature is designed for use in Tunnel layer, switch to Tunnel layer mode by clicking on the Tunnel layer button on the main menu bar, as shown below.
Figure 1: Tunnel Layer Button
If you plan to resize your tunnels based upon the bandwidth of routed end to end flows, you should have demands defined in your network, in the demand file. If not, you can add some by switching into Modify mode, and selecting Modify > Elements > Demands... and selecting Add > Multiple Demands....
If you plan to resize your tunnels based upon actual measured tunnel traffic statistics, then you should have read in the NorthStar Planner formatted tunnel traffic load file. To read it in, go to File > Load Network Files and select the entry T_trafficload (for “tunnel trafficload”) and click Browse to find the desired input file. Alternatively, you can simply include the tunnel trafficload file into your specification file with the following line:
T_trafficload = T_trafficload.runcodeThe following shows the tunnel traffic load format for one tunnel, named tunDenDet, originating at node DEN and with three periods of measured tunnel traffic:
DEN:tunDenDet A2Z - 3.0M 4.0M 9.1KSelect Report > Report Manager to open the Report Manager window. At least one of the following reports will be of interest to you.
If you plan to resize your tunnels based upon the bandwidth of routed end to end flows, click on the “Demand Traffic on Tunnel” report in the left pane under Tunnel Layer Network Reports > Tunnel Reports to generate and view it in the right-pane. This report provides information on existing tunnels such as the tunnel’s planned bandwidth (Bandwidth), the total bandwidth of flows traversing the tunnel (FlowBW), and the difference between those two values (BW_Diff). This report identifies network inefficiencies by allowing the user to see the under-booked and over-booked tunnels in the network. The tunnel sizing feature can then automate an adjustment of these tunnels’ bandwidths according to user-specified settings.
Figure 2: Demand Traffic on Tunnel Report (formerly Planned Tunnel Util)
If you plan to resize your tunnels based upon actual measured tunnel traffic statistics, click on the “Measured Tunnel Traffic” report. This displays the measured tunnel traffic load numbers, as read in from the T_trafficload file, in tabular format.
In Design mode, select Design > TE Tunnels > Tunnel Sizing. If you did not switch to Tunnel layer earlier, the program will ask you to switch to Tunnel layer. Click “Yes” to continue.
A Find Tunnels window will appear as shown in Figure 275. In addition to the regular options, there are options specific to tunnel sizing. Those fields are described in the table below
Figure 3: Find Tunnels for Tunnel Sizing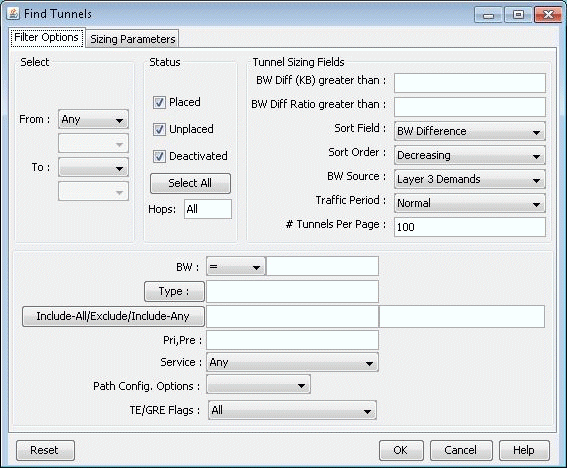
Field
Description
BW Diff (KB) greater than
If the absolute value of the difference between the tunnel bandwidth and total flow bandwidth is greater than this value (expressed in kilobits), then those tunnels are fetched.
BW Diff Ratio greater than
If the absolute value of the ratio of bandwidth difference to tunnel bandwidth is greater than this value, then those tunnels are fetched.
Sort Field
Sorts the displayed tunnels by either bandwidth difference or bandwidth difference ratio.
Sort Order
Sorts the displayed tunnels according to the type in the Sort field; sorts either in decreasing order or in decreasing order of the absolute value.
BW Source
Specifies the source of traffic: “Layer 3 Demands” or “Traffic Load” (measured tunnel traffic). This parameter will show up as the “FlowBW” field in the Tunnel Sizing window. It is also used as the flow bandwidth of the new bandwidth calculation.
Traffic Period
This field specifies the time period of traffic to be used. If the BW Source is Layer 3 Demands, then the Planned traffic from the demand file is used. If the BW Source is Tunnel Traffic Load, then possible values are Period1 through Period24, and Peak. Peak indicates the heaviest/worst load experienced among any of these 24 traffic periods.
# Tunnels Per Page
Specifies how many tunnels to display per page.
The next step is to check your tunnel sizing options. In the Find Tunnels window, select the “Sizing Parameters” tab.
Note:Alternatively, you can set the sizing parameters globally via Tools > Options > Design and click on the “Demand/Tunnel Sizing” options pane. When the options in the Design Options window are set, click “OK”. A window will ask you whether to reroute the tunnels. You can click “No” since changing the tunnel sizing options does not affect tunnel routing. (You are prompted because the program is aware that you have modified the design options. Though the tunnel sizing options do not affect routing, other design options might.)
Figure 4: Tunnel Sizing Parameters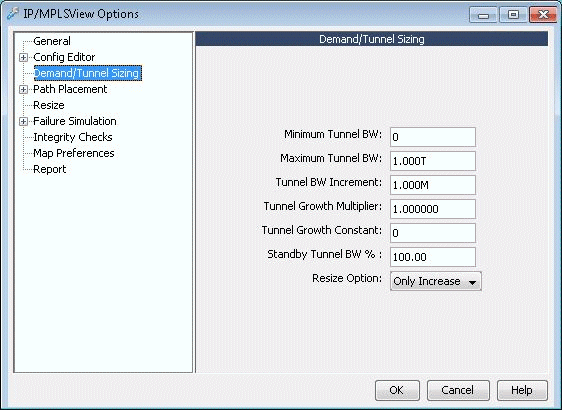
Set the sizing parameters to your preferred setting. The table below describes each field.
When the options have been selected, click “OK” to fetch tunnels that match the specified criteria. Those tunnels will then be displayed in the Tunnel Sizing window as shown in Figure 4.
Field
Description
Parameter in Dparam File
Minimum Tunnel BW
The minimum value to be assigned for any new tunnel bandwidth. If the calculated bandwidth is less than this value, then this value is used as the new bandwidth.
minSizingBW
Maximum Tunnel BW
The maximum value to be assigned for any new tunnel bandwidth. If the calculated bandwidth is greater than this value, then this value is used as the new bandwidth.
maxSizingBW
Tunnel BW Increment
The increment by which the bandwidth will be increased. Basically, the calculated bandwidth will be rounded up to the nearest multiple of this value.
incSizingBW
Tunnel Growth Multiplier
This value is multiplied by the total flow bandwidth to calculate the new bandwidth. For example, 1.00 will generate a new tunnel bandwidth assignment that is 100% of the total flow bandwidth traversing the tunnel, and 1.5 will generate a value that is150% of the traffic load bandwidth.
sizing_growthmultiplier
Tunnel Growth Constant
A constant offset to add in the calculation of the new bandwidth.
sizing_growthconstant
Standby Tunnel BW %
If the primary tunnel being resized has an associated standby tunnel, then use this field to indicate a percentage value of the new primary tunnel bandwidth that should be used to set the standby tunnel bandwidth. The default is 100%, or the same as the primary tunnel bandwidth.
sizing_standbypct
Resize Option
The “Only Increase” option is for sizing only overbooked tunnels. When this option is set, a new bandwidth will only be calculated if the total flow bandwidth is greater than or equal to the current planned tunnel bandwidth.
When the “Fit to Traffic” option is set, a new bandwidth will always be calculated.
sizing_resizeopt
Figure 5: Tunnel Sizing Window
In the Tunnel Sizing window, each entry in the table represents a tunnel. The “Bandwidth” column indicates the planned tunnel bandwidth. The “Flow BW” column indicates the actual measured traffic load on that tunnel based upon the inputs in the T_trafficload file. The “New BW” column, in white, will automatically be populated with a proposed new bandwidth value for each tunnel, based upon the Tunnel Sizing option settings specified in the Design Options window. If a “New BW” column field is blank, that indicates that the Tunnel Sizing conditions were not met for this particular demand, and no new value is proposed. For more information on how exactly this field is calculated, see Calculation of the New Tunnel Bandwidth.
The proposed “New BW” values for the tunnels is not taken into effect until you confirm, or approve of the changes. To do so, you can either press “Confirm All” to approve all the proposed changes. Once an entry is confirmed, the “Bandwidth” column will be replaced by the value in the “New BW” column, and the “New BW” column will be cleared. You can also highlight just the desired entries in the table (using <SHIFT>-click and <CTRL>-click for multiple selection), and press the “Confirm Selected” button to approve just the changes in the selected rows.
To adjust the Tunnel Sizing options for selected tunnels, you can do so directly in the Tunnel Sizing window, by selecting the desired table entries, and pressing the “Recalculate Selected” button. You will then be prompted to enter the desired Tunnel Sizing parameters, which will be applied only to the selected tunnels. Enter the new values here and click “OK” to recalculate.
Figure 6: Options Window To Recalculate Selected Tunnels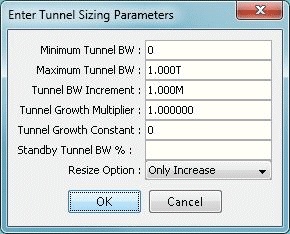
Once you are satisfied with your changes in the Tunnel Sizing window, press the “OK” button. Any changes that were confirmed should now be in effect. Any new bandwidth value that was not confirmed will not be saved when the Tunnel Sizing window is closed.
During the confirmation process, the server will determine if the tunnel using the new bandwidth value can be placed. If it cannot be placed, the tunnel will keep its old bandwidth, and an error message will be displayed in the console.
The following sections describe some other features available in the Tunnel Sizing window.
The columns in the Tunnel Sizing table can be customized to show or hide certain fields. Right-click on the table and select “Customize Current View” from the pop-up menu (Figure 6). A window will appear that allows the user to select the desired columns for display.
Figure 7: Right-click Pop-up Menu
The table can also be sorted by any column by clicking on the column header. This sorts the tunnels currently displayed in the table.
If there are multiple pages of tunnels, the user may wish to sort the tunnels across all the pages by either BW diff or BW diff ratio in order to see the most overbooked tunnels on one page. This can be done in the previous “Find Tunnels” window. If the tunnels have already been fetched, you may sort by right-clicking on the body of the table and selecting “Sort Globally”. A window will appear as shown in Figure 280 allowing you to select the sorting options.
Figure 8: Select Sort Options Window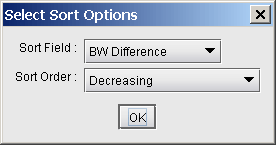
You may override the suggested new bandwidth by typing in a new value directly into the table. To do this, either double-click on the tunnel’s “New BW” field. The table cell will then become editable. Alternatively, right-click on the selected tunnel(s) and choose “Replace New BW Values”. You will then be prompted to enter a new BW value for those tunnel(s).