Specifying Tunnel Constraints (Affinity/Mask or Include/Exclude)
Constraint-based tunnel routing is implemented in Cisco and Juniper by coloring links and specifying which link colors a tunnel can or cannot route over. For Cisco, the links can be colored using 32 link attributes, each represented by a bit. The tunnel routing constraints are then specified per tunnel using affinity and mask. Juniper, on the other hand, uses the term admin groups to represent link colors. For Juniper, the tunnel routing constraints can be specified per tunnel using include and exclude statements. Below is a brief summary of how to specify affinity/mask for Cisco routers and include/exclude for Juniper routers.
Cisco
Link attribute contain 32 bits as the colors. A tunnel’s 32-bit mask specifies which of the tunnel’s 32 affinity bits are required to match the link attributes. If the match is successful, the tunnel is allowed to route through the trunk provided that the other routing requirements (such as capacity) are also satisfied. If the match is unsuccessful, the tunnel is not allowed to route over the trunk. In other words, a tunnel can route over a link if tunnel_affinity = (link_attribute & tunnel_mask).
Juniper
For Juniper, the terminology and options are slightly different. For Juniper, you can have up to 32 administrative groups as the colors. For each link, you can assign one or more administrative groups as the link color. Then for each tunnel, you can add groups to an “exclude” or “include” list (or, in recent versions of JUNOS, there an “include-all” and “include-any” list). For a tunnel to route over a link, that link cannot have any of the excluded groups and must have at least one of the included groups (for include or include-any) or all of the included groups (for include-all). Note that for Juniper, you can have an include and exclude list for secondary paths as well as primary paths.
NorthStar Planner Modeling of Tunnel Constraints
In the NorthStar Planner client, the Tunnel Attributes window can be used to assign names to link attributes as described in Tunnel Attribute/Admin Group Names on page 258. For Juniper tunnels, admin-groups can be entered here. For Cisco tunnels, the names can be left as is or changed for informational purposes.
Following this, the link attributes/admin-groups can be assigned to links from the Modify Links window as described in Setting Link Attributes on page 258.
Finally, the tunnel routing constraints can be specified from the Modify Tunnels window by clicking the Affinity/Mask button (for Cisco) as described in Tunnel Affinity and Mask (Cisco)on page 259 or Include-All/Exclude/Include-Any button (for Juniper) as described in Including and Excluding Admin-Groups (Juniper) on page 260.
Tunnel Attribute/Admin Group Names
If you want to give meaningful global names to one of the 32 link attributes/admin groups, you can select Tools > Options > General..., Path Placement > MPLS TE LSP Tunnel Attributes options pane for the following window. For Juniper switches, enter in the admin-group names here. The default names are bit0, bit1, bit2, etc. Click “OK” to save your changes.

Setting Link Attributes
To change the attributes for a single link, right-click that link on the map and select Modify >Links under Pointer . Then select the Attributes tab. To set the same link attribute for both directions on the link, leave the default setting “Symmetric.” Then check off the link’s attributes. This will set the corresponding bit for that attribute to 1.
To set different link attributes for the two directions on the link, select “Asymmetric.” Then select the direction “A to Z” or “Z to A” that you want to modify and select the attributes for that direction.
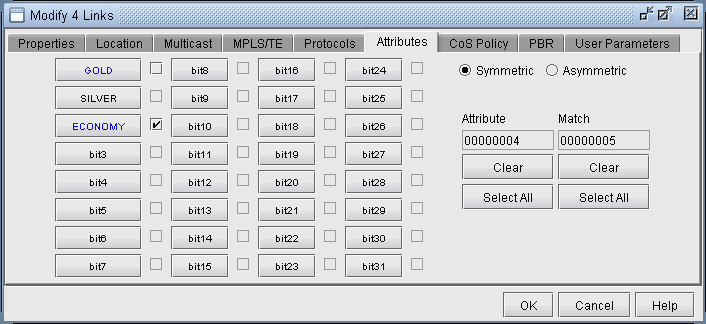
To change the affinity attributes for multiple links at a time, select Modify > Elements > Links. In the Links table, select the desired rows by using the <Shift> and <Ctrl> keys. To select all rows, click “Select All” or click in the table and press <Ctrl>-A. Then, press Modify. You will get a window like the one shown below.
Note that the Match field appears only when multiple links are selected for modification. It is not a property of the link but is for the user to indicate which bits to modify for the selected links. Bits that are not matched will not be touched in the modification.
To specify a bit that you want to change for all the selected links, click the button for that bit to activate the checkbox for that bit. This will also turn the button text blue. Then check or uncheck the adjacent box to turn on or off the attribute, i.e., to set the value for that attribute to 1 or 0.
For example, in Figure 1, three links are being modified. For each of these links, the GOLD attribute is set to 0 and the ECONOMY attribute is set to 1. No other attributes on any of these links will be modified.
To customize the attribute names, refer back to Tunnel Attribute/Admin Group Names on page 258.
Tunnel Affinity and Mask (Cisco)
Affinity and mask for a tunnel can be specified through the Add Tunnel or Modify Tunnel windows. In these windows, there is a text field to the right of the “Affinity/Mask” button, in which you can directly enter a hexadecimal for the affinity and mask. The affinity and mask should be separated by a comma.

Alternatively, if you want to specify the affinity and mask by selecting the relevant bits from which the hexadecimal number is derived, click on the “Affinity” button. The Tunnel Affinity/Mask Properties window will appear, as shown below.
The mask specifies which attributes a link must match in order for the tunnel to be routed over that link. The affinity specifies whether that attribute is turned on or off. For example, in Figure 3, the tunnel is configured so that it can only route over links that have the ECONOMY attribute set to 1 and the BIT8 attribute set to 0.
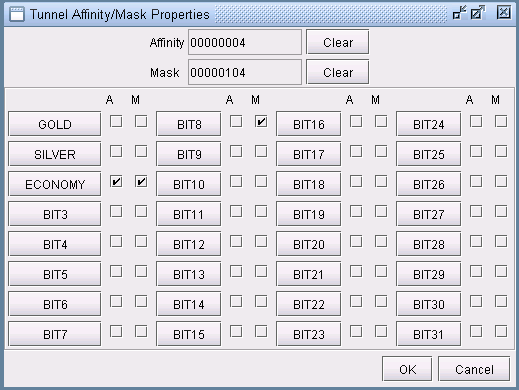
The Affinity and mask are both hexadecimals. Each digit can go from 0 to F and is made up of 4 bits. Check off the bits that you want to set. This will change the affinity and mask listed on top. If you press “Clear” all the bits will be unchecked and the number will be reset to 00000000.
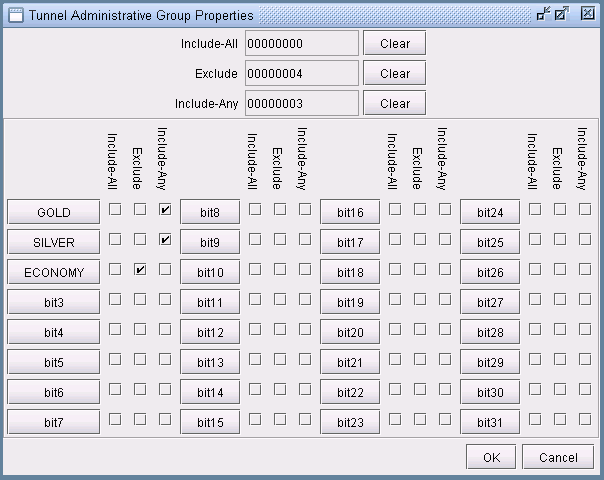
Including and Excluding Admin-Groups (Juniper)
For Juniper, include and exclude constraints can be specified through the Add Tunnel or Modify Tunnel windows. You can directly specify these properties next to the Include-All/Exclude/Include-Any button in the form of hexadecimals.

Alternatively, you can check off the attributes in the following window. In the example below, the constraint is that this tunnel must route over a link with at least one of the admin-groups GOLD or SILVER but not the admin group ECONOMY.