Managing Custom Roles
These topics provide instructions to add custom roles, backup custom roles, and restore custom roles.
Adding Custom Roles
Follow these steps to add a custom overlay role to device(s) managed by Contrail Enterprise Multicloud (CEM).
-
Run the following command from the server running the
device manager container.
# docker exec -it config_devicemgr_1 bash
-
Define the custom role object in
predef_payloads.json.(config-device-manager) # vi /opt/contrail/fabric_ansible_playbooks/conf/predef_payloads.json
-
Define custom overlay roles.
All roles are defined in the
“data”->"object_type":
"overlay-role",   	"objects": [
section. As an example,motd-testis defined as a custom overlay role."object_type": "overlay-role", "objects": [ { "fq_name": [ "default-global-system-config", "motd-test" ], "name": "motd-test" }, -
After the roles are defined, map the custom role to devices
and underlay roles.
All device profiles are listed in the
“data”->"object_type":
"node-profile"
section. Custom roles are added in thenode_profile_roles -> role_mappingssection.As an example, add
motd-testcustom role tojuniper-mxdevice that is already configured withleafphysical role.{ "fq_name": [ "default-global-system-config", "juniper-mx" ], "name": "juniper-mx", "node_profile_vendor": "Juniper", "node_profile_device_family": "junos", "node_profile_hitless_upgrade": true, "node_profile_roles": { "role_mappings": [ { "physical_role": "leaf", "rb_roles": ["CRB-Access", "CRB-Gateway", "DC-Gateway", "Route-Reflector", "DCI-Gateway", "ERB-UCAST-Gateway", "DCI-Gateway", "CRB-MCAST-Gateway", "PNF-Servicechain", "AR-Client", "motd-test"] }, { "physical_role": "spine", "rb_roles": ["lean", "CRB-Access", "CRB-Gateway", "DC-Gateway", "Route-Reflector", "CRB-MCAST-Gateway", "DCI-Gateway", "PNF-Servicechain", "AR-Client"] } ] } } -
Edit the
all.ymlfile.(config-device-manager) # vi /opt/contrail/fabric_ansible_playbooks/group_vars/all.yml
-
Create a directory,
motd_test, and configuremotd-testas leaf physical role in thefeature_based_plugin_rolessection of theall.ymlfile.The Jinja template for each custom role and underlay role is stored in this directory.
feature_based_plugin_roles:
  motd-test@leaf:
	- motd_test
  CRB-Access@leaf:
	- overlay_storm_control
	- overlay_telemetry
Note:The name of the directory is
motd_test. The name of the custom role ismotd-test. -
Add the
motd_testdirectory to the configuration apply order in thefeature_apply_ordersection.feature_apply_order: - basic - underlay_ip_clos [...] - overlay_telemetry - motd_test
-
Add Jinja templates.
The device configuration templates are located here:
/opt/contrail/fabric_ansible_playbooks/config_templates/
Create
motd_testdirectory.(config-device-manager) # cd /opt/contrail/fabric_ansible_playbooks/config_templates/ (config-device-manager) # mkdir motd_test (config-device-manager) # cd motd_test
-
Add custom role to a device.
The configuration file name depends on the device type. In this example, the file name for the devices are as follows:
-
MX Series devices:
juniper_junos_motd_test.j2 -
QFX Series devices:
juniper_junos-qfx_motd_test.j2
Create a configuration file,
juniper_junos_motd_test.j2, to add a custom role for the MX series device.(config-device-manager) # vi juniper_junos_motd_test.j2
-
-
Configure the file using the
setcommand.set groups {{cfg_group}} system login message MOTD_TESTUsing
{{cfg_group}}allows you to separate custom group configuration from predefined CEM roles. -
Exit the container and then restart it.
(config-device-manager) # exit
# docker restart config_devicemgr_1
The new role is now seen in the Contrail Command user interface (UI). See Figure 1.
Figure 1: motd-test Routing-Bridging Role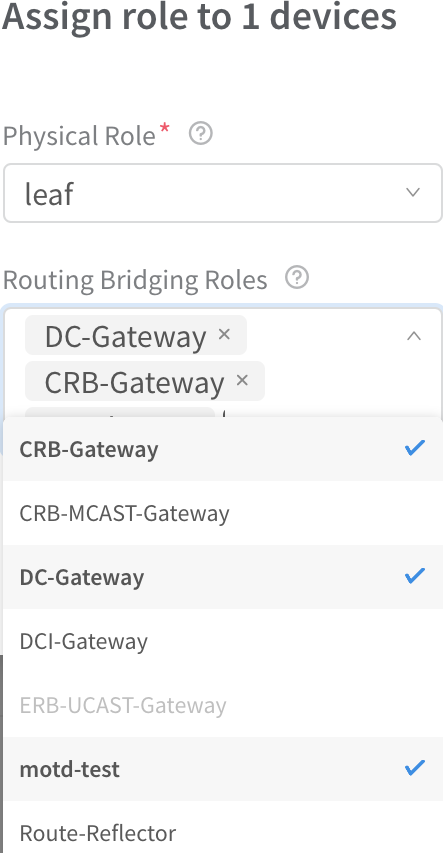
-
(Optional) After applying the role, log in to the device
and confirm that the configuration is applied.
MX> show configuration | compare rollback 1
[edit groups]
   __contrail_overlay_networking__ { ... }
+  __contrail_motd_test__ {
+  	system {
+      	login {
+          	message MOTD_TEST;
+      	}
+  	}
+  }
[edit]
- apply-groups [ re0 __contrail_basic__ __contrail_underlay_ip_clos__ __contrail_underlay_infra_bms_access__ __contrail_overlay_bgp__ __contrail_overlay_evpn__ __contrail_overlay_evpn_access__ __contrail_overlay_evpn_gateway__ __contrail_overlay_evpn_type5__ __contrail_overlay_dhcp_relay__ __contrail_overlay_security_group__ __contrail_overlay_lag__ __contrail_overlay_multi_homing__ __contrail_overlay_fip_snat__ __contrail_overlay_networking__ ];
+ apply-groups [ re0 __contrail_basic__ __contrail_underlay_ip_clos__ __contrail_underlay_infra_bms_access__ __contrail_overlay_bgp__ __contrail_overlay_evpn__ __contrail_overlay_evpn_access__ __contrail_overlay_evpn_gateway__ __contrail_overlay_evpn_type5__ __contrail_overlay_dhcp_relay__ __contrail_overlay_security_group__ __contrail_overlay_lag__ __contrail_overlay_multi_homing__ __contrail_overlay_fip_snat__ __contrail_overlay_networking__ __contrail_motd_test__ ];
Backup and Restore Custom Roles
These topics provide instructions to backup and restore custom roles.
Backup Custom Roles
Follow these steps to backup custom roles.
-
Backup
/opt/contrail/fabric_ansible_playbooks/conf/predef_payloads.json.# docker exec -it config_devicemgr_1 cat /opt/contrail/fabric_ansible_playbooks/conf/predef_payloads.json > predef_payloads.json.bak
-
Verify the overlay roles and node profiles.
For example, when you back up custom roles during the upgrade process, the existing containers are removed and the custom roles are erased. You will not be able to restore these roles and configurations once it has been erased. Hence, ensure that you back up the correct file by verifying the roles and node profiles before the upgrade process.
-
Backup
all.yml.# docker exec -it config_devicemgr_1 cat /opt/contrail/fabric_ansible_playbooks/group_vars/all.yml > all.yml.bak
-
Verify the
feature_based_plugin_rolesandfeature apply ordersections. -
Backup custom roles.
# docker exec -it config_devicemgr_1 tar --exclude "overlay*" -czvf custom_roles.tar.gz /opt/contrail/fabric_ansible_playbooks/config_templates/
# docker cp config_devicemgr_1:custom_roles.tar.gz
Ensure that you add
--excludebefore"overlay*"when you back up custom roles. If you do not add--exclude, both custom roles as well as predefined roles are backed up. This might cause any predefined roles that had bug fixes for the next release to be overwritten.For example, assume that there is a fix in the Jinja template for overlay_evpn predefined role for Contrail Networking Release 2005. When you upgrade Contrail Networking Release 2003 to Contrail Networking Release 2005, and subsequently use the backup file (that was backed up not using
--exclude), all fixes related to predefined roles for Contrail Networking Release 2005 will be overwritten when you use the config template from the backup file.
Restore Custom Roles
Follow these steps to restore custom roles.
-
Copy the new
/opt/contrail/fabric_ansible_playbooks/conf/predef_payloads.jsonfile.# docker exec -it config_devicemgr_1 cat /opt/contrail/fabric_ansible_playbooks/conf/predef_payloads.json > predef_payloads.json.new
-
Verify overlay roles and node profiles.
# diff -u predef_payloads.json.bak predef_payloads.json.new
Note:New roles might have been added when CEM was updated.
-
Restore the
predef_payloads.jsonchanges.-
Open
predef_payloads.json.docker exec -it config_devicemgr_1 vi /opt/contrail/fabric_ansible_playbooks/conf/predef_payloads.json
-
Verify that all roles are defined in the
“data”->"object_type":
"overlay-role",   	"objects": [
section, andmotd-testis defined as a custom overlay role.For more information, see the
predef_payloads.json.bakfile. For a file diff, refer to section two of thepredef_payloads.json.bakfile."object_type": "overlay-role", "objects": [ { "fq_name": [ "default-global-system-config", "motd-test" ], "name": "motd-test" }, -
Verify that the custom role is mapped to devices and underlay
roles.
All device profiles are listed in the
“data”->"object_type":
"node-profile"
section. Custom roles are added in thenode_profile_roles -> role_mappingssection.As an example, add
motd-testcustom role tojuniper-mxdevice that is already configured withleafphysical role.{ "fq_name": [ "default-global-system-config", "juniper-mx" ], "name": "juniper-mx", "node_profile_vendor": "Juniper", "node_profile_device_family": "junos", "node_profile_hitless_upgrade": true, "node_profile_roles": { "role_mappings": [ { "physical_role": "leaf", "rb_roles": ["CRB-Access", "CRB-Gateway", "DC-Gateway", "Route-Reflector", "DCI-Gateway", "ERB-UCAST-Gateway", "DCI-Gateway", "CRB-MCAST-Gateway", "PNF-Servicechain", "AR-Client", "motd-test"] }, { "physical_role": "spine", "rb_roles": ["lean", "CRB-Access", "CRB-Gateway", "DC-Gateway", "Route-Reflector", "CRB-MCAST-Gateway", "DCI-Gateway", "PNF-Servicechain", "AR-Client"] } ] } }
-
Open
-
Backup
all.yml.# docker exec -it config_devicemgr_1 cat /opt/contrail/fabric_ansible_playbooks/group_vars/all.yml > all.yml.new
-
Verify changes in
feature_based_plugin_rolesandfeature apply order.# diff -u all.yml.bak all.yml.new
Note:New roles might have been added when CEM was updated.
-
Restore
all.yml.For more information, see the
all.yml.bakfile. For a file diff, refer to section five of theall.yml.bakfile.-
Open
all.yml.docker exec -it config_devicemgr_1 vi /opt/contrail/fabric_ansible_playbooks/group_vars/all.yml
-
Verity that
feature_based_plugin_roleshas all roles and role mappings. Ensure thatmotd-testrole is also added.feature_based_plugin_roles: motd-test@leaf: - motd_test CRB-Access@leaf: - overlay_storm_control - overlay_telemetry
-
Verify that the
feature_apply_orderdescribes the order of templates that are applied on devices. Ensure thatmotd_testis also added.feature_apply_order: - basic - underlay_ip_clos [...] - overlay_telemetry - motd_test
-
Open
-
Restore custom roles Jinja templates.
# docker cp custom_roles.tar.gz config_devicemgr_1:/
# docker exec -it config_devicemgr_1 tar xzvf custom_roles.tar.gz
-
Restart the container and verify roles.
# docker restart config_devicemgr_1