Troubleshoot Your Switch Connectivity
Follow these guidelines to check traffic statistics and troubleshoot problems with switch connectivity.
You can get real-time statistics for a given switch interface by selecting the switch and clicking the Live Traffic Counters button, or drilling down on a specific interface or virtual chassis member and then doing the same. Traffic statistics include input and output, L2 and L3 errors, and BUM traffic.
View Switch Processes
Real-time statistics for the processes running on a given switch are available by selecting the switch and then drilling down to the switch Insights page. Click the View Live Process Detail button. Supports virtual chassis and virtual machines in addition to physical devices.
Troubleshooting Steps
If the Juniper Mist™ portal shows a switch as disconnected when it is online and reachable locally, you can troubleshoot the issue. You need console access or SSH access to the switch to perform the troubleshooting steps listed in this topic.
To troubleshoot your switch:
-
To check for any MTU issues, initiate a ping test toward any public server (for
example, 8.8.8.8).
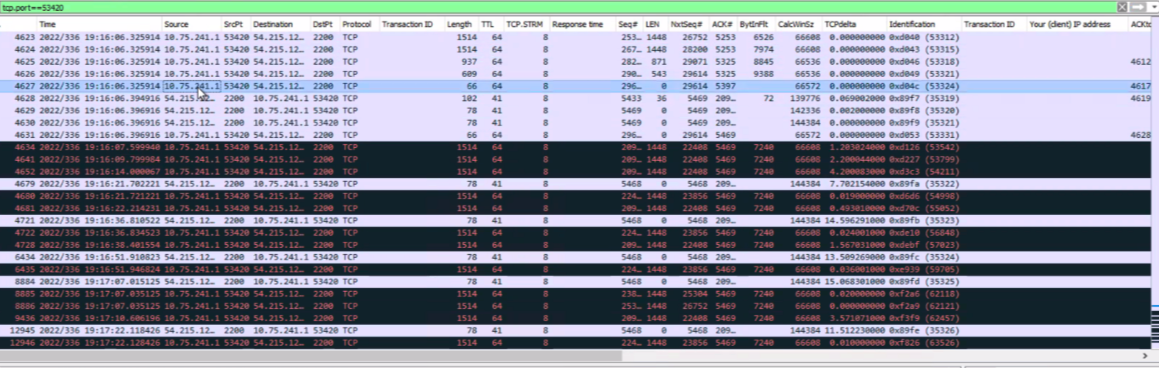
Another way to check for MTU issues is to review the uplink packet capture file from the switch. A failing transaction due to an MTU issue would look like the following example. The example shows that the packets with a size of 1514 are being retried.
To troubleshoot this issue further, do a ping test from the switch. Use different ping sizes as shown in the following example:
user@switch> ping size 1450 8.8.8.8
PING 8.8.8.8 (8.8.8.8): 1450 data bytes
76 bytes from 8.8.8.8: icmp_seq=0 ttl=59 time=12.444 ms
— 8.8.8.8 ping statistics —
2 packets transmitted, 2 packets received, 0% packet loss
round-trip min/avg/max/stddev = 12.318/12.381/12.444/0.063 ms
As you can see below, the ping test with the size of 1480 has failed.
user@switch> ping size 1480 8.8.8.8
PING 8.8.8.8 (8.8.8.8): 1480 data bytes

— 8.8.8.8 ping statistics —
4 packets transmitted, 0 packets received, 100% packet loss
To resolve this issue, you can adjust the MTU on the uplink, based on the byte size at which packets are getting timed out.
Watch the following video as well for more information on how to troubleshoot a switch:
So, adoption of a brownfield switch, extremely straightforward, we've done it many a time. You go into the inventory, switches, click on adopt switches, you'll be able to adopt, you'll be able to copy those lines of code and then put it onto any switch on which we have. We say whatever is the minimum supported version, I'll talk about the supported versions very very soon as well.
But you copy them and the switch should be able to show up in your inventory and you can assign it to a site. Now, that's nice marketing, you'll be able to do it. Let me take a step back.
Let's talk about adoption and claim. Let's talk about those terminologies. Anything that is already existing, as in your customer has already configured their switches and it's been there as a brownfield device for a while, you're trying to bring that onto the network, that's where you go through the adoption route.
Now, if you have a customer who is buying the ZTP, buying their switches brand new, then you go the claim route because you have a claim code associated to it. So, that's the difference between adoption and claiming. So, claiming is very very similar to what you do on your APs.
You just hit the claim code, the APs automatically connect to the cloud. Extremely similar concepts with the claim in here. Now, so once you adopt, let's talk about the adoption and its problems.
Once you adopt, let's say you're not able to see the device come onto the inventory and you're not able to sign it, you don't even see the device. What are the problems that you can see? The first point I would always look for is make sure you have an IP address on the IRB0 or whatever the IRB that they use. Here, I'm just talking about IRB0.
This is the example that I have on my switch, but please ensure you already have an IP assigned either via the ZTP or statically and you'll be able to see the IP come in. I have seen cases where your uplink was not connected to the switch when the device was up already and you just plugged it in many hours later and the EX has given up on trying to DHCP anymore. So, even if you connect your uplink, it's just not asking for an IP and ultimately, turns out all you would have to do is just go do a restart on the DHCP service sometimes and that has helped.
So, please do remember if you don't see an IP and the device has been up for a while, it could be potentially an issue with the way EX does DHCP in some of the versions, but just a point to note, you wouldn't have to restart the entire switch for the sake of this. All you would do is just start the DHCP service itself. So, once you have an IP, what's next? You want to make sure you're able to reach your gateway.
You want to make sure you're able to get out to the internet. So, whoever your gateway is, look up your routes, make sure you're able to reach your gateway. I guess these are pretty simple, very straightforward.
So, let me go through them very quickly. I've put these together so that whoever is going through for the completeness of the document. Now, the next thing is you want to ensure you're able to reach, you've pinged your gateway.
You now want to go reach out to the internet as well. You may have pings available for the internet or not. So, maybe they are blocked.
The key is to ask what is open and try to ping and ensure you're able to ping outside of your gateway. Now, the most important piece is resolution of addresses. Are you able to resolve names? Once you have an IP, be it DHCP, be it statically assigned.
If you're statically assigned, ensure you have a name server configured. If not, there is also, you know, when you're doing it via DHCP, you would also need to ensure your name server is actually resolving to the address. We are reaching out to octerm.msys.net. You will not respond, we will not respond to pings, but you will see that it resolved and it is trying to ping there.
So, you could also just ping google.com just for the sake of completeness in there. Now, one issue I have seen is, I have seen the DNS server or the name server config disappear from the EX in a certain case scenario. I think I've had at least a couple of SCs reach out to me.
I personally have, when I switch from static to DHCP or DHCP to static, either one of these cases, when you go into shell and go into slash xc slash resolve.conf, you just see no addresses anymore, but you still see the name server config in here. It is strange. It is buggy, but it is a cause that I have seen that, you know, all of a sudden the EXs, even after they got their IP address from a DHCP server, the DHCP server handed out DNS addresses, it still did not, for some reason, the resolve.conf is empty.
So, make sure, if that is the case, go update your name server config again. It'll repopulate the resolve.conf and you'll be able to go through the motions again. So, some of these may not be ideal.
It's just maybe in some versions of Junos where it's buggy. Again, what I'm trying to ensure is, whenever there's a client to, sorry, the switch to cloud connectivity, in the steps there are multiple different factors for it to be getting through. So, I want to make sure I cover all bases and especially everything I have seen during multiple deployments.
So, resolve.conf, please ensure it's up to date. It may take you off guard, but it is possible that that can happen. Lastly, the most important piece is the firewall.
Now, the easiest piece for you to check if your firewall ports are open or not is from the switch. Ensure you're able to telnet on octerm.mysys.net on port 2200. Now, what this does is, all you're looking for is the status called connected here.
You'll see connected to, you'll see nothing happen beyond that, but it will tell you that the connection is going through. If you're stuck at trying, you know that it is not a problem anywhere between your stack. It is definitely at the firewall level.
If you have passed through the previous four steps, you're able to ping, you're able to, your DNS is able to resolve, and now you're here. You want to ensure firewall is open. Please talk to the security folks.
That's where you're looking, but that's exactly where the problem is at this point. So, we've, you know, gone all the way from layer three to higher levels now. The last important piece that you want to check is if it is connected, if everything looks good, this is what you will see.
You will see our show system connections match 2200, which is the port, you know, we're making connection on. This port, you will see it, the TCP connection is in established state. If you see it in any other state apart from established, I'll talk about a couple more states in the next slide.
You know for a fact that it is, again, something related to the firewall again. So, you know these are indicators as to where to look for. I have also seen certain cases, again, when you try to issue show system connections match 2200, you see nothing at all that is matching that port number.
And you go in and say, I want to check my configurations, you will see that, you know, set system services, outbound SSH, all looks great. It has the client ID, it has the exact outbound SSH client that we need to hit. But for some reason, you will not see these, you will not see the switch trying to make a connection, which is an outbound SSH connection to the cloud.
Again, you can try two things. One, either deactivate system services outbound SSH client missed and reactivate it, or you could also delete the lines of config and re-add it. Either case, it is one of those quirks I've seen where Junos doesn't try to make a connection to the cloud.
So, please make sure if you do not see anything in here, you've passed the last five steps, but if you do not see anything appearing, please make sure you just deactivate and reactivate. Hopefully, that helps. If not, delete.
And then every time you copy, always copy the fresh config. So, that will ensure things work okay for you. And then you should be able to see after a few minutes, you should be able to see the device in established state.
So, this is where I said delete or deactivate. But there are states other than established where you will... This is established right here. But if you go in, one of the state is since sent, right? The TCP is being blocked.
You're sending SYN, but there is no SYN or ACK, or any of that sort from the other end. And that definitely screams and tells you that there is a firewall in between that's blocking the SYN that was sent by the cloud or by the switch to the cloud. So, that is another good indicator apart from, you know, you're doing a telnet OC term misses port 2200 and seeing connected.
If it's not, you can also see it is in a state that is not in established, usually SYN sent if the firewall is blocking. So, these are different states for your brownfield switch not to come up. So, you've gone through the entire gamut of process that you can think, at least I can think of.
And essentially, all we talk about when we say activation code is the fact that whenever your purchase order is placed alongside in response to the PO, you also get something called as an activation code. Let's say you bought, you know, 300 switches and correspondingly 300 wired assurance subscriptions. All of this tied together is a part of one activation code.
It could also include, let's say, 300 switches, 1000 APs, and also 1000 wireless subscriptions. All of this together is all put into one activation code. It's a combination of claim codes from all devices as well as your subscriptions all put into one place.
And that's what is activation code. Claim code, on the other hand, is what is printed on every single device. So, you can individually claim devices.
You will also have to add your subscription separately if that is the case. But that's the difference between what is an activation code and what is a claim code. Activation code is your one-shot PO kind of deal, pretty much, or the terminology piece of it.
So, how do you provision a device? You can either go into, you go into your inventory. You can either do a claim code or an activation code and then assign them to a site. So, either one of those, you guys are pretty familiar with this process as well, again.
Now, I wanted to put together, I think some of you may have seen this, what I did is put together a video of how ZTP works. I want to go through this real quick. So, everybody's on the same page before I actually go into some of the ways you can make ZTP work in even conditions that are not super conducive.
All right, let's go through the process of how ZTP works. So, what I have on my left-hand side is your switch on which I will be looking at the show log messages. And on my right-hand side is where I will claim the switch.
I will go through the entire process. What is most important is out of the box, you will see the devices continuously trying to run phone, to call home. And you will see, it will continuously say, my device probably is not provisioned, right? It goes to a redirect.juniper.net. It'll try, if redirect.juniper.net has an entry of your particular MAC address and your serial number, then it will appropriately pass you on to your home, be it previously for Skype, be it CSO, be it MISC.
So, now what we are doing on our right-hand side is we're going to go ahead and claim the switch. Once you claim the switch, what the claim operation does is on the backend, not only updates, you know, there is that this particular claim code and this particular serial number is corresponding to a particular device, but also goes into redirect.juniper.net, which is your jump server on which the device automatically reaches out to, and then register itself saying, if you see this particular MAC or a serial, send it to ztp.misc.com, right? So, that's the most important piece. We'll talk about manage with MISC and monitor only in just a little bit, but that's where you will talk about, you know, that's pretty much all you're doing whenever you say that this is a claim code.
When you hit claim, this is the backend operation that happens. At this point, once you hit claim, the next time around, the phone home service, again, it's constantly running, right? The PHD is a protocol. In fact, PHD is an open source.
It's Netconf over, it's over Netconf, so it's an open IETF draft and it's not something that is proprietary. So, you can see the complete logs in here. We will talk about how this will go, how the protocol works as well.
Once you hit claim, you will see, you will stop seeing 404 not found and device not provisioned. Instead, you will also see that now the phone home server is able to reach home, right? So, you will initially, once you claim, you will see that the device is disconnected, but you also have the advantage of configuring these switches even before they're ever connected. The switch does not have to be connected.
Imagine a day zero scenario, right? You wouldn't have to go through the process of configuring on the day off. Rather, you can configure it well ahead in advance because you have now the ability of configuring the switch in a disconnected state. Now, you can go into show log messages.
You will start seeing phone home starting to kick through. The phone home, once it kicks through, all it will do is now it will say redirect.juniper.net. Great. I know who your actual home is.
Please go to ztp.mist.com and that will eventually push you to, as you can see, contacting URL ztp.mist.com and then it will understand the process that, oh, this is my home. I will send you the bootstrap config, blah, blah, blah. It goes through a few more processes.
Eventually, point being, your phone home operation goes through and whatever config that you may have made right here on your right-hand side will automatically get pushed at the point when the config goes through, right? That's the advantage. If you haven't configured anything, everything will be at default. It'll just always be the same with everything being on the default VLAN and it'll just communicate with the default VLAN.
But in case you need configurations, you can always have that. The end state is you will see that phone home has succeeded. Notification, you will see that phone home looks great and that's all you will see from the phone home perspective.
So there is no magic behind the switches doing ZTP. It is the phone home service. You will also see the most important piece.
It'll remove the configuration of redirect.juniper.net because you wouldn't want to continuously keep doing phone home once it's completed phone home services. So you can see now that the phone home is complete on your right-hand side. The device will go green.
Now the most important piece out of all of this is, as I said, there is no magic in the ZTP process. It completely follows the phone home client on your switch talking to the phone home server that is sitting in the cloud. As long as the communication is okay, again, for this, if you see that the communication is failing, it is definitely going to be.
You have to just go through the same route of what we did in the brown theory. Make sure you've got an IP. Make sure you're able to reach to the internet.
Make sure your firewall is open. Otherwise, that's pretty much all you would do during this process as well. Again, some of the things that I have utilized to instantiate, especially for the SE community, you don't have to do it in a fresh customer, but you have already a switch that has already been claimed or already has connected to the cloud once, but you want to show ZTP one more time.
How do you do that? All you would do is you would go ahead and re-add the configuration of redirect.juniper.net, anything that is corresponding to a phone home, those two lines where you say RFC compliant and your phone home server's redirect is juniper.net. And then on your switch, you can go into and say instead of, it is just a service, all you would say is restart phone home service. It'll immediately start the process. So in case you want to show the full process over again, that's what I did here.
I restarted the phone home service. I just didn't show you what I did because this is my home switch. It has been already claimed multiple times, but I wanted to show you the demo.
So for the SE community, phone home service is just another service that sits on your switch. So once it goes through, it deletes those lines, the HTTP redirect.juniper.net being your phone home server, just re-add it back again and restart phone home service. It'll do the same thing over again.
So you can unclaim and restart it here. So you can rinse and repeat as many times as you want, especially for demonstrations. ZTP, again, is not magical.
I've shown you what the source behind ZTP is. So what happens when you go into a customer setup and say, my ports on the uplink are definitely not access ports and for sure are definitely trunk ports. How do I make ZTP work on that? Out of the box, the switches are not configured with anything, right? If the device is connecting to a trunk port, all you would want to do is just one of two things.
One, that trunk port needs to have a native VLAN on which you can actually get a DHCP scope and get an IP address. That is only for the first instance when the device is coming up. After that, you can actually configure the device for it to actually talk over a particular tagged VLAN and also either set a static IP or get an IP from that new tagged VLAN.
But the most important piece is you would want to work with your customer to ensure that they have a native VLAN or VLAN 1 in their scope where they're providing IP addresses. That way, we are not hitting a situation where you're not getting any IP addresses. If it is a trunk port with only four allowed VLANs and you plug your switch in and those four allowed VLANs are let's say 10, 20, 30, and 40, ZTP will not work.
Again, it's not that Mist is at fault or Mist ZTP is at fault. It's just that the process requires an IP address for you to communicate to the cloud and you're not getting an IP and we need to fix the problem. How are you going to get an IP? One of two ways.
The first important piece is if you have a trunk port, ensure it has a native VLAN on which you can actually communicate and also has a DHCP scope for that VLAN or you can also have VLAN 1 and that could also provide if you're tagging along. But once the first piece, once you get an IP address and it communicates to the cloud, you can actually configure your switch entirely to exactly let's say you had a port 10 or VLANs 10, 20, 30, and 40 and you wanted your switch to be managed with VLAN 10. Absolutely, you can do that.
You can point to when you're configuring your switch. So you now have the ability to actually configure even before, right? This is at the point where let's say your switch is absolutely disconnected. You don't have your phone home running, anything like that.
But you can actually say, I'd want my device to get an IP address on VLAN 20. I want that to be a static VLAN, for example, and a static IP address, for example, on VLAN 20. Great.
It'll work just fine through the entirety of the process because your trunk is already allowing for you to do that. But the key part is in the initial onboarding process, the device does not have a VLAN defined to it. And you have to have some way for it to communicate to the cloud.
And that's important. So hopefully this one makes it a lot more clearer in terms of why it needs something of a native VLAN or a VLAN 1 on the opt-in configure. So you can at least get an IP first up, but then subsequent management can completely be based on exactly the ports that you want to run with.
And this is extremely similar to what you do with the APs as well. The APs also need a management VLAN. By default, it also works on the untagged port.
So you have to have a native VLAN for the ports connecting to the AP. Same concepts run here as well. Now there's another situation saying, hey, my uplink ports are aggregated ethernet.
Your crap doesn't work here. How am I supposed to make this work? We can make it work. We just have to be very cognizant and well aware before going into the POC.
If you have an uplink, let's say you have an uplink of 4600 and you have XE001 and XE101 connecting to your 4300, which is going to be your ZTP candidate. And these are the two ports that are going to be connected from 4300 to 4600. And if the 4600 is already pre-configured for an aggregated ethernet, we don't have to change anything just for the sake of ZTP.
We do not have to. All we would need to do is to ensure either one of these two ports, XE001 or XE101, configure your option for sub to ensure irrespective of the device on the other side has an LSEP or not. I would like for me to keep the port up.
The key part is only one of these two ports need to be configured with the force up and the configuration should be on the 4600. The 4300, you have no config abilities, right? You still don't have, it is not cloud managed yet. You have nothing.
So it can come out of the box again. They can make the connections just the way it is. They want to have XE001 and 101 connect to the corresponding ports on 4600.
Absolutely. Just have this force up command on either one of these two interfaces, XE001 or 101, not on both. I mean, if you do it on both, then you end up with a loop.
You don't want to do that. But with force up, it worked great. Again, one of the most important things I constantly harp upon is the fact that getting it right the very first time, you don't want to go day three or day four for you to make this work.
Let's say the switch connected. Life looks good. You connected the switch.
It connected. You also saw the keyword ZTP completed in your switch insights. That's great.
But now after 10 minutes, the switch disconnected, you're no more in contention. Something happened. We don't know what.
What is this 10 minute window? Why did you lose connection after 10 minutes? What happened? So during this process, let's say your ZTP went through because you have all of the above set in place, right? You have your native VLAN or your VLAN1 config. It got an IP address in the right addresses or VLANs. All of this is pushed down to the switch.
Now, what is the connecting port to your uplink? If that uplink configuration is blank, and you said, I want my IRB now to be on VLAN20, which is my management VLAN, but you haven't allowed that VLAN on your uplink or your uplink is fully unconfigured, there goes the problem. That's right there to say that you configured your uplink wrong. And now you're in a state where you wanted your uplink to be this.
You're not able to connect to it. Now it'll roll back and go to an older known config, which is where this configs are not pushed. The way the config would manifest or this issue would manifest is that, hey, now the configs are getting pushed.
Every 10 minutes, we just see disconnect and come back again. But at that point, it has the old config, which is the default config. This is crap.
The important piece that has happened there is the configs were pushed from the cloud. At this point now, you're stuck in a state where your uplink port configurations were not configured correctly. Your VLANs were not allowed for the VLANs that you wanted it to be your IRB or your management VLAN.
And now you're stuck at a state where you're not able to make configurations or it is continuously rolling back. Important thing to note here is your uplink as well as your entire config should be correct in the first place. But uplink takes special priority for you to make sure this is done right.
So please ensure your uplink connectivity is exactly in conjunction with what you want your IRBs to be. If you are allowing default, you make sure you allow your default VLANs in your ports. If you want this camera VLAN, VLAN 20, you want to make sure your uplink is a trunk port where VLAN 20 isn't allowed VLAN.
So you can actually go and get an IP address, all of that good stuff. So please ensure your configurations are correctly done before actually saying, I want to do ZTP. It's switching 101, I know.
But when you're doing it from a cloud-based system, you think everything, some things may be different or you may miss assigning ports, its corresponding profiles. It will manifest in a very unique way where you're seeing rollbacks continuously happening, but you don't know why. And that's pretty much.
Troubleshoot Disconnected Switches with Juniper Support
When a switch is disconnected from the Mist cloud cannot reconnect, you can quickly find out the disconnection reason using the switch CLI and share the details with the Juniper support team.
To check the disconnection reason, run the following CLI command locally on the switch: op mist_debug.py cmd check-connectivity.
This command should be used only when the switch is disconnected from the Mist cloud. It retrieves the reason for the current disconnection state. This command does not work if the switch has never connected to the Mist cloud.
Example
user@switch> op mist_debug.py cmd check-connectivity
Starting Cloud Connection Troubleshooting
Management routing-instance is not configured
Checking if Switch IP is configured...
Switch IPs configured: ['178.35.0.45']
----------------------------------------
Checking if Gateway is configured...
Default gateway is configured: 178.35.0.1
----------------------------------------
Checking if Gateway is reachable...
Default gateway is not reachable
Failed
Troubleshooting ended with trouble code: GATEWAY_UNREACHABLE