Installing an MX2010 CB-RE
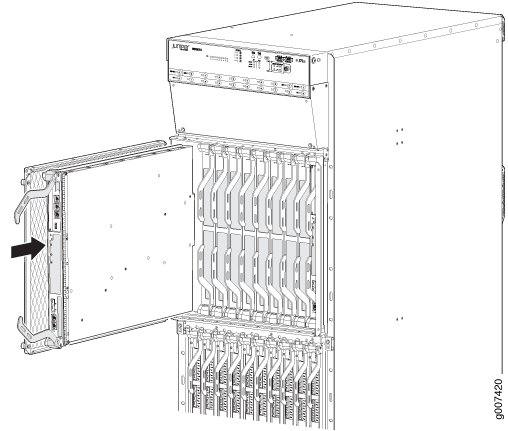
To install a CB-RE (seeFigure 1):
- Attach an electrostatic discharge (ESD) grounding strap to your bare wrist, and connect the strap to one of the ESD points on the chassis.
- Remove the CB-RE from the electrostatic bag.
- Carefully align the sides of the CB-RE with the guides inside the chassis.
- Slide the CB-RE into the chassis until you feel resistance, carefully ensuring that it is correctly aligned.
- Grasp both ejector handles, and gently close them inward simultaneously until the CB-RE is fully seated.
- Check the LEDs on the CB-RE faceplate to verify that it
is functioning normally.
The green OK/FAIL LED should light steadily a few minutes after the CB-RE is installed.
If the OK/FAIL LED is red, remove and install the CB-RE again. If the OK/FAIL LED still lights steadily, the CB-RE is not functioning properly. Contact your customer support representative. See Contact Customer Support.
- Check the status of the CB-RE by using the
show chassis environment cbcommand:user@host> show chassis environment cb CB 0 status: State Online Master IntakeA-Zone0 Temperature 25 degrees C / 77 degrees F IntakeB-Zone1 Temperature 29 degrees C / 84 degrees F IntakeC-Zone0 Temperature 28 degrees C / 82 degrees F ExhaustA-Zone0 Temperature 26 degrees C / 78 degrees F ExhaustB-Zone1 Temperature 28 degrees C / 82 degrees F TCBC-Zone0 Temperature 32 degrees C / 89 degrees F Power 1 1.0 V 1008 mV 1.2 V 1208 mV 1.8 V 1801 mV 2.5 V 2526 mV 3.3 V 3312 mV 5.0 V 5020 mV 5.0 V RE 4995 mV 12.0 V 12123 mV 12.0 V RE 12007 mV Bus Revision 100 FPGA Revision 271 CB 1 status: State Online Standby IntakeA-Zone0 Temperature 30 degrees C / 86 degrees F IntakeB-Zone1 Temperature 25 degrees C / 77 degrees F IntakeC-Zone0 Temperature 39 degrees C / 102 degrees F ExhaustA-Zone0 Temperature 33 degrees C / 91 degrees F ExhaustB-Zone1 Temperature 28 degrees C / 82 degrees F TCBC-Zone0 Temperature 31 degrees C / 87 degrees F Power 1 1.0 V 1015 mV 1.2 V 1211 mV 1.8 V 1814 mV 2.5 V 2545 mV 3.3 V 3345 mV 5.0 V 5066 mV 5.0 V RE 5020 mV 12.0 V 12104 mV 12.0 V RE 12046 mV Bus Revision 100 FPGA Revision 0
Figure 1: Installing an MX2010 CB-RE

