ON THIS PAGE
Example: Classify all Traffic from a Remote Device with Fixed Interface-Based Classification
This example shows the configuration of fixed classification based on the incoming interface. Fixed classification can be based on the physical interface or a logical interface.
Requirements
To verify this procedure, this example uses a traffic generator. The traffic generator can be hardware-based or it can be software running on a server or host machine.
The functionality in this procedure is widely supported on devices that run Junos. The example shown here was tested and verified on SRX Series Firewalls running a supported Junos OS release. The SRX Series Firewalls are configured to run as routers.
If you are performing tests on SRX Series Firewalls, you might need to configure the devices to run as unsecured routers in your test environment. You do not typically do this in a production environment.
Overview
A fixed interface classifier is the simplest way to classify all packets from a specific interface to a forwarding class. You typically use this approach on edge routers to classify all traffic from a remote device to a certain forwarding class and queue. A fixed interface classifier simply looks at the ingress interface on which the packet arrives and assigns all traffic received on that interface to a certain service class.
The fixed interface classifier cannot set the locally-meaningful packet-loss-priority, which is used by rewrite rules and drop profiles. The implicit packet-loss-priority is low for all fixed interface classifiers.
A fixed interface classifier is inadequate for scenarios in which interfaces receive traffic that belongs to multiple service classes. However, interface-based classification can be useful when it is combined with other classification processes. Filtering based on the inbound interface can improve the granularity of classification, for example, when combined with filtering based on code point markings. Combining the processes for interface and code point marking classification allows a single code point marking to have different meanings, depending on the interface on which the packet is received. If you want to combine a fixed interface classifier with a code point classifier, this is in effect a multifield classifier.
More Granular Alternative to Fixed Interface Classifier
In Junos, you can combine interface-based classification and code-point classification by using a multifield classifier, as follows:
[edit firewall family inet filter MF_CLASSIFIER term 1]
from {
    dscp ef;
    interface ge-0/0/0.0;
}
then forwarding-class Voice;
The following Juniper Networks Learning Byte video describes classifiers in more detail.
Topology
Figure 1 shows the sample network.
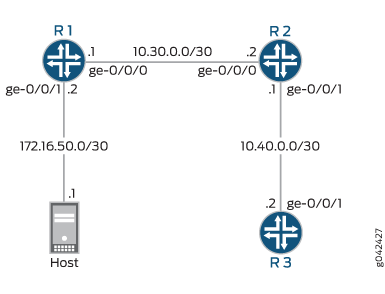
To simulate voice traffic, this example shows TCP packets sent from the host to a downstream device. On Device R2, a fixed interface classifier routes the packets into the queue defined for voice traffic.
The classifier is assigned to interface ge-0/0/0 on Device R2. As always, verification of queue assignment is done on the egress interface, which is ge-0/0/1 on Device R2.
CLI Quick Configuration shows the configuration for all of the Juniper Networks devices in Figure 1. The section Step-by-Step Procedure describes the steps on Device R2.
Configuration
Procedure
CLI Quick Configuration
To quickly configure this example, copy the following commands, paste them into a text file, remove any line breaks, change any details necessary to match your network configuration, and then copy and paste the commands into the CLI at the [edit] hierarchy level.
Device R1
set interfaces ge-0/0/0 description to-R2
set interfaces ge-0/0/0 unit 0 family inet address 10.30.0.1/30
set interfaces ge-0/0/1 description to-host
set interfaces ge-0/0/1 unit 0 family inet address 172.16.50.2/30
set interfaces lo0 unit 0 family inet address 192.168.0.1/32
set protocols ospf area 0.0.0.0 interface ge-0/0/0.0
set protocols ospf area 0.0.0.0 interface ge-0/0/1.0 passive
set protocols ospf area 0.0.0.0 interface lo0.0 passive
Device R2
set interfaces ge-0/0/0 unit 0 family inet address 10.30.0.2/30
set interfaces ge-0/0/1 unit 0 family inet address 10.40.0.1/30
set interfaces lo0 unit 0 family inet address 192.168.0.2/32
set protocols ospf area 0.0.0.0 interface ge-0/0/0.0
set protocols ospf area 0.0.0.0 interface ge-0/0/1.0
set protocols ospf area 0.0.0.0 interface lo0.0 passive
set class-of-service forwarding-classes queue 0 BE-data
set class-of-service forwarding-classes queue 1 Premium-data
set class-of-service forwarding-classes queue 2 Voice
set class-of-service forwarding-classes queue 3 NC
set class-of-service interfaces ge-0/0/0 unit 0 forwarding-class Voice
Device R3
set interfaces ge-0/0/0 unit 0 family inet address 10.50.0.1/30
set interfaces ge-0/0/1 unit 0 family inet address 10.40.0.2/30
set interfaces lo0 unit 0 family inet address 192.168.0.3/32
set protocols ospf area 0.0.0.0 interface ge-0/0/0.0
set protocols ospf area 0.0.0.0 interface ge-0/0/1.0
set protocols ospf area 0.0.0.0 interface lo0.0 passive
Step-by-Step Procedure
The following example requires you to navigate various levels in the configuration hierarchy. For instructions on how to do that, see Using the CLI Editor in Configuration Mode in the CLI User Guide.
To enable the default DSCP BA classifier:
-
Configure the device interfaces.
[edit interfaces]
user@R2# set ge-0/0/0 unit 0 family inet address 10.30.0.2/30
user@R2# set ge-0/0/1 unit 0 family inet address 10.40.0.1/30
user@R2# set lo0 unit 0 family inet address 192.168.0.2/32
-
Configure an interior gateway protocol (IGP) or static routes.
[edit protocols ospf area 0.0.0.0]
user@R2# set interface ge-0/0/0.0
user@R2# set interface ge-0/0/1.0
user@R2# set interface lo0.0 passive
-
Configure a set of forwarding classes.
[edit class-of-service forwarding-classes]
user@R2# set queue 0 BE-data
user@R2# set queue 1 Premium-data
user@R2# set queue 2 Voice
user@R2# set queue 3 NC
-
Map all traffic that arrives on ge-0/0/0.0 into the Voice queue.
[edit class-of-service interfaces ge-0/0/0 unit 0]
user@R2# set forwarding-class Voice
Results
From configuration mode, confirm your configuration by entering the show interfaces and show class-of-service commands. If the output does not display the intended configuration, repeat the instructions in this example to correct the configuration.
user@R2# show interfaces
ge-0/0/0 {
    unit 0 {
        family inet {
            address 10.30.0.2/30;
        }
    }
}
ge-0/0/1 {
    unit 0 {
        family inet {
            address 10.40.0.1/30;
        }
    }
}
lo0 {
    unit 0 {
        family inet {
            address 192.168.0.2/32;
        }
    }
}
user@R2# show protocols
ospf {
    area 0.0.0.0 {
        interface ge-0/0/0.0;
        interface ge-0/0/1.0;
        interface lo0.0 {
            passive;
        }
    }
}
user@R2# show class-of-service
forwarding-classes {
    queue 0 BE-data;
    queue 1 Premium-data;
    queue 2 Voice;
    queue 3 NC;
}
interfaces {
    ge-0/0/0 {
        unit 0 {
            forwarding-class Voice;
        }
    }
}
If you are done configuring the device, enter commit from configuration mode.
Verification
Confirm that the configuration is working properly.
Verifying a Fixed-Interface Classifier
Purpose
Verify that the fixed interface classifier is enabled on the Device R2’s ingress interface. Keep in mind that although the classifier operates on incoming packets, you view the resulting queue assignment on the outgoing (egress) interface.
Action
Clear the interface statistics on Device R2’s egress interface.
user@R2> clear interface statistics ge-0/0/1
Using a packet generator, send TCP packets to a device that is downstream of Device R2.
This example uses the packet generator hping.
root@host> sudo hping3 10.40.0.2 -c 25 –fast

HPING 10.40.0.2 (eth0 10.40.0.2): NO FLAGS are set, 40 headers + 0 data bytes
len=46 ip=10.40.0.2 ttl=62 id=8619 sport=0 flags=RA seq=0 win=0 rtt=1.9 ms
len=46 ip=10.40.0.2 ttl=62 id=8620 sport=0 flags=RA seq=1 win=0 rtt=2.8 ms
len=46 ip=10.40.0.2 ttl=62 id=8621 sport=0 flags=RA seq=2 win=0 rtt=1.9 ms
len=46 ip=10.40.0.2 ttl=62 id=8623 sport=0 flags=RA seq=3 win=0 rtt=1.8 ms
len=46 ip=10.40.0.2 ttl=62 id=8624 sport=0 flags=RA seq=4 win=0 rtt=7.1 ms
len=46 ip=10.40.0.2 ttl=62 id=8625 sport=0 flags=RA seq=5 win=0 rtt=1.8 ms
len=46 ip=10.40.0.2 ttl=62 id=8626 sport=0 flags=RA seq=6 win=0 rtt=1.8 ms
len=46 ip=10.40.0.2 ttl=62 id=8627 sport=0 flags=RA seq=7 win=0 rtt=1.9 ms
len=46 ip=10.40.0.2 ttl=62 id=8628 sport=0 flags=RA seq=8 win=0 rtt=2.0 ms
len=46 ip=10.40.0.2 ttl=62 id=8634 sport=0 flags=RA seq=9 win=0 rtt=7.4 ms
len=46 ip=10.40.0.2 ttl=62 id=8635 sport=0 flags=RA seq=10 win=0 rtt=1.8 ms
len=46 ip=10.40.0.2 ttl=62 id=8636 sport=0 flags=RA seq=11 win=0 rtt=2.0 ms
len=46 ip=10.40.0.2 ttl=62 id=8637 sport=0 flags=RA seq=12 win=0 rtt=7.8 ms
len=46 ip=10.40.0.2 ttl=62 id=8639 sport=0 flags=RA seq=13 win=0 rtt=7.0 ms
len=46 ip=10.40.0.2 ttl=62 id=8640 sport=0 flags=RA seq=14 win=0 rtt=1.8 ms
len=46 ip=10.40.0.2 ttl=62 id=8641 sport=0 flags=RA seq=15 win=0 rtt=7.2 ms
len=46 ip=10.40.0.2 ttl=62 id=8642 sport=0 flags=RA seq=16 win=0 rtt=2.1 ms
len=46 ip=10.40.0.2 ttl=62 id=8643 sport=0 flags=RA seq=17 win=0 rtt=2.0 ms
len=46 ip=10.40.0.2 ttl=62 id=8644 sport=0 flags=RA seq=18 win=0 rtt=7.3 ms
len=46 ip=10.40.0.2 ttl=62 id=8645 sport=0 flags=RA seq=19 win=0 rtt=1.7 ms
len=46 ip=10.40.0.2 ttl=62 id=8646 sport=0 flags=RA seq=20 win=0 rtt=7.1 ms
len=46 ip=10.40.0.2 ttl=62 id=8647 sport=0 flags=RA seq=21 win=0 rtt=2.0 ms
len=46 ip=10.40.0.2 ttl=62 id=8648 sport=0 flags=RA seq=22 win=0 rtt=1.7 ms
len=46 ip=10.40.0.2 ttl=62 id=8649 sport=0 flags=RA seq=23 win=0 rtt=1.8 ms
len=46 ip=10.40.0.2 ttl=62 id=8651 sport=0 flags=RA seq=24 win=0 rtt=1.8 ms
On Device R2, verify that the Voice queue is incrementing.
user@R2> show interfaces extensive ge-0/0/1 | find "queue counters"
  Queue counters:       Queued packets  Transmitted packets  Dropped packets
    0 BE-data                        0                    0                0
    1 Premium-data                   0                    0                0
    2 Voice                         25                   25                0
    3 NC                             3                    3                0
  Queue number:         Mapped forwarding classes
    0                   BE-data
    1                   Premium-data
    2                   Voice
    3                   NC
...
Meaning
The output shows that the Voice queue has incremented by 25 packets after sending 25 packets through the ge-0/0/0 interface on Device R2.