ON THIS PAGE
Example: Configure and Apply a Default DSCP BA Classifier
A Junos classifier identifies and separates traffic flows and provides the means to prioritize traffic later in the CoS process.
A BA classifier performs this function by associating well-known CoS values with forwarding classes and loss priorities. To enable a default classifier, you simply apply it to your device interfaces. If you do not apply a default classifier to an interface, the classifier does not take effect.
Junos provides multiple default BA classifier types, which you can combine and supplement with custom BA classifiers as needed to achieve your overall traffic classification goals. This example shows how to apply the default DSCP classifier and verify its functionality.
Requirements
To verify this procedure, this example uses a traffic generator. The traffic generator can be hardware-based, or it can be software running on a server or host machine. If you do not have access to a traffic generator, you can use extended ping for verification. We show this approach as well.
The functionality in this procedure is widely supported on devices that run Junos. The example shown here was tested and verified on MX Series routers.
Overview
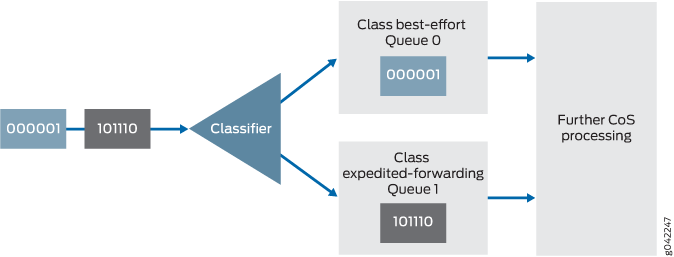
The basis of Junos CoS is traffic differentiation. Assigning traffic to different service classes provides the necessary differentiation. From the view of a router, the service class assigned to a packet defines how the router behaves toward the packet. The concept of traffic differentiation is present in every CoS tool, and as a result, classes of service are present across the entire CoS design. A classifier has one input, the incoming packet, and it has N possible outputs, where N is the number of possible classes of service into which the packet can be classified.
BA classification is used when the traffic coming into your device already has trusted CoS values in the packet header. For example, the default DSCP BA classifier specifies that packets coming in with code points 000000 are assigned to the best-effort forwarding class and given a loss priority of low.
A forwarding class and loss priority are assigned by default
to each well-known DSCP. To view this, run the
show class-of-service classifier
command.
user@host> show class-of-service classifier type dscp

Classifier: dscp-default, Code point type: dscp, Index: 7
  Code point         Forwarding class                    Loss priority
  000000             best-effort                         low
  000001             best-effort                         low
  000010             best-effort                         low
  000011             best-effort                         low
  000100             best-effort                         low
  000101             best-effort                         low
  000110             best-effort                         low
  000111             best-effort                         low
  001000             best-effort                         low
  001001             best-effort                         low
  001010             assured-forwarding                  low
  001011             best-effort                         low
  001100             assured-forwarding                  high
  001101             best-effort                         low
  001110             assured-forwarding                  high
  001111             best-effort                         low
  010000             best-effort                         low
  010001             best-effort                         low
  010010             best-effort                         low
  010011             best-effort                         low
  010100             best-effort                         low
  010101             best-effort                         low
  010110             best-effort                         low
  010111             best-effort                         low
  011000             best-effort                         low
  011001             best-effort                         low
  011010             best-effort                         low
  011011             best-effort                         low
  011100             best-effort                         low
  011101             best-effort                         low
  011110             best-effort                         low
  011111             best-effort                         low
  100000             best-effort                         low
  100001             best-effort                         low
  100010             best-effort                         low
  100011             best-effort                         low
  100100             best-effort                         low
  100101             best-effort                         low
  100110             best-effort                         low
  100111             best-effort                         low
  101000             best-effort                         low
  101001             best-effort                         low
  101010             best-effort                         low
  101011             best-effort                         low
  101100             best-effort                         low
  101101             best-effort                         low
  101110             expedited-forwarding                low
  101111             best-effort                         low
  110000             network-control                     low
  110001             best-effort                         low
  110010             best-effort                         low
  110011             best-effort                         low
  110100             best-effort                         low
  110101             best-effort                         low
  110110             best-effort                         low
  110111             best-effort                         low
  111000             network-control                     low
  111001             best-effort                         low
  111010             best-effort                         low
  111011             best-effort                         low
  111100             best-effort                         low
  111101             best-effort                         low
  111110             best-effort                         low
  111111             best-effort                         low
The forwarding class determines the output queue. By default, all best-effort traffic uses queue 0.
To view the queues that are associated, by default, with each
forwarding class, use the show class-of-service forwarding-class command. (For clarity, some of the output is excluded.)
user@host> show class-of-service forwarding-class

Forwarding class                       ID      Queue
  best-effort                           0       0
  expedited-forwarding                  1       1
  assured-forwarding                    2       2
  network-control                       3       3
The loss priority is used by schedulers in conjunction with the random early detection (RED) algorithm to control packet discard during periods of congestion. When you are thinking about loss priorities, keep in mind that unless you configure them, they have no meaning. The default drop behavior is to wait until the queue is 100 percent full and then begin dropping packets indiscriminately. When the queue dips below 100 percent full, packets stop dropping.
The default drop behavior is shown in the show class-of-service
drop-profile command.
user@host> show class-of-service drop-profile

Drop profile: <default-drop-profile>, Type: discrete, Index: 1
  Fill level    Drop probability
         100                 100
To create meanings for the various loss priorities, you must configure custom drop profiles. For example, you might define the low loss priority to mean a 10 percent drop probability when the queue is 75 percent full and a 40 percent drop probability when the queue fill level is 95 percent. You might define the high loss priority to mean a 50 percent drop probability when the fill level is 25 percent and a 90 percent drop probability when the fill level is 50 percent. Custom drop profiles are not included in this example, but are mentioned here for clarity because classifiers assign loss priorities. It is important to understand that these assignments are meaningless until you create drop profiles.
The default classifier operation is shown in Figure 1. The figure shows two IPv4 packets entering an interface and being classified according to the DSCP code points in the packet headers.
Classifiers are described in more detail in the following Juniper Networks Learning Byte video.
Topology
Figure 2 shows the sample network.
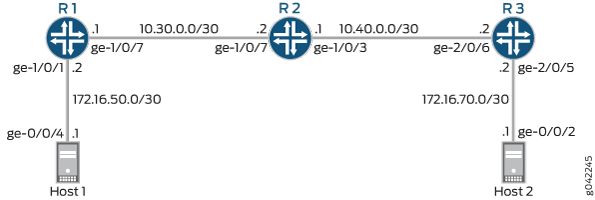
It is important to apply your class-of-service configuration across the topology, instead of applying it to a single device. Furthermore, even though classification takes effect on incoming interfaces, you should apply BA classifiers to all core and core-facing interfaces. This is because a single interface can be either incoming or outgoing, depending on the direction of the traffic. For example, as traffic flows from Host 1 to Host 2, the incoming interfaces are ge-1/0/7 on Device R2 and ge-2/0/6 on Device R3. As traffic flows in the other direction, from Host 2 to Host R1, the incoming interfaces are ge-1/0/3 on Device R2 and ge-1/0/7 on Device R1.
The BA classifier is not applied to ge-1/0/1 on Device R1 or ge-2/0/5 on Device R3, because these interfaces are not core facing. Generally, at the edge-facing interfaces, you would use a multifield classifier, not a BA classifier.
CLI Quick Configuration shows the configuration for all of the Juniper Networks devices in Figure 2. The section Step-by-Step Procedure describes the steps on Device R2.
Configuration
Procedure
CLI Quick Configuration
To quickly
configure this example, copy the following commands, paste them into
a text file, remove any line breaks, change any details necessary
to match your network configuration, and then copy and paste the commands
into the CLI at the [edit] hierarchy level.
Device R1
set interfaces ge-1/0/1 unit 0 family inet address 172.16.50.2/30
set interfaces ge-1/0/7 unit 0 family inet address 10.30.0.1/30
set class-of-service interfaces ge-1/0/7 unit 0 classifiers dscp default
Device R2
set interfaces ge-1/0/3 unit 0 family inet address 10.40.0.1/30
set interfaces ge-1/0/7 unit 0 family inet address 10.30.0.2/30
set class-of-service interfaces ge-1/0/3 unit 0 classifiers dscp default
set class-of-service interfaces ge-1/0/7 unit 0 classifiers dscp default
Device R3
set interfaces ge-2/0/5 unit 0 family inet address 172.16.70.2/30
set interfaces ge-2/0/6 unit 0 family inet address 10.40.0.2/30
set class-of-service interfaces ge-2/0/6 unit 0 classifiers dscp default
Step-by-Step Procedure
The following example requires you to navigate various levels in the configuration hierarchy. For instructions on how to do that, see Using the CLI Editor in Configuration Mode in the CLI User Guide.
To enable the default DSCP behavior aggregate classifier:
-
Configure the device interfaces.
[edit interfaces]
user@R2# set ge-1/0/3 unit 0 family inet address 10.40.0.1/30
user@R2# set ge-1/0/7 unit 0 family inet address 10.30.0.2/30
-
Enable the default DSCP classifier on the interfaces.
[edit class-of-service interfaces]
user@R2# set ge-1/0/3 unit 0 classifiers dscp default
user@R2# set ge-1/0/7 unit 0 classifiers dscp default
Results
From configuration mode, confirm your configuration
by entering the show interfaces and show class-of-service commands. If the output does not display the intended configuration,
repeat the instructions in this example to correct the configuration.
user@R2# show interfaces
ge-1/0/3 {
    unit 0 {
        family inet {
            address 10.40.0.1/30;
        }
    }
}
ge-1/0/7 {
    unit 0 {
        family inet {
            address 10.30.0.2/30;
        }
    }
}
user@R2# show class-or-service
interfaces {
    ge-1/0/3 {
        unit 0 {
            classifiers {
                dscp default;
            }
        }
    }
    ge-1/0/7 {
        unit 0 {
            classifiers {
                dscp default;
            }
        }
    }
}
If you are done configuring the device, enter commit from configuration mode.
Verification
Confirm that the configuration is working properly.
Verifying Behavior Aggregate Classifiers
Purpose
Verify that the default behavior aggregate classifier is enabled on the device interfaces. Keep in mind that although the classifier operates on incoming packets, you view the resulting queue assignment on the outgoing interface.
Action
-
Clear the interface statistics on Device R2.
user@R2> clear interface statistics ge-1/0/3
-
Using extended ping from Device R1 or a packet generator running on a host or server, send packets with the code point set to 001010.
Both methods are shown here. The packet generator used is hping.
-
When you are using extended ping to set the DSCP code points in the IPv4 packet header, the type-of-service (ToS) decimal value (in this case, 40) is required in the
tosoption of thepingcommand. -
When you are using hping to set the DSCP code points in the IPv4 packet header, the ToS hex value (in this case, 28) is required in the
--tosoption of thehpingcommand.
If your binary-to-hex or binary-to-decimal conversion skills are rusty, you can use an online calculator, such as http://www.mathsisfun.com/binary-decimal-hexadecimal-converter.html .
Note:When you convert a binary DSCP code point value, be sure to add two extra zeros at the end. So instead of 001010, use 00101000. These 0 values (the 7th and 8th bits) are reserved and ignored, but if you do not include them in the conversion, your hex and decimal values will be incorrect.
Extended Ping Sent from Device R1
user@R1> ping 172.16.70.1 tos 40 rapid count 25

PING 172.16.70.1 (172.16.70.1): 56 data bytes
!!!!!!!!!!!!!!!!!!!!!!!!!
--- 172.16.70.1 ping statistics ---
25 packets transmitted, 25 packets received, 0% packet loss
round-trip min/avg/max/stddev = 0.430/0.477/0.847/0.079 ms
hping Sent from Host 1
root@host1> hping 172.16.70.1 --tos 28 -c 25

HPING 172.16.70.1 (eth1 172.16.70.1): NO FLAGS are set, 40 headers + 0 data bytes
len=46 ip=172.16.70.1 ttl=61 DF id=0 sport=0 flags=RA seq=0 win=0 rtt=0.3 ms
len=46 ip=172.16.70.1 ttl=61 DF id=0 sport=0 flags=RA seq=1 win=0 rtt=0.6 ms
len=46 ip=172.16.70.1 ttl=61 DF id=0 sport=0 flags=RA seq=2 win=0 rtt=0.4 ms
len=46 ip=172.16.70.1 ttl=61 DF id=0 sport=0 flags=RA seq=3 win=0 rtt=0.4 ms
len=46 ip=172.16.70.1 ttl=61 DF id=0 sport=0 flags=RA seq=4 win=0 rtt=0.6 ms
len=46 ip=172.16.70.1 ttl=61 DF id=0 sport=0 flags=RA seq=5 win=0 rtt=0.3 ms
len=46 ip=172.16.70.1 ttl=61 DF id=0 sport=0 flags=RA seq=6 win=0 rtt=0.4 ms
len=46 ip=172.16.70.1 ttl=61 DF id=0 sport=0 flags=RA seq=7 win=0 rtt=0.4 ms
len=46 ip=172.16.70.1 ttl=61 DF id=0 sport=0 flags=RA seq=8 win=0 rtt=0.4 ms
len=46 ip=172.16.70.1 ttl=61 DF id=0 sport=0 flags=RA seq=9 win=0 rtt=0.4 ms
len=46 ip=172.16.70.1 ttl=61 DF id=0 sport=0 flags=RA seq=10 win=0 rtt=0.5 ms
len=46 ip=172.16.70.1 ttl=61 DF id=0 sport=0 flags=RA seq=11 win=0 rtt=0.4 ms
len=46 ip=172.16.70.1 ttl=61 DF id=0 sport=0 flags=RA seq=12 win=0 rtt=0.5 ms
len=46 ip=172.16.70.1 ttl=61 DF id=0 sport=0 flags=RA seq=13 win=0 rtt=0.4 ms
len=46 ip=172.16.70.1 ttl=61 DF id=0 sport=0 flags=RA seq=14 win=0 rtt=0.4 ms
len=46 ip=172.16.70.1 ttl=61 DF id=0 sport=0 flags=RA seq=15 win=0 rtt=0.4 ms
len=46 ip=172.16.70.1 ttl=61 DF id=0 sport=0 flags=RA seq=16 win=0 rtt=0.4 ms
len=46 ip=172.16.70.1 ttl=61 DF id=0 sport=0 flags=RA seq=17 win=0 rtt=0.5 ms
len=46 ip=172.16.70.1 ttl=61 DF id=0 sport=0 flags=RA seq=18 win=0 rtt=0.5 ms
len=46 ip=172.16.70.1 ttl=61 DF id=0 sport=0 flags=RA seq=19 win=0 rtt=0.4 ms
len=46 ip=172.16.70.1 ttl=61 DF id=0 sport=0 flags=RA seq=20 win=0 rtt=0.4 ms
len=46 ip=172.16.70.1 ttl=61 DF id=0 sport=0 flags=RA seq=21 win=0 rtt=0.5 ms
len=46 ip=172.16.70.1 ttl=61 DF id=0 sport=0 flags=RA seq=22 win=0 rtt=0.4 ms
len=46 ip=172.16.70.1 ttl=61 DF id=0 sport=0 flags=RA seq=23 win=0 rtt=0.5 ms
len=46 ip=172.16.70.1 ttl=61 DF id=0 sport=0 flags=RA seq=24 win=0 rtt=0.4 ms
-
-
On Device R2, verify that queue 2 is incrementing.
Code point 001010 is associated with assured-forwarding, which uses queue 2 by default.
user@R2> show interfaces extensive ge-1/0/3 | find "queue counters"


Queue counters:     Queued packets  Transmitted packets      Dropped packets
    0                   0               0                       0
    1                   0               0                       0
    2                   50              25                      0
    3                   3               3                       0
  Queue number:         Mapped forwarding classes
    0                   best-effort
    1                   expedited-forwarding
    2                   assured-forwarding
    3                   network-control
Meaning
The output shows that queue 2 has incremented by 50 packets after sending 50 packets through the router.