- play_arrow Fast Track: Initial Installation
- play_arrow Site Planning, Preparation, and Specifications
- play_arrow Planning and Preparing the Site
- Overview of Preparing the Site for the MX2020 Router
- MX2020 Site Preparation Checklist
- MX2020 Physical Specifications
- MX2020 Rack Requirements
- MX2020 Cabinet Size and Clearance Requirements
- Clearance Requirements for Airflow and Hardware Maintenance for the MX2020 Router
- MX2020 Cabinet Airflow Requirements
- MX2020 Router Environmental Specifications
- MX2000 Router Grounding Specifications
- MX2020 Chassis Moving Guidelines
- MX2020 Moving Requirements and Guidelines Using a Router Transport Kit
- Rack-Mounting Requirements
- play_arrow Transceiver and Cable Specifications
- play_arrow Pinout Specifications
- RJ-45 Connector Pinouts for MX Series CB-RE Auxiliary and Console Ports
- RJ-45 Connector Pinouts for an MX Series CB-RE or RCB Management Port
- Management Cable Specifications
- Console Port Connector Pinout Information
- RJ-45 to DB-9 Serial Port Adapter Pinout Information
- Mini-USB Port Pinout Specifications
- RJ-45 Management Port Connector Pinout Information
- RJ-45 Port, SFP Port, SFP+ Port, QSFP+ Port, and QSFP28 Port Connector Pinout Information
- play_arrow AC Power Requirements, Specifications, and Guidelines
- MX2020 AC Power Requirements
- MX2000 AC Power Cord Specifications
- MX2000 AC Power System Electrical Specifications
- MX2000 Router Grounding Specifications
- MX2000 Three-Phase Delta AC Power Distribution Module Electrical Specifications
- MX2000 Three-Phase Wye AC Power Distribution Module Electrical Specifications
- MX2000 Single-Phase AC Power Distribution Module Electrical Specifications
- Calculating AC Power Requirements for MX2020 Routers
- Mapping Input Power from AC Power Distribution Modules to AC Power Supply Modules on MX2000 Routers
- play_arrow DC Power Requirements, Specifications, and Guidelines
- MX2020 DC Power Requirements
- MX2020 DC Power Distribution Description
- MX2020 DC Power Distribution (240 V China) Description
- MX2000 Router DC (-48 V) Power Subsystem Electrical Specifications
- MX2000 Router DC (240 V China) Power Subsystem Electrical Specifications
- Determining DC Power Requirements for Your MX2020 Router
- DC Power (-48 V) Circuit Breaker Requirements for the MX2020 Router
- DC Power (240 V China) Circuit Breaker Requirements for the MX2000 Router
- DC Power Cable Specifications for the MX2020 Router
- play_arrow Universal (HVAC/HVDC) Power Requirements, Specifications, and Guidelines
- MX2020 High-Voltage Universal Power Requirements
- MX2000 High-Voltage Universal PDM (MX2K-PDM-HV) Power Cord Specifications
- MX2000 Router High-Voltage Universal (HVAC/HVDC) Power Subsystem Electrical Specifications
- Determining High-Voltage Universal Power Requirements for Your MX2020 Router
- High-Voltage Universal (HVAC/HVDC) Power Circuit Breaker Requirements for the MX2000 Router
-
- play_arrow Initial Installation and Configuration
- play_arrow Installation Overview
- Installing an MX2020 Router Overview
- Tools and Parts Required to Unpack the MX2020 Router
- Tools Required to Install the MX2020 Router Using a Pallet Jack
- Tools Required to Install the MX2020 Router Using a Router Transport Kit
- Tools and Parts Required for Connecting an MX2000 Router to Power
- Tools and Parts Required to Maintain the MX2020 Hardware Components
- Tools and Parts Required for MX2020 Router Connections
- play_arrow Unpacking the Router
- play_arrow Installing the Mounting Hardware
- play_arrow Installing the Router
- Removing Components from the MX2020 Router Chassis Before Installing it in a Rack
- Installing a MX2020 Router Using a Pallet Jack Overview
- Installing the Pallet Jack Attachment
- Installing the MX2020 Router Using a Pallet Jack with Attachment
- Installing a MX2020 Router Using a Router Transport Kit Overview
- Installing the Router Transport Kit on the MX2020 Router
- Securing the MX2020 Router to the Router Transport Platform
- Installing the MX2020 Router Using a Router Transport Kit
- Reinstalling Components in the MX2020 Router After Installing in a Rack
- play_arrow Connecting the MX2020 to Ground
- play_arrow Providing Power to the MX2020
- Connecting Power to an MX2000 Single-Phase AC Power Distribution Module
- Connecting AC Power to an MX2000 Router with Three-Phase Delta AC Power Distribution Modules
- Connecting AC Power to an MX2000 Router with Three-Phase Wye AC Power Distribution Modules
- Mapping Input Power from AC Power Distribution Modules to AC Power Supply Modules on MX2000 Routers
- Installing MX2020 AC Power Supply Modules
- Installing MX2000 Router DC Power Supply Modules (-48 V)
- Installing MX2000 Router DC Power Supply Modules (240 V China) or High-Voltage Universal (HVAC/HVDC) Power Supply Modules
- Connecting Power to a DC-Powered MX2020 Router with Power Distribution Modules (-48 V)
- Connecting Power to a DC-Powered MX2000 Router with DC Power Distribution Modules (240 V China)
- Connecting an MX2000 DC Router Power Distribution Module (-48 V) Cable
- Connecting an MX2000 DC Router Power Distribution Module (240 V China) Cable
- Connecting Power to a High Voltage-Powered MX2000 Router with Power Distribution Modules
- Powering On the DC-Powered (-48 V) MX2020 Router
- Powering On the DC-Powered (240 V China) MX2000 Router
- Powering On a Three-Phase AC-Powered MX2000 Router
- Powering On the High-Voltage Powered Universal (HVAC/HVDC) MX2000 Router
- play_arrow Connecting the MX2020 to the Network
- Connecting the MX2020 Router to Management and Alarm Devices
- Connecting the MX2020 Router to a Network for Out-of-Band Management
- Connecting the MX2020 Router to a Console or Auxiliary Device
- Connecting an MX2020 Router to an External Alarm-Reporting Device
- Connecting the Alarm Relay Wires to the MX2020 Craft Interface
- Disconnecting the Alarm Relay Wires from the MX2020 Craft Interface
- Connecting MPC or MIC Cables to the MX2020 Router
- Register Products—Mandatory to Validate SLAs
- play_arrow Configuring the Junos OS Software
-
- play_arrow Installing, Replacing, and Maintaining MX2020 Router Components
- play_arrow Required Tools and Parts
- play_arrow Installing, Removing, and Maintaining Power Components
- Replacing an MX2000 Three-Phase Delta AC Power Distribution Module
- Replacing an MX2020 Three-Phase Wye AC Power Distribution Module
- Removing an MX2000 Single-Phase AC Power Distribution Module
- Installing an MX2000 Single-Phase AC Power Distribution Module
- Replacing an MX2000 DC Power Distribution Module (-48 V)
- Replacing an MX2000 DC Power Distribution Module (240 V China)
- Replacing an MX2000 High-Voltage Universal (HVAC/HVDC) Power Distribution Module
- Replacing an MX2020 DC Power Supply Module (-48 V)
- Replacing an MX2000 DC Power Supply Module (240 V China)
- Replacing an MX2000 High-Voltage Second-Generation Universal (HVAC/HVDC) Power Supply Module
- Replacing an MX2000 AC Power Supply Module
- Maintaining the Power Supply Modules on the MX2000 Line of Routers
- Maintaining the MX2020 Power Usage
- Converting an MX2000 Router Between AC and DC Power
- play_arrow Installing, Removing, and Maintaining Cooling System Components
- Replacing an MX2020 Fan Tray
- Maintaining the MX2020 Fan Trays
- Removing the MX2020 Air Filter
- Installing an MX2020 Air Filter
- Maintaining the MX2020 Air Filter
- Maintaining the MX2020 Air Vents
- Removing the MX2020 Air Baffle
- Installing the MX2020 Air Baffle
- Maintaining the MX2020 Cooling System Components
- Maintaining the MX2020 Cooling System Zones
- play_arrow Installing, Removing, and Maintaining Host Subsystem Components
- Maintaining the MX2020 Host Subsystem
- Replacing an MX2000 SFB
- Maintaining the Switch Fabric Board (SFB)
- Replacing an MX2000 CB-RE
- Maintaining the MX2020 Control Boards
- Maintaining the MX2020 Routing Engines
- Upgrading to the Control Board-Routing Engine REMX2K-X8-64G in a Redundant Host Subsystem
- Upgrading to the REMX2K-X8-64G CB-RE in a Nonredundant Host Subsystem
- Maintaining the MX2020 Switch Processor Mezzanine Board (SPMB)
- Maintaining MX2020 Packet Forwarding Engine Components
- play_arrow Installing, Removing, and Maintaining Interface Modules— ADCs, MPCs, and MICs
- Holding an MPC
- Storing an MX2020 MPC
- Replacing an MX2020 MPC and Adapter Card (ADC)
- Maintaining MX2020 MPCs
- Maintaining MX2020 Adapter Cards
- Replacing an MX2020 MIC
- Maintaining MX2020 MICs
- Replacing an SFP or XFP Transceiver on an MX2020 MPC or MIC
- Installing an SFP or XFP into an MX2000 MPC or MIC
- Installing an MX2020 Dual-Wide MIC
- Install a Transceiver
- Remove a Transceiver
- Replacing a CFP2 Transceiver
- play_arrow Installing, Replacing, and Maintaining the Craft Interface
- play_arrow Installing, Removing, and Replacing EMI Covers
- play_arrow Installing, Replacing, and Maintaining Cables and Cable Managers
- Replacing a Cable on an MX2020 MPC or MIC
- Maintaining Cables That Connect to MX2020 MPCs or MICs
- Removing the MX2020 DC Cable Manager
- Installing the MX2020 DC Cable Manager
- Replacing the MX2020 Cable Managers
- Replacing the MX2020 Extended Cable Managers
- Removing the MX2020 Lower Cable Manager
- Installing the MX2020 Lower Cable Manager
- Removing the MX2020 Upper Cable Manager
- Installing the MX2020 Upper Cable Manager
- Replacing an MX2020 Three-Phase Delta AC Power Cord
- Replacing an MX2020 Three-Phase Wye AC Power Cord
- Replacing an MX2020 DC Power Distribution Module Cable
- Connect a Device to a Management Console Using an RJ‑45 Connector
- Connect a Fiber-Optic Cable
- Disconnect a Fiber-Optic Cable
- How to Handle Fiber-Optic Cables
- play_arrow Powering Off the Router
- play_arrow Maintaining the Chassis and Components
- Routine Maintenance Procedures for the MX2020 Router
- Taking an MX2000 Host Subsystem Offline
- Maintaining the MX2020 Chassis FRU Power On Sequence
- Maintaining and Verifying the Status of the MX2020 Router Components
- Maintaining the MX2020 Ethernet Switch
- Maintaining and Verifying the MX2020 Router Version
-
- play_arrow Troubleshooting Hardware
- play_arrow Contacting Customer Support and Returning the Chassis or Components
- play_arrow Contacting Customer Support
- play_arrow Locating Component Serial Numbers
- Displaying MX2020 Router Components and Serial Numbers
- MX2020 CB-RE Serial Number Label
- MX2020 Craft Interface Serial Number Label
- MX2020 Fan Tray Serial Number Label
- MX2020 MIC Serial Number Label
- MX2020 MPC Serial Number Label
- MX2020 Power Distribution Module Serial Number Label
- MX2020 Power Supply Module Serial Number Label
- MX2020 SFB Serial Number Label
- play_arrow Packing and Returning Components
-
- play_arrow Safety and Compliance Information
- play_arrow General Safety Guidelines and Warnings
- play_arrow Installation and Maintenance Safety Guidelines and Warnings
- play_arrow Radiation and Laser Warnings
- play_arrow Maintenance and Operational Safety Guidelines and Warnings
- play_arrow Electrical Safety Guidelines and Warnings
- General Electrical Safety Guidelines and Warnings
- Prevention of Electrostatic Discharge Damage
- AC Power Electrical Safety Guidelines
- AC Power Disconnection Warning
- DC Power Copper Conductors Warning
- DC Power Disconnection Warning
- DC Power Grounding Requirements and Warning
- DC Power Wiring Sequence Warning
- DC Power Wiring Terminations Warning
- Midplane Energy Hazard Warning
- Multiple Power Supplies Disconnection Warning
- Action to Take After an Electrical Accident
- play_arrow Agency Approvals and Compliance Statements
-
MX2000-SFB3 Switch Fabric Board Description
The MX2000-SFB3 Switch Fabric Board creates a highly scalable and resilient “all-active” centralized switch fabric that delivers up to 4 Tbps of full-duplex switching capacity per line card slot for MX2010 and MX2020 routers. The MX2000-SFB3 along with the MX2K-MPC11E Modular Port Concentrator provides industry-leading 100-Gigabit Ethernet and 400-Gigabit Ethernet-ready port density. Figure 1 shows the MX2000-SFB3.


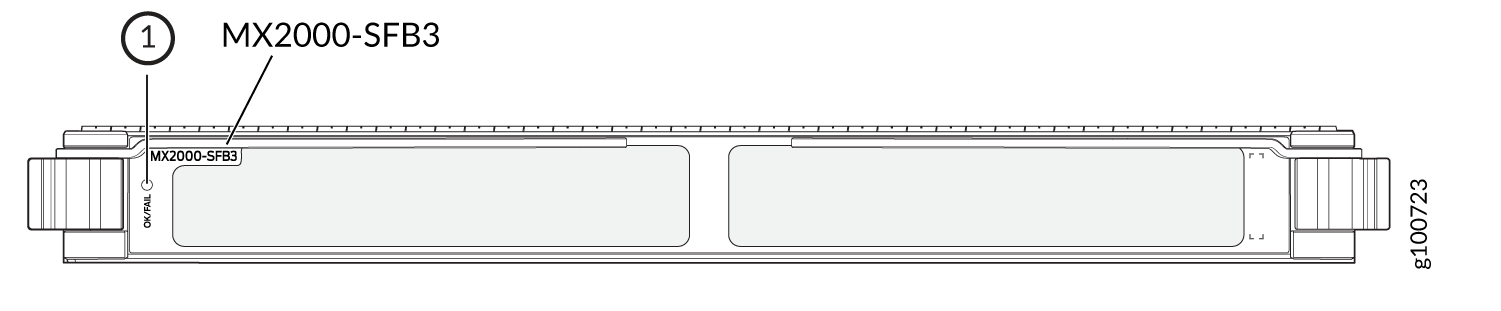
1 — OK/FAIL status LED |
Software release |
Note: The MX2K-MPC11E is not supported in any Junos OS 19.4 releases. |
Physical Description |
|
MX Series Router Platform Support |
|
Prerequisites |
|
Hardware Features | The MX2000-SFB3:
|
LED | The MX2000-SFB3 has one OK/FAIL LED that indicates status as follows:
The port LEDs under each SFB slot on the front panel of the device chassis indicate the online/offline status. These LEDs are labeled 0 through 7. |
Safety, Environmental, and Security Features |
|
Upgrades |
|
MX2020 and MX2010 SFB Slots | You can install up to eight MX2000-SFB3’s in MX2020 routers and MX2010 routers. The MX2000-SFB3’s install vertically into a fabric board slot on the front of the chassis in the slots labeled 0 through 7. If any slots are empty, you must install a slot cover. CAUTION: If one of the MX2000-SFB3’s fails, do not remove it until you have a replacement MX2000-SFB3 or slot cover ready to install. |
MX2000-SFB3 Power Zones | MX2020 routers support two power zones. Power is provisioned for an MX2000-SFB3 fabric card from one of the two power zones, based on the SFB3 slot number. The power is provisioned from the lower power zone for the MX2000-SFB3 fabric cards in slots 0-3. Similarly, the power is provisioned from the upper power zone for the MX2000-SFB3 fabric cards in the slots 4-7. Note: MX2020 routers do not support power redundancy mode for the MX2000-SFB3 fabric card in both the power zones. MX2010 routers support a single power zone; Therefore, power is provisioned from the same power zone for all the MX2000-SFB3 fabric cards, regardless of the SFB3 slot number. |
System Power Requirements |
|
Supported Routing Engines | The MX2000-SFB3 supports these routing engines:
|
Supported Power Distribution Modules | The MX2000-SFB3 supports these power distribution modules:
|
Supported Power Supply Modules | The MX2000-SFB3 supports these power supply modules:
Note: With the existing power supplies, an MX2020 can support a maximum of 14 MX2K-MPC11Es (seven in the top MPC slots and seven in the bottom MPC slots) while maintaining PSM redundancy in each zone. Likewise, the MX2010 with existing power supplies can support a maximum of six MX2K-MPC11Es and maintain PSM redundancy. |
Interoperabilitly with MPC Line Cards | The MX2000-SFB3 interoperates with these MPCs:
Starting in Junos OS Release 22.2R1 MX2000-SFB3 interoperates with these MPCs:
|
Interoperabilitily With Other Switch Fabric Boards | All fabric board types must be MX2000-SFB3. MX2010 routers and MX2020 routers don’t support a mixed fabric board type. |
MX2K-MPC11E Support
The number of MX2K-MPC11E line cards that the MX2020 and MX2010 router chassis can support varies, depending upon the ambient temperature of the chassis and the PSM redundancy. Table 1 shows the number of MX2K-MPC11E line cards that are supported on the MX2020 router with fully populated, existing PDMs and PSMs (in redundant and non-redundant modes) at 40 C° (72° F) + 6000 ft. (1829 m).
With PSM Redundancy | Without PSM Redundancy | Temperature and Elevation | |
---|---|---|---|
Upper Zone | 7 | 8 | 40 C° (72° F) + 6000 ft. (1829 m) |
Lower Zone | 7 | 8 | 40 C° (72° F) + 6000 ft. (1829 m) |
Total | 14 | 16 | 40 C° (72° F) + 6000 ft. (1829 m) |
Table 2 shows the number of MX2K-MPC11E line cards that are supported on the MX2010 router with fully populated, existing PDMs and PSMs (in redundant and non-redundant modes) at 40 C° (72° F) + 6000 ft. (1829 m).
MX2010 Line Card Type | Maximum Supported With PSM Redundancy | Maximum Supported Without PSM Redundancy | Temperature and Elevation |
---|---|---|---|
MX2K-MPC11E | 6 | 7 | 40 C° (72° F) + 6000 ft. (1829 m) |
MX2000-SFB3 Switch Fabric Board Bandwidth Per MPC Line Card
Table 3 lists the fabric bandwidth for supported MPC line cards when used with the MX2000-SFB3.
MPC Line Card | MPC Line Card Bandwidth | Fabric Bandwidth per Packet Forwarding Engine |
---|---|---|
MPC6E | 520 G | 130 G |
MPC8E | 960 G | 240 G |
MPC9E | 1.6 T | 400 G |
MX2K-MPC11E | 4 T | 500 G |
MPC2E-NG (with ethernet MICs only) | 80 G | 20 G |
MPC3E-NG (with ethernet MICs only) | 130 G | 32.5 G |
MPC5E | 240 G | 60 G |
MPC7E-MRATE | 430 G | 107.5 G |
MPC7E-10G | 400 G | 100 G |