Configure Push Notifications for User Engagement
After enabling virtual beacons, add the messages for your push notifications and fine-tune the power settings for optimal impact.
When developing applications with the Juniper Mist SDK (Software Development Kit), you can include notifications. For example, you can display a greeting when a user enters your building. You can display a special offer when a customer approaches a sales display.
To set up these notifications, add virtual beacons to your floor plan. Because the beacons are virtual, you can add as many of them as you need. For each one, specify the message or web page to display, and define the coverage area. When your mobile app user enters the virtual beacon’s coverage area, as shown in pink below, the specified message or web page appears in the app.
Video Overview
Now what are these virtual beacons? These virtual beacons what you see here, essentially, is a point on the floor plan that enables you to configure interactive experiences. This could be augmented reality, where you could look around different locations and see different things pop up, or it will literally be an indoor push notification as you walk in that area first for you, again, based on whether or not you identify it in the system.
So and this is again that process pattern we got that I talked about earlier thanks to Bob. When instead of having to deploy hundreds of battery beacons to trigger push notifications or to enable wayfinding, all you're doing here is you're deploying your Wi-Fi access point deployed with the Mist virtual beacon directional antenna array. And just for that, you visualize your entire floorplan. Now you can create these points of interest, these points of experience. All you do is go into the Mist portal add a virtual beacon, drag and drop this virtual beacon anywhere on the floor plan where you have the coverage and trigger a push notification.
We have a built in very basic CRM to show the are the possible? But for example, imagine an an all hands event or a speaker sessi on in a public venue where you can now trigger a push notification indoors. We're all familiar with GPS based notifications when we are driving by a highway to get Ad for thing as we're passing by. Similar experiences can now be enabled indoors leveraging the Bluetooth network that is being transmitted by the Mist access point and the SDK interacting with that network leveraging machine learning in the cloud.
So just very quickly here, we put nothing physical out there on that floor plan. At that point of interest, all we did was create a virtual beacon, tie it to a particular campaign or particular message. As a mobile app user company of this area, they will automatically see that information that might show up on the lock screen, and that could be any contextual method you choose. So, again, from management perspective, from a different perspective, all those concerns go away. They get mitigated. Nothing's particular except for the network in the ceiling, create as many interactive experiences as you want, leveraging virtual beacons, no limit on the number of virtual beacons we can be can deploy. All you want to look at is what is the experience you want to enable.
Before You Begin
Add virtual beacons to the floorplan. See Add Virtual Beacons to a Floorplan.
To configure push notifications:
-
Ensure that the floorplan is showing the virtual beacons and their coverage
areas:
-
Click the Settings button (near the top right corner of the
page).

-
In the pop-up window, select the check boxes for Show Virtual
Beacons and Show Virtual Beacons Coverage.

-
Click the Settings button (near the top right corner of the
page).
-
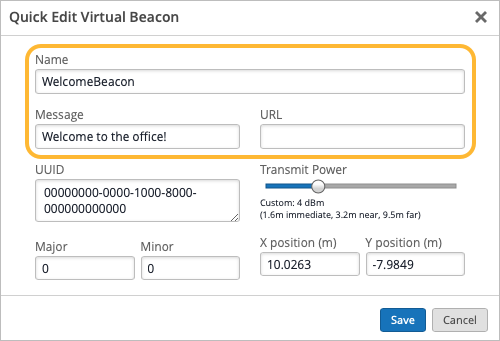
Configure the notifications for each virtual beacon:
-
Enter the Message or URL that you
want to display in your application when users enter the coverage area of this virtual
beacon.
-
Enter the Message or URL that you
want to display in your application when users enter the coverage area of this virtual
beacon.
-
Test your application to ensure that the notifications appear when expected. If needed,
adjust the coverage area of the virtual beacon.
A pink circle represents a virtual beacon's coverage area.

To adjust the coverage area:
-
Adjust the Transmit Power to make the coverage area larger
or smaller.

-
If the pink area on the map is smaller than the desired coverage area, drag the Transmit Power control to the right. After you save the settings, the pink circles will widen.
-
If the pink area is too large, drag the Transmit Power to the left. After you save the settings, the pink circles will become narrower.
-
-
Adjust the Transmit Power to make the coverage area larger
or smaller.