ON THIS PAGE
Marvis macOS Client
Complete the preinstallation tasks, and then choose the method that you want to use to install the Marvis client on your macOS device.
The Marvis client for macOS provides detailed visibility into how your macOS device interacts with the wireless network. With insights into device connectivity and performance, the Marvis client helps optimize network performance, streamline troubleshooting, and enhance overall user experience.
Marvis macOS Client Installation Overview
You can download the installer file from the Juniper Mist portal. To download the installer file from the Juniper Mist portal:
Select Organization > Admin > Mobile SDK from the left menu.
Click Marvis Client at the top of the Mobile SDK page.
Under MacOS, select the app version, and then click Download Installer.
You'll need to save the *.dmg installer file in a folder on your device.

Prerequisites
Before you begin, you'll need:
-
The secret token to onboard your Marvis client
To obtain the secret code:
Select Organization > Admin > Mobile SDK from the left menu on the Juniper Mist portal.
Click Token at the top of the Mobile SDK page.
Create a new token, or use an existing token:
For a new token—Click Create Invitation. Enter a name for this invitation, and then click Create. When the token appears on the page, click View to see the QR code.
For an existing token—Refer to the token names to find the one that you want to use. Click the View link on the right side of the page to see the QR code.

Note: To obtain the secret token using API, see https://api.mist.com/api/v1/docs/Org#sdk-invite.
-
macOS 14.6 or a later release running on your device
-
Administrator rights required for installation
Installation Options for the Marvis Client (macOS)
You can install the Marvis client for macOS by using any of the following methods:
Operational Modes
The Marvis client operates in the following modes:
-
Onboarding mode—Default mode. See Configure Marvis Client for Onboarding.
-
Telemetry mode—Standard operational mode for live environments that you can set using command-line parameters during installation. See Configure Marvis Client to Operate in Telemetry Mode.
Install the Marvis Client for macOS (CLI Method)
When you install the Marvis macOS client using the CLI method, the Marvis client is installed in Telemetry mode. To install the Marvis client for macOS using the CLI:
-
Select Allow. Location permission is needed for the
Marvis client to collect Wi-Fi telemetry from the client device.
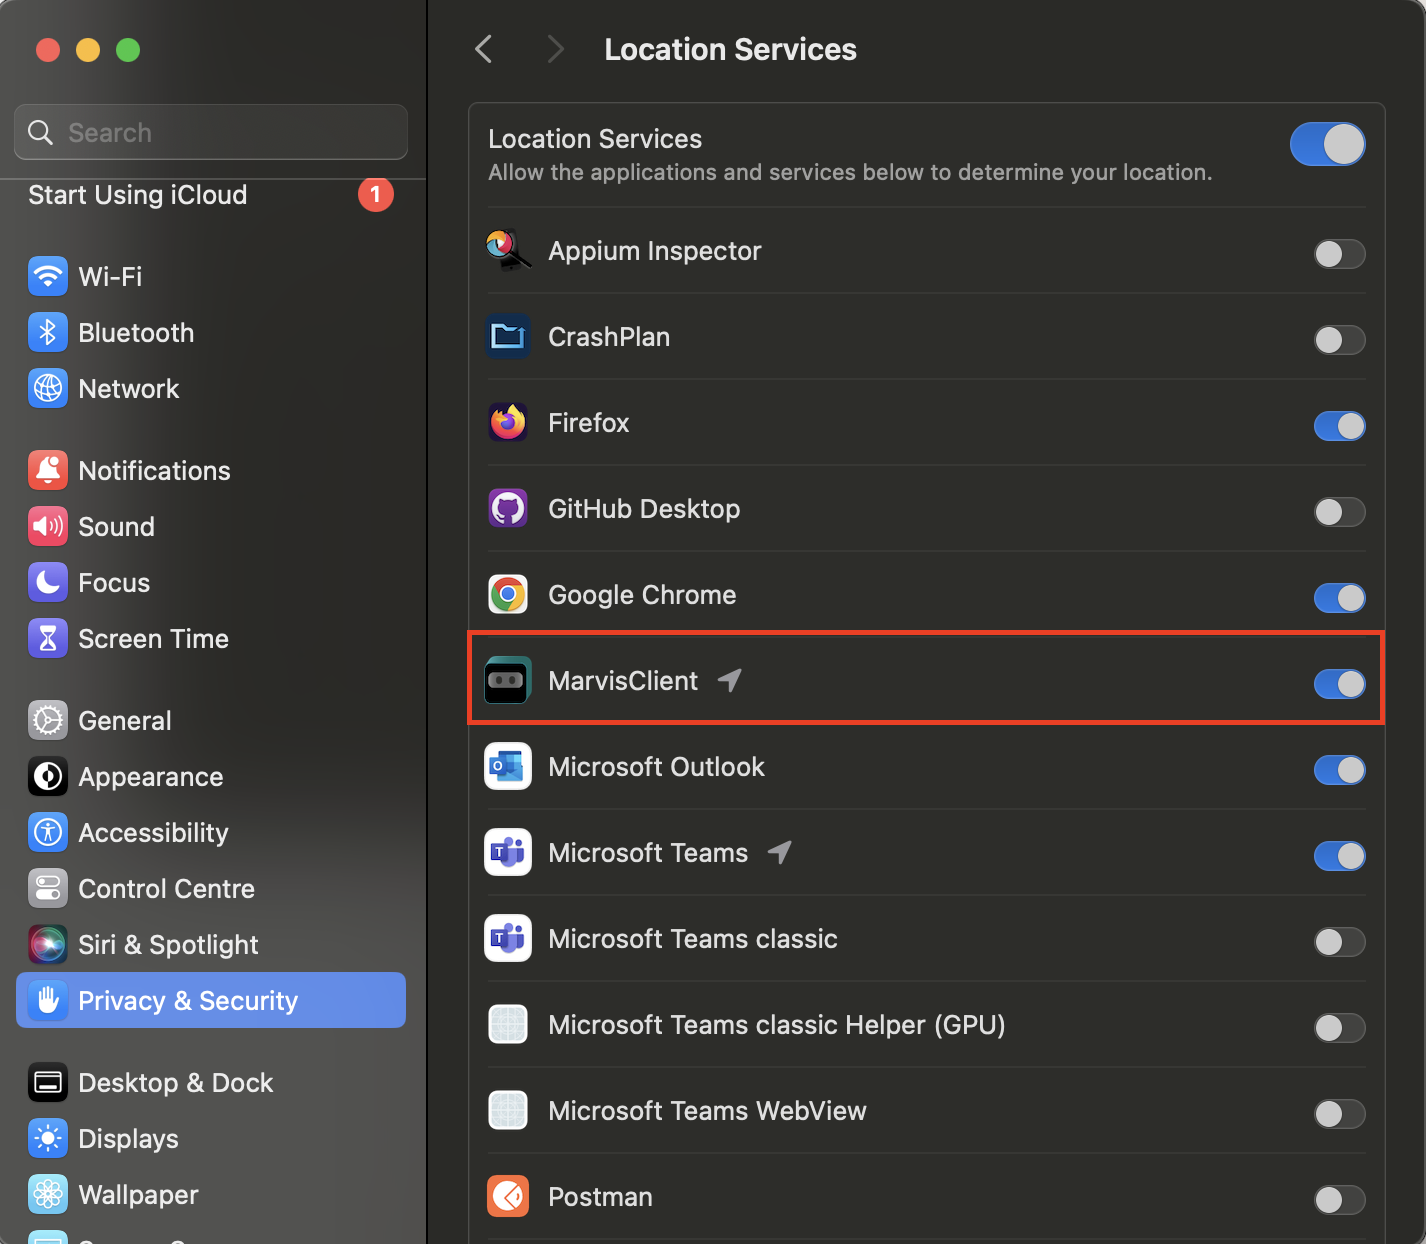
If Location Services is not enabled automatically after you install the Marvis Client, follow these steps:
Navigate to System Settings > Privacy > Location Services.
Enable location services for the Marvis Client.
Install the Marvis Client for macOS (GUI Method)
When you install the Marvis macOS client using the GUI method, the Marvis client is installed in the Onboarding mode. To install the Marvis client for macOS:
-
Select Allow. Location services must be enabled for
the Marvis client to function correctly.
If Location Services is not enabled automatically after you install the Marvis Client, follow these steps:
Navigate to System Settings > Privacy > Location Services.
Enable location services for the Marvis Client.
Configure Marvis Client for Onboarding
You can use the Marvis Client app to onboard devices to the Juniper Mist Access Assurance network through a custom Network Access Control (NAC) portal. For more information, see Client Onboarding Through a NAC Portal Using the Marvis Client App.
Configure Marvis Client to Operate in Telemetry Mode
marvis-cli --token-value
                        <token>
Deploy the Marvis Client on macOS Devices Using an MDM
- Upgrade the Marvis Client for macOS Using MDM
- Update the Marvis Client Configuration for macOS Using MDM
- Uninstall Marvis Client for macOS Using an MDM
- Connection States
You can deploy the Marvis client on macOS devices by using the SOTI, Intune, or Jamf mobile device management (MDM) solution. You can refer to the following topics for information about enrolling and managing devices using MDMs:
-
SOTI
-
Intune
-
Jamf
To deploy the Marvis client:
Enroll the target devices or device groups with the appropriate MDM profile.
Configure the necessary profiles or application policies within your MDM portal.
Upload the Marvis client .pkg installer file to your MDM portal and assign the file to the target devices or device groups.
After the installation is complete, send a configuration script to the devices through the MDM portal:
#!/bin/bash
/usr/local/bin/marvis-cli --token-value <token> [options]
Upgrade the Marvis Client for macOS Using MDM
To upgrade to a newer version of the Marvis client, upload the updated .pkg file to the MDM portal and reassign the application policies to the target devices or device groups. You need not resend the configuration script.
Update the Marvis Client Configuration for macOS Using MDM
To update the Marvis client configuration parameters, resend the configuration script with the updated parameters:
#!/bin/bash
/usr/local/bin/ marvis-cli start --token-value <token> [--auto-upgrade-allowed <true|false> ] [--ui-mode-enabled <true|false>] [--force]
Uninstall Marvis Client for macOS Using an MDM
To uninstall the Marvis using an MDM:
Remove the application policy assignment if it enforces mandatory app installation.
Send the uninstallation script to the devices:
#!/bin/bash
 /usr/local/bin/marvis-cli uninstall
You might still see the app as Installed on some MDM portals. After you remove the policy, wait for a while, and then check the app status.
Note:The uninstall process might not remove all log files and folders. You can choose to delete the files manually if required. To completely remove Marvis client along with all the logs and configuration files, use the following command:
#!/bin/bash
/usr/local/bin/marvis-cli uninstall --clean
Connection States
The Marvis client status is indicated by the following visual indicators and connection states. Note that you can view thesestates only if the Marvis client is in Telemetry mode.
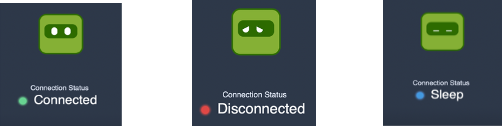
-
Disconnected—Client is not connected to the Juniper Mist cloud.
-
Connected—Client is connected to the Juniper Mist cloud.
-
Sleep —Client is connected to the Juniper Mist cloud through a non-Juniper AP.
Verify the Installation
-
Verify that the Marvis client is present in your Applications directory.

-
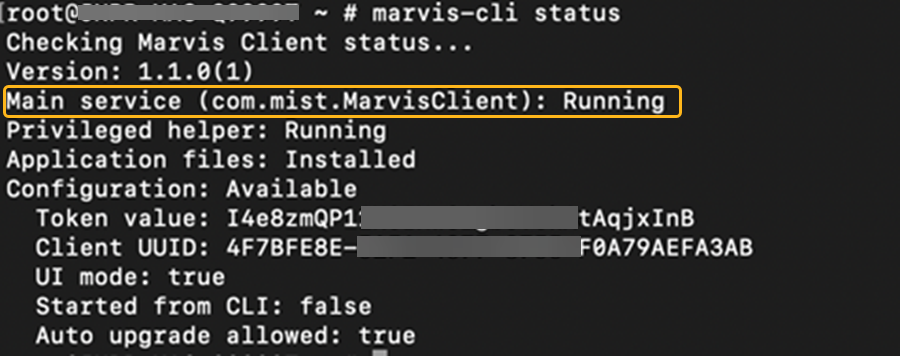
Verify the background services:
Open the Terminal app and execute the following command:
sudo -i

marvis-cli status
Provide your administrator password when prompted.
Verify that a service entry is present.
Verify that Marvis Client is listed in the Services tab in Activity Monitor.
If you do not see Marvis Client listed, reinstall the Marvis client. If that does not resolve the issue, contact the support team.

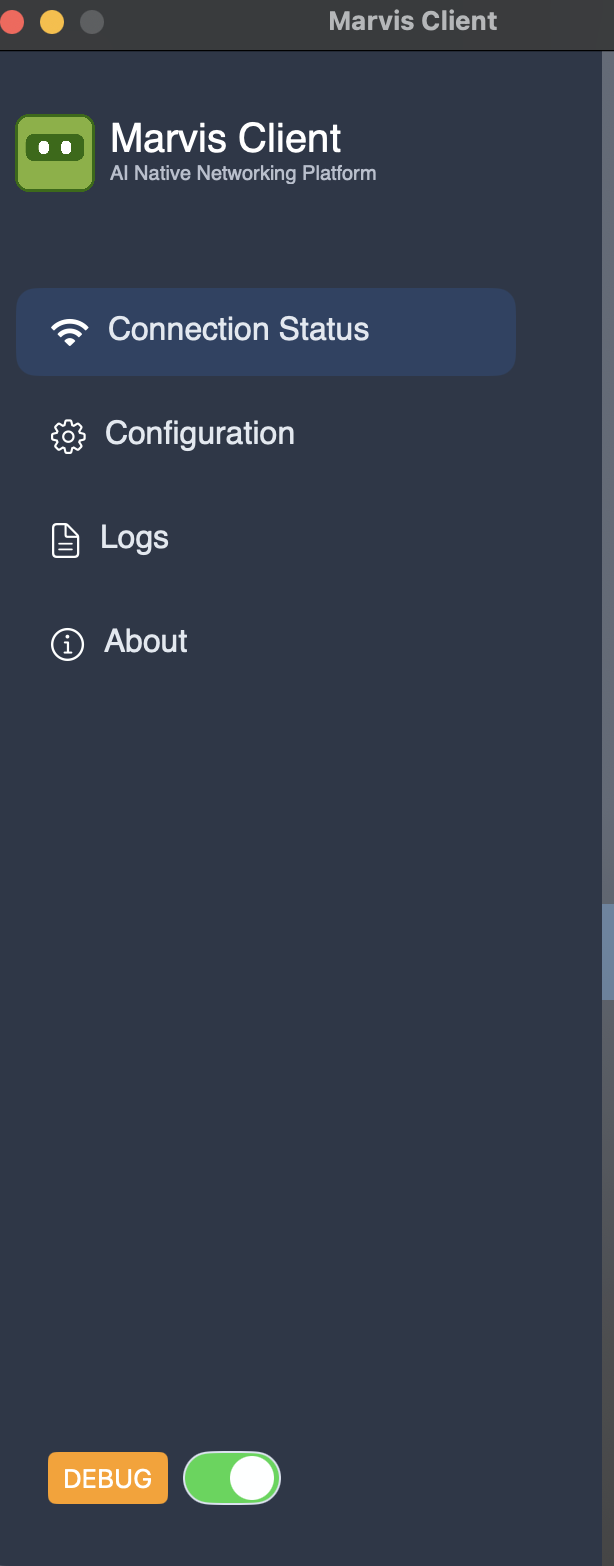
After the installation, you’ll see the Marvis icon in your system tray or menu bar. You can click the icon to open the Marvis client and view the connection status.
Manage Services
Here are the commands that you can use to manage the following main Marvis client system services:
-
Main Service: com.mist.MarvisClient
-
Privileged Helper: com.mist.MarvisClient.MarvisPrivilegedHelper
-
Start services:
marvis-cli start --token-value <token> [options]
-
Restart services:
marvis-cli restart
-
Logs services:
marvis-cli logs
-
Version services:
marvis-cli --version
View Logs in the Marvis macOS Client
-
Info—General information
-
Error—Critical issues
-
Debug—Detailed data that you can use to debug issues
-
Click the hamburger icon, select About, and then tap the version number 7
times.
You'll see the Logs option listed in the menu.
-
Select Logs. Select the log category from the
Log Level drop-down list.
You'll see recent logs based on the selected log level. You can click the Copy button to copy the log details and send the information to the support team for troubleshooting.

Uninstall the Marvis macOS Client
You can uninstall the Marvis macOS client by using the Finder (GUI) or the CLI. The CLI method offers a clean uninstall option to remove residual files and configurations.
Uninstall the Marvis macOS Client (GUI)
The GUI method provides a user-friendly way to uninstall the Marvis client.
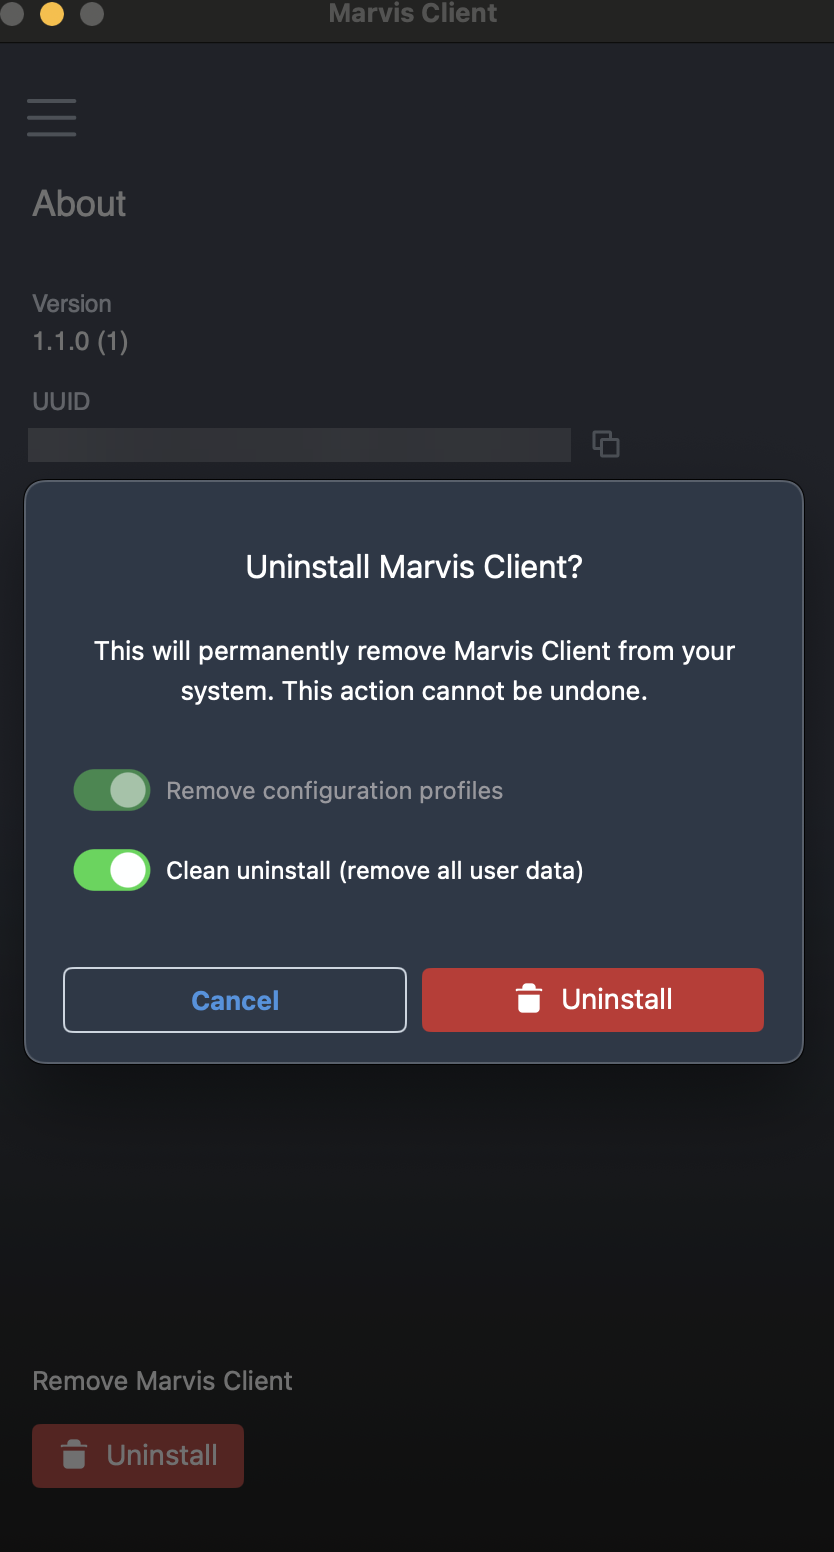
Open the Marvis Client application.
Navigate to the About page.
Tap Uninstall to uninstall the Marvis client.
Note: The Uninstall option is available in Marvis macOS client version 1.1.0 and later.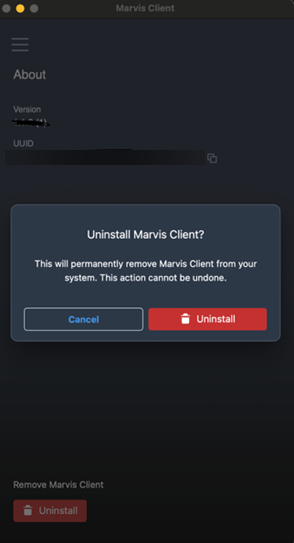
Uninstall the Marvis macOS Client Using the CLI
The CLI method provides flexibility for advanced users with the provision of both standard and clean uninstallation of the Marvis client. You'll need administrative privileges for this procedure. Enter your admin password when prompted.
Standard Uninstall
To remove the application only (without configuration files):
Open Terminal.
Run the following command:
For standard uninstall:
sudo -i
marvis-cli uninstall
For clean uninstall:
sudo -i
marvis-cli uninstall --clean
Clean Uninstall
To completely remove the Marvis client, including all residual files and configurations:
Enable Debug mode by tapping the version number 7 times on the About page.
Tap Uninstall.
Note: The Uninstall option is available in Marvis macOS client version 1.1.0 and later.Enable both these options and tap Uninstall to proceed.
Remove Configuration Profile
Clean Uninstall