ON THIS PAGE
Marvis Android Client
Complete the preinstallation tasks, and then choose the method that you want to use to install the Marvis Client on your device.
The Marvis client for Android provides detailed visibility into how your Android device interacts with the wireless network. It helps optimize network performance, streamline troubleshooting, and enhance overall user experience by providing insights into device connectivity and performance.
The Marvis Android client is supported on the following devices:
-
Android handheld devices and smartphones that run Android 11.0 and later versions
-
Zebra devices that run Android 11.0 and later versions
Marvis Android Client Installation Overview
You can use any one of the following methods to install the app:
-
Manual—Download and install the Marvis client app directly from the Google Play Store or the Juniper Mist portal.
To download the client from the Juniper Mist portal:
Select Organization > Admin > Mobile SDK from the left menu.
Click Marvis Client at the top of the Mobile SDK page.
Select the app version under Android, and then click Download Installer.

-
Android Debug Bridge (ADB)—Install the app using ADB, a command-line tool that developers can use to communicate with Android devices to debug issues and install/uninstall apps.
-
Mobile device management (MDM)—Use any of the following MDM solutions to install the app:
-
AirWatch or VMware Workspace ONE
-
SOTI
Note:We've tested interoperability only with the MDMs listed above.
-
Requirements
Before you start the installation:
-
Enable the mandatory permissions listed in Table 1 for the app.
Table 1: Permissions Required for the Marvis Client App for Android Permission
Description
Mandatory or Optional
Location—Set as Allow all the time
Enables the Marvis client app to obtain the Wi-Fi roam data and function as expected.
Mandatory
Bluetooth
Allows the app to obtain the x and y coordinates of the location.
Mandatory
Nearby devices
Enables the app to determine the relative location of nearby devices. Android 12 needs this permission enabled to run the location service on mobile devices.
Mandatory
Notifications
Enables notifications if you want to be notified when the Marvis client is running actively in the background.
Optional
Camera—Set as Allow Once
Enables you to scan the QR code during enrollment. You need not enable this permission if you are installing the app through ADB or MDM.
Optional
-
Configure your network firewall settings to allow the Marvis client to connect to your organization.
If your organization resides in the Amazon Web Services (AWS) cloud (default), use the following settings:
-
wss://client-terminator.mistsys.net:443/ws or protocol WSS (websocket) port 443 for domain/path
-
https://api.mist.com or the HTTPS protocol port 443 for domain
If your organization resides in the Google Cloud Platform (GCP) cloud, use the following settings:
-
wss://client-terminator.gc1.mist.com/ws or protocol WSS (websocket) port 443 for domain/path
-
https://api.gc1.mist.com/ or the HTTPS protocol port 443 for domain
Note:If your organization resides in a cloud other than AWS or GCP, contact the support team for the appropriate URLs to configure the firewall settings.
-
-
Obtain your secret token or QR code to onboard the Marvis client.
Select Organization > Admin > Mobile SDK from the left menu.
Click Token at the top of the Mobile SDK page.

Create a new token, or use an existing token:
For a new token—Click Create Invitation. Enter a name for this invitation, and then click Create. When the token appears on the page, click View to see the QR code.
For an existing token—Refer to the token names to find the one that you want to use. Click the View link on the right side of the page to see the QR code.
Note: To obtain the secret token using API, see Create SDK Invite.
As a best practice, we recommend that you disable the random MAC address. This avoids the need to re-register your device every time it connects to the network. To disable the random MAC address:
Navigate to the Settings page on your device.
Tap Network & Internet or Connections and then tap Wi-Fi.
Tap the gear (settings) icon next to the wireless connection.
Tap MAC Address Type and then tap Phone MAC.
Operational Modes
The Marvis client operates in the following modes:
-
Onboarding mode—Default mode when you install the Marvis client app using the GUI method. In this mode, you can onboard devices through a NAC portal.
-
Telemetry mode—Mode when you install the Marvis client app using the CLI method. This mode is the standard operational mode for live environments.
- Configure Marvis Android Client for Onboarding
- Configure Marvis Android Client to Operate in Telemetry Mode
- Admin Mode on the Marvis Android Client
Configure Marvis Android Client for Onboarding
You can use the Marvis Client app to onboard devices to the Juniper Mist Access Assurance network through a custom Network Access Control (NAC) portal. For more information, see Client Onboarding Through a NAC Portal Using the Marvis Client App.
Configure Marvis Android Client to Operate in Telemetry Mode
To enable the Marvis client to operate in Telemetry mode, install the Marvis client using an MDM (Deploy the Marvis Client Using the SOTI MDM) or adb command (Deploy Marvis Android Client Using Other MDMs).
Admin Mode on the Marvis Android Client
When you open the Marvis client in onboarding or Telemetry mode, you'll see only the Network Onboarding and About options. To view other menu options, you'll need to switch to the Admin mode:
Tap the hamburger icon, and then tap the Marvis client icon 7 times.
Enter the password as AIDriven. Now you can see that you are in the Admin mode and can view additional menu options.
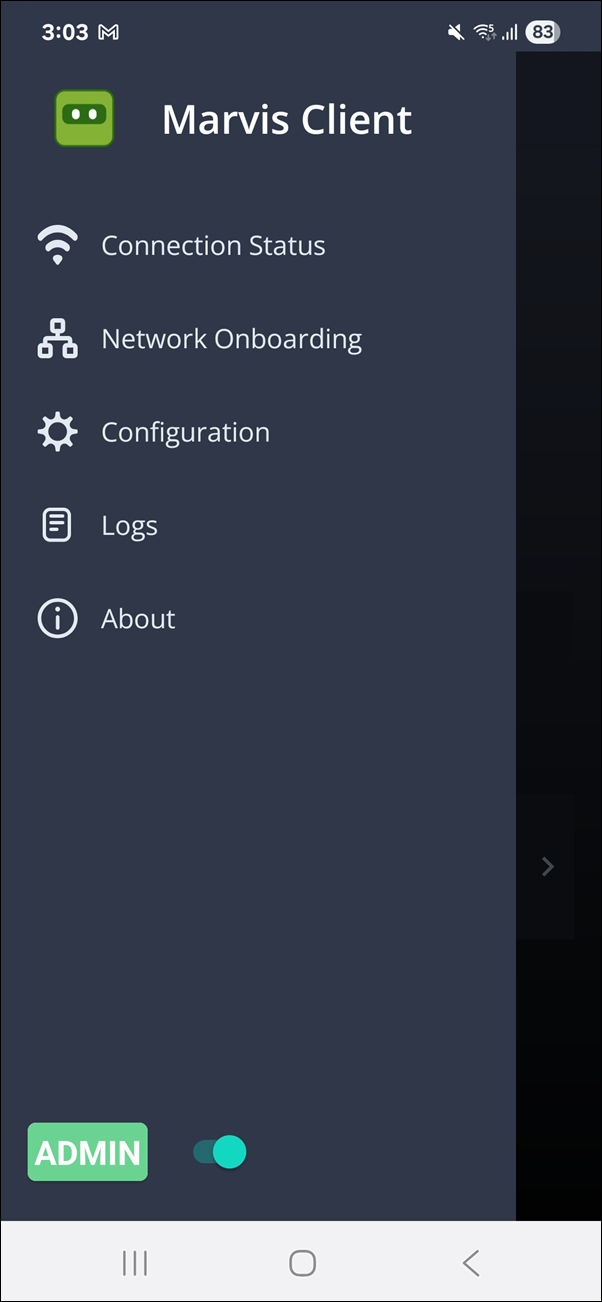
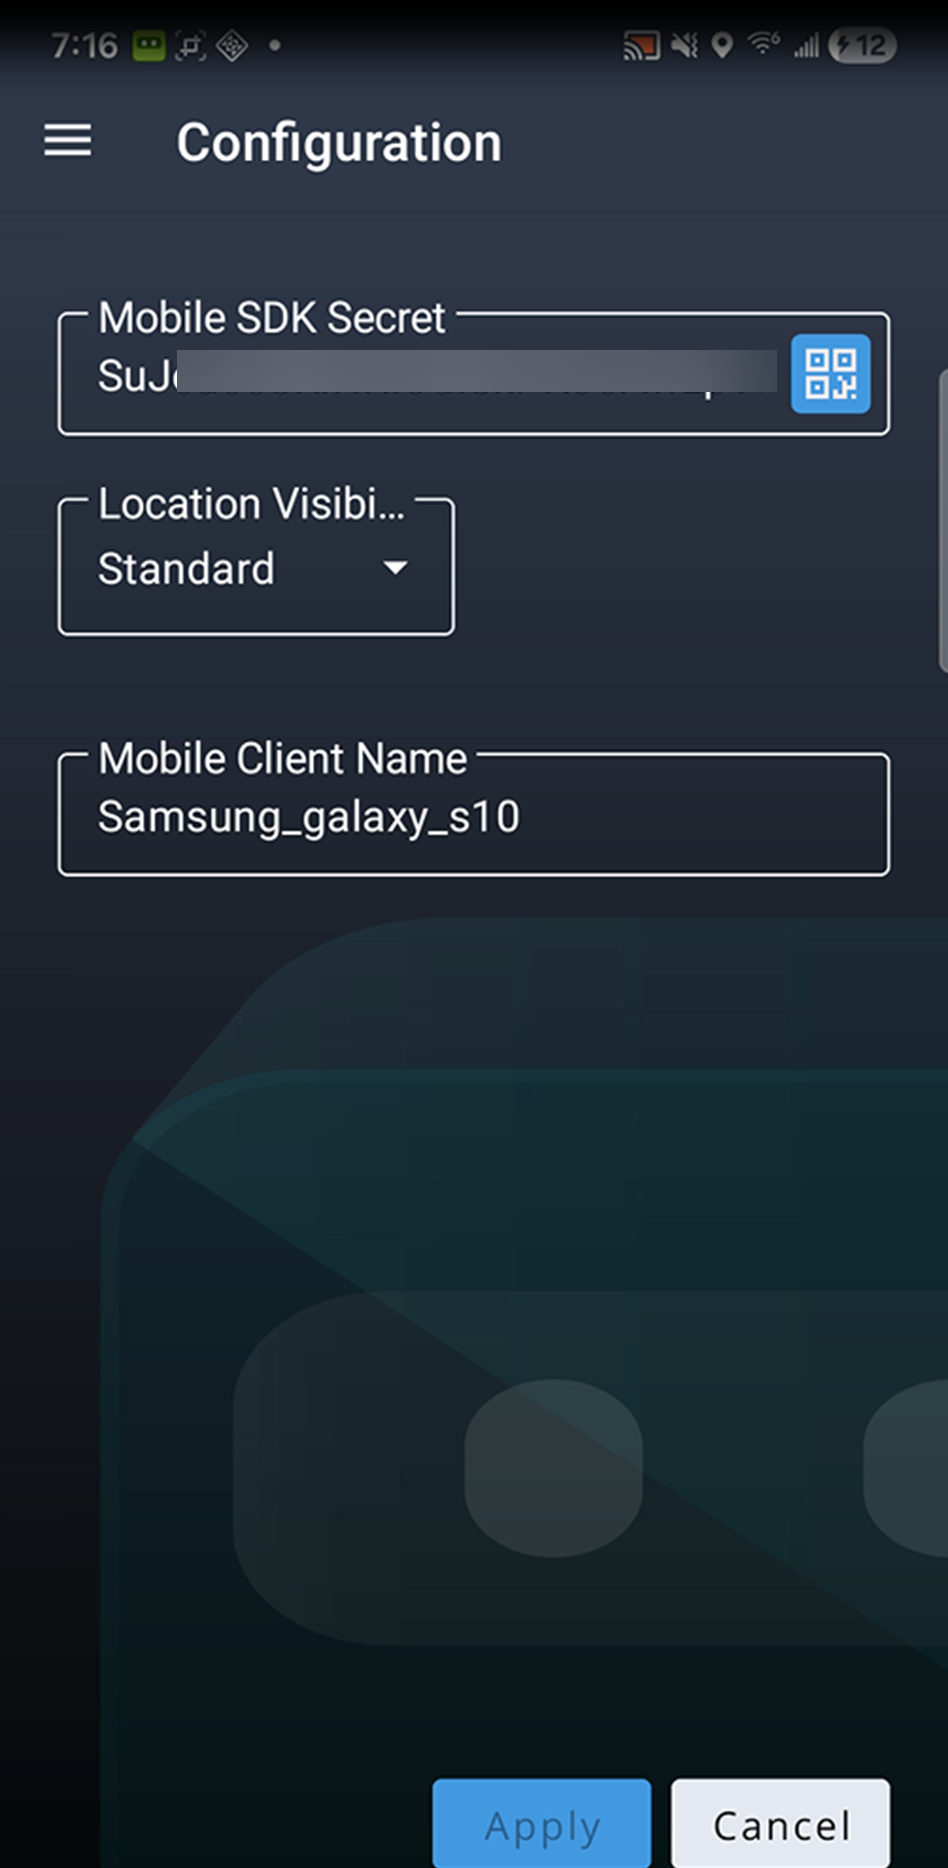
In Admin mode, the About page displays the UUID, Device Name, Org ID and Org Name.

You can use the Configuration option to update or verify the client name, location access, and mobile SDK token.
Connection States
The Marvis client status is indicated by the following visual indicators and connection states. Note that you can view these states only if the Marvis client is in Telemetry mode.
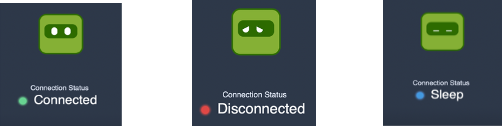
-
Disconnected—Client is not connected to the Juniper Mist cloud.
-
Connected—Client is connected to the Juniper Mist cloud.
-
Sleep —Client is connected to the Juniper Mist cloud through a non-Juniper AP.
Deploy the Marvis Client Using the SOTI MDM
To deploy the Marvis client using a mobile device management (MDM) solution, you must customize the Android package kit (APK) package deployment. You customize the APK deployment with the intent action to set the secret software development kit (SDK) token upon installation. When you launch the customized application package, the client is fully preconfigured and onboarded for operation.
You can onboard the Marvis client using the SOTI MDM.
We do not present the overall generic Android application deployment process with SOTI. We present only the information necessary to customize the Android application to complete the Marvis client deployment.
Before you begin:
-
Ensure that you have a Windows device or a virtual machine (VM). You will run Package Studio, which runs only on Windows devices.
To deploy the Marvis client using the SOTI MDM:
When you deploy the customized package with SOTI, the Marvis client is preconfigured and onboarded.
Deploy the Marvis Client Using AirWatch or VMware Workspace ONE
We do not cover the overall generic Android app deployment process with AirWatch. We cover only the specific steps needed to complete the Marvis client deployment.
mode=explicit,broadcast=false,action=android.intent.action.MAIN,package=com.mist.marvisclient,class=com.mist.marvisclient.MainActivity,extraString=MOBILE_SDK_SECRET=TheSecretValueHere(string)
If you have configured a specific port on a Zebra device for voice calls, then use the following intent command:
mode=explicit,broadcast=false,action=android.intent.action.MAIN,package=com.mist.marvisclient,class=com.mist.marvisclient.MainActivity,extraString=MOBILE_SDK_SECRET=TheSecretValueHere(string),extraString=MOBILE_VOICE_CALL_PORT=5070
You can use the following references to deploy the intent command:
-
Configuring Automatic Launch for Android Mobile Devices if you have already deployed the Marvis client on the device
-
RunIntent Action, File-Action Android for new deployments of our APK installer on devices
Deploy Marvis Android Client Using Intune
Once the Marvis client is installed successfully, add the configuration details such as secret token, location mode, device name:
On the Intune portal, navigate to Apps>Manage Apps.
Select Configuration>Create>Managed devices.
Add Basic details such as the name, platform, and profile type. Select Marvis Client as the Targeted app.
Add the location access permissions and configuration settings such as MOBILE_LOCATION_DURATION, MOBILE_LOCATION_MODE, MOBILE_CLIENT_NAME, AND MOBILE_SDK_SECRET.
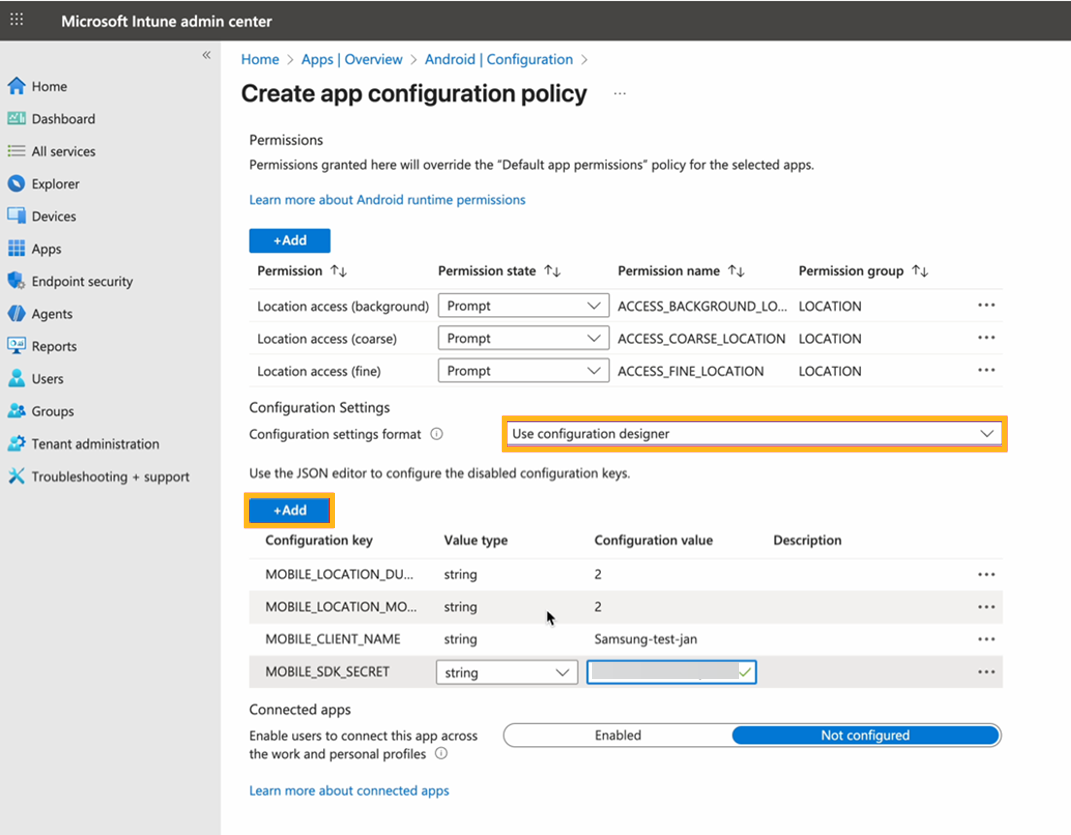
Add groups.
Click Create.
Deploy Marvis Android Client Using Other MDMs
If you're using any other MDM, verify that the MDM supports intent execution. Here is a sample for Android Debug Bridge (ADB)-based (developer/debug) deployment that you can use to adapt to an MDM of your choice:
adb shell am start -n "com.mist.marvisclient/com.mist.marvisclient.MainActivity" -a android.intent.action.MAIN -c android.intent.category.LAUNCHER --es "MOBILE_SDK_SECRET" "TheSecretValueHere(string)" -t "text/plain"
Enable the location mode and update the client name:
adb shell am start -n "com.mist.marvisclient/com.mist.marvisclient.MainActivity" -a android.intent.action.MAIN -c android.intent.category.LAUNCHER --es "MOBILE_SDK_SECRET" "TheSecretValueHere(string)" -t "text/plain" --es "MOBILE_CLIENT_NAME" "TheClientName(String)" -t "text/plain" --es "MOBILE_LOCATION_DURATION" "2" -t "text/plain" --es "MOBILE_LOCATION_MODE" "2" -t "text/plain"
If the MDM solution does not support execution of Android intents, you might need to onboard each deployed client device manually.
Verify the Installation
After you install and onboard the Marvis client, verify that those processes have run correctly. Ensure that your device is connected to the Mist Wi-Fi network.
To verify the installation:
-
About 15 minutes after you onboard the Marvis client, confirm that the
Marvis client data is available on the Juniper Mist portal. You need to wait
for a minimum of 10 to 15 minutes after onboarding the Marvis client for the
data to propagate to the Juniper Mist cloud.
The client data is not available on the Juniper Mist portal when a problem occurs in the client workflow of collecting and sending data to the Juniper Mist cloud. Contact the support team. You can access the logs in the Marvis client app. See View Logs in the Marvis Android Client. Alternatively, you can also use tools such as Logcat or Android Debug Bridge (ADB) to collect the Marvis client logs and share the logs with the support team.
For Zebra devices, you can use the RxLogger tool as an alternative method to collect logs.
When you contact the support team, you must share the Marvis client UUID. You can find the UUID on the About page of the Marvis client app. The UUID is used to track the data flow from the Marvis client to the Juniper Mist cloud.

View Logs in the Marvis Android Client
-
Info—General information
-
Error—Critical issues
-
Debug—Detailed data that you can use to debug issues
-
Enter the password as AIDriven.
You'll see the Logs option listed in the menu.
-
Enable View Logs to view the logs captured by the
Marvis client. You can select the type of information you want to view from
the Log Level drop-down list.
You can click the Copy button to copy and send the log details to the support team for troubleshooting.
 Note:
Note:If you contact the Juniper Mist support team to resolve any issue, you might be asked to provide details such as the organization ID, UUID, and organization name. You can find these details listed in the About page. Note that you'll need to access this page in Admin mode to view the information. See Admin Mode on the Marvis Android Client.